If your outdoor lights turn on but the yard still looks patchy, harsh, or oddly dim, placement is usually the first thing to question.
The fastest useful checks are simple: measure spacing, look for beams blocked by plant growth or hardscape, and stand where people actually walk to see whether the light lands on the surface or just shines into their eyes.
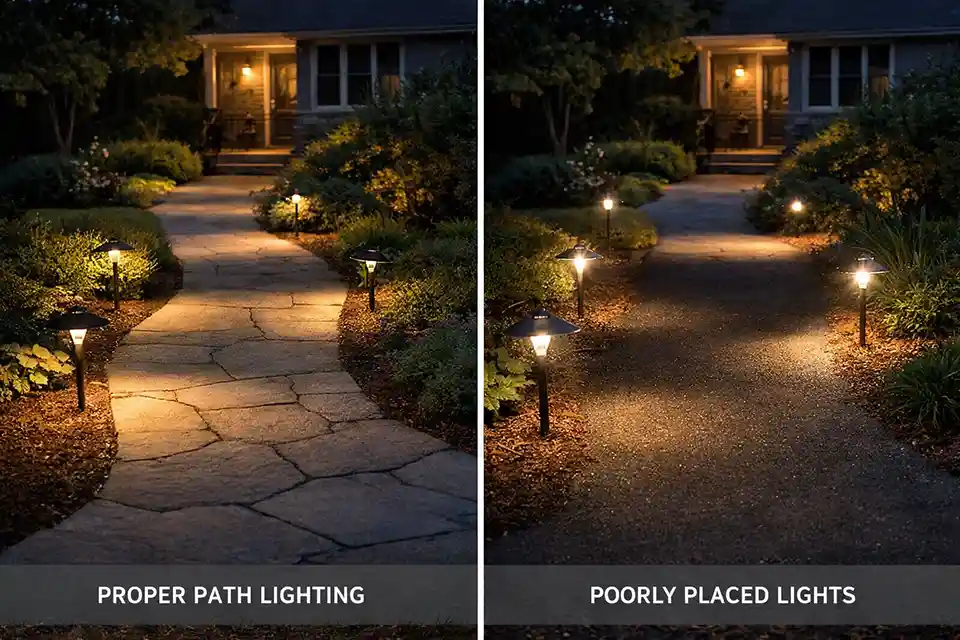
On many paths, spacing that stretches past about 8 feet creates visible dark spots unless beam spread is unusually wide. A fixture that looked fine when installed can also slip into failure mode after 6 to 12 months as shrubs thicken, mulch rises by 1 to 2 inches, or a stake tilts slightly off-axis.
This is where people lose time. Glare is not proof that a light is strong enough. Bright glare with a dim walking surface is one of the clearest signs of poor placement. That is different from a real power problem, where output falls everywhere or the fixture becomes intermittent instead of simply lighting the wrong place.
Why poor placement causes both glare and dark spots
The most common mistake is treating glare and dark areas as two separate problems. In many yards, they come from the same bad layout.
Glare is a placement failure, not a brightness win
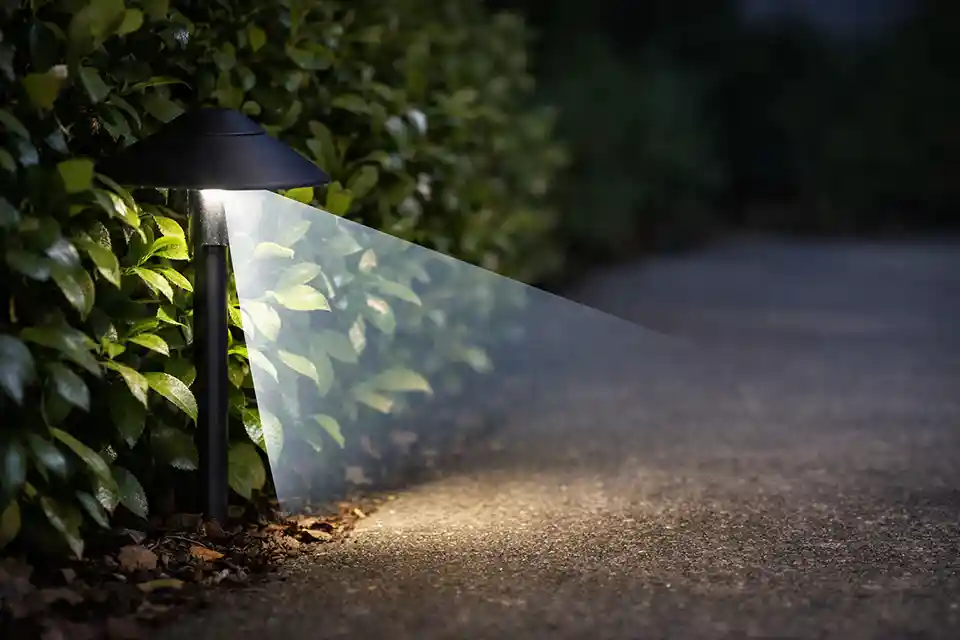
When the lamp or LED source is exposed too directly, your eyes adapt to the bright point instead of the path, step, or entry surface. That makes the surrounding area look darker than it really is. A light can be fully on, visibly bright, and still do a poor job lighting the space.
This often happens when path lights are installed too high, tilted upward, or placed where the source is visible from a normal walking approach. A shift of even 10 to 15 degrees in aim can turn a useful fixture into a glare source.
Dark spots usually come from stretched spacing or blocked beam paths
Most weak-looking layouts are not underpowered first. They are under-overlapped. A run that needs 6- to 8-foot spacing is often stretched to 10 or 12 feet because the layout looks tidy in daylight. After dark, that same spacing creates isolated pools with 3- to 4-foot dead zones between them.
Blocked beam paths make the problem worse. If leaves, ground cover, edging, or mulch sit within about 12 inches of the lens, the light may never reach the surface you think it is covering. That same pattern also shows up with solar fixtures affected by Sun Exposure Issues Affecting Solar Lights, where poor siting reduces charging by day and useful projection by night.
A 2-minute test: placement problem, fixture mismatch, or power issue?
Most readers do not need a full troubleshooting session first. They need a fast way to rule out the wrong category.
When it is probably placement
If the fixture is bright, stable, and fully on, but the target surface still looks dim, the problem is usually placement. The classic signs are glare near eye level, a bright hotspot on the wrong surface, or dark spots between otherwise working fixtures.
When it is probably the wrong fixture
If you can re-aim, lower, or move the light slightly and the result is still too narrow, too harsh, or too decorative for the area, the fixture itself may be the mismatch. This shows up often when a narrow spotlight is asked to cover a wide path or when a decorative path light is expected to light steps and side-yard edges.
When it is more likely a power problem
If output drops everywhere on the run, lights fade after a few minutes, or one section becomes intermittent instead of merely awkwardly lit, that is the point to suspect power, voltage, or connection issues rather than placement alone.
The practical shortcut is this: if one temporary move improves the scene immediately, you are probably not dealing with a deeper electrical fault. That is the same reason people sometimes misread visual failure as buried cable trouble near hardscape crossings, even when the more likely issue is still layout geometry rather than a problem like Outdoor Lights Losing Power Under Walkways and Driveways.
What people usually misread first
The wrong fix usually starts with the wrong diagnosis.
More lumens is often the waste-of-time fix
A brighter replacement lamp does not solve bad geometry. It usually intensifies the harshest part of the scene and deepens the contrast that makes dark spots feel worse. Homeowners tend to overestimate output and underestimate angle, shielding, and beam spread.
That is why “looks bright from the patio” is not a useful test. What matters is whether the target surface is readable from about 5 to 8 feet away without forcing your eyes through direct glare.
Equal spacing is not always good spacing
People also overestimate symmetry. Straight, identical spacing can work on a simple run, but it often fails on curves, steps, corners, and entries. Those zones need overlap where direction changes or footing matters most.
A fixture line that looks evenly planned in daylight may perform poorly after dark because the actual walking pattern is uneven. Neat spacing on paper often creates poor visibility at turns, step noses, and driveway edges because those locations need denser overlap than a straight path section does.
Poor placement or the wrong fixture?
This distinction matters because not every bad result is solved by moving the same fixture a few inches.
Signs the fixture is fine but the location is wrong
A correct fixture in the wrong place usually creates a familiar pattern: glare at normal eye level, dark spots between otherwise working lights, or a harsh hotspot on a wall, trunk, or slice of pavement while the intended target stays weak. Those problems usually improve when the fixture is lowered, re-aimed, shielded, or moved farther from the surface it is trying to light.
Signs the fixture itself is the mismatch
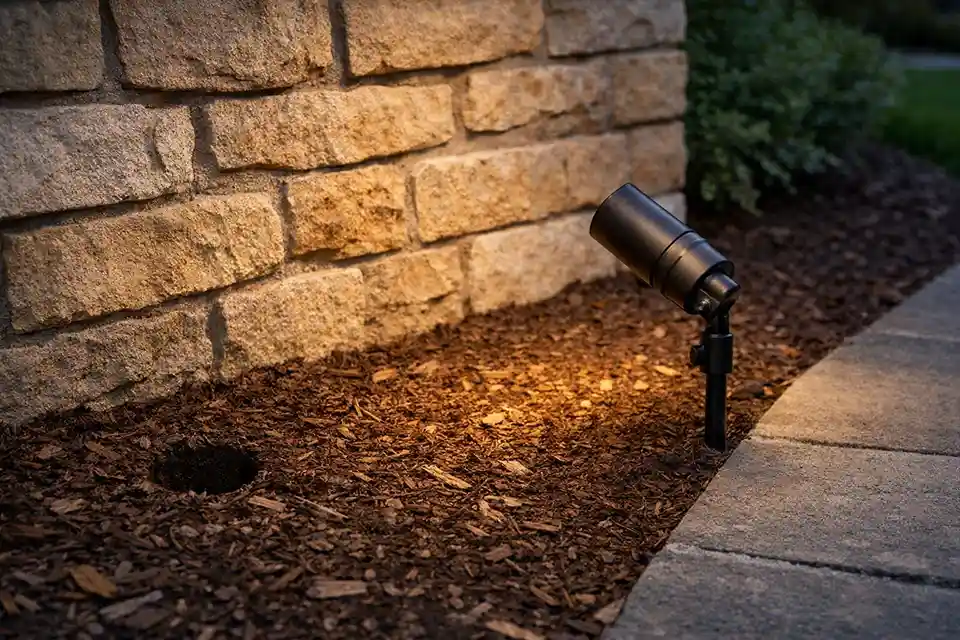
A narrow spotlight used where you really need broad path coverage is not just misplaced. It is the wrong tool. The same goes for decorative path lights with weak lateral spread being asked to cover stairs, long side yards, or wide entries.
Backing a spotlight away from a wall or tree from about 8 to 12 inches to 18 to 36 inches can improve spread, but only up to a point. Once you are forcing a fixture to do a job it was never meant to do, small adjustments stop making sense.
Pro Tip: Before buying anything brighter, test one temporary correction first. Move a fixture, lower it, or shield the direct view of the source and watch the space for 2 to 3 nights.
Where outdoor layouts usually fail first
Some parts of the yard reveal poor placement much faster than others.
Curves, corners, and steps
These fail before straight runs because the viewing angle changes while footing becomes more important. A path light that works on a flat, simple segment may leave the outside edge of a curve dim or push glare directly into someone approaching the turn.
A useful field check is to walk the route at normal speed and stop at each transition. If the next step edge, corner line, or direction change is not clearly readable from about 4 to 6 feet away, the layout is not doing enough where it matters most.
Shrubs, beds, and mature landscaping
This is the most underestimated long-term cause. A fixture installed with clean sightlines in spring can be partly obstructed by midsummer. After 6 to 18 months, plant growth often changes the beam path more than the fixture itself changes.
That is also why articles like Solar Outdoor Lights Not Charging Under Tall Trees matter here. Shade and canopy cover do not just affect charging; they often signal that the fixture is now in the wrong visual and functional position altogether.
Mowing edges, mulch rise, and bed creep
This is the kind of site drift people usually underestimate because each change looks small on its own. A fixture near a bed edge may get nudged half an inch during trimming, then sink slightly under fresh mulch, then end up visually blocked by seasonal growth. None of those changes feels major in daylight. Together, within one season, they can easily turn a clean beam path into glare plus dark spots.
That kind of maintenance interference is one of the clearest signs that the location itself is weak. Re-aiming may help temporarily, but a fixture that needs constant correction is often in the wrong zone to begin with.
A fast way to diagnose it before replacing fixtures
A useful diagnosis here should take about 20 to 30 minutes.
Quick Diagnostic Checklist
- Look for dark spots or dark gaps wider than about 3 to 4 feet on paths, entries, or step zones
- Stand at normal walking approach angles and check whether you see the source before you see the ground
- Measure fixture spacing instead of estimating it; many weak runs are stretched beyond 8 feet
- Check for mulch, plant growth, or edging within 12 inches of the lens or beam path
- Re-aim one suspect fixture by 10 to 15 degrees and reassess the target surface, not the visible bulb
- Pull one spotlight farther back and compare the beam shape before buying a stronger lamp
A practical threshold helps here: if the fixture looks bright but the walking surface still reads poorly from 5 to 8 feet away, the problem is usually placement, shielding, or beam spread before it is electrical output.
What changes by fixture use case
Not every outdoor lighting problem should be judged by the same standard. The failure pattern changes with the job.
Path lights
These fail most often from excessive spacing, visible glare, or insufficient overlap. A path light does not need to look dramatic. It needs to make the walking line legible.
Step and entry lights
These fail when the fixture looks bright but does not reveal edges, depth, or direction. Too much source visibility is worse here than people think because it makes the actual step surface harder to read.
Accent and wall-wash lights
These fail when they sit too close to the target, creating a hard circle instead of a usable spread. On walls and trunks, the most common mistake is chasing brightness instead of setback distance and beam shape.
This is also where site-specific comparison matters more than generic advice. The right spacing for a narrow garden path is not the right spacing for a broad entry apron or a wall-wash effect.
How to fix the layout without overcorrecting
The best fix is usually smaller than a full replacement and bigger than a random tweak.
Start with aim, then spacing, then obstruction
Correct the direction first. Then tighten spacing where overlap is missing. Then clear the beam path. That order saves time because it separates visual geometry from site clutter.
Use downward control, not more visual drama
Shielded, downward-directed light usually performs better than exposed sparkle. This is one condition homeowners commonly underestimate: the more visible the source is, the less comfortable the space often feels. The goal is readable ground, steps, and edges, not a row of bright points.
A simple comparison usually settles the issue fast. When one fixture is tucked lower or aimed down enough to hide the source from direct view, the surrounding space often looks calmer and more usable within seconds. That is a placement win, not a brightness upgrade.
Know when adjustment is no longer enough
If a bed has matured, the path pattern changed, or fixtures keep getting disturbed by maintenance, routine repositioning stops making sense. At that point, a partial re-layout or fixture-type change is smarter than repeated minor corrections.
A good hard-stop rule is this: if you have already corrected aim, tightened spacing, cleared obstructions, and the result still leaves dark spots or persistent glare after 2 to 3 nights of testing, stop tweaking the same fixture. That is the point where layout redesign or fixture replacement becomes more rational than another small adjustment.
If the system still performs poorly after the layout is corrected, then it makes sense to investigate electrical aging and connection problems more seriously through issues like Aging Outdoor Wiring Problems Causing Dim or Failing Lights. The order matters. Placement is usually the first suspect when the lights are on but the result still feels uneven, glaring, or full of dark spots.
| Symptom | More likely cause | Better fix | Usually wasted fix |
|---|---|---|---|
| Bright glare, dim path | Exposed source or bad aim | Lower, shield, re-aim | Stronger lamp |
| Dark spots between lights | Spacing too wide | Add overlap or move fixtures closer | Replacing one fixture |
| Harsh hotspot on wall or tree | Fixture too close | Pull back to widen spread | Higher output bulb |
| Good on install day, weak months later | Plant growth or mulch change | Clear beam path and reset height | Full system replacement |
| Curves or steps feel dim | Layout ignores movement path | Add coverage at transitions | Keeping equal spacing everywhere |
Poor placement is usually the first thing to suspect when outdoor lights are on but the yard still feels uneven, harsh, or disappointingly dim.
In most cases, the decision order should stay simple: check aim first, then spacing, then obstructions, then fixture type, and only after that start chasing electrical causes.
That order is what keeps a small lighting problem from turning into a cycle of brighter lamps, repeated adjustments, and fixes that never touch the real cause.
For broader official guidance on responsible outdoor lighting, see the International Dark-Sky Association.