Outdoor security lights prevent glare when the fixture is shielded, aimed downward, kept moderate, and tested from the actual walking path instead of judged from inside the house.
The first checks are practical: can you see the bare LED lens from 20–30 feet away, does the beam cross a bedroom window or property line, and are the step edge, gate latch, or walking surface still hard to identify within 6–8 feet of approach?
If those signs show up, the problem is not weak security lighting. It is uncontrolled light.
The better fix is rarely a stronger bulb. For many residential entries, a 700–1,300 lumen shielded fixture aimed downward can be more useful than a 2,500 lumen floodlight aimed straight across the yard.
Good security lighting helps you see movement, edges, locks, and approach areas without forcing your eyes to recover from the light itself.
Why Security Lights Backfire
The light is aimed at the scene, not the decision point
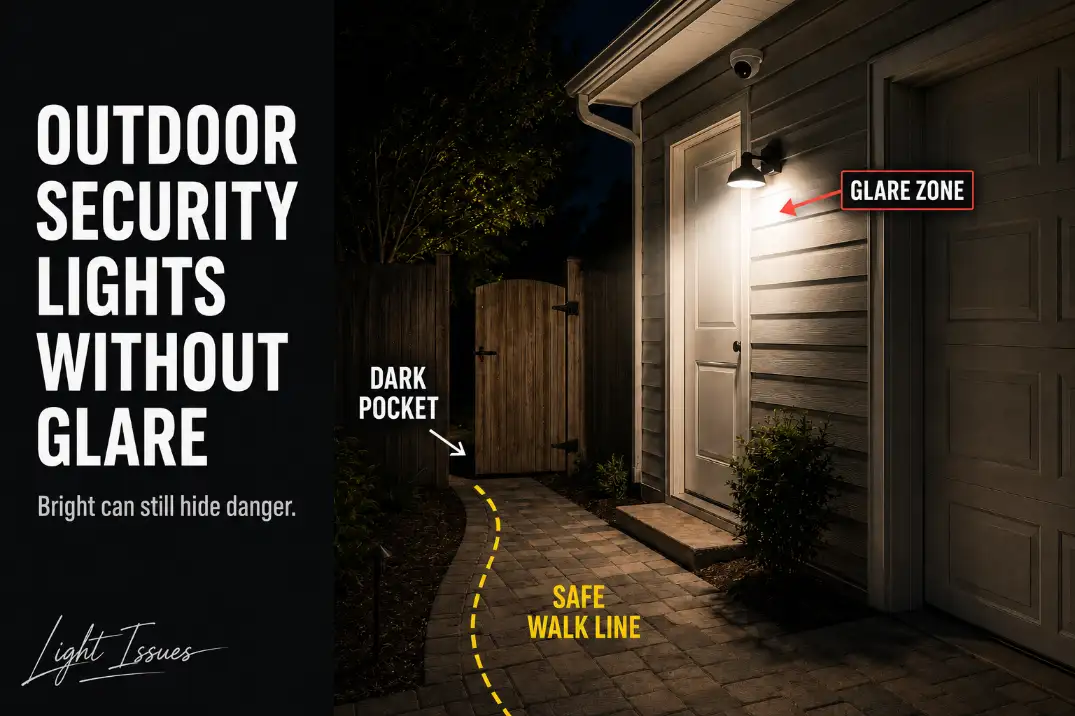
Security lights backfire when they are placed to “cover the yard” instead of to reveal the few areas where decisions happen.
A backyard, driveway, side gate, or patio entry does not need even brightness everywhere. It needs clear transitions: the step before the foot reaches it, the latch before the hand searches for it, and the turn before someone is already in it.
The common mistake is aiming the light outward from the wall like a small stadium flood. That may make the yard look active from inside the house, but outside it often creates a bright wall, a hot lens, and a broken approach line.
A useful security light should answer a narrow question: what needs to be visible first when someone reaches this point at night?
Brighter bulbs often enlarge the mistake
The wasted fix is upgrading output before fixing direction. If the fixture has an exposed LED panel, a bare bulb, or a wide unshielded lens, more lumens usually mean more glare, more spill light, and harder contrast.
The shadows behind bins, posts, shrubs, cars, or railings may stay dark while the bright surfaces become more aggressive.
This is why glare is not just a comfort problem. It can reduce practical security by making the eye adapt to the fixture instead of the scene.
Floodlight cameras can fail the same way
Security camera lights add another layer. A bright floodlight near a camera may overexpose faces, reflect off pale siding, or flare against wet pavement. The video may look bright but still fail to show useful detail near the door, driveway, or gate.
If faces, packages, or license plates look blown out on recordings, the light may be too direct, too close to the camera lens, or too reflective for the surface below.
Glare vs Visibility
Glare is the symptom; visibility is the outcome
Glare is what your eye feels when the source dominates the view. Visibility is what the light allows you to identify: a step edge, a lock, a moving person, a package, a gate hinge, or a turn in the path.
That distinction matters because a light can be bright and still fail. If the LED chips or bare lens are the first thing you notice from the approach, the light is asking your eyes to defend themselves before they read the scene.
Good outdoor security lighting lets the ground, entry, and objects appear before the fixture becomes the focus.
A simple threshold helps: stand on the normal approach path and look toward the entry for 3–5 seconds. If you can identify the walking surface, step edge, and door hardware without squinting, the light is probably helping.
If the fixture becomes the brightest object in your vision and the ground still feels uncertain, it is glare masquerading as security.
Useful light has controlled contrast
Security visibility does not require a flat, fully lit yard. In fact, perfectly even brightness is not usually the goal around a home.
The goal is controlled contrast: enough light to read edges and movement, not so much light that white siding, wet concrete, or reflective pavers become the main visual event.
Warm white light around 2700K–3000K usually feels more comfortable around entries than harsh blue-white light.
Cooler light can appear “brighter” at first glance, but it often makes glare feel sharper, especially on pale walls, garage doors, and wet hardscape.
| What you see at night | Most likely problem | Why it matters | Better first fix |
|---|---|---|---|
| Bare lens visible from 20–30 ft | Source glare | Eye adapts to the fixture first | Shield or re-aim downward |
| Bright siding but dark ground | Beam aimed too high | Wall brightness replaces useful detail | Lower the beam angle |
| Gate area lit from one side only | Beam blockage | Fence, bins, or posts create shadow pockets | Add controlled fill or shift aim |
| Wet pavers create white hotspots | Surface reflection | Rain turns useful light into glare | Use warmer, shielded output |
| Camera video looks blown out | Overexposure near lens | Brightness hides detail instead of revealing it | Reduce output or move beam off-axis |
| Yard looks bright from indoors only | Wrong viewing position | Inside view misjudges walking safety | Test from the actual approach |
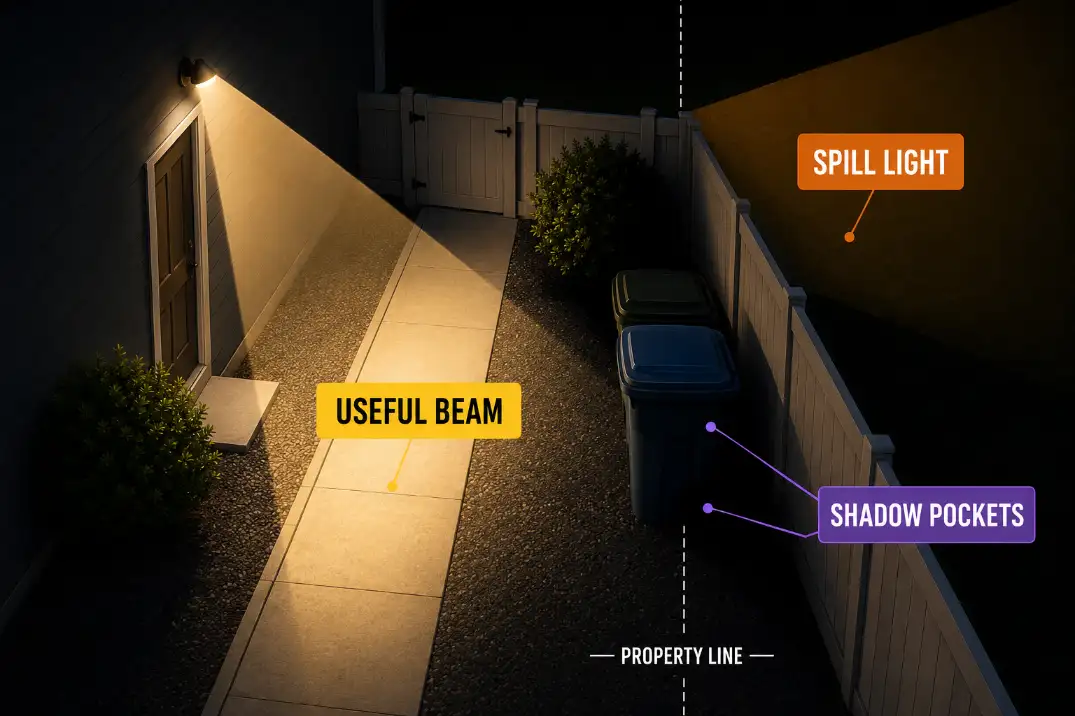
Spill Light
Spill light is wasted coverage
Spill light is light that leaves the area it needs to serve. It may cross a fence, hit a neighbor’s window, wash across a bedroom wall, or brighten a side yard that no one uses at night.
Homeowners often overestimate it because it makes the property look more lit from a distance.
But spill light is not the same as useful security coverage. A garage floodlight can throw light across a driveway while the side-door threshold remains hard to see.
A backyard wall light can brighten the fence but miss the latch, step, or narrow space between storage and the gate.
The test is not “does the yard look bright?” The better test is “does the correct area become clear before glare or spill becomes distracting?”
Property lines and windows change the decision
Outdoor security lighting becomes weaker when it annoys the wrong target. A beam crossing into a neighbor’s bedroom window, a second-story window, or a shared fence line can create conflict without improving security.
It can also make the homeowner keep the light switched off, which defeats the point.
Small yards need tighter control. In a narrow side yard, the difference between useful light and nuisance light may be only a few feet of beam spread.
That is where shielded fixtures, lower output, and careful aiming matter more than raw lumen ratings.
Pro Tip: Check spill light from outside the property line if possible, not just from your porch. A light that feels reasonable near the door may be harsh when viewed from a neighbor’s window angle.
Shadow Pockets
Shadows often come from beam blockage, not weak bulbs
A shadow pocket is a dark wedge created when an object blocks the beam. Bins, shrubs, railings, posts, parked cars, grill carts, storage cabinets, and fence returns can all create them.
The fixture may be bright, the wall may glow, and the yard may still contain one dark area exactly where someone steps, turns, or reaches.
This is why adding more power from the same direction often disappoints. Same-direction light cannot fill a blocked wedge. It can make the lit side harsher while leaving the hidden side nearly unchanged.
The more useful correction is to change direction, reduce obstruction, or add a second low-output light from a different angle.
Decision points deserve priority
Do not try to solve every dark patch first. Prioritize places where darkness changes behavior: steps, thresholds, locks, gates, side doors, corners, garage-to-yard routes, and path turns.
A dark area behind an ornamental shrub may not matter. A dark area where a person turns while carrying groceries, taking out trash, or unlocking a gate matters immediately.
A good rule is to make the next decision point visible before the person reaches it. For steps, the edge should be identifiable at least 6–8 feet before contact.
For a gate, the latch should be visible several steps away. For a side door, the handle and landing should not depend on someone standing directly under the light.
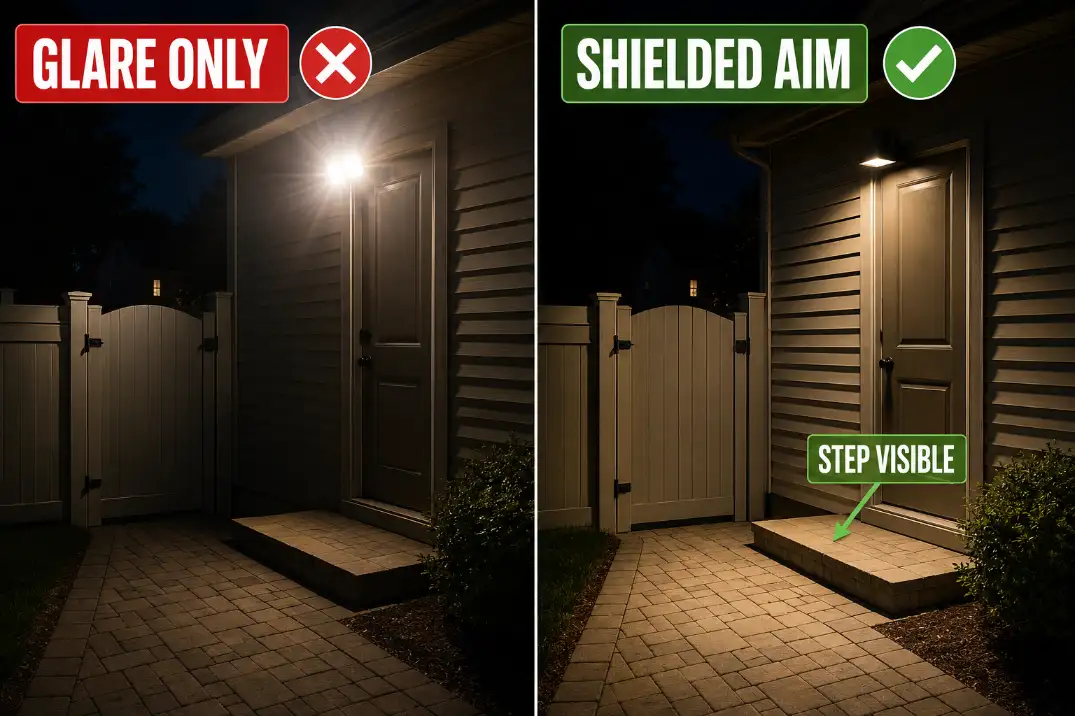
Shielded Fixtures
Shielding beats raw output
The strongest security-light upgrade is usually control, not power. A shielded fixture hides the source from normal viewing angles and sends light downward or toward the task area.
That may mean a full-cutoff wall light, a hooded floodlight, adjustable heads with the lenses tucked down, or a fixture where the LED surface is recessed instead of exposed.
For most residential entries, 700–1,300 lumens per controlled fixture is enough to make the entry, step, or gate area usable when aim and shielding are right. Larger areas may need more output, but broad brightness should come after beam control, not before it.
Mounting height also matters. Many wall-mounted security lights work best around 8–10 feet high because they can cover the approach without sitting directly at eye level.
Too low, and the lens can hit the eye. Too high, and the light may cast longer shadows behind ordinary objects.
Choose fixtures by beam behavior
Do not choose outdoor security lights only by lumen count. Look at the physical shape. A flat exposed LED panel usually creates more glare risk than a recessed or hooded source.
A wide flood pattern can be useful over a driveway, but it can be too aggressive in a narrow side yard. Adjustable heads are helpful only if they can point downward without exposing the lens from the main approach.
Color temperature matters too. In most home security zones, 2700K–3000K is a safer starting point than 4000K+ blue-white light.
Warmer light is not automatically dim; it is often easier to live with because it creates less harsh contrast on siding, pavers, and wet surfaces.
Know when adjustment stops making sense
Re-aiming stops making sense when the fixture cannot hide its own source. If the lens stays visible from the normal approach no matter how you tilt it, the fixture is the wrong form for the location.
If the light must point directly toward a neighbor’s window to cover your entry, the fixture position is wrong. If every motion trigger floods the whole yard for 10–15 minutes, the control setting is working against the purpose.
For many home entries, a 1–3 minute motion duration is enough to cross the path, unlock the door, check movement, or bring trash bins through a side gate.
Longer timers may be useful for a long driveway, but they often create nuisance light in compact suburban yards.
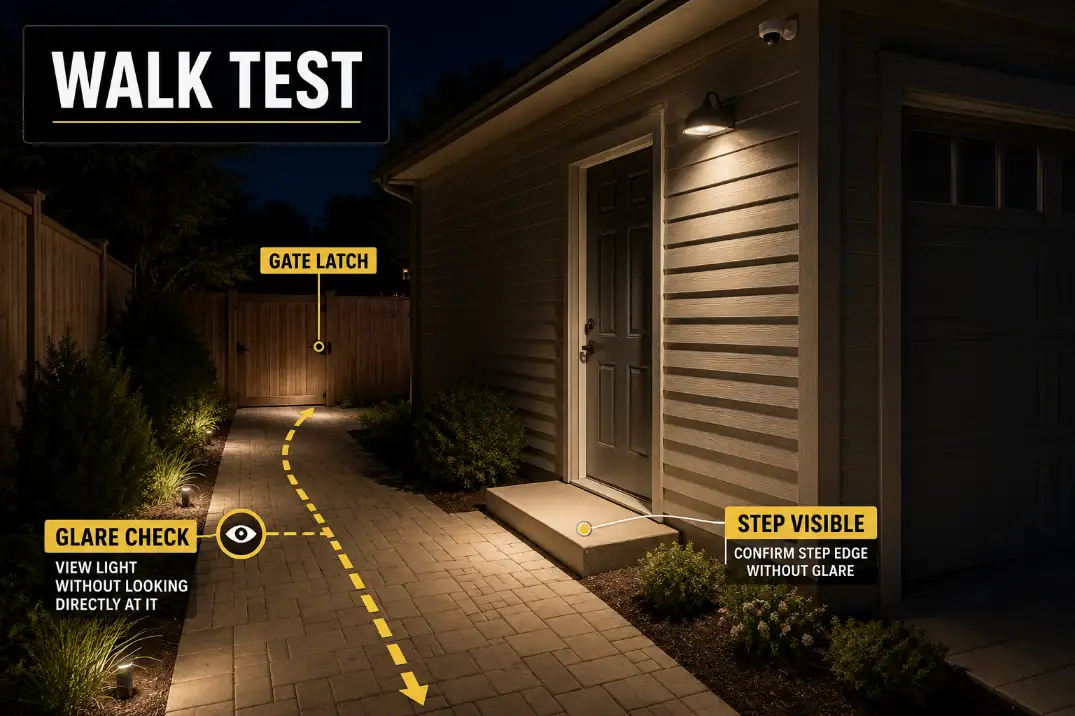
Night Walk Test
Test after real darkness
The night walk test is the most reliable way to judge outdoor security lights without glare. Do it after the yard is truly dark, not at dusk.
Wait 20–30 minutes after sunset or after stepping out of a bright indoor room so your eyes are closer to normal night adaptation.
Start from the real approach: driveway, sidewalk, side gate, garage side door, trash route, patio path, or backyard entry. Walk toward the light without staring at the fixture.
Notice what becomes visible first. The useful details should appear before the light source dominates your view.
Walk both directions
A light can look acceptable from the door and still fail from the yard. Walk away from the house, then walk back toward it. Check whether the fixture hits your eyes on the return path.
Then repeat from the opposite side of the walkway or gate if that is how people actually move through the space.
This matters around side yards because the same beam can be helpful in one direction and harsh in the other. A person carrying a trash bag, a package, or a tool may not approach from the neat “front-facing” angle used during installation.
Check wet surfaces and camera view
Dry pavement hides some glare problems. Wet concrete, sealed pavers, painted steps, and metal thresholds can reflect light back toward the eye.
Test once on a dry night and once after rain if possible. If the ground suddenly produces bright white patches, lower the aim, warm the color, shield the source, or reduce output.
Also check camera recordings if the fixture supports a security camera. A scene that looks bright live can still produce poor footage if the light blows out faces or creates lens flare.
If the camera image loses detail near the door or package zone, move the beam off-axis or reduce intensity before assuming the camera is weak.
Use a pass-or-fail checklist
Use this checklist after the light has been running for a few minutes:
- Can you see the bare bulb, LED chips, or exposed lens from 20–30 feet away?
- Is the step edge visible 6–8 feet before you reach it?
- Can you read the gate latch, lock, or handle without standing directly under the fixture?
- Does the beam cross a neighbor window, bedroom window, or property line?
- Do bins, shrubs, railings, or parked cars create dark wedges behind them?
- Does wet pavement create glare that dry pavement did not show?
- Does the motion timer stay on longer than the route actually needs?
- Does camera footage show usable detail, or does the light blow out faces and packages?
If the first failure is eye-level glare, fix aim or shielding before increasing brightness. If the first failure is a dark step, gate, or turn, adjust the beam toward that decision point.
If the first failure is a blocked shadow pocket, move the obstruction, change the fixture angle, or add a second lower-output light from another direction.
The best outdoor security lights do not make a yard look like a parking lot. They make the right details visible at the right time: the step before the foot lands, the latch before the hand reaches, and the movement before the viewer has to squint.
For broader responsible lighting principles around targeted, controlled, low-level outdoor light, see DarkSky International.