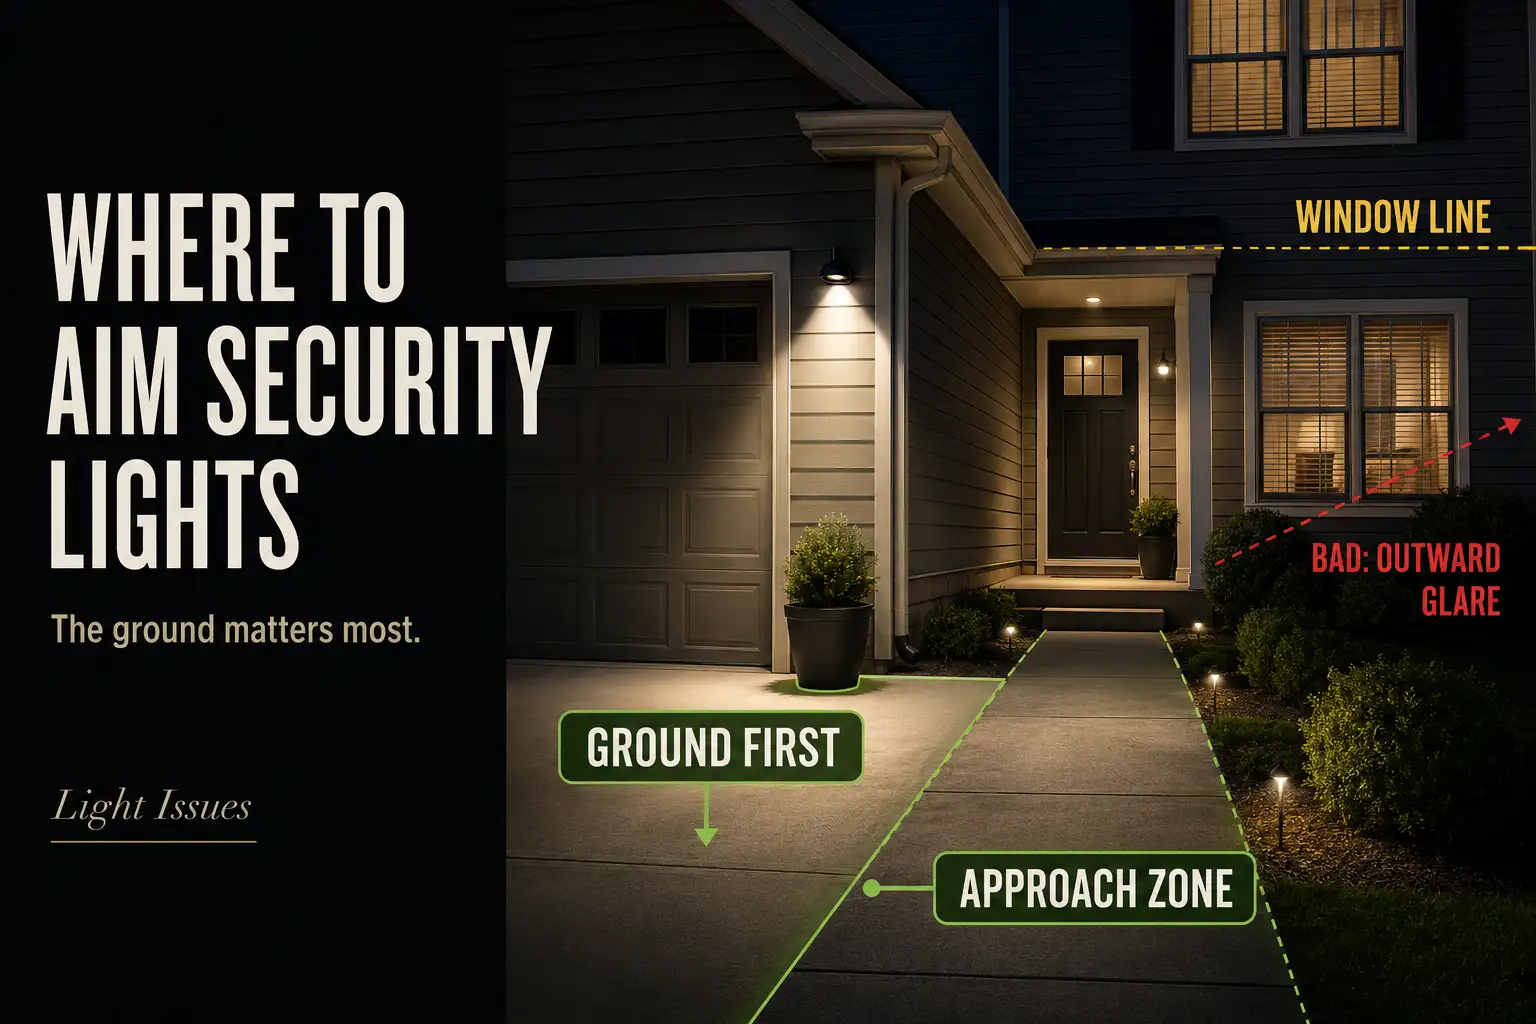
Outdoor security lights should be aimed at the ground route first, then adjusted so the beam reaches the approach zone without crossing window or eye level.
Start by checking where the brightest patch lands, whether the bare fixture face is visible from 20 to 30 feet away, and whether the beam cuts through the 5- to 6-foot band where eyes and lower window panes often line up.
The most common failure is not a weak light. It is a strong light aimed across open air instead of onto the surface people use.
A mis-aimed security light can look bright from the house while still missing the driveway edge, gate latch, steps, or side path. If the ground stays hard to read after 10 minutes of dark adaptation, the aim matters more than the bulb.
Ground First
Aim at the walking surface before anything else
The ground is the first target because security lighting works by revealing movement surfaces, not by shining at faces.
A light that makes pavement edges, steps, wet spots, and path turns readable is usually more useful than a brighter beam thrown across the yard.
For most wall-mounted or eave-mounted fixtures, aim the main beam so its strongest patch lands about 10 to 25 feet from the fixture.
If the fixture is mounted around 8 to 12 feet high, even a small tilt change can move the hot spot several feet. That is why aiming from the ladder is unreliable; the view from the fixture is not the view from the path.
A good security light lets you notice the route before you notice the lamp. If your eye goes to the fixture before it goes to the ground, the beam is probably too high or too exposed.
This is the same pattern that creates harsh visibility problems in Outdoor Security Lights Without Glare, where the fixture looks powerful but the eye loses ground detail.
Do not chase distance first
People often overestimate how far a security light needs to throw. A beam that reaches 60 feet but blinds someone walking toward it is weaker in practice than a controlled beam that clearly covers the first 20 feet of approach.
The better question is not “How far does it shine?” It is “Can someone see the next step, edge, turn, or latch without staring into the fixture?” If the answer is no, more wattage usually makes the mistake louder instead of solving it.

Approach Zone
Cover the route people actually take
The approach zone is the path someone naturally crosses before reaching a door, garage keypad, side gate, porch step, trash route, or car door. Security lighting should follow that movement line instead of washing the whole yard evenly.
For a front entry, the useful zone may be a 3- to 4-foot-wide walkway and the step area before the door. For a garage, it may be the strip between the driveway and the service door. For a side gate, it may be the first 8 to 15 feet where someone reaches the latch and turns.
When the beam is centered on the lawn, fence, or far driveway instead of the route, the fixture can be technically bright and still miss the job.
That is the broader placement failure covered in Fix Poor Outdoor Light Placement, and aiming is often the first correction before changing the fixture.
Put brightness before the decision point
The brightest patch should land before a person reaches the decision point, not after it. A decision point is where someone turns, steps up, opens a gate, reaches a keypad, crosses from car to walkway, or moves from open driveway into a narrow side path.
If the hot spot lands behind the person after they already reach the door, the light feels active but late. This is why some homeowners increase sensor sensitivity and still dislike the result.
The sensor may trigger, but the beam is not helping at the moment the route becomes more complicated.
Beam zone and sensor zone are different
The beam zone is where light lands. The sensor zone is where motion is detected. They should support the same route, but they are not the same adjustment.
A common mistake is aiming the lamp head correctly while leaving the motion sensor pointed toward the street, a neighbor’s driveway, or a sidewalk beyond the property.
The light then turns on for the wrong movement and still misses the useful ground zone. If the fixture is powerful enough but the light keeps landing in the wrong place, Outdoor Lights Miss the Target Area is usually a closer explanation than simple brightness loss.
Pro Tip: Walk the route from the driveway or gate, not from directly under the fixture. That is the view the lighting has to serve.
Window Lines
Stay below the eye-level band
Window lines matter because a beam that looks harmless from the yard can become harsh inside the house. The risky band is usually around 5 to 6 feet above the walking surface, where standing eye level, many lower window panes, and direct neighbor sightlines overlap.
If the beam crosses that band, the symptom may be “the room feels blasted with light,” but the mechanism is more specific: the main cone is crossing the window or eye line. A lower-lumen bulb may reduce the complaint for a night or two, but it does not fix the path of the beam.
The better correction is to lower the aim, use the fixture’s shielding, narrow the spread if possible, or split the heads so one covers ground while the other avoids glass.
If the issue already reaches a nearby house, Stop Outdoor Lights Shining Into Neighbor Windows gives that spill problem a more focused treatment.
Aim below windows, not between them
Trying to thread a beam between windows often sounds precise but fails in real use. Wind, fixture looseness, mounting height, reflective siding, and small adjustment errors can all push the useful beam into glare territory.
A safer rule is to keep the main cone below the sill line and let the outer spill reveal nearby movement. This is especially important on side walls, where a neighboring window may be only 10 to 20 feet away.
On close lots, a beam that looks reasonable from your own path can hit another house almost directly.
Where Not to Aim Outdoor Security Lights
Avoid targets that create glare without useful detail
The worst aim points are usually not random. They are places that look logical from the wall but fail from the walking route.
Do not aim the main beam directly at:
- bedroom, living room, or neighbor windows
- the street or passing driver sightlines
- shiny garage doors that bounce light back
- white vinyl fences or pale siding in narrow spaces
- face level across the walking route
- the far end of the yard when the near approach is still dark
This is where a routine brightness fix stops making sense. If the light already makes windows, fences, or garage doors glow but the ground still has dark patches, a stronger bulb will usually increase glare faster than it improves visibility.
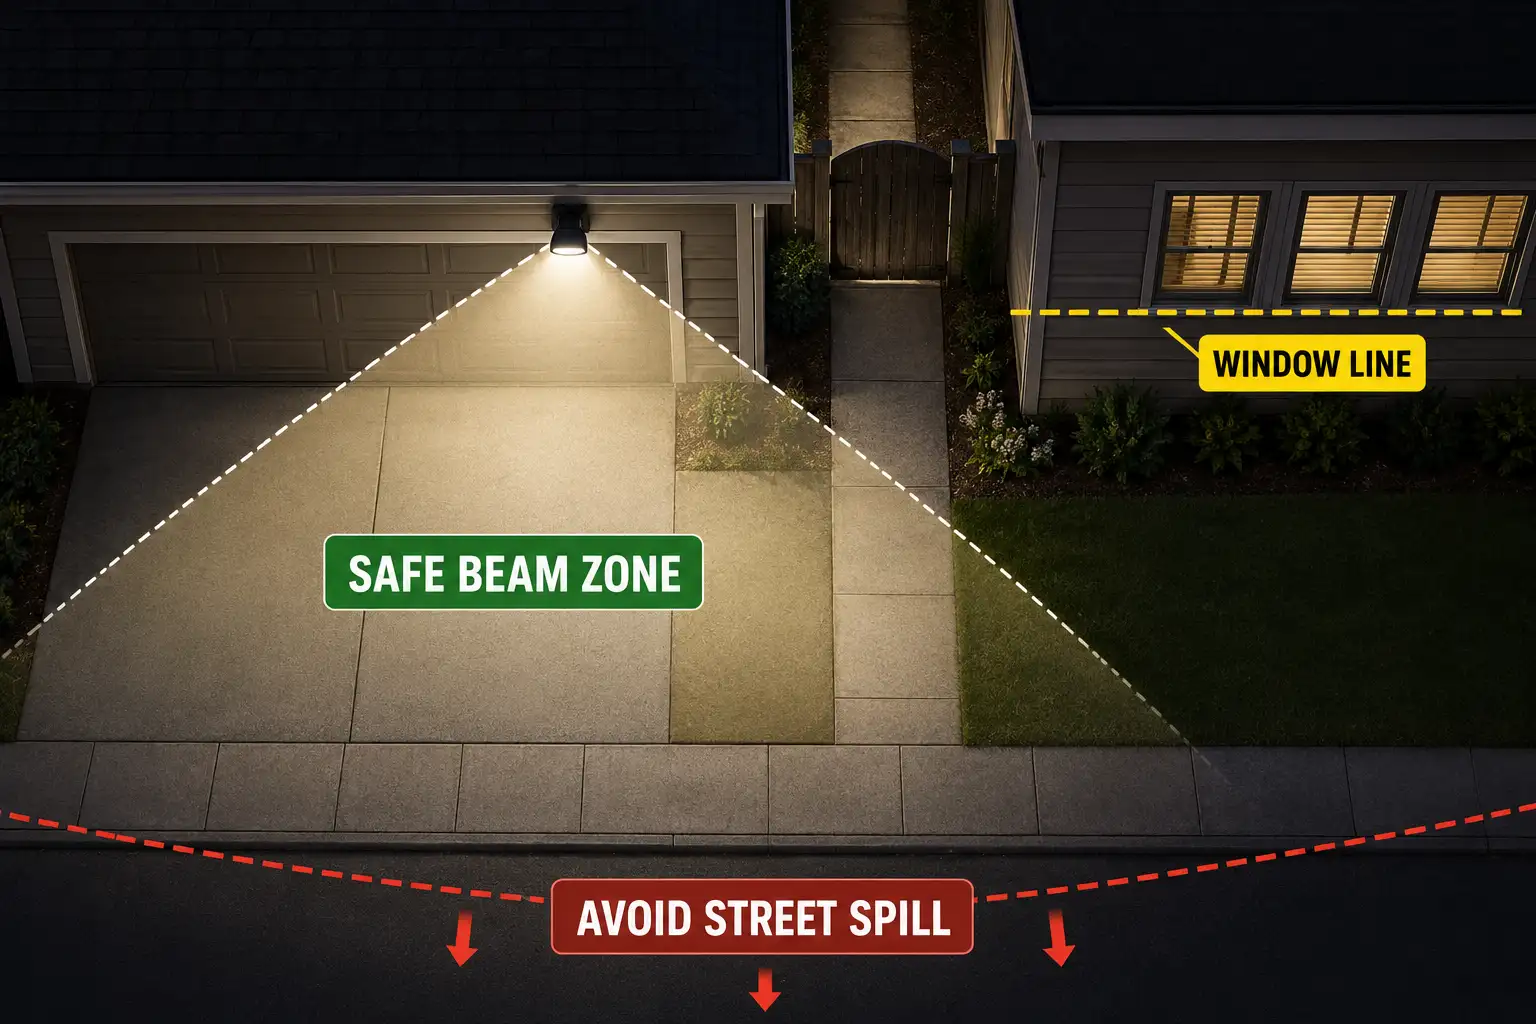
Driveway Aim
Cover step-out zones, not the street
Driveway security lights should protect the places where people actually move: the car-door step-out area, garage apron, driveway edge, trash cart route, and walkway connection.
A beam aimed toward the street can look strong from the curb while leaving the property-side movement zone uneven.
For a typical residential driveway, aim the strongest coverage across the first 15 to 35 feet of pavement. That usually catches the garage apron, parked vehicle area, and the route from car to door.
If the beam throws beyond that and lights the street more than the driveway edge, the aim is too forward.
A driveway can look brightly lit from across the street while still hiding a wet pavement edge, tire shadow, porch step, or side walkway transition.
That is why simply making the fixture brighter can disappoint. In some layouts, Brighter Outdoor Lights Can Make Visibility Worse because the glare crushes detail instead of revealing it.
| Mounting spot | Best aim target | Avoid aiming at | When one fixture is not enough |
|---|---|---|---|
| Garage wall | Ground in front of garage doors | Driver eye level or shiny door panels | Wide two-car driveway with dark side edges |
| Eave over driveway | Car step-out and walkway connection | Street traffic or opposite curb | Entry door sits off to one side |
| Corner of garage | Driveway edge and side approach | Neighbor window line | Beam must turn around a corner |
| Side wall near driveway | Gate route and service path | Fence glare across narrow space | Side yard and driveway need separate coverage |
| Porch-facing fixture | First step and approach walk | Front windows or faces | Garage area remains outside the beam |
Split the job when the target is too wide
One security light should not be expected to cover the garage door, parked cars, side gate, sidewalk, front entry, and backyard corner all at once.
When one fixture has too many jobs, aiming becomes a compromise that leaves glare in one direction and darkness in another.
A better setup may use one lower-output fixture aimed at the driveway and another smaller light aimed at the walking route.
This is not about adding more brightness everywhere. It is about giving each beam a smaller, more useful job.
Side Yard Aim
Shorter aim usually beats stronger light
Side yards need shorter aim, not stronger light. The space is narrow, surfaces reflect light, and neighboring windows are often close. In a 4- to 6-foot-wide side yard, a broad floodlight can feel harsher than a smaller, tighter beam.
Aim along the ground route, gate latch, utility area, or blind corner near the garage. Do not aim across the fence line or straight down the full length of the passage unless the beam is shielded and controlled.
A long beam in a narrow side yard often bounces off fencing, siding, AC equipment, and wet concrete before it helps the person walking through.
Reflection is easy to underestimate
White vinyl fences, pale siding, glossy gates, and wet pavement can throw light back toward the house. After rain, the same side path may feel much brighter than it did during a dry test.
In humid or rainy regions, this is not a rare one-night issue; it can be the normal condition for part of the year.
If the side yard looks acceptable when dry but harsh after rain, the beam is probably too high, too broad, or aimed at a reflective surface. Lower the beam first.
If that removes the glare but leaves the latch or step dark, use a tighter fixture or a second smaller light rather than pushing one floodlight harder.
Test From the Path
Judge the light after your eyes adjust
The final aim should be judged from the path, driveway, side gate, and inside nearby windows — not from the ladder. Wait at least 10 minutes after dark so your eyes adjust, then walk the actual route the light is supposed to protect.
A working setup lets you see the next step, door area, driveway edge, and nearby obstacles without staring into the fixture.
A failing setup makes the fixture feel bright while the ground still has dark gaps. If the lamp face pulls your attention for more than a few seconds, lower the aim before changing bulbs.
Use this quick aim test:
- Stand 20 to 30 feet from the fixture and check whether the bare LED face pulls your eye.
- Walk the actual approach route after 10 minutes of dark adaptation.
- Look for dark gaps at steps, driveway edges, gate latches, and turns.
- Check the nearest window from inside the house.
- Trigger the motion sensor from the driveway or gate, not from under the fixture.
- Retest after rain if the surface reflects light.
Match the timer to the route
For motion security lights, the timer should support the movement the beam is meant to reveal. A 30- to 60-second setting is often enough for a quick driveway or entry approach. A longer 2- to 5-minute setting may make sense for unloading groceries, rolling trash carts, or using a side gate.
Longer is not automatically better. If the beam points outward, a long timer gives neighbors and passing traffic more time to notice the mistake.
If the light keeps reacting to cars, pets, or sidewalk movement beyond the property, sensor range and beam aim are working against each other.
Motion Sensor Lights Annoy Neighbors at Night becomes relevant when nuisance triggering and spill direction combine.

Pro Tip: Change one thing at a time. Adjusting bulb brightness, sensor range, and fixture angle together makes it harder to know what actually fixed the problem.
Questions People Usually Ask
Should outdoor security lights point straight out?
No. A straight-out aim usually creates glare and window spill before it improves safety. Most residential security lights work better when the main beam lands on the ground within the first 10 to 25 feet, then spreads across the approach route.
Should a driveway security light aim toward the street?
Usually not. Aim toward the property-side driveway, car step-out area, garage approach, and walkway connection. If the beam reaches the street strongly enough to bother drivers or neighbors, it is probably aimed too far forward.
Is a brighter bulb the fastest fix?
Only if the current beam is already aimed correctly and the target area is still too dim. If the hot spot is on a window, fence, street, or upper wall, more brightness usually makes the aiming problem worse.
For broader official guidance on efficient outdoor lighting choices and controls, see the U.S. Department of Energy.