If an outdoor light on a wooden deck post starts flickering, tripping a GFCI, or dying after rain, the usual problem is moisture getting in from the back of the fixture, not a failed bulb.
The first checks that actually change the diagnosis are simple: see whether the trouble starts within 12 to 48 hours of rain, deck washing, or sprinkler overspray; look for dark staining or soft wood directly below the mounting plate; and note whether the light comes back after 24 to 72 dry hours. That pattern usually points to intrusion at the fixture-to-wood joint, the cable entry, or a wet splice hidden nearby.
This gets confused with normal condensation all the time. A little lens fog that clears within a few hours is not the same thing as corrosion, leakage current, or a wet socket.
The useful threshold is practical, not theoretical: if you only see brief haze inside the lens and the light performs the same in wet and dry weather, it is usually cosmetic.
If the fixture flickers, trips protection, or fails again after each rain cycle, moisture has already reached electrical parts and the problem is no longer cosmetic.
What is usually happening behind the fixture
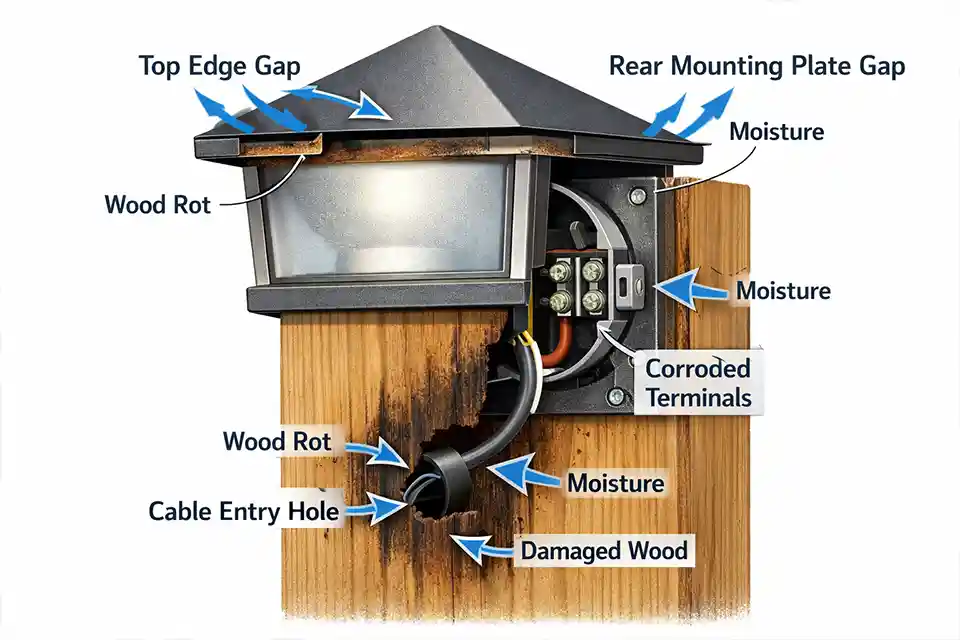
Deck-post lights fail differently than lights mounted on brick, stucco, or vinyl. The wood expands when it stays damp, shrinks when it bakes in the sun, and twists slightly as seasons change. The fixture stays rigid. That mismatch opens small gaps around mounting screws, backplates, and wire holes, especially on posts that get hard afternoon sun and then cool night air.
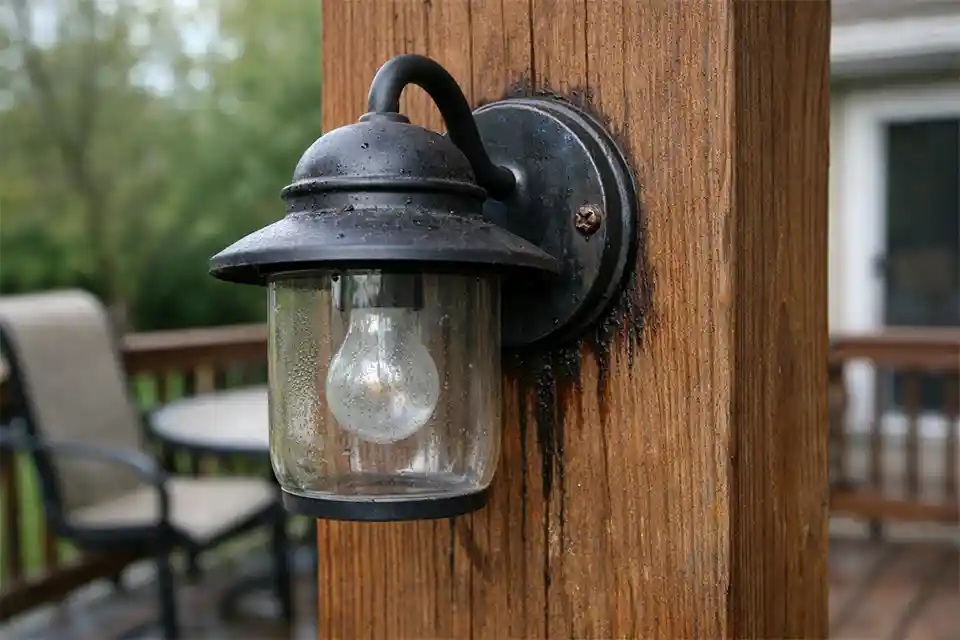
The most common leak path is the rear mounting surface, not the lens. That matters because people often replace lamps, sockets, or photocells first and leave the real entry point untouched. On deck posts, the evidence is usually on the back side anyway. You take the light down and find a dark ring where the plate sat, or one rusty screw that is worse than the other because that corner held water longer. That is more useful than the fogged lens people fixate on.
If the fixture sits near a post cap, a horizontal trim detail, or a decorative groove, even a few hours of standing moisture can feed the problem. Water does not need a dramatic opening. A tiny gap at the top of the plate or a cable hole drilled flat instead of slightly downward is often enough. When outdoor lights trap humid air, water droplets inside an outdoor light fixture can appear even if the fixture is not directly leaking.
Quick diagnostic checklist
-
The light starts acting up within 12 to 48 hours after rain, washing, or irrigation.
-
It works again after 24 to 72 hours of warm, dry weather.
-
The post is darker below the fixture than on the sides or back.
-
One mounting screw is more corroded than the others.
-
The fixture sits below a post cap, trim lip, or other detail that sheds water onto it.
-
The fixture is rated for damp locations only, not wet locations.
-
A previous repair relied mostly on exterior caulk without replacing corroded parts or fixing the cable path.
What people usually misread first
The first overreaction is condensation inside the lens. The first underreaction is wet wood behind the light.
A little fogging during temperature swings is not ideal, but it does not decide the repair on its own. If that haze disappears within a few hours and the light output stays stable, it does not prove internal damage. Corrosion at the socket, terminals, or driver cavity does. That is the difference between something visible and something decision-useful.
The wood is what people miss. Once the post surface stays above roughly 20% moisture content, sealants hold less reliably, corrosion speeds up, and minor leakage paths stop being minor. In humid parts of Florida, that can happen quickly. In colder northern states, freeze-thaw cycling turns a narrow seasonal gap into a repeat failure by late winter. That same weather-driven pattern shows up in Deck or Patio Lights Not Working After Winter, but on deck posts the wood movement is often part of the root cause, not just background wear.
One detail that gets overlooked a lot: old caulk can make the installation look protected while actually trapping water. When the top edge cracks and the lower edges stay sealed, the fixture can become a small pocket instead of a barrier.
Where the failure usually starts
These causes are not equal, and they should not be treated that way.
| Failure point | What you usually see | What it usually means | Priority |
|---|---|---|---|
| Rear mounting gap against wood | Dark halo, streaking below fixture, weather-related outage | Primary intrusion path | Highest |
| Cable entry through drilled post | Failure after washing or irrigation, little visible front-side damage | Water following the wire inward | Highest |
| Corroded splice or connector | Flicker, dimming, heat, mineral residue | Resistance and leakage are already developing | High |
| Lens condensation only | Temporary haze, no trips, no outage | Usually cosmetic unless persistent | Moderate |
| Failed lamp or LED board | Dead in all weather, no rain pattern | Component issue rather than moisture pattern | Moderate |
| Repeated GFCI trips | Random shutoff during wet periods | Safety issue, not just nuisance behavior | Highest |
Cable entry points deserve more suspicion than they usually get. On deck posts, the drilled hole is often just large enough for the wire and nothing else, which sounds neat until water follows the cable jacket straight inward. If the wire enters level or slightly uphill instead of dropping first, the post can feed moisture into the fixture every time it gets wet. That is why Why Water Gets In Through Cable Entry Points fits this problem so closely.
Fix the water path first, then the electrical damage
Shut the circuit off at the breaker, not just the switch. If the light is on a GFCI-protected outdoor circuit, confirm it is dead before opening the fixture.
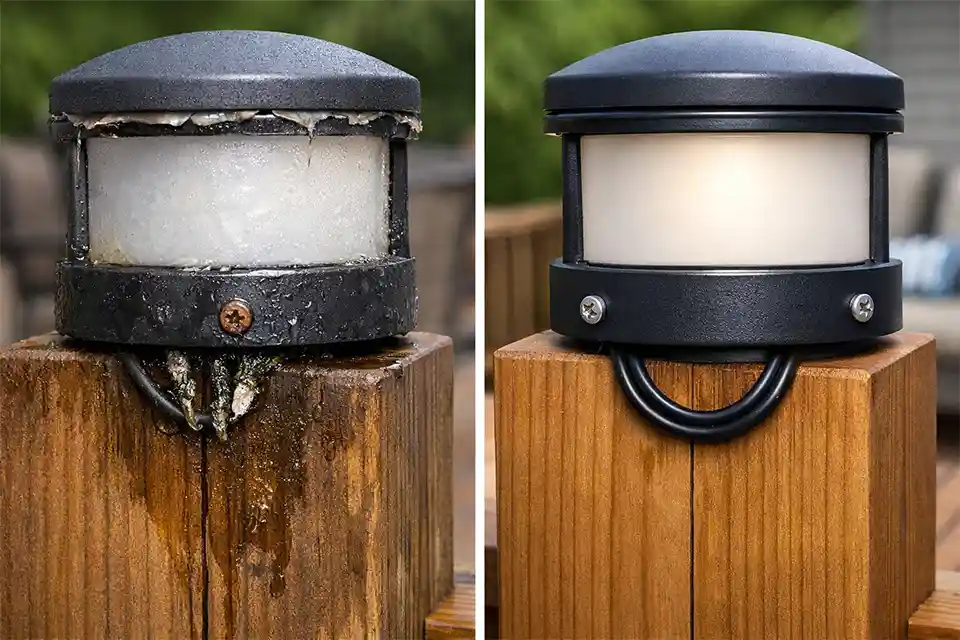
Remove the light and inspect the post side first. If the wood is darkened in a ring around the plate, if one fastener hole is darker than the others, or if the grain feels raised and fuzzy instead of firm, you have already found the important part of the failure. Let that area dry completely before reinstalling. In mild weather that may take about 24 hours. Saturated wood can need 72 hours or more. Reattaching a fixture to damp wood is one of the most common wasted repairs because the surface feels dry before the screw holes are actually dry.
Then inspect the electrical parts. Replace rusted screws, oxidized connectors, and any socket or terminal with visible corrosion. If the copper is blackened more than about 1/2 inch back from the stripped end, cut it back to bright metal and resplice. A corroded connection that starts working again after a dry spell is still a corroded connection. Drying it does not fix it; it only hides it for a while. That broader pattern is covered well in Corroded Wire Splices Outdoors.
When remounting, use an exterior-rated gasket or closed-cell backer behind the fixture. Seal the upper edge and upper side transitions carefully, but do not build a full perimeter dam. On wood posts, a fully trapped cavity often ages worse than a properly detailed top seal with a way for incidental moisture to escape.
Pro Tip: Before remounting, look closely at the old backplate imprint on the post. The darkest part of that mark usually tells you where water sat longest, which is often more informative than the front of the fixture.
When the standard fix stops making sense
There is a point where resealing stops being a repair and starts being denial.
If the fixture has already failed three or more times in one wet season, or if it begins tripping again within one to two weeks after resealing, stop adding caulk and rebuild the mount or replace the fixture. At that point, the installation detail or the fixture design is not holding up to the environment.
The same applies when the wood is deteriorating. If the post surface is soft or cracked deeper than about 1/4 inch, the light is no longer the whole problem. The substrate has become part of the leak path, and fixing only the fixture will not last. In real installs, this is often where people keep replacing parts on the light because replacing the post detail feels like a bigger job. It is a bigger job, but it is also the correct one.
Repeated GFCI trips get underestimated too. People treat them like weather-related annoyance, when they are really the circuit telling you leakage current is becoming real enough to matter. That moves the issue out of the maintenance category. Before putting the circuit back into service, review Outdoor Lights Tripping GFCI Outlets.
The part that actually changes the outcome
For lights mounted on wooden deck posts, the real issue is usually not “water in the fixture” in a vague sense. It is water getting in through a specific path that the installation keeps reopening: the rear plate, the cable entry, or a wet splice near moving wood. Replacing lamps and controls before fixing that path wastes time. The repair that lasts is the one that changes the water path, removes corroded electrical parts, and stops treating a damp, shifting wood surface as though it were stable.
For broader official requirements on fixtures used in wet or damp locations, see OSHA 1910.305.