Outdoor lighting usually misses the right areas because the fixture is in the wrong relationship to the target, not because the bulb is too weak.
The first checks are beam direction, beam spread, mounting height, spacing, and whether shrubs, posts, walls, or grade changes interrupt the light path. A useful rule: if the target surface is still dark within 3 to 6 feet of a working fixture, adding a brighter bulb is usually the wrong first fix.
This is different from a power problem. Failed wiring, a weak transformer, or a timer issue makes lights dim, dead, intermittent, or inconsistent. Placement problems show up when the light works but lands badly: the wall is bright, the walking surface is dark, the steps disappear, the driveway has hot spots, or a patio feels harsh while the seating area remains shadowed.
The Fastest Way to Tell If Placement Is the Real Problem
Placement problems have a specific pattern: the fixture is producing light, but the task is not being served. The target may be a step edge, gate latch, lockset, driveway turn, address number, seating zone, or walkway centerline. If that target stays hard to see after the system has been on for 30 to 45 minutes after sunset, the layout needs attention.
Check from the user’s position
Do not judge the light from the street or from beside the fixture. Stand where the light is supposed to help. If the goal is a path, walk the path. If the goal is the front door, stand at the threshold. If the goal is a stair, look at the tread edge and nosing.
A fixture can look bright from 25 feet away and still fail from the position where it matters. This is why many outdoor lighting complaints sound like brightness complaints but are really outdoor lights missing target areas.
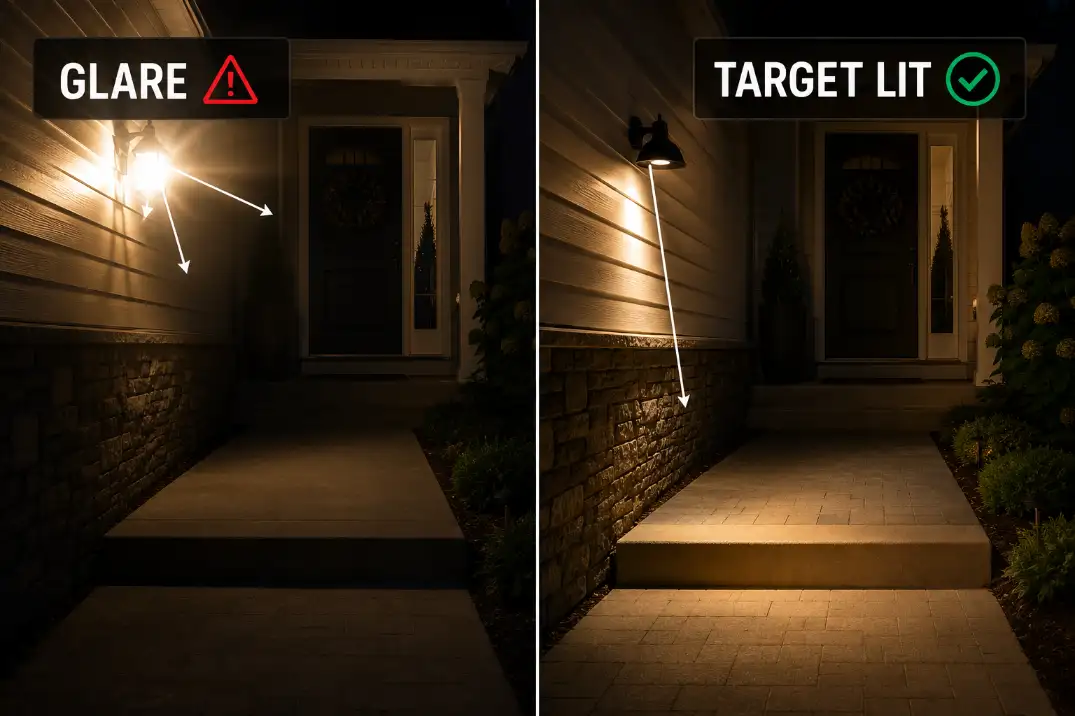
Look for glare before assuming low output
Glare is the symptom people misread most often. When an exposed lamp or badly aimed beam hits your eyes first, your vision adjusts to the bright source, and the ground around it looks darker. A poorly aimed 700-lumen light can feel less useful than a shielded 250-lumen fixture aimed at the walking surface.
If the brightest thing you see is the bulb, wall, window, or pale concrete instead of the target area, the problem is not lack of light. The problem is control.
Which Placement Problem Do You Actually Have?
Bad placement is not one problem. It usually falls into one of four types. Sorting them first prevents wasted fixes.
| Problem type | What you see at night | What it usually means | First correction |
|---|---|---|---|
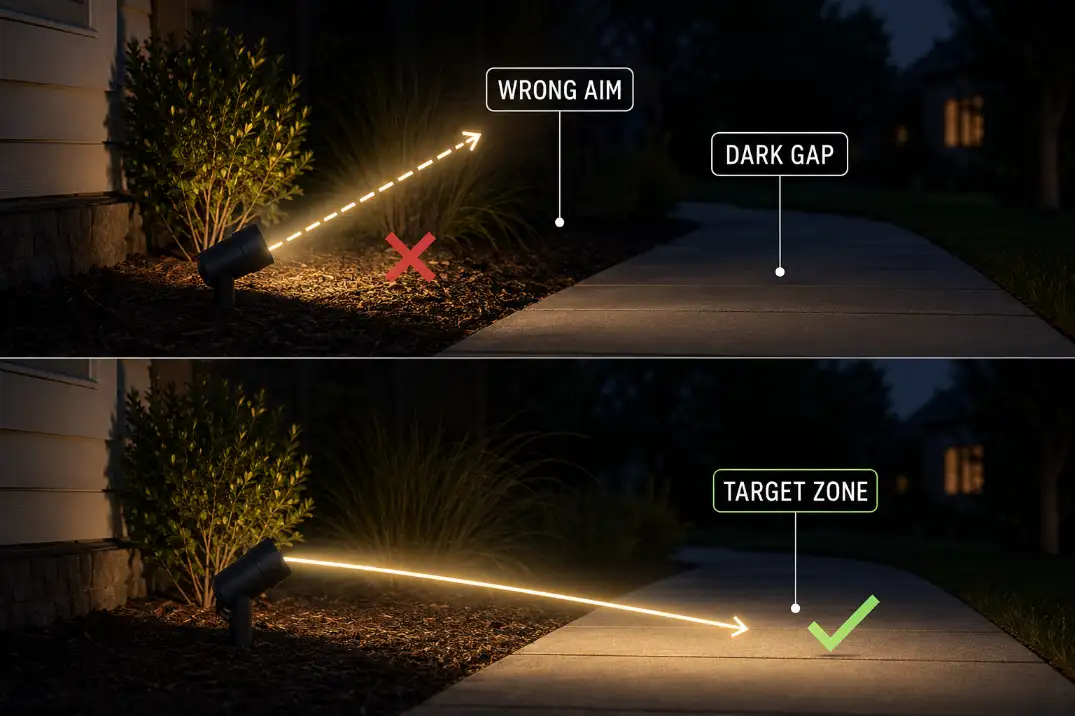
| Aim problem | Light lands beside the target | Fixture direction is wrong | Rotate or tilt the fixture |
| Beam spread problem | Bright circle with dark edges | Beam is too narrow or too wide | Change lens, fixture type, or spacing |
| Location problem | Correct aim causes glare or spill | Fixture sits in the wrong place | Move the fixture |
| Shielding problem | You see the bulb before the ground | Light reaches eyes first | Add shielding or replace fixture |
Aim is the easiest fix
If the fixture can be adjusted and the target is within reach, aim first. Many outdoor lights only need a 10- to 20-degree correction. Mark the original position before adjusting so you can reverse the change if it makes glare worse.
Beam spread is different from aim
A beam can point in the right direction and still fail because it is too narrow. This creates a bright patch surrounded by darkness. A wider beam, lower output, or closer spacing may solve that better than another high-output fixture.
Location is the expensive mistake
When a fixture cannot hit the target without shining into a window, across a property line, or into someone’s eyes, adjustment has reached its limit. At that point, the fixture location is wrong.
What People Usually Misread First
The eye notices brightness before it notices coverage, so people often upgrade bulbs, add fixtures, or replace motion lights before checking where the light actually lands.
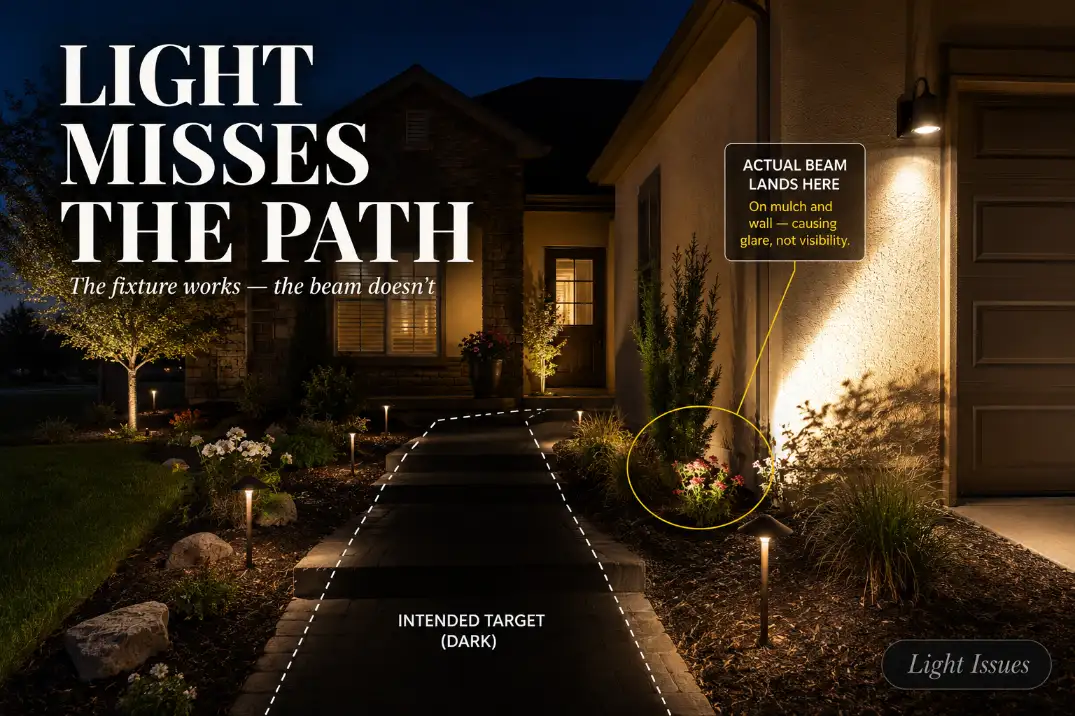
Bright fixture, dark surface
A path light set too close to a planting bed may light mulch instead of pavement. A porch light mounted high and off to one side may brighten door trim while leaving the lockset in shadow. A floodlight aimed outward may light a fence better than the driveway.
The decision-useful signal is not “Can I see the fixture?” It is “Can I see the surface or object the fixture is supposed to support?” On walkways, dark gaps longer than about 6 to 8 feet become noticeable, especially on uneven pavers, gravel, or steps.
More lumens often make the problem worse
The most wasted fix is installing a stronger bulb before correcting aim, shielding, or placement. Higher output can increase glare, sharpen shadows, wash out texture, and make the actual walking surface harder to read.
This is where placement problems overlap with poor outdoor light placement causing dark spots and glare, but the repair order matters: control first, brightness second.
Shadows matter more than fixture count
People often overestimate how many fixtures they need and underestimate how much shadows from objects change coverage. A 4-inch deck post, mailbox column, planter, railing, or dense shrub can block enough light to create a blind strip behind it.
Plant growth makes this worse. In warm, humid areas like Florida, foliage can shift beam coverage by 12 to 24 inches over a growing season. In northern states, snow piles can reflect light back toward the fixture and create glare where the layout worked fine in fall.
Placement Rules by Area
The best placement depends on the job. Symmetry in daylight is less important than coverage after dark.
Paths and walkways
Path lights should guide the walking line, not outline the landscape bed. Many residential path lights work best starting around 6 to 8 feet apart, but curves, narrow beams, and uneven paving may need tighter spacing around 5 to 6 feet.
Avoid placing fixtures in two rigid rows unless the path is wide enough to need it. That “runway” effect can look overbuilt and still leave the centerline uneven. Staggered placement usually feels more natural and reduces glare from repeated lamp faces.
Steps and level changes
Steps need edge definition. Lighting the vertical riser alone is not enough if the tread edge remains unclear. The goal is to make the change in level readable from both directions.
For exterior stairs, a small downlight, side light, or recessed step light often works better than a bright fixture behind the person walking. If the user’s own body casts a shadow over the tread, the light is in the wrong relationship to the step.
Front doors and entries
Entry lighting should help with the lockset, threshold, address number, and package area. A decorative wall lantern can support that, but it often fails when mounted too high, too far sideways, or with an exposed bulb.
For many front doors, the most useful light is not the brightest one on the wall. It is the one that lets someone see the keyway, doorbell, step, and landing without looking directly into the lamp.
Driveways
Driveway lights should support turning, backing, walking edges, and transitions to paths or garage doors. Lighting the middle of the pavement is less useful if the edges and turns stay dark.
A common mistake is aiming fixtures straight across the driveway. That creates bright bands and dark approach zones. Lighting along the travel direction or marking key edges usually gives better guidance.
Patios and seating areas
Patio lighting fails when accent lighting is expected to do task lighting. Tree uplights, wall grazers, and decorative string lights can create mood, but they may not help people see steps, grill controls, table surfaces, or chair legs.
Seated eye level matters. A lamp that seems fine while standing can be harsh when someone sits 3 to 4 feet lower. Shielding and lower-output layered lighting usually work better than one exposed bright fixture.
Why the Obvious Fix Fails
The obvious fix is usually “make it brighter.” That only works when the fixture is already aimed correctly and slightly underpowered. It fails when the beam is landing in the wrong place.
A brighter bulb cannot fix the wrong location
If a path light sits behind a dense plant, more output lights the plant better. If a wall fixture is mounted too far from a door, more output brightens the siding. If a spotlight is aimed across a driveway instead of along the travel direction, more output creates a harsh streak while the turn remains unclear.
Brightness is a performance adjustment. It is not a placement correction.
When the beam crosses the property line
Outdoor lights should not solve one problem by creating another. If a floodlight shines into a neighbor’s window, across the street, or directly into passing drivers’ eyes, the beam is uncontrolled.
This matters most with wall-mounted floodlights, garage lights, and driveway fixtures. A shielded downward angle usually beats a wider, brighter beam. If the fixture cannot be aimed at the target without light trespass, relocation or replacement makes more sense than another adjustment.
Replacing the fixture can still waste money
A new fixture helps when the old one has the wrong distribution, such as an exposed lantern where a shielded downlight is needed. But replacement is premature if the existing fixture can be rotated, hooded, lowered, or moved 12 to 24 inches.
Routine adjustment stops making sense when every correction creates a new problem: glare into windows, spill across a property line, light aimed into irrigation spray, or a target still left dark. In sprinkler-heavy areas, poor location can also lead to future damage like sprinkler spray damaging outdoor lights.
How to Reposition Outdoor Lights So They Hit the Right Areas
Good placement starts with the target and works backward. Do not start with equal spacing, fixture symmetry, or where the light looks best during the day.
Use the 3-point night test
Test after the system has been on for 30 to 45 minutes after sunset. Then check from three places:
- The actual walking or working position.
- The approach angle from 15 to 20 feet away.
- The target surface itself, such as a step edge, threshold, latch, or driveway turn.
If the fixture passes from one position but fails from another, the beam may be too narrow, too exposed, or aimed from the wrong side.
Move in small increments
Temporary testing matters. Use a flashlight, clip light, or movable low-voltage fixture before burying wire or setting stakes permanently. Move the light in 12-inch increments and watch how shadows change.
Small shifts matter outdoors because beams interact with plants, stone texture, grade changes, railings, and reflective surfaces. In dry areas like Arizona, pale gravel and stucco can bounce light strongly, so glare may appear before coverage improves. In humid or heavily planted yards, foliage absorbs and blocks more light, making coverage shrink faster.
Aim for overlap, not isolated pools
Healthy path lighting usually has soft overlap between fixtures. Failing placement creates bright circles separated by black gaps. The goal is not to flood the whole yard. It is to prevent the eye from constantly readjusting between bright and dark.
For safety areas, prioritize horizontal surfaces and edges. For accent areas, prioritize vertical surfaces such as trees, columns, and walls. Problems begin when one fixture is expected to do both jobs from one location.
Pro Tip: Test the route in both directions. A path that looks fine when leaving the house may glare badly when returning from the driveway.
Quick Diagnostic Checklist
Use this after dark, not at sunset. Placement problems often look less severe while there is still ambient light.
- Stand on the target area and check whether the useful surface is lit.
- Look for dark gaps longer than 6 to 8 feet along paths, driveways, or steps.
- Check whether the brightest surface is a wall, shrub, window, mulch, or fixture lens.
- Approach from 15 to 20 feet and note whether glare hits your eyes before light reaches the ground.
- Watch for shadows from posts, railings, planters, tree trunks, or shrubs.
- Compare summer and winter conditions if plants, snow piles, furniture, or umbrellas change the beam path.
When Placement Is Not the Whole Problem
Placement should be corrected first when the fixture is bright and reliable. But if the light fades, flickers, shuts off, or changes output during the night, the system may have another issue.
Dim light at the end of a run
Low-voltage systems can lose output near the end of a long cable run. In that case, the last fixture may seem misplaced because it cannot throw enough usable light. If the first lights on the run look strong and the last few look weak, investigate voltage drop in outdoor lighting systems before moving every fixture.
Motion lights that aim correctly but trigger poorly
A motion light can illuminate the right area but still trigger badly if the sensor zone does not match the beam zone. The lamp may point at the driveway while the sensor watches a street, tree branch, blank wall, or passing animal path.
If the light turns on and off unpredictably, the issue may be sensor behavior rather than placement. In that case, troubleshooting outdoor motion lights turning on and off is more useful than redesigning the layout.
Seasonal obstruction
Placement can be correct in March and wrong in July. Shrubs grow into beams, patio umbrellas block downlights, and seasonal furniture changes sightlines. In Midwest yards with spring rain and fast plant growth, a clean lighting plan can become patchy in 6 to 8 weeks if fixtures sit directly behind planting.
That does not always mean the original layout was bad. It means the beam path depended on a clear zone the landscape does not consistently maintain.
Practical Fixes That Usually Work
The best fix is the smallest change that moves useful light onto the target without creating glare, spill, or harsh shadows.
Rotate before relocating
If the fixture adjusts, rotate or tilt it first. Recheck from the user’s viewpoint, not beside the fixture. Many path and accent lights only need a small aim correction.
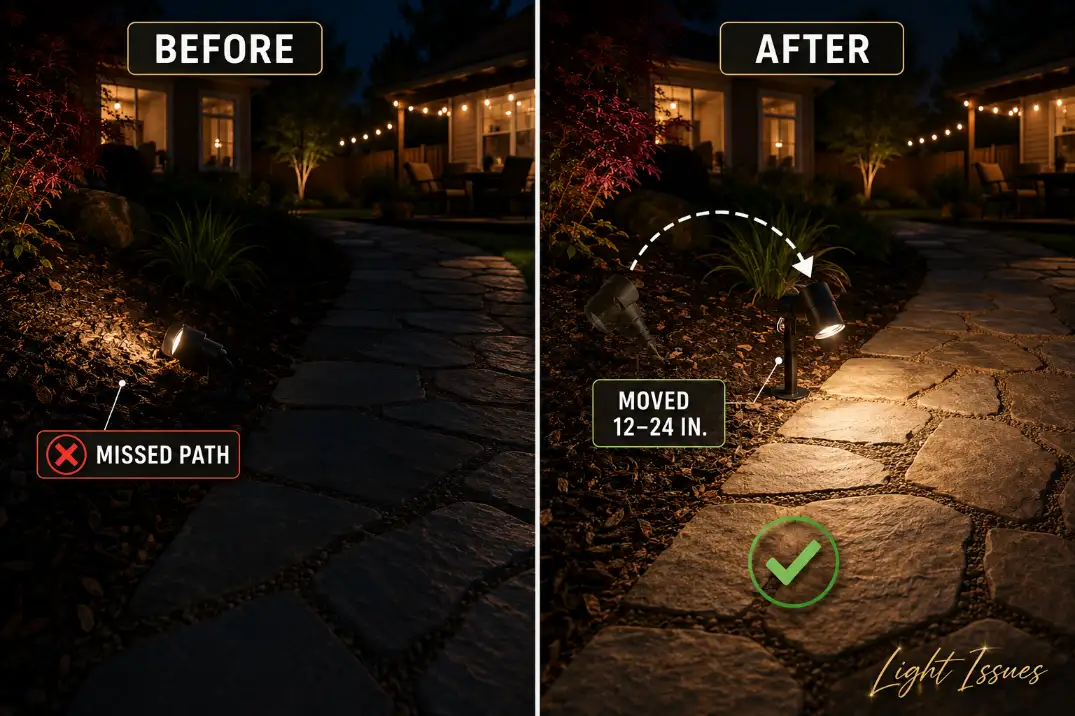
Move fixtures when the target is outside the beam
If the beam cannot reach the target without glare, move the fixture. For low path lights, shifting 12 to 24 inches can determine whether light lands on pavement or planting. For entries, adding a lower shielded fixture may work better than forcing a decorative wall lantern to behave like a task light.
Add shielding when glare is the main failure
A hood, louver, shield, or better fixture shape can turn an annoying light into a useful one. Shielding matters most when the lamp is visible from normal approach angles.
If someone walking from 20 feet away sees the bulb directly, the light is probably competing with the surface it should reveal.
Adjust color temperature after placement is fixed
Color temperature does not fix bad placement. But once aim and shielding are corrected, warmer white light around 2700K to 3000K often feels less harsh around entries, patios, and paths than cooler light. Treat color as a comfort adjustment, not a diagnostic fix.
Questions People Usually Ask
Should path lights be staggered or lined up?
Staggered placement usually looks more natural and reduces repeated glare points. Straight rows can work on wide formal walks, but they often create a runway effect on narrow residential paths.
Can a brighter bulb fix bad outdoor light placement?
Only if the fixture is already aimed correctly and slightly underpowered. If light lands on mulch, walls, windows, or shrubs instead of the target, more brightness usually makes the mistake more obvious.
How far apart should outdoor path lights be?
Start around 6 to 8 feet for many residential path lights. Use tighter spacing around 5 to 6 feet near curves, steps, uneven paving, or narrow beam fixtures.
When should I stop adjusting and replace the fixture?
Replace it when the fixture cannot aim at the target without glare, cannot be shielded, has the wrong beam spread, or sits in a location that will always create spill or shadows. If one night of careful testing creates no usable improvement, the fixture type or location is probably wrong.
For broader official guidance on efficient residential lighting choices, see the U.S. Department of Energy.