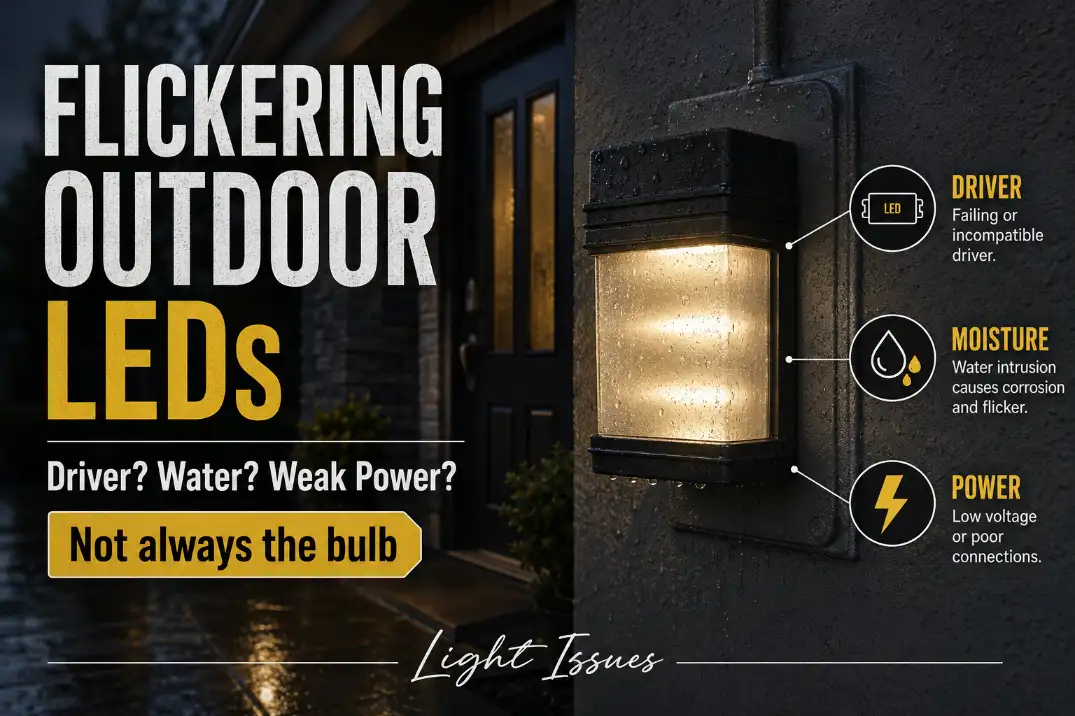
Outdoor LED lights usually flicker because the driver cannot hold stable current, moisture is disturbing the connection, or the fixture is receiving weak or unstable power.
The fastest clue is not the brightness; it is the pattern. One fixture flickering alone points first to its driver or local splice.
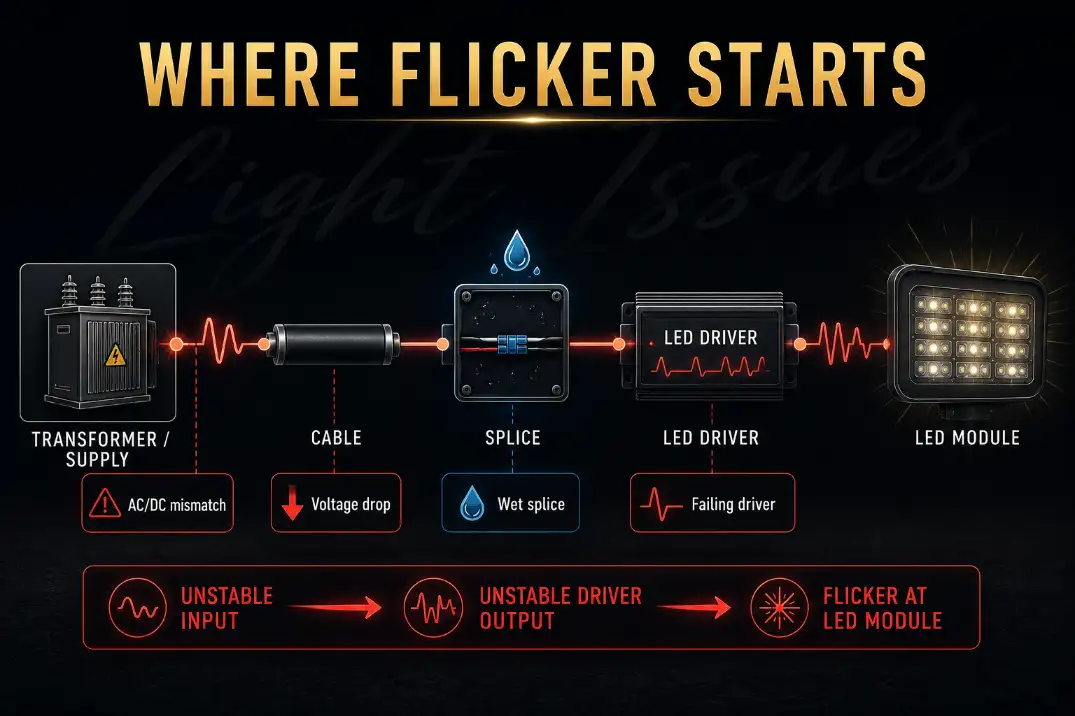
Flicker after rain, sprinklers, or heavy humidity points toward moisture. Farthest fixtures flickering first usually means voltage drop. Every fixture flickering together points upstream to the transformer, dimmer, photocell, timer, switch, or supply.
A healthy low-voltage landscape system often feeds fixtures in the 12–15 volt range, depending on the transformer and fixture rating. If the last light on a run sees 9.5–10 volts under load while the transformer is putting out more than 12 volts, the LED is not “randomly blinking.”
It is being starved. Also separate visible flicker from camera flicker: phone-video banding alone may be a driver or camera interaction, while visible pulsing, dropout, or weather-linked blinking is a repair signal.
Quick Pattern Decoder
| Flicker pattern | Most likely cause | First useful check |
|---|---|---|
| One fixture flickers alone | Driver or local connection | Move or test the fixture on a known-good feed |
| Flicker starts after 10–30 minutes | Heat-stressed driver | Turn off 10–15 minutes, then retest |
| Flicker appears after rain or sprinklers | Moisture intrusion | Inspect lens, gasket, cable entry, and splice |
| Farthest fixtures flicker first | Voltage drop | Measure loaded voltage at the last fixture |
| All fixtures flicker together | Transformer, control, or supply issue | Bypass timer, dimmer, photocell, or smart switch |
| Flicker only appears on phone video | Camera/driver modulation effect | Check whether the flicker is visible to the eye |
Is It Actually Flickering or Only Showing on Camera?
Camera banding is not always a failure
LEDs can pulse faster than the eye easily notices. A phone camera may turn that modulation into dark bands, rolling lines, or a shimmer on video. That does not automatically mean the fixture is failing.
The distinction matters because camera-only flicker can lead to unnecessary replacements. If the light looks steady to your eye, does not drop out, and does not change after rain or warm-up, the issue may be the camera interacting with the LED driver’s modulation pattern.
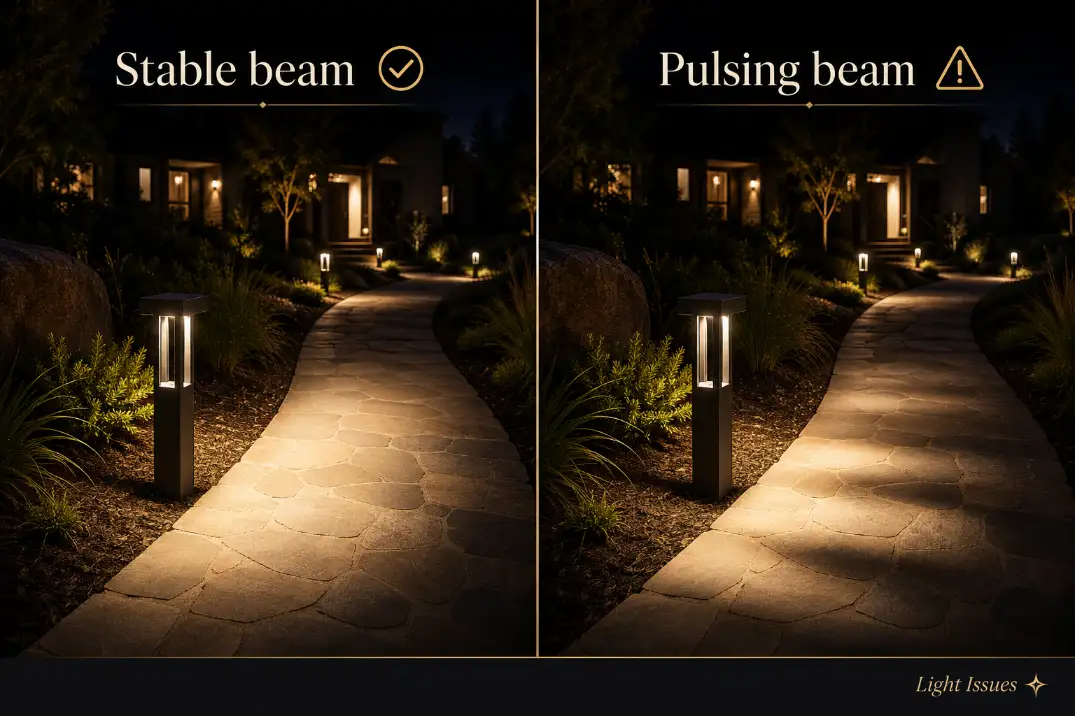
Visible flicker deserves diagnosis
Visible flicker is different. If you can see pulsing, flashing, random dropout, or repeated dim-bright cycling, the driver is losing stable input or output.
That is a symptom, not the mechanism. The mechanism may be driver failure, wet resistance, voltage drop, incompatible controls, or a loose connection that interrupts stable power before the driver can regulate it.
If the fixture had been dimming over months before it started flickering, driver aging becomes more likely. That pattern connects closely with Outdoor LED Driver Failure, especially when the fixture still receives power but cannot hold steady output.
Driver, Moisture, or Power: Which One Comes First?
One fixture alone: suspect the driver or local splice
When one LED fixture flickers while nearby fixtures stay stable, do not start by blaming the whole system. The most likely causes are inside that fixture or right next to it: the LED driver, a local splice, a socket contact, or a short section of damaged wire.
A loose local splice can mimic driver failure because the driver sees unstable input before it fails internally. That is why a flickering fixture should be checked at both levels: the fixture electronics and the immediate connection feeding it.
Driver failure often has a rhythm. The fixture may pulse steadily, get worse as it warms, or recover briefly after being switched off for 10–15 minutes. That short recovery is useful because heat-stressed electronics can behave normally when cool and fail again under load.
The common wasted fix is replacing the LED board or bulb while leaving the failing driver untouched. In many integrated outdoor LEDs, the driver is the part that gives up first. If the fixture is sealed and the driver is not serviceable, replacing the fixture may be more sensible than chasing small parts.
After rain or irrigation: suspect moisture first
Moisture-related flicker is usually less neat. It may appear the same night as rain, the next evening after humidity builds inside the housing, or only after sprinklers hit the fixture for 15–30 minutes. In humid Florida yards, coastal California entries, or Midwest freeze-thaw cycles, water does not need to flood the fixture to cause trouble.
Look for fogged lenses, green or white corrosion, damp wire nuts, swollen gaskets, and splices sitting in mulch. A damp splice can raise resistance enough to make the driver pulse. Once copper turns green or black inside the strands, drying it is not a repair.
This is where people often overestimate exterior caulk and underestimate cable-entry paths. Water may enter through the top screw hole, gasket edge, conduit opening, backplate, or buried splice instead of the visible lens seam.
For a deeper explanation of that failure path, Moisture Damage in Outdoor Lighting Explained is the better supporting guide.
Pro Tip: If flicker follows irrigation, run the sprinkler zone during daylight for 20 minutes and watch the spray pattern. Side spray often hits the cable entry or backplate, not the lens.
Farthest fixtures first: suspect voltage drop
Voltage drop deserves more priority than many homeowners give it. If the lights closest to the transformer stay stable but the farthest fixtures flicker, the system is usually not suffering from “bad LEDs.”
It is losing too much voltage along the cable run, through undersized wire, excessive load, poor splices, or a weak layout.
Measure voltage while the system is on. A no-load reading can look normal because the cable is not carrying real demand. Compare the transformer output with the voltage at the last flickering fixture.
If the far fixture is more than about 15–20% below the transformer output under load, the run design or connection quality matters more than the fixture brand.
Also check whether the fixture, LED strip, or replacement lamp expects 12V DC while the landscape transformer supplies 12V AC. Matching the voltage number alone is not enough if the driver type is wrong.
This is especially common in long landscape lighting runs, where smaller-gauge cable, added fixtures, and aging connectors slowly turn a once-stable system into a pulsing one.
Voltage Drop in Outdoor Lighting Systems is the more relevant diagnosis when flicker starts at the end of the line.
All lights together: look upstream
If every outdoor LED flickers at once, move upstream before replacing fixtures. Shared flicker usually points to the transformer, photocell, timer, smart switch, dimmer, loose supply connection, or overloaded circuit.
Controls are a frequent hidden cause. Older incandescent-style dimmers may be rated for high wattage but still perform poorly with small LED loads.
A fixture that flickers only at lower dimming levels, especially below roughly 20–30%, may be healthy while the dimmer is operating outside its stable range.
Smart switches, photocells, and motion controls can also leak small current or chop power in a way the LED driver dislikes. If the flicker disappears on a plain compatible switch, the control failed the diagnosis, not necessarily the fixture.
The Test Sequence That Avoids Guesswork
1. Map the flicker before touching parts
Write down which lights flicker, when they flicker, and what changed recently. New fixture? New dimmer? Recent storm? Added lights? Fresh mulch? Yard work near buried cable? Those details often matter more than the fixture’s age.
A single fixture that flickers after warm-up is a different problem from five lights pulsing together at dusk. Treating both with the same bulb replacement is how repairs get expensive without getting smarter.
2. Measure loaded voltage
For low-voltage systems, check voltage at the transformer, first fixture, and problem fixture while the lights are on. A drop of 1–2 volts across a long run may be acceptable depending on the fixture rating. A drop of 3 volts or more is a much stronger clue that cable length, wire gauge, fixture load, or connection resistance is causing instability.
For line-voltage fixtures, do not open live boxes unless you are qualified. Flicker paired with buzzing, heat, discoloration, breaker trips, or repeated GFCI trips should be treated as an electrical safety issue.
3. Isolate one fixture
If one fixture flickers, test it in a known-good location if the system design allows. If the flicker follows the fixture, suspect its driver or internal electronics. If the fixture works normally elsewhere, the original location has the problem: splice, cable, socket, junction, moisture, or voltage.
4. Bypass questionable controls
If flicker appears only through a dimmer, photocell, smart switch, timer, or motion control, test with a compatible basic control. Outdoor LEDs need controls rated for LED loads and outdoor conditions. Compatibility is not a cosmetic detail; it changes the waveform the driver receives.
What People Usually Misread
Outdoor-rated does not mean water-proof in every installation
Outdoor-rated fixtures still depend on correct mounting, gasket condition, drainage, cable entry, and exposure direction. Damp-rated and wet-location products are not the same, and even wet-location fixtures can fail when sprinkler spray hits the wrong side or water is trapped behind the mounting plate.
Over-caulking can make this worse. If water is already inside, sealing every visible edge may trap moisture instead of solving the entry path. Some fixtures need drainage or breathing space. Blocking that path can turn occasional condensation into repeated flicker.
Transformer power is not the same as usable power at the fixture
A transformer can be on and still fail to deliver stable voltage at the end of the run. This is one of the most underestimated causes in landscape systems.
The fixture does not care what the transformer reads with no load; it cares what voltage reaches the driver while the full system is running.
If several far fixtures flicker together, reworking the cable layout often beats replacing fixtures. Better fixes include splitting one long run into two shorter runs, reducing load, using heavier-gauge cable, improving splices, or moving the feed point.
A new bulb does not prove the fixture is healthy
A replacement lamp that flickers in the same location tells you very little by itself. If two known-good lamps flicker in the same fixture, the location is the suspect. If one lamp flickers in several locations, the lamp or its internal driver is suspect.
Stop buying lamps after the second repeat failure. At that point, check voltage, moisture, controls, and connections.
When to Stop Testing and Call an Electrician
Flicker is not always dangerous, but some combinations should end the DIY diagnosis.
Stop using the fixture and call a qualified electrician if you notice repeated GFCI trips, breaker trips, buzzing from a switch or fixture, a warm wall plate, burnt smell, scorch marks, melted insulation, or flicker affecting multiple unrelated indoor and outdoor circuits. Those signs move the issue beyond ordinary LED behavior.
This boundary is important because moisture and weak connections can create more than flicker. They can create heat, leakage current, and unsafe fault paths.
Best Fix by Cause
| Confirmed cause | Repair that makes sense | Fix that often wastes time |
|---|---|---|
| Failing driver in one fixture | Replace driver if serviceable, or replace sealed fixture | Replacing only the LED board |
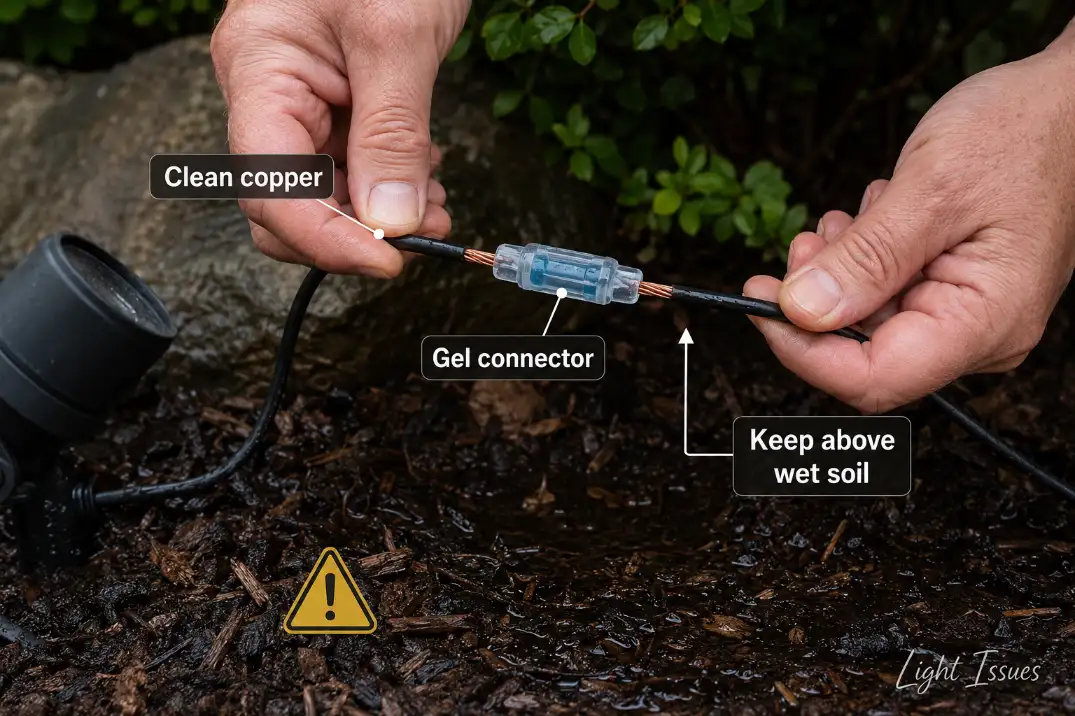
| Wet splice or corroded wire | Cut back to clean copper and use outdoor waterproof connectors | Drying the connector and reusing it |
| Voltage drop at end of run | Rework run layout, reduce load, improve wire size or feed point | Replacing the farthest fixture |
| Incompatible dimmer/control | Use LED-rated compatible outdoor control | Trying several fixture brands |
| AC/DC mismatch | Match fixture input type to transformer or power supply output | Assuming all 12V products use the same power |
| Water entering housing | Correct gasket, orientation, cable entry, and drainage | Caulking every seam blindly |
Pro Tip: A splice should not live in wet mulch if it can be lifted, boxed, or repositioned. Keeping the connection out of the wettest zone often matters as much as the connector itself.
Bottom Line
Outdoor LED flickering is easiest to solve when you stop treating the blink as the cause. The blink is only the visible symptom. The useful diagnosis comes from the pattern.
One fixture flickering alone usually points to its driver, local splice, or immediate connection. Flicker after rain, sprinklers, humidity, or freeze-thaw cycles points toward moisture.
Farthest fixtures flickering first points strongly toward voltage drop or power-type mismatch. Every fixture pulsing together points upstream to a transformer, dimmer, photocell, timer, switch, or supply issue.
The best repair is the one that matches that pattern. Replace a failing sealed fixture when the flicker follows the fixture. Repair wet or corroded splices when weather changes the behavior.
Rework the cable run when loaded voltage collapses at the far end. Replace incompatible controls when flicker appears only through dimmers, smart switches, timers, or photocells.
For broader technical context on LED flicker and temporal light modulation, see the U.S. Department of Energy.