Moisture damage in outdoor lighting usually starts before a fixture completely dies. The first signs are often flickering after rain, a GFCI that trips overnight, a light that works only after drying out, or corrosion around the bulb base, connector, or socket. Before opening any fixture, turn power off at the breaker or transformer. Then check whether the problem follows rain, irrigation, snowmelt, or heavy dew.
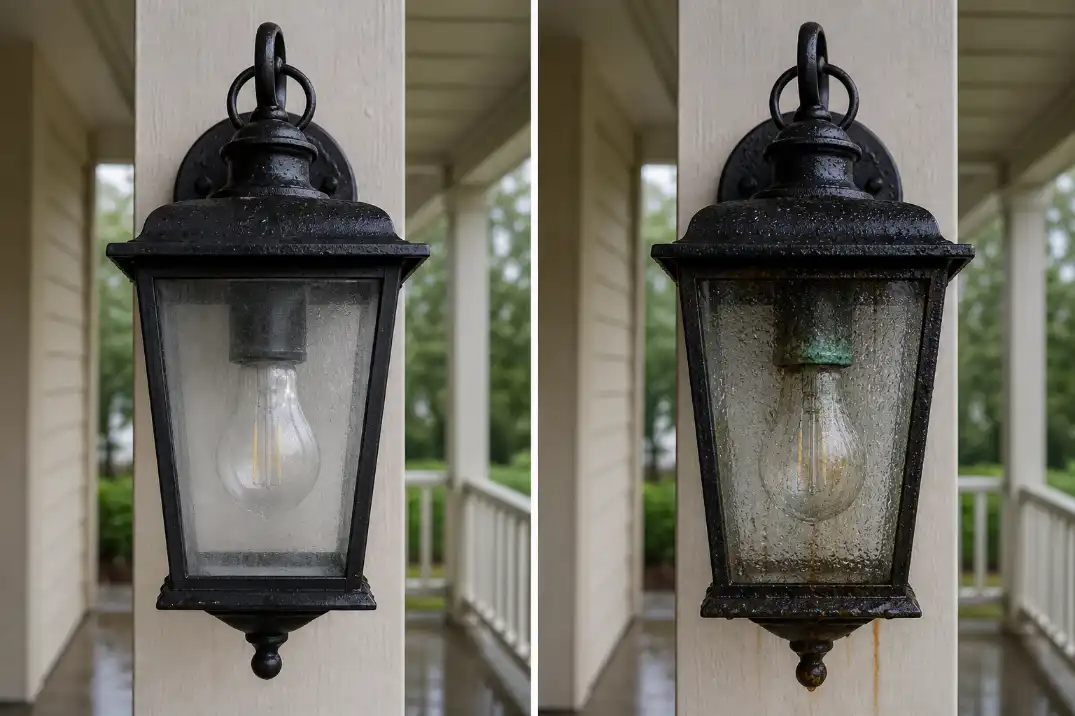
A little fog inside the lens is not automatically damage. If it clears by late morning or within about 12 hours, it may be normal condensation. If droplets remain after a dry day, corrosion appears, or the same fixture fails during the next wet cycle, moisture has probably reached a part that should have stayed dry. Wiping the lens may improve the appearance, but it does not fix the water path.
Check These Four Things First
Use this order before replacing parts:
- Timing: Does the light fail after rain, irrigation, snowmelt, or heavy dew?
- Moisture duration: Does fog clear within 12 hours, or do droplets remain into the next dry day?
- Damage location: Is moisture only on the lens, or is there corrosion at the socket, splice, connector, or cable entry?
- Scope: Is one fixture failing, one zone dimming, or the whole lighting run affected?
Scope changes the diagnosis. One wet wall light usually points to a local seal, socket, or backplate issue. Several dim path lights often point to a wet low-voltage connector or cable run. A circuit that trips after storms is more serious, especially if it happens more than once. That behavior is closely related to the failure pattern explained in Outdoor Lights Tripping GFCI Outlets.
Quick Safety Check Before You Open Anything
Moisture and outdoor wiring need a slower inspection than a simple bulb change. A wet fixture can still be energized, and a tripping GFCI is usually warning you about leakage current, not being “too sensitive.”
Turn off the right power source
For 120-volt wall, porch, post, and column lights, turn off the breaker before removing the lens, bulb, or mounting plate. For low-voltage landscape lighting, unplug or switch off the transformer first. For solar fixtures, switch the unit off and let the battery compartment dry before handling contacts or batteries.
Do not keep resetting a GFCI that trips as soon as the lights come on. If the same circuit trips twice after wet weather, stop testing and treat it as a fault condition.
Do not put a new bulb into a wet socket
A replacement bulb makes sense only when the socket is dry, clean, and firm. If the old bulb base is rusty, stuck, darkened, or greenish, the socket is already part of the problem.
A practical rule: if moisture is still visible after two dry days, or the light fails again within the same wet week, stop treating it as a normal bulb failure.
How Moisture Damage Actually Starts
Outdoor fixtures are built to tolerate weather, but they are not immune to water entering from the wrong direction, sitting in the wrong place, or repeating too often. The damage usually follows a predictable chain: water entry, trapped moisture, corrosion, leakage current, then component failure.
Condensation is different from trapped water
Thin fog on the inside of a lens can happen when warm humid air inside the fixture cools quickly at night. In humid regions such as Florida, the Gulf Coast, or parts of the Midwest after summer storms, brief fogging may appear even in properly installed fixtures.
Droplets that remain into the next dry day are different. So are mineral rings, rust stains, green copper deposits, and water collecting at the bottom of the lens. Those signs mean moisture is staying long enough to attack materials. The deeper condensation distinction is covered more narrowly in Why Is There Condensation Inside My Outdoor Light Fixture?, but for damage diagnosis, persistence matters more than appearance.
Water usually enters at a weak boundary
Most moisture problems begin at top seams, backplates, gasket edges, screw holes, cable openings, cracked lenses, or buried connectors. A gap as small as 1/16 inch can be enough for wind-driven rain to reach the wrong side of a fixture, especially on exposed walls, driveway columns, fence posts, and coastal homes.
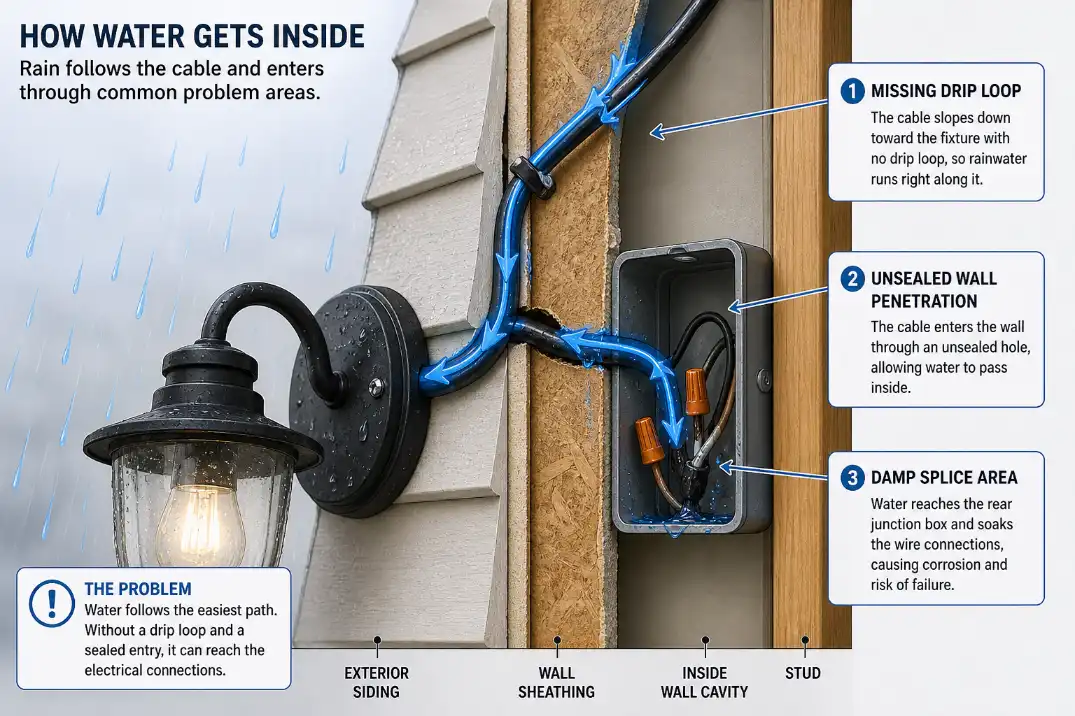
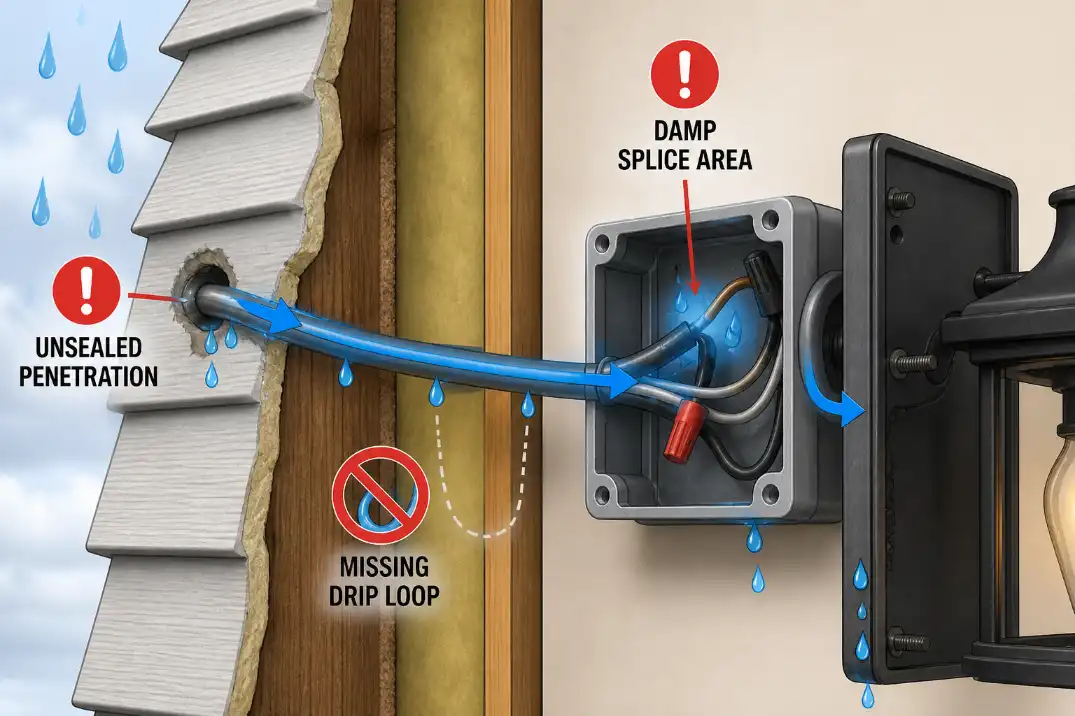
The mistake is assuming the wet lens is the whole issue. Many fixtures take water from behind, where the cable enters the wall box or post. If the cable slopes toward the fixture, water can track along the jacket and enter the junction area without pouring through the front lens. That is why diagnosing Why Water Gets in Outdoor Lights is often more useful than immediately replacing the lamp.
Corrosion means repeated exposure
Fresh water exposure may leave little evidence. Corrosion usually means wet-dry cycles have happened several times. Green deposits on copper, white powder on aluminum, rusted screws, and blackened socket contacts are not cosmetic details. They show that moisture has stayed long enough to change the material.
In coastal areas or near pools, this process moves faster because salty or chemically treated moisture is more conductive and corrosive than ordinary rainwater.
What Fails First in Different Outdoor Lighting Systems
Moisture does not affect every outdoor lighting system in the same way. A wall light, low-voltage path light, and solar fixture can all look “water damaged,” but the first failed part and safest inspection step are different.
| System type | Moisture usually attacks first | Typical symptom | First safe check |
|---|---|---|---|
| 120V wall or porch light | Socket, splice, photocell, junction box | GFCI trip, flicker, dead fixture | Breaker off, inspect moisture and corrosion |
| Low-voltage landscape lights | Connectors, cable cuts, fixture contacts | Several dim lights, intermittent run | Transformer off, inspect splices and cable path |
| Solar outdoor lights | Battery bay, switch, panel seal, LED board | Short runtime, no charging, flicker | Switch off, dry battery area, check contacts |
| Post or column lights | Base seal, cable entry, interior splice | Works after drying, fails after rain | Check top cap, base drainage, rear entry |
| Step and deck lights | Lens seal, screw holes, trapped water | Winter failure, rust marks, dim output | Inspect cracks, gasket compression, freeze gaps |
120-volt fixtures show moisture as fault behavior
With line-voltage lighting, moisture may show up as a tripped GFCI, flickering, delayed failure, or a dead fixture after rain. The fixture may look dry by the time you inspect it, so timing is often more diagnostic than appearance.
A 120-volt junction box with visible water, damaged insulation, heat marks, or repeated GFCI trips is not a cleanup project. That is electrician territory.
Low-voltage systems often fail at connectors first
In 12-volt landscape lighting, the transformer is often blamed too early. A healthier low-voltage run may deliver roughly 11–15 volts depending on load, cable length, and transformer tap. When several fixtures dim together or fail after irrigation, the more likely issue is a wet connector, nicked cable, buried splice, or corrosion-related voltage drop.
Pierce-point connectors, taped wire nuts, and splices sitting in mulch are common weak points. If copper is green or black beyond the exposed end, replacement of that cable section may be more reliable than another quick connector.
Solar lights fail differently
Solar lights usually do not trip a GFCI because they are not tied to household line voltage. Moisture damage shows up as short runtime, no charging, flickering, or a light that works briefly after drying and then fails again.
If a solar light has a wet battery bay, dry it fully before testing. If the spring contacts are rusty, the battery wrapper is swollen, or the light runs less than 1–2 hours after a full sunny day, the failure may be battery and contact related. For charging-specific diagnosis, Why Your Solar Outdoor Lights Aren’t Charging is the better follow-up.
The Fixes That Usually Waste Time
Moisture damage attracts quick fixes because the light may work again after drying. That is why it gets misread. A fixture that recovers temporarily is not necessarily fixed; it may just be between wet cycles.
Replacing bulbs repeatedly
Replacing one failed bulb is reasonable. Replacing the same bulb twice in one wet season is not. If a new bulb flickers, darkens at the base, or fails after the next rain, the bulb is the symptom carrier. The underlying issue is usually socket corrosion, trapped moisture, poor contact pressure, or water entering through the housing.
Sealing the whole fixture with caulk
Caulk can help when it blocks water at the top or sides of a backplate. It can make things worse when it seals the bottom, covers weep holes, or traps moist air inside. Outdoor fixtures need protection from water entry and a path for incidental moisture to escape.
Pro Tip: If a fixture has to be dried more than once in a season, stop adding sealant and find the entry path. Repeated drying means moisture is returning through the same weakness.
Cleaning corrosion without replacing damaged parts
Light surface residue can sometimes be cleaned. Pitted contacts, brittle copper, swollen insulation, and rusted socket parts are different. Sanding a damaged contact may restore shine, but it does not restore spring pressure, plating, or long-term reliability.
Cleaning buys days or weeks if water entry continues. Replacement buys seasons only if the entry path, drainage, and connector quality are corrected too.
Where to Inspect for Real Damage
The best inspection follows the likely water path instead of jumping from part to part. Start where water enters, move to where it collects, then check the electrical part most likely to fail.
Gaskets, lenses, and mounting surfaces
A healthy gasket should sit evenly and spring back when pressed. A failing gasket is flattened, cracked, pinched, or hardened. UV exposure, lamp heat, and freezing winters all shorten gasket life.
Look at the top edge of the fixture, lens corners, screw holes, and backplate. If the fixture is mounted on rough stone, uneven siding, or a warped post, the gasket may not compress evenly. Tightening screws harder rarely solves that and can distort the housing.
Cable entry and backplate
If water stains appear behind the fixture or the rear splice is corroded while the front lens looks clean, suspect cable entry. Useful clues include damp screw holes, staining below the backplate, a cable that slopes toward the fixture, missing drip loop, or an unsealed wall penetration.
This hidden path is especially common on wall lights, post lights, and fixtures added after the original exterior finish was installed. If the rear entry is wrong, sealing only the lens will not change the outcome.
Splices and connectors
Outdoor splices should not sit where water naturally collects. In landscape beds, mulch can stay damp for 24–72 hours after rain or irrigation. If a connector is buried in that damp layer, it is exposed far longer than the fixture above it.
Ordinary indoor wire nuts wrapped in tape are not a permanent outdoor splice. Once water reaches copper, corrosion can move under the insulation. If green crust or white oxidation is visible, the issue is close to the pattern described in Corrosion in Outdoor Light Connections.
Photocells, timers, and sensors
Moisture inside a photocell or control housing can mimic other problems. A light may turn on during the day, shut off at night, flicker after rain, or work only when tested manually.
If multiple lights controlled by one photocell act strangely together, inspect the control before replacing several fixtures. If only one fixture is affected, the problem is more likely local: seal, socket, splice, or cable entry.
Repair or Replace?
The right decision depends on where the moisture reached, how long it stayed, and whether the same failure has already returned.
| Condition found | Reasonable action | When replacement makes more sense |
|---|---|---|
| Light fog clears within 12 hours | Monitor, improve ventilation if needed | If droplets or staining appear |
| Damp lens with clean contacts | Dry, reseat gasket, correct seal | If water returns after next rain |
| Minor gasket wear | Replace gasket or lens seal | If housing is warped or cracked |
| Corroded socket contacts | Replace socket or fixture | If contacts are pitted or loose |
| Green copper at splice | Cut back to clean copper, use outdoor connector | If corrosion runs under insulation |
| Wet 120V junction box | Stop testing and call electrician | Immediately if GFCI trips repeatedly |
Clean and reseal when damage is early
Early moisture issues are fixable when metal contacts are clean and the entry point is obvious. Turn power off, dry the fixture, clean minor residue, replace worn gaskets, and correct the mounting angle. Give the fixture a full dry day before judging the repair; in humid weather, two days is more realistic.
A repair is working only if the fixture stays dry through the next rain or irrigation cycle.
Replace parts when contacts are damaged
Replace the socket, connector, gasket, lens, or entire fixture when the damaged part can no longer do its job. Pitted socket contacts, cracked lenses, brittle gaskets, swollen insulation, and corroded copper are not cosmetic.
A full fixture replacement often makes more sense when the socket and gasket are both damaged, when the housing traps water by design, or when repair parts cost nearly as much as a better wet-rated fixture.
Call an electrician when water reaches line-voltage wiring
If water is inside a 120-volt junction box, the GFCI trips repeatedly, insulation is damaged, or heat marks appear, stop troubleshooting. Moisture faults can be intermittent and still dangerous.
Low-voltage systems are safer to inspect, but widespread dimming, transformer shutdown, or several fixtures failing after the same storm points upstream. Start at the transformer, main cable, and shared splices before replacing the fixture that looks worst.
How to Keep Moisture Damage From Coming Back
The best moisture repair is not the one that makes the fixture turn on today. It is the one that keeps the same weak point from getting wet again next month.
Inspect twice a year
A spring and fall inspection catches most problems before they become failures. In spring, look for winter cracks, shifted fixtures, lifted sealant, and brittle gaskets. In fall, check for water paths before freezing weather makes small gaps worse.
For exposed fixtures, open the lens only after power is off. Look for mineral rings, rust stains, green copper deposits, gasket compression, and loose screws.
Control irrigation and mulch exposure
Sprinklers often create a harsher moisture pattern than rain. A fixture sprayed for 10–20 minutes several times per week may never dry fully, especially in shaded beds. Adjust spray heads so they do not hit lenses, sockets, solar panels, or low-voltage connectors directly.
Keep mulch and soil from burying connectors. If a splice sits below the damp mulch line, it can remain wet for days after watering. Moisture damage from irrigation is common enough that Sprinkler Spray Damages Outdoor Lights deserves attention when failures appear during watering season instead of storm season.
Match the fixture rating to the exposure
A covered porch fixture does not face the same exposure as a driveway column, poolside light, open fence post, or coastal wall. Damp-rated fixtures belong in protected locations where they are not directly hit by rain or snow. Wet-rated fixtures are the better choice for direct weather exposure.
IP ratings can help compare resistance to dust and water, but they do not cancel poor mounting, blocked drainage, or cable-entry mistakes. A stronger-rated fixture can still fail if it is installed upside down, sealed in a way that traps water, or mounted where sprinklers hit it every day.
In coastal, poolside, or high-spray locations, inspect for corrosion every 3–6 months. Stainless hardware, better gaskets, sealed outdoor-rated connectors, and fixtures designed for wet locations matter more in these environments.
Bottom Line
Moisture damage in outdoor lighting is a timed failure pattern, not just water inside a fixture. Brief fog that clears quickly is usually less important than lingering droplets, repeated corrosion, GFCI trips, or a fixture that fails after every wet cycle.
Start with timing, moisture duration, damage location, and scope. Drying and bulb replacement are reasonable only for early, isolated symptoms. Once corrosion, damaged contacts, wet splices, or repeated failures appear, the fix needs to address the entry path and the compromised part.
For broader official guidance on home electrical safety, see the U.S. Consumer Product Safety Commission.