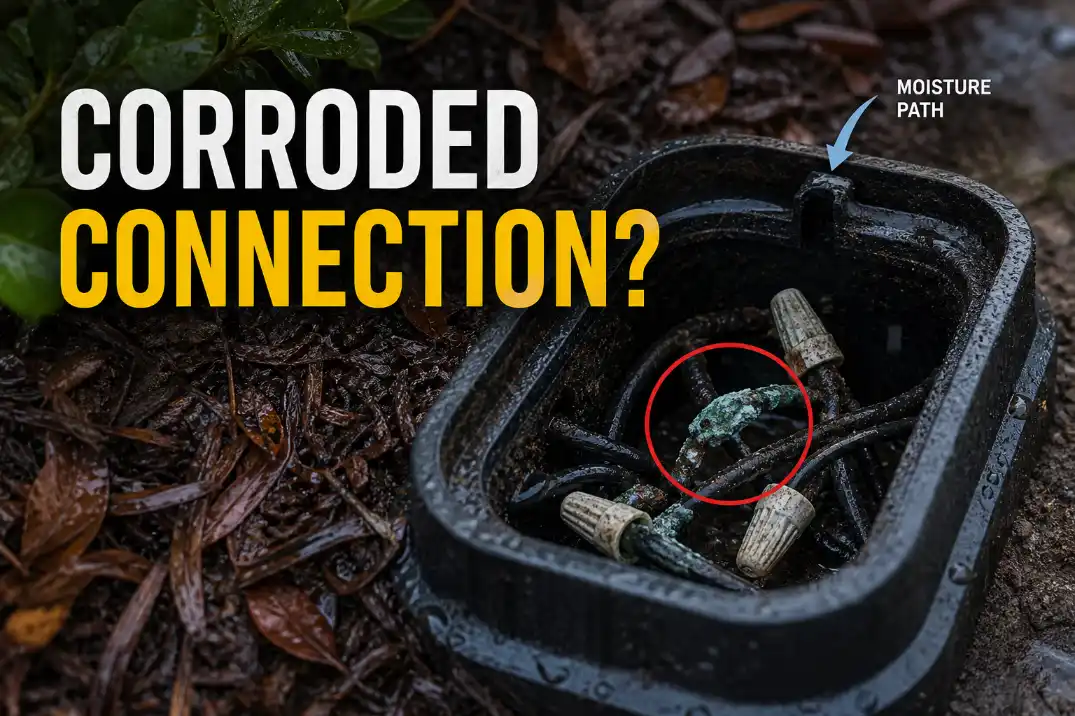
Corrosion in outdoor light connections usually means moisture has reached a place where metal needs to stay clean, tight, and conductive. The first places to check are the wire splice, fixture terminals, socket contacts, and any buried or low-mounted connection that stays damp for more than 24–48 hours after rain or irrigation.
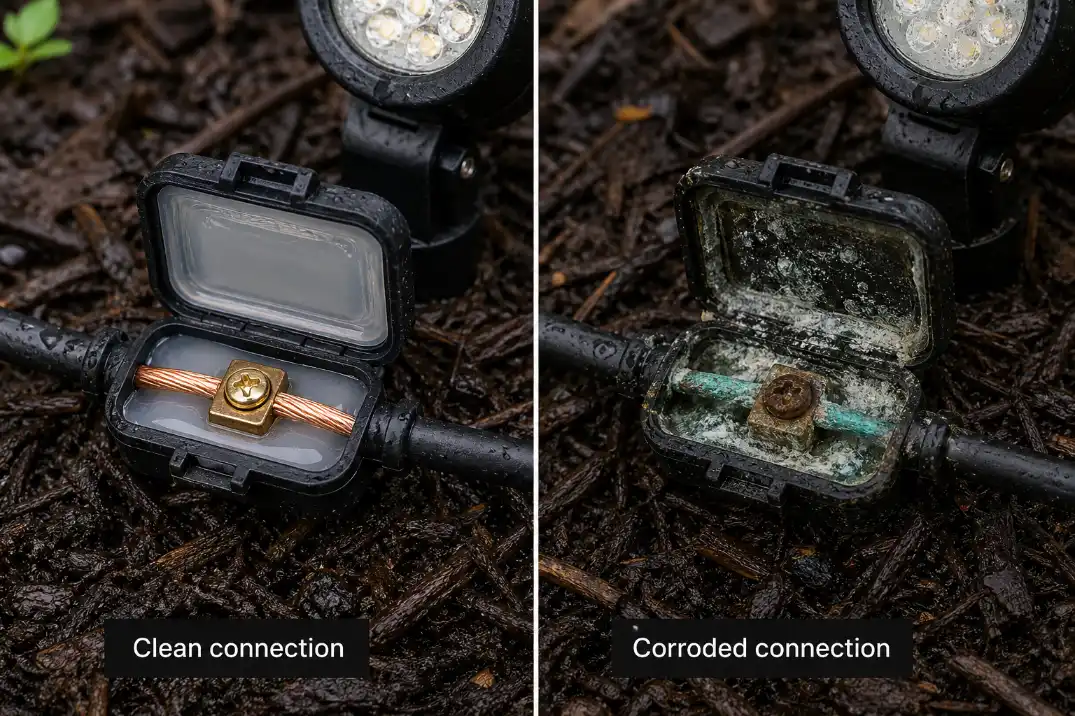
A healthy outdoor connection should show clean copper or intact plated metal, firm contact pressure, and no dampness inside the connector or box. A failing one may show green copper oxidation, white crust, rusted screws, blackened plastic, or a light that flickers when the wire is touched.
This is not the same as a simple burned-out bulb. A bulb usually fails once. A corroded connection often fails in stages: dimming first, flickering next, then repeat outages, voltage drop, or GFCI trips after wet weather. Replacing the bulb may make the light work for a night, but it does not fix the electrical path.
Quick Diagnostic Checklist
Use this before replacing fixtures or blaming the transformer:
- One light flickers when the fixture, cable, or connector is moved.
- Several downstream lights dim or fail after the same splice point.
- The problem gets worse after rain, sprinklers, snowmelt, or humid nights.
- Copper looks green, terminals look rusty, or connectors show white powder.
- Voltage is lower at the fixture than at the transformer or previous splice.
- A GFCI trips only when the outdoor circuit is wet.
- The same light fails again within days or weeks after a bulb change.
A single bad fixture may point to the socket or terminal inside that fixture. Several lights failing along one run usually points upstream.
If the behavior is inconsistent instead of fully dead, compare the pattern with Outdoor Lights Working Intermittently because corrosion often appears as an on-and-off failure before it becomes obvious.
First, Know Which Type of Connection You Have
Corrosion matters in every outdoor lighting system, but the repair boundary changes depending on whether you are dealing with low-voltage landscape lighting or a 120-volt hardwired fixture.
Low-voltage landscape lighting
Most landscape lighting systems use a transformer and operate around 12 volts, sometimes with higher transformer taps such as 13, 14, or 15 volts to compensate for long runs. These systems commonly fail at buried splices, path light leads, quick-pierce connectors, and cable junctions near soil or mulch.
The common mistake is assuming any “outdoor” connector can sit directly in wet ground. A connection under 1–2 inches of mulch may stay damp long after the yard surface looks dry. For long-term reliability, low-voltage splices should be remade with connectors rated for wet or direct-burial use, then placed where they are not sitting in a wet pocket.
120-volt outdoor fixtures
Wall lights, garage entry lights, post lights, and many hardwired exterior fixtures are different. If corrosion appears inside a 120-volt box, socket, metal fixture body, or ground connection, the issue is no longer just nuisance flickering. Moisture plus damaged conductors can create shock, heat, arcing, or a ground-fault path.
If a line-voltage outdoor light trips a GFCI after rain, shows blackened wiring, has a wet electrical box, or has damaged insulation, stop treating it like a bulb problem. That is where a licensed electrician makes more sense than repeated DIY cleaning.
What Corrosion Actually Does
It creates resistance before it creates total failure
Corrosion is not just surface dirt. It forms a poor conducting layer between metal parts that need clean contact. As resistance increases at a splice, socket, screw terminal, or fixture lead, the light may dim, flicker, heat up, or lose enough voltage to stop working.
In low-voltage lighting, even a 1–2 volt drop between the transformer and a far fixture can be visible, especially on longer runs. In 120-volt fixtures, the bigger concern is not just brightness; it is damaged contact surfaces, wet boxes, compromised grounding, or leakage that trips protective devices.
The symptom is corrosion; the mechanism is moisture
The residue is what you see. The real mechanism is repeated wet-dry cycling at an exposed or poorly sealed electrical joint. Rain, irrigation spray, condensation, snowmelt, pool splash, and coastal air can all keep the connection wet long enough for oxidation to build.
That is why a fixture that works on dry afternoons but fails after storms should push moisture higher on the list than bulb replacement. For that exact pattern, Why Your Outdoor Light Works Fine Until It Rains is closely related because the trigger is usually water reaching a vulnerable electrical path.
What the Corrosion Tells You
Not all residue means the same thing. The color and location help decide whether cleaning is enough or replacement is smarter.
| Visible sign | What it usually means | Better repair decision |
|---|---|---|
| Green or blue-green copper | Moisture reached exposed copper | Cut back to bright copper and remake the splice |
| White crust inside connector | Water and minerals entered the connector | Replace connector; improve sealing or location |
| Orange-brown rust | Steel screw, socket, or hardware corrosion | Replace the damaged terminal, screw, socket, or fixture part |
| Blackened plastic or melted cap | Heat from high resistance | Stop using the circuit and inspect more broadly |
| Brittle or cracked insulation | Aging, UV, moisture, or movement damage | Replace that section, not just the connector |
| Corrosion under the wire jacket | Moisture traveled along the conductor | Cut farther back or replace cable section |
A practical threshold: if copper is dark, powdery, or green more than about 1/2 inch under the insulation, do not just scrape the exposed end. Cut back until the conductor is bright, solid, and flexible.
Where Outdoor Light Connections Corrode First
Buried splices and low junction points
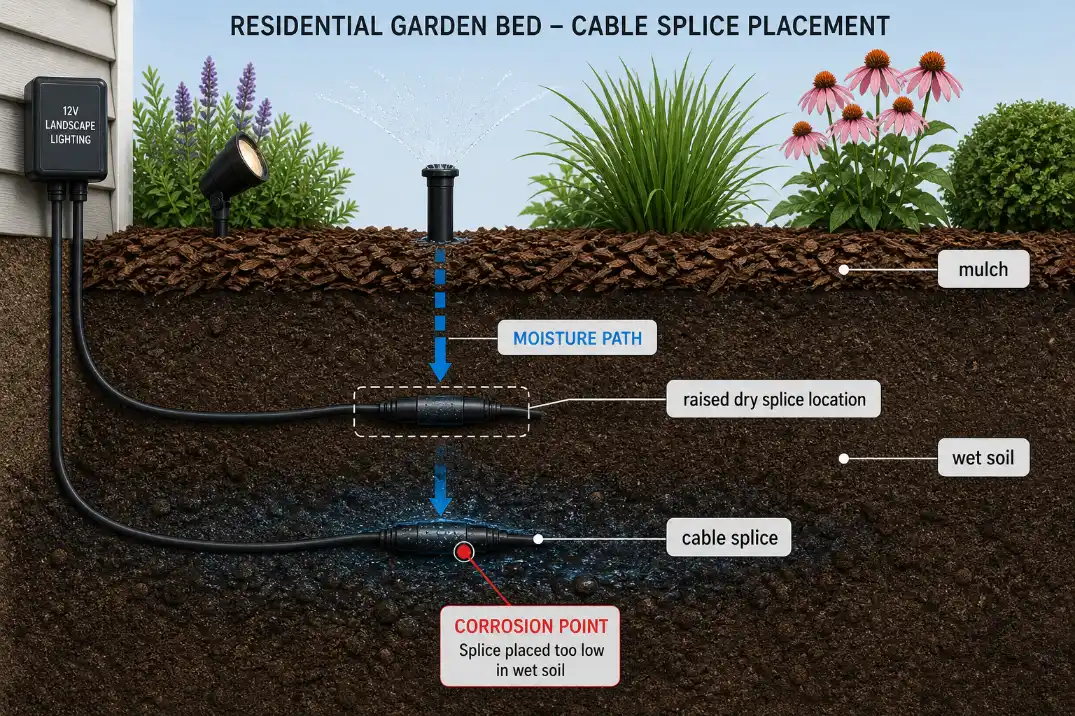
The highest-risk connection is the one closest to wet soil. Splices under mulch, gravel, lawn edges, or irrigation spray often fail before the fixture itself. Soil can hold moisture for days, and mulch can keep a connection damp even when the top layer looks dry.
This is where many repairs fail. A new connector placed back into the same wet pocket may work briefly, then corrode again after the next wet cycle. “Outdoor-rated” does not automatically mean “fine to bury loosely in soil.”
Fixture bases and socket contacts
Path lights, post lights, step lights, and wall fixtures often corrode at the base or socket because the fixture body traps moisture. A hardened gasket, poorly sealed cable entry, clogged weep path, or cracked housing can keep terminals damp.
People often overestimate the bulb and underestimate the socket. A new lamp may work for a short time because it scrapes against the contact, but if the socket spring, center contact, or screw shell is pitted or rusty, the failure usually returns.
Loose splices and quick connectors
Movement makes corrosion worse. A splice that flexes when the cable is touched can admit moisture through tiny gaps. Quick-pierce connectors, indoor wire nuts, and old taped splices are especially weak in landscape lighting because they face soil movement, freeze-thaw cycles, and mower or yard-tool vibration.
If a connection is both loose and corroded, the looseness is not a separate minor issue. It is part of the failure. The repair logic overlaps with Loose Outdoor Wiring Connections, because a connection that moves will rarely stay dry and stable for long.
What People Usually Misread First
Replacing bulbs becomes a loop
A corroded connection can make a bulb look weak, dead, or unreliable. But if the same fixture fails repeatedly within a week or two, the bulb is probably not the root cause. The connection is delivering unstable power.
Dry weather does not mean the problem is gone
A wet connection may start working again after 6–24 dry hours. That recovery is a clue, not a fix. Once corrosion forms on the contact surfaces, the connection is already degraded.
Silicone over a wet connector is not a repair
Smearing sealant over a damp or dirty connection often traps moisture inside. The better repair is to disconnect power, remove the damaged connector, cut back to clean copper, remake the splice correctly, and place it where water does not sit around it.
Dielectric grease is prevention, not restoration
Dielectric grease can help protect clean, sound connections from moisture when used appropriately, especially on low-voltage outdoor connectors designed for that use. It does not reverse oxidation, tighten a loose splice, or make a burned connector safe. If the connector is already wet, loose, green, or heat-damaged, grease only hides the problem.
Pro Tip: Use dielectric grease only after the metal is clean, the connection is mechanically tight, and the connector type is appropriate for outdoor use.
How to Inspect the Connection Safely
Start with the failure pattern before opening anything. Did the light fail after rain, after irrigation, only at night, or only after several minutes? Does one fixture fail, or do several lights past the same point go dim? If the first failed fixture is immediately after a buried splice or cable junction, inspect that shared connection before replacing individual lights.
For low-voltage systems, turn off or unplug the transformer. For line-voltage fixtures, turn off the breaker and verify the circuit is not energized before opening the fixture or box. Do not open wet 120-volt fixtures while standing on damp ground.
Check the first bad fixture, the splice before it, the fixture base, the socket, and any junction box near wet soil. Look for corrosion on conductive parts, not just dirt on the outside. If the failure follows irrigation, the issue may be less about rain and more about repeated spray; that pattern connects closely with Outdoor Lighting Loses Power When Irrigation Starts.
How to Fix Corroded Outdoor Light Connections
Clean only minor surface corrosion
Cleaning can make sense when the corrosion is light, the metal underneath is firm, and the connector or terminal still holds tightly. A small brass brush or electrical contact cleaner may help on accessible terminals.
But cleaning is not enough if the connector is wet inside, the copper is green under the insulation, the socket has lost tension, or the plastic is discolored from heat.
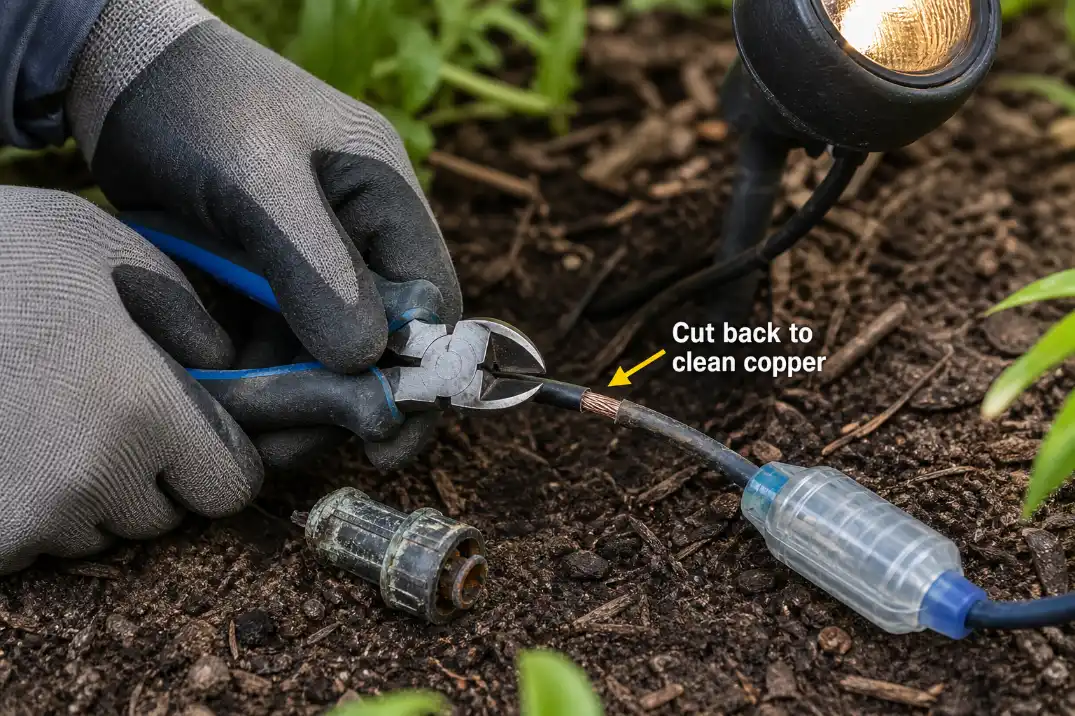
Cut back to clean copper
For low-voltage splices, the most reliable repair is often to remove the old connector, cut the wire back to bright copper, and remake the splice with a connector rated for wet or direct-burial use. The new connection should be tight before it is sealed.
If you cut back 1 inch and the copper still looks dark or powdery, cut farther. If corrosion has traveled deep into the cable, replace that cable section instead of chasing the problem inch by inch.
Replace damaged sockets, terminals, and connectors
Rusted socket shells, pitted contacts, melted wire caps, brittle fixture leads, and cracked insulation should be replaced, not polished. Once a contact surface loses spring pressure or has been overheated, it may fail again even if it looks cleaner.
For hardwired 120-volt fixtures, use weather-rated boxes, approved connectors, proper grounding, intact gaskets, and correct strain relief. Tape and caulk are not substitutes for a code-appropriate connection.
Relocate the splice out of the wet zone
The best repair changes the environment around the connection. Raise low-voltage splices above saturated soil where possible, keep them out of sprinkler spray, and avoid burying them loose under mulch. Even moving a splice 3–6 inches higher or into an accessible dry enclosure can change how long it stays wet after irrigation.
If water is entering through a fixture opening, cable hole, or enclosure gap, fixing the splice alone may not last. In that case, Why Water Gets In Through Cable Entry Points explains why the same connection can corrode again even after new parts are installed.
When the Standard Fix Stops Working
A connector replacement stops making sense when the same failure keeps returning. If the repaired connection fails again after one rainy week, one irrigation cycle, or a few damp nights, the connector was probably only where the problem appeared.
Look broader when two or more nearby connections show corrosion, voltage is still low after the splice is remade, a GFCI trips again after wet weather, or the cable jacket is cracked, brittle, or stained. Corrosion visible under the insulation is another sign that the problem has moved beyond a simple connector swap.
At that stage, test the system as a run: transformer output, voltage at the first fixture, voltage at the first failed fixture, and voltage at the farthest fixture. If the lights are older and several symptoms are appearing together, Why Outdoor Lights Stop Working Over Time gives the broader aging pattern that often overlaps with corrosion.
Conditions That Make Corrosion Happen Faster
Salt air, chlorinated pool splash, freeze-thaw cycles, and daily irrigation all shorten the life of outdoor connections. Coastal areas, poolside fixtures, and wet garden beds are especially hard on exposed metal. In northern states, water inside a connector can freeze, expand, and loosen the splice; in irrigated yards, 10–20 minutes of daily spray can keep a low splice wetter than a heavy rain that drains away.
The important point is not that every outdoor fixture needs special treatment. It is that connections in repeatedly wet locations need better placement, better connector selection, and easier access for inspection.
Questions People Usually Ask
Can I just scrape corrosion off the wire?
Only if the corrosion is light and the metal underneath is still bright and solid. If the wire remains dark, green, powdery, or brittle after cutting back a short distance, replace more of the conductor or cable section.
Can I use regular wire nuts for outdoor light connections?
Regular indoor wire nuts are a poor choice in wet landscape areas. For low-voltage outdoor lighting, use connectors rated for wet or direct-burial use, and keep the splice accessible rather than buried loose in mulch or soil.
Why does the light work after I move the wire?
Movement can temporarily restore contact between corroded metal surfaces. That does not mean the wire is fixed. It means the connection is loose, oxidized, or both.
Bottom Line
Corrosion in outdoor light connections is not just cosmetic aging. It is evidence that moisture has reached a conductive joint and started weakening the electrical path. The repair that lasts is the one that fixes both parts of the problem: the damaged connection and the wet condition that caused it.
For low-voltage systems, that usually means cutting back to clean copper, using the right waterproof connector, and moving the splice out of wet soil or mulch. For 120-volt outdoor fixtures, corrosion inside boxes, sockets, or grounding points deserves more caution, especially when GFCI trips, blackened wiring, or wet enclosures are involved.
For broader guidance on outdoor electrical safety around wet locations, see the Electrical Safety Foundation International.