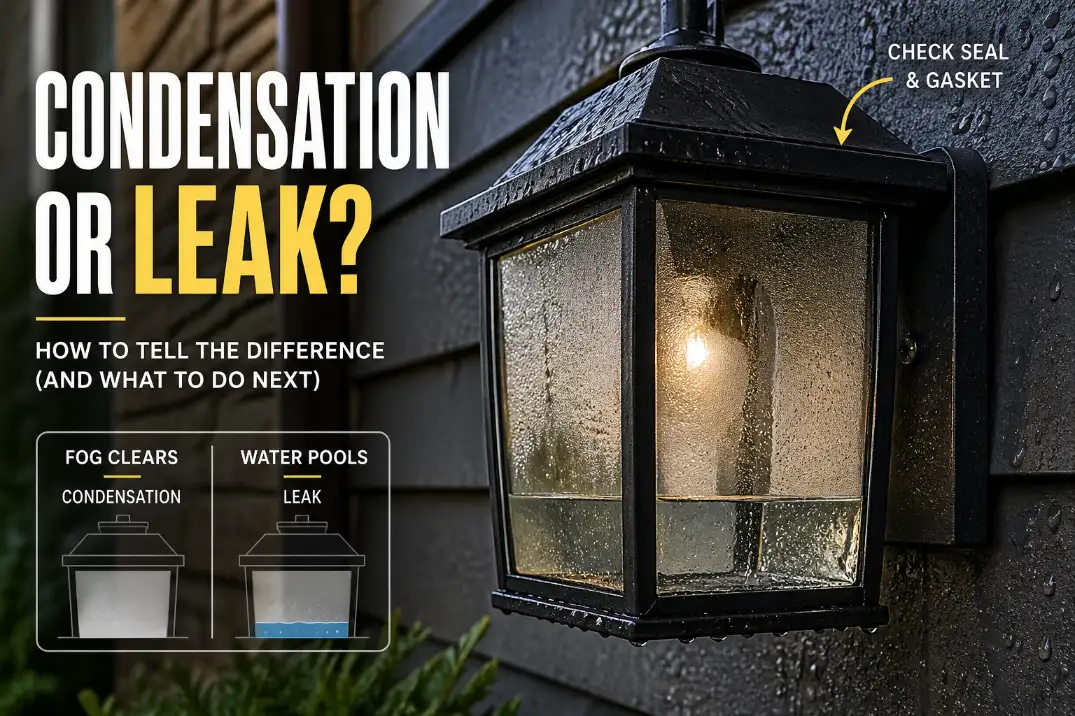
Water inside an outdoor light fixture is normal only when it looks like thin fogging or tiny droplets that clear within about 24–48 hours of dry weather. Standing water, a visible water line at the bottom of the lens, rust stains, flickering, repeated fogging after every rain, or a GFCI trip points to a leak or electrical moisture problem.
The first useful distinction is simple: condensation forms from humid air trapped inside the fixture; a leak means bulk water is entering through a failed gasket, cracked lens, backplate gap, cable opening, or blocked drain path.
If moisture is still visible after 72 hours of dry weather, stop treating it as harmless humidity. At that point, the fixture is either holding water, taking water in, or failing to dry the way an outdoor-rated fixture should.
Quick Diagnosis: Normal Moisture or a Real Leak?
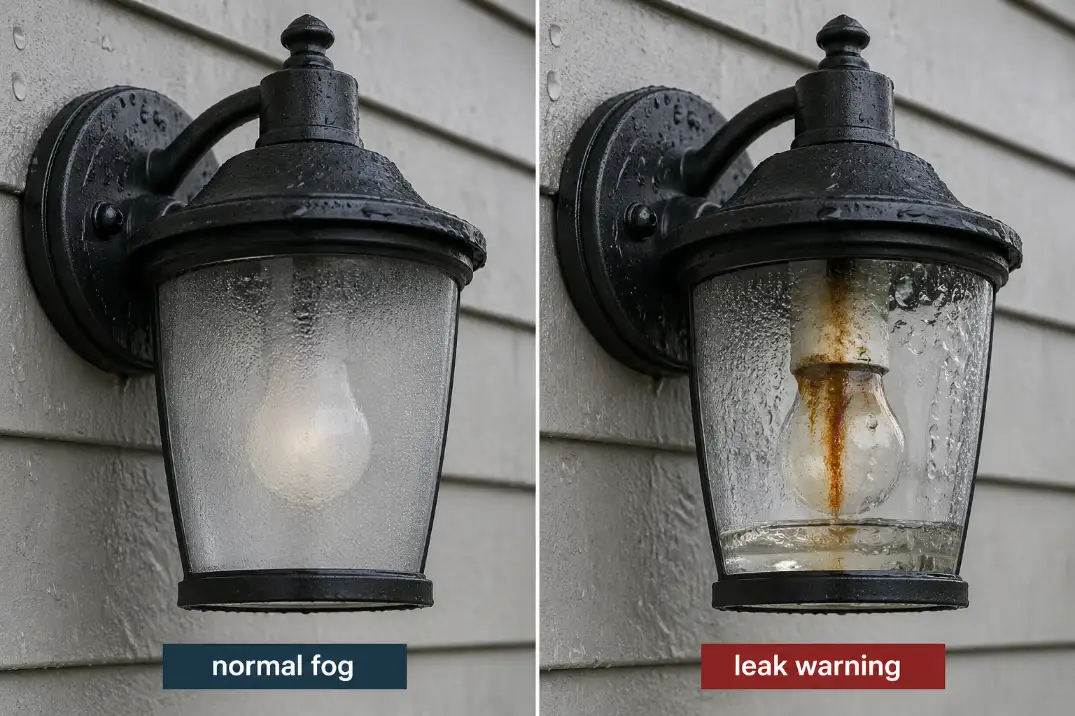
Normal condensation is light, temporary, and evenly spread
A little interior fog can happen when warm, humid air gets trapped inside the fixture and cools overnight. That is common in humid climates such as Florida, the Gulf Coast, and coastal areas where outdoor humidity can sit above 70% for long periods.
Normal condensation usually appears as a thin haze or small droplets across the glass. It does not create a puddle, stain the socket, trip protection, or cause the light to flicker. If the fixture clears after 1–2 dry days and stays clear until the next major humidity swing, the issue is usually cosmetic rather than structural.
A leak leaves directional evidence
A leak rarely looks evenly spread. It usually leaves a clue: a drip trail under the top cap, a mineral streak near a screw, rust below the socket, or a small pool at the lowest point of the lens. That pattern matters more than the amount of fog on the glass.
This is where many homeowners misread the problem. The visible symptom is water inside the lens, but the real mechanism may be a failed seal, a wall gap behind the fixture, or a blocked escape path. For the broader failure pattern behind rainwater entry, see Why Water Gets in Outdoor Lights.
Weatherproof does not mean condensation-proof
An outdoor-rated fixture can resist rain and still show condensation. The housing may be designed to shed water from the outside, but the air already inside the fixture can still release moisture when the temperature drops 20–30°F overnight.
That does not mean every wet fixture is acceptable. Weather resistance explains temporary fogging; it does not explain standing water, rust, electrical symptoms, or moisture that returns after every storm. Once water pools or reaches wiring, the issue is no longer a harmless rating question.
The Checks That Actually Change the Answer
Look at the bottom of the fixture first
The most useful evidence is often at the lowest point. A few droplets on the glass are less important than 1/8 inch of standing water, brown staining, or green-white corrosion near metal parts.
A healthy fixture may show temporary moisture, but it should not store liquid water for several days. If water remains after 72 hours of dry weather, the fixture is not just “sweating.” It is either leaking, poorly vented, or unable to drain.
Watch the timing of the failure
Timing can separate a minor moisture issue from a serious one. If the light flickers or trips a GFCI during rain, moisture may be reaching the socket, splice, driver, or wiring path quickly. If it works during the storm but fails the next evening, water may be sitting inside the housing and creating delayed corrosion or leakage current.
A fixture that only fogs is a lower priority than one that fails after wet weather. If the broader pattern is “works fine until rain, then acts up,” Why Outdoor Lights Fail After Rain is the more direct diagnostic path.
Check behind the fixture, not only inside the glass
A clear lens does not prove the installation is dry. Water can enter behind the backplate, follow the cable opening, and wet the splice or wall box without leaving much evidence on the glass.
This hidden path is common on uneven siding, brick, stucco, or old exterior boxes. The homeowner sees moisture inside the fixture and assumes the lens seal failed, but the entry point may be behind the fixture body.
Pro Tip: Shut power off at the breaker before removing an outdoor fixture cover. Moisture around a socket, LED driver, or splice is not a “wipe and test” situation.
Decision Table: What the Moisture Pattern Usually Means
| What you see | Most likely cause | What it means | Best next move |
|---|---|---|---|
| Thin fog clears in 24–48 hours | Condensation from trapped humid air | Usually minor | Monitor and improve drying |
| Water puddles after rain | Failed seal, cracked lens, or seam leak | Active water entry | Inspect gasket, lens, and top cap |
| Wet wall or damp backplate | Mounting surface leak | Water may enter from behind | Reseal top and sides, leave lower escape path |
| GFCI trips after rain | Moisture reaching electrical path | Safety issue | Leave off and inspect fixture/wiring |
| Rust or green-white residue | Repeated wet-dry cycles | Electrical parts are degrading | Replace damaged parts or fixture |
| Moisture after irrigation runs | Sprinkler spray hitting seams | Directional water pressure | Redirect spray before resealing |
Why the Obvious Fix Often Fails
Wiping the glass does not fix the entry point
Drying the lens makes the fixture look better for a day, but it does not change the leak path. If water keeps entering through a gasket, backplate gap, or cable opening, the same moisture will return after the next storm.
This is especially true when the light keeps working for a while. A fixture can look “fine” electrically while corrosion is starting inside the socket or connector.
More caulk can make the problem worse
Sealing every seam feels logical, but outdoor fixtures often need a lower drain or weep path. If the bottom edge is sealed shut, moisture that would normally escape may stay trapped inside for days.
The better approach is targeted sealing: protect the top and sides where water runs down, but avoid blocking the lowest escape route unless the manufacturer’s design clearly requires it.
Replacing bulbs is usually a distraction
If the socket is rusted, the LED board is stained, or the fixture trips a GFCI after rain, the bulb is rarely the real issue. A new bulb may work briefly, then fail again because the electrical path is still wet or corroded.
If moisture appears to be coming from the wiring entry rather than the lens, Why Water Gets in Through Cable Entry Points explains why the visible fixture is not always the original source.

How to Fix the Problem Without Guessing
Step 1: Turn power off and dry the fixture fully
Turn off power at the breaker before opening the fixture. Remove the lens or cover, pour out any standing water, and let the fixture dry. In warm dry weather, this may take about 24 hours. In shade, humidity, or cool weather, expect 48–72 hours.
Do not keep testing the light while moisture is still present. Repeated cycling can accelerate damage around sockets, LED drivers, and low-voltage connections.
Step 2: Inspect the gasket, lens, and top seam
Look for a cracked lens, flattened gasket, missing screw, warped cover, or separated top cap. A tiny crack near the top of the lens matters more than a large water mark near the bottom because the crack explains the entry path.
On older fixtures, rubber and foam seals often lose compression after years of sun, heat, and freeze-thaw cycles. Tightening screws may help a loose cover, but it will not restore a gasket that has hardened or flattened.
Step 3: Clear the drain path
If the fixture has a weep hole or bottom opening, make sure it is open. Paint, dirt, insect debris, mineral deposits, or old caulk can block the exit.
Fixture orientation matters too. A light installed upside down, tilted backward, or pressed unevenly against siding may hold water even when its drain exists. In that case, resealing the same installation does not solve the geometry problem.
Step 4: Seal the wall interface correctly
Use exterior-rated sealant around the top and sides of the backplate where it meets the wall. Avoid sealing the entire bottom edge unless the fixture design specifically calls for it.
On rough brick, stone, stucco, or uneven siding, a mounting block or gasketed base may be more important than more sealant. The goal is not to bury the fixture in caulk; it is to stop water from running behind it while still allowing incidental moisture to escape.
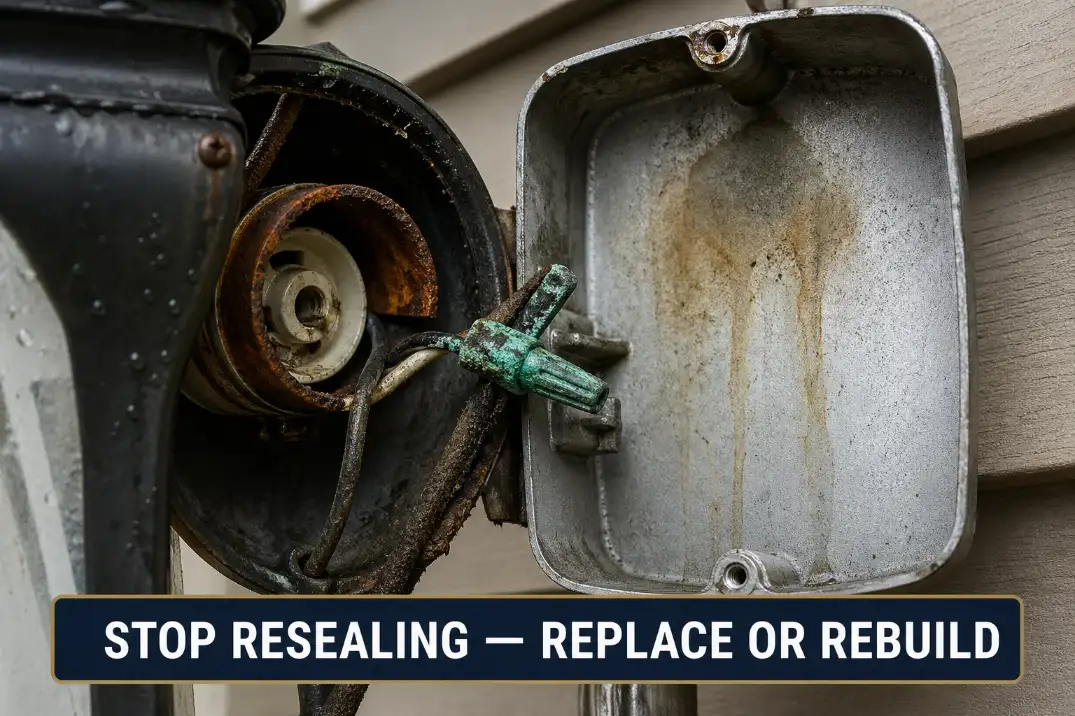
When Resealing Stops Making Sense
Replace the fixture when corrosion reaches electrical parts
Drying and resealing make sense when the fixture is wet but still clean inside. They stop making sense when the socket is rusted, the LED driver is stained, wire insulation is brittle, or connectors show green-white corrosion.
At that point, the issue is no longer just water inside the glass. It is moisture damage to electrical parts. If you are seeing intermittent operation, flickering, or failure after the fixture warms up for a few minutes, corroded connections may already be part of the problem. For that pattern, Corroded Wire Splices Outdoors is more useful than another surface reseal.
Treat GFCI trips as a stop signal
A GFCI trip after rain means current may be leaking outside the intended electrical path. That can happen at the fixture, splice, outlet box, cable entry, or another wet point on the outdoor circuit.
Do not keep resetting the GFCI to “see if it holds.” If the same light trips protection after storms, leave it off until the moisture path is found. For circuit-level troubleshooting, Outdoor Lights Tripping GFCI Outlets covers the safer sequence.
Conditions That Change the Diagnosis
Humid climates make fogging more common
In humid regions, light fogging alone is less alarming. A fixture may fog after a cool night even when rain has not entered directly. The deciding factor is whether it clears and whether it leaves stains, pooling, or electrical symptoms.
Freezing winters make trapped water more damaging
In northern states, trapped water can freeze and expand. A small amount of standing water can widen a lens crack, deform a gasket, or push apart a seam after repeated freeze-thaw cycles.
If a fixture survived summer rain but started leaking after winter, the cause may be expansion damage rather than a new installation mistake.
Sprinklers are harder on fixtures than ordinary rain
Rain usually falls from above. Sprinklers can hit seams from the side or below for 10–20 minutes at a time, several days per week. That directional spray can force water into openings that would resist normal rainfall.
If the problem started after irrigation changes, redirect the spray before replacing the fixture. A perfectly decent outdoor light can fail early when it is treated like a small pressure-washed target.
Common Questions
Is water inside an outdoor light dangerous?
Standing water, rust, flickering, buzzing, burning smell, or GFCI tripping should be treated as unsafe until inspected. Light fogging that clears quickly is usually less urgent, but liquid water near electrical parts is different.
Should outdoor fixtures be airtight?
Usually no. Many outdoor fixtures need controlled drainage or ventilation. Making the housing airtight can trap moisture and make condensation last longer.
Can I drill a drain hole?
Only if the fixture design allows it and drilling will not expose wiring, damage the fixture listing, or create a new entry point. Clearing an existing weep path or correcting the mounting angle is usually safer.
Is this the same problem in solar lights?
The idea is similar, but the weak points are different. Solar lights usually fail around the battery compartment, sensor window, LED board, or small internal wiring. Because the housings are smaller, trapped moisture can disable them faster.
Bottom Line
A little fog inside an outdoor light fixture can be normal. Water that pools, stains, returns after every rain, remains after 72 hours, causes flickering, or trips a GFCI is not normal condensation.
Do not start with more caulk. Start by finding the water path: lens seal, top seam, backplate gap, cable entry, blocked drain, sprinkler spray, or fixture damage. Drying and resealing are reasonable only while the electrical parts are still clean. Once corrosion reaches the socket, driver, or wiring, replacement or rebuilding the connection is the safer repair.
For broader electrical safety guidance, see OSHA’s GFCI overview.