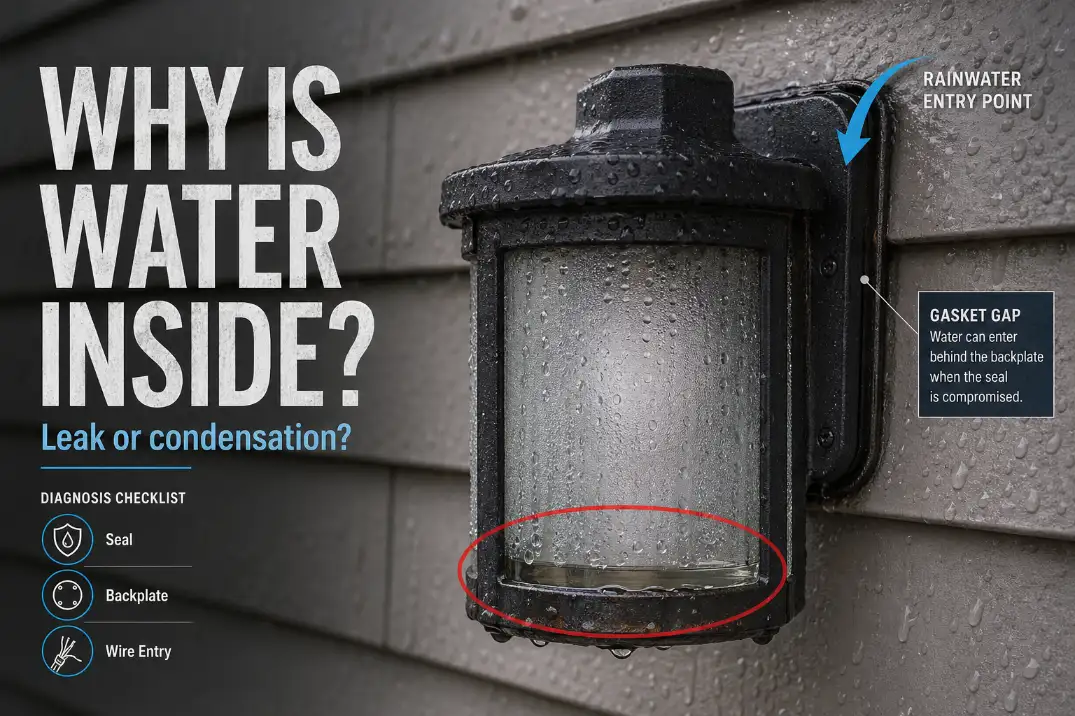
The water you see inside an outdoor light is rarely the whole problem. It may be harmless condensation, but it can also be the visible clue of a failed gasket, a leaking backplate, a blocked drain, or moisture following the wiring path into the fixture.
Start with the first useful distinction: does the moisture clear, or does it stay? A light haze that disappears within 30–90 minutes, or at least by the end of a dry day, is usually less concerning. Droplets that remain after 24 hours, water pooling at the bottom, rust stains, green corrosion, flickering after rain, or a GFCI that trips repeatedly point to water intrusion.
If water has reached the socket, wire splice, junction box, LED driver, or battery compartment, turn the light off before troubleshooting further. Visible moisture is the symptom. The real failure is the path that lets water reach a place it should not stay.
The Four Ways Water Gets Into Outdoor Lights
Outdoor lights are not all sealed the same way. Some are designed to breathe. Some have small drain paths. Some rely heavily on gasket pressure. Problems begin when water enters faster than it can escape, or when it reaches electrical parts that should stay dry.
1. Moisture forms inside as condensation
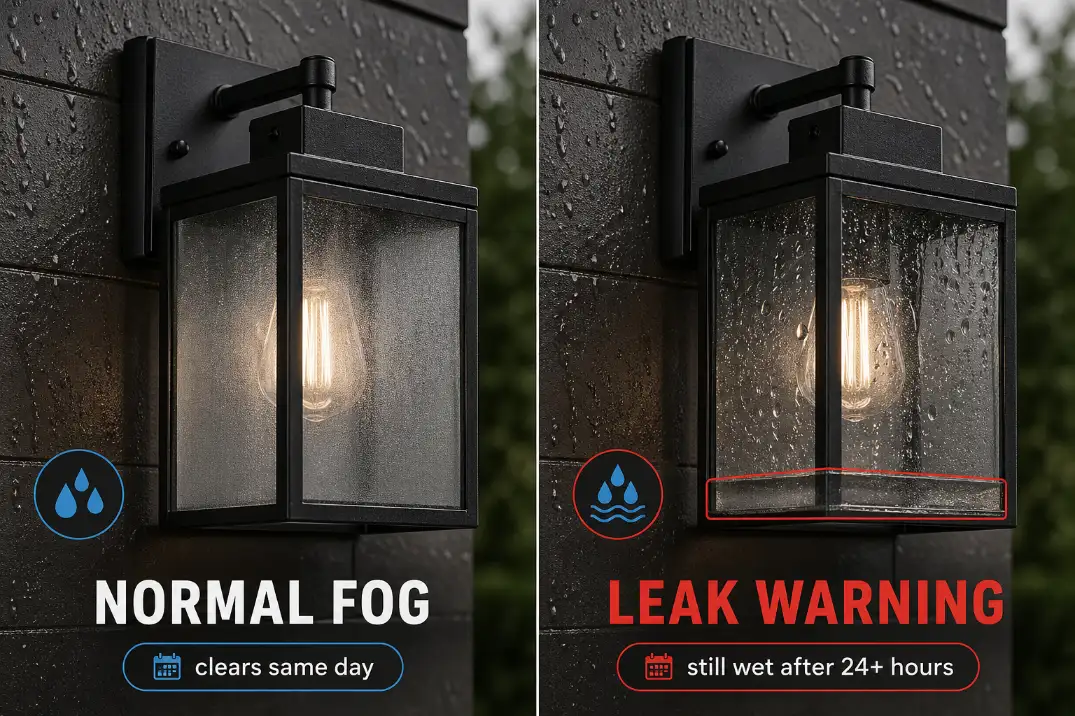
Condensation happens when humid air is trapped inside the fixture and the lens cools faster than the surrounding air. This is common after warm days, cool nights, heavy humidity, rain followed by sun, or sudden temperature swings.
In humid areas such as Florida or the Gulf Coast, a little morning fog inside a fixture can appear even when the fixture is not actively leaking. The key is behavior. Fine haze that clears the same day is different from droplets that collect, run down the glass, and sit at the bottom of the housing.
This is where many homeowners overreact at first and underreact later. A little fog is not automatically failure. But moisture that keeps returning and never fully clears may mean the fixture is trapping humidity, not draining, or leaking from a weak point. For a closer look at the first visible symptom, Water Inside Outdoor Light Fixtures explains when moisture is only a lens issue and when it points deeper into the fixture.
2. Water leaks through the fixture body
The most visible leak path is the fixture itself: lens gasket, access cover, screw holes, battery door, solar panel seam, photocell opening, or cracked housing. A gap smaller than 1/16 inch can be enough for wind-driven rain to enter.
Rubber and foam gaskets flatten over time. Plastic lenses can warp after repeated heat and UV exposure. In hot climates where fixtures regularly sit above 90°F, cheaper gasket material may harden and lose compression faster. In cold regions, water that freezes below 32°F can expand inside tiny cracks and make the leak worse over winter.
A failed gasket does not always look dramatic. Sometimes the only clue is one corner of the lens that no longer presses evenly against the housing.
3. Water enters from behind the mounting surface
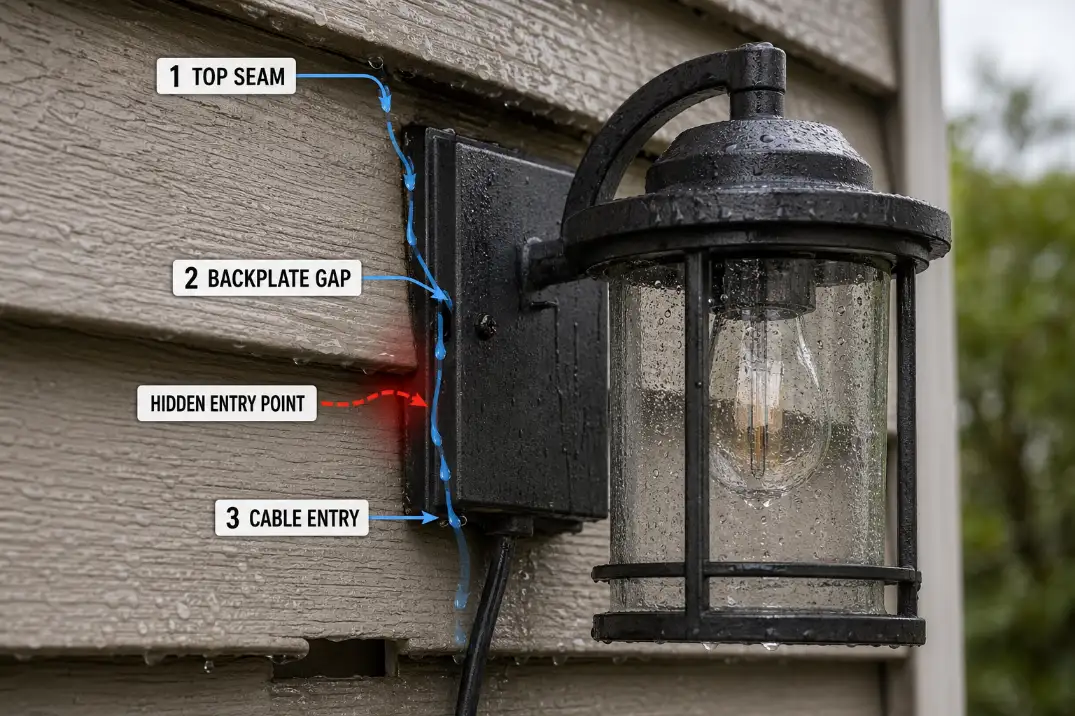
Wall lights often leak from the back, not the front. Rain runs down siding, brick, stucco, trim, or a mounting block, then slips behind the fixture backplate. From there it can reach the junction box, wire opening, or inside edge of the fixture.
This is why a fixture can look sealed from the front and still get wet after storms. The water is not pushing through the glass. It is traveling behind the light.
Uneven siding grooves, rough masonry, old caulk, loose screws, and warped mounting blocks can all create hidden water channels. The visible droplets usually show where water ended up, not where it entered.
4. Water follows the wiring path
Water can also follow cable jackets, low-voltage wires, conduit openings, or hollow posts. This is especially common with post lights, landscape lights, step lights, mailbox lights, and fixtures installed near wet soil.
A missing drip loop is a classic example. If the wire slopes toward the fixture, rainwater can run along the cable directly into the housing. The fixture may look dry on the outside while the entry point stays wet.
That hidden path is often more important than the visible lens, which is why Why Water Gets in Through Cable Entry Points belongs near the center of this topic, not as a small side issue.
Condensation or Water Intrusion?
This is the decision that changes everything. Condensation may only need monitoring, cleaning, or better drying. Water intrusion needs the leak path fixed.
| Sign | Usually Condensation | Usually Water Intrusion |
|---|---|---|
| Appearance | Fine haze or light mist | Large droplets, streaks, or pooling |
| Drying time | Clears in 30–90 minutes or the same day | Still visible after 24–48 hours |
| Location | Even film on the inside of the lens | Bottom of fixture, seam, socket area |
| Risk level | Low if temporary | Medium to high if electrical parts are wet |
| First action | Monitor and keep vents clear | Inspect seal, backplate, cable entry, and drain |
A practical rule: if the fixture dries completely during a normal dry day, do not overcorrect it. If water remains through two dry periods, the fixture is either leaking, trapping moisture, or installed where it cannot dry properly.
If the problem is only light fogging, the more specific guide on condensation inside an outdoor light fixture is a better next step than replacing the whole fixture.
Where to Inspect First
Do not start with the bulb. Start with the water path. Replacing a bulb may restore light for a few days, but it does not stop water from coming back.
Check the highest wet point
Water usually travels downward. Look above the moisture first: top seam, upper backplate edge, siding joint, porch trim, post cap, cable entry, or solar panel seam.
If the bottom of the fixture is wet, the entry point may still be at the top. The lower pool only tells you where water collected.
Check gasket pressure
Open the lens or cover and look for flattened, cracked, loose, dirty, or shifted gasket material. A good gasket should make even contact around the cover. If one side looks compressed and another side barely touches, water will find the weak corner.
Clean the sealing surface before judging the gasket. Dirt, paint flakes, dead insects, or a few grains of sand can prevent a tight seal.
Pro Tip: If the gasket does not leave a slight compression mark when the cover is closed, it is probably not sealing well enough for direct weather exposure.
Check the backplate and wall surface
For wall fixtures, inspect the top and sides of the mounting plate. Old caulk often separates in a thin line that is easy to miss. Brick and stucco can also leave small channels behind the fixture.
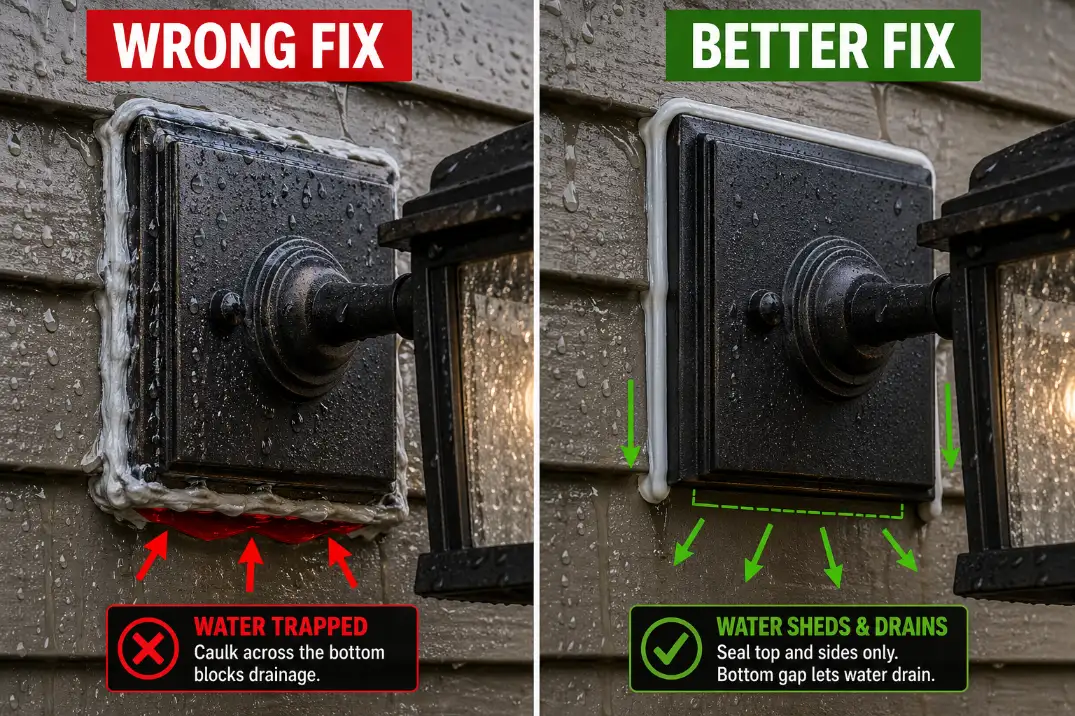
The goal is not to bury the entire fixture in sealant. The goal is to stop water from entering from above while still allowing moisture to escape at the bottom where the fixture design allows drainage.
Check weep holes and drain paths
Many fixtures have small weep holes or lower openings. These are not defects. They allow trapped moisture to drain.
Paint, caulk, dirt, mineral deposits, mulch splash, and insect debris can block these openings. Once drainage is blocked, minor condensation can turn into standing water. If water sits inside for days, corrosion becomes much more likely.
Check electrical contact points
Look for rust, white powder, green corrosion, darkened terminals, brittle insulation, or a socket that looks stained. These are stronger warning signs than fogged glass.
If the light flickers, dims, or trips after rain, the issue may already have moved beyond the lens. The more direct rain-failure pattern is covered in Why Outdoor Lights Fail After Rain, but the core point is the same: repeated wet-weather failure means water is reaching something that affects power.
Risk Level by Symptom
Some moisture is annoying. Some moisture is a warning. Some moisture means the light should stay off until the problem is corrected.
| Symptom | Risk Level | What It Usually Means | Next Move |
|---|---|---|---|
| Light haze clears same day | Low | Temporary condensation | Monitor and keep vents clear |
| Droplets after 24 hours | Medium | Active leak or trapped moisture | Inspect gasket, seam, and backplate |
| Water pooling inside | High | Drainage or seal failure | Turn off, open, dry, repair path |
| GFCI trips after rain | High | Moisture reaching electrical path | Stop resetting repeatedly |
| Rust or green corrosion | Medium-high | Long-term moisture exposure | Clean, repair, or replace parts |
| Burning smell or dark socket | Urgent | Heat or electrical damage | Power off and replace or call a pro |
The most underestimated warning sign is corrosion. A fixture can still turn on while the contacts are already deteriorating. That does not mean the problem is harmless. It means the failure is not finished yet.
Why the Obvious Fix Often Fails
A lot of outdoor light repairs fail because they address the part that is easiest to see, not the part that lets water in.
Replacing the bulb does not stop the leak
A wet socket can kill a bulb, but the bulb did not invite the water in. If the new bulb works for a week and fails after the next storm, the repair only reset the symptom.
Replace the bulb after the fixture is dry, the socket is clean, and the leak path has been corrected. Otherwise, the same moisture will keep damaging the new part.
Caulking everything can make the problem worse
Caulk is useful when it blocks water from entering at the top or sides of a wall-mounted fixture. It becomes a problem when it seals the bottom edge and traps water inside.
The most common sealing mistake is closing the escape route while leaving the entry route untouched. A fully sealed bottom can turn the fixture into a cup. Any water that enters from behind, above, or through the wiring path has nowhere to go.
A better fixture will not fix a bad water path
Buying a wet-location fixture helps only if the installation also sheds water correctly. If the mounting surface funnels rain behind the backplate, the new fixture may fail the same way.
This is one of the most common overestimates: assuming the product rating solves the whole problem. The underrated factor is installation geometry. Water needs to be directed away from vulnerable seams, cable entries, and electrical boxes.
Wet-Rated, Damp-Rated, and “Outdoor Rated” Are Not the Same
A fixture can be sold for outdoor use and still be wrong for a specific outdoor location. This matters because many water problems begin before installation, with the wrong fixture chosen for the exposure.
Damp-rated fixtures are for protected moisture
Damp-rated fixtures can handle humidity and indirect moisture, but they are not meant for direct rain, sprinkler spray, snowmelt, or water flowing against electrical parts.
A covered porch, protected entry, or roofed patio may be appropriate. An exposed wall, open pergola, uncovered deck, post light, or landscape fixture usually needs stronger weather protection.
Wet-rated fixtures are for direct water exposure
Wet-rated fixtures are designed for places where rain or splashing may reach the fixture. That does not mean they are immune to poor installation, blocked drainage, cracked housings, or repeated side spray from irrigation.
A wet-rated fixture installed with a bad backplate seal can still take on water. The rating matters, but it is not a substitute for correct mounting.
IP ratings help, but they do not explain everything
Some fixtures also list an IP rating. This describes resistance to dust and water intrusion under defined test conditions. It can be useful, especially for landscape, step, and architectural lighting, but it still does not guarantee survival in every real yard.
Sprinklers, pressure washing, coastal salt, freeze-thaw cycles, mulch contact, and buried wire connections can create conditions the fixture label alone does not solve.
What Changes by Fixture Type
Water intrusion looks different depending on the fixture. A good diagnosis should not treat a wall lantern, solar path light, and mailbox post light as the same problem.
Wall lights
Wall lights usually fail at the backplate, top seam, lens gasket, or junction box. The wall surface matters as much as the fixture. Lap siding, uneven brick, and stucco can all leave hidden paths behind the light.
If stains appear below the backplate, do not focus only on the lens. The water may be entering from behind and draining forward.
Post and mailbox lights
Post lights often take water from the cap, hollow post, mounting base, or cable rising through the post. Mailbox lights are especially vulnerable because the post cavity can hold moisture even when the fixture looks dry.
If the light keeps getting wet after the lens seal is repaired, inspect the post cavity and wire path. The issue may be below the fixture rather than in the glass. That is why Water Intrusion in Outdoor Lights Installed on Mailbox Posts often requires a different diagnosis than a standard wall fixture.
Step lights
Step lights are exposed to splash, runoff, wall cavity moisture, and pressure from nearby foot traffic. Their faceplates may look tight while water enters from the box, faceplate seam, or wall opening.
Because step lights sit low and often near masonry, water can stay around them longer than expected. If the surrounding material stays damp for more than 24 hours after rain, the fixture has less chance to dry between wet cycles. For that lower, splash-prone setup, Water in Outdoor Step Lights is the more focused branch of this topic.
Landscape lights
Landscape lighting has two common moisture problems: fixture exposure and connection exposure. The fixture may be wet from rain or sprinklers, while the splice or connector may be sitting in damp soil or mulch.
A low-voltage landscape light can look like it has a bad lamp when the real failure is a wet connector several feet away. Sprinklers make this worse because they spray from the side or below, where many fixtures are less protected. If irrigation is part of the pattern, Sprinkler Spray Damages Outdoor Lights becomes a more likely explanation than ordinary rainfall.
Solar lights
Solar lights usually fail fastest when water reaches the battery compartment, switch, panel seam, or small circuit board. A solar light may still work for a night or two after getting wet, then fade as the battery contacts corrode.
Do not assume every solar light that dims after storms has a charging problem. If the battery door is loose, the panel seam is cracked, or the switch feels gritty, moisture may be the real trigger.
Environmental Conditions That Make Water Intrusion Worse
The same fixture can last for years in one yard and fail quickly in another. Exposure is not equal.
Sprinklers are harsher than normal rain
Rain usually falls from above. Sprinklers often hit fixtures from the side, below, or at close range. A spray head 3–6 feet away can push water into seams several times per week.
That repeated wetting matters. A fixture that can dry after one rainstorm may not recover when irrigation hits it every morning.
Shade slows the drying cycle
North-facing walls, dense shrubs, deep porch corners, mulch beds, and covered side yards can keep lights damp long after the weather clears. If a fixture stays wet for 24–48 hours after rain, corrosion risk rises because contacts never get a clean drying window.
This is why two identical lights on the same house can age differently. The shaded one may fail first even though it receives less direct rain.
Heat and UV age seals
In hot, dry climates, the issue is not always too much rain. Heat and UV exposure can harden gaskets, warp plastic lenses, and weaken cheap battery doors. A fixture in Arizona sun may leak during rare storms because the seal aged before the rain arrived.
Freezing expands small leaks
In northern states, trapped water can freeze, expand, and widen small cracks. A fixture that only fogged in fall may have a distorted lens, lifted gasket, or cracked plastic housing by spring.
Snowmelt is also persistent. Unlike a brief rain shower, melting snow can keep the fixture area damp for days.
Coastal air accelerates corrosion
Coastal moisture and salt air do not just add water. They speed corrosion. Screws, terminals, sockets, and low-grade metal housings deteriorate faster near the ocean, especially where wind-driven mist reaches the fixture.
In coastal California or similar environments, material quality and sealed connections matter more than they do in a dry inland yard. If salt air is part of the exposure, Coastal Outdoor Lights: Salt Air and Water Intrusion is the better place to separate ordinary leaks from corrosion-driven failure.
How to Stop Water Getting Into Outdoor Lights
The best repair sequence is simple: make it safe, dry it out, find the water path, correct the path, then decide whether the fixture is still worth using.
1. Turn off power first
For hardwired fixtures, turn off the breaker before opening the light. For plug-in or low-voltage fixtures, disconnect the power source. For solar lights, switch the unit off and remove the battery if accessible.
Do not keep resetting a GFCI that trips after rain. Repeated tripping means the system may be detecting moisture-related leakage current.
2. Dry the fixture before judging the damage
Open the cover and let the fixture dry. In warm dry weather, a small fixture may dry in 6–12 hours. A shaded, enclosed, or waterlogged fixture may need 24–48 hours.
If water returns after the next rain, the problem is not leftover moisture. It is an active entry path.
3. Restore the gasket or cover seal
Clean the gasket channel and sealing surface. Replace cracked, flattened, missing, or loose gasket material when possible. Tighten covers evenly, but do not overtighten plastic parts. Overtightening can warp the lens and create a new leak path.
If replacement gasket parts are unavailable, weather-resistant gasket material may help on some fixtures, but it should not block ventilation, drainage, or heat release.
4. Correct the backplate seal
For wall fixtures, remove the fixture if needed and inspect the mounting surface. Seal the upper and side water paths with exterior-rated sealant where appropriate. Avoid sealing the bottom drainage path unless the manufacturer specifically requires it.
The cleanest repair sheds water away from the fixture instead of trapping water inside it.
5. Fix cable entries and wet splices
Cable openings should have proper grommets, bushings, fittings, or outdoor-rated connectors. Where wire approaches a fixture, a drip loop can prevent water from following the cable into the housing.
For low-voltage systems, rebuild wet or corroded splices instead of wrapping them again and burying them in mulch. If you see green copper corrosion, white residue, or softened insulation, the connection has already been compromised. This is where Corroded Wire Splices Outdoors become part of the water problem, not a separate electrical issue.
6. Clear the drain path
Clean weep holes with a soft brush, toothpick, or low-pressure air. Do not drill random holes into the fixture. Drilling can expose electrical parts, change the fixture’s rating, or make the leak worse.
If water needs a new hole to escape, the better question is why the fixture is collecting that much water in the first place.
When Repair Stops Making Sense
Repair is reasonable when the housing is solid, the gasket can be restored, the socket is clean, and the water path is clear. Replacement makes more sense when the fixture itself can no longer protect its electrical parts.
Replace the fixture if you find cracked plastic, a warped lens, a rusted socket, burned terminals, a swollen LED driver, brittle wiring, or water inside a sealed electronics compartment. Integrated LED fixtures are especially hard to save once water reaches the driver or board.
A useful cutoff is two failed wet-weather repairs. If you have cleaned, dried, resealed, and corrected the obvious path twice and water still returns, stop treating it as routine maintenance. Either the fixture design is wrong for that exposure, the installation is directing water into it, or the junction box and wiring path need deeper correction.
The broader damage pattern is not always visible in the lens. If moisture has already spread into contacts, housings, or repeated failure points, Moisture Damage in Outdoor Lighting Explained helps connect the visible water to the longer-term deterioration.
What to Buy or Install Differently Next Time
The replacement fixture should match the exposure, not just the style of the house.
Choose wet-location-rated fixtures for uncovered walls, open patios, post lights, pergolas, exposed decks, landscape areas, and anywhere sprinklers or rain can hit directly. Use damp-rated fixtures only where the fixture is protected from direct water.
Look for replaceable gaskets, corrosion-resistant screws, accessible drain paths, solid lens fit, and a housing that does not flex when handled. For solar lights, inspect the battery door, switch cover, and panel seam before buying a full set. If those parts feel loose indoors, they will not improve after months of sun, rain, and soil splash.
The best outdoor light repair is not dramatic. Temporary fog can be monitored. Droplets after 24 hours need a leak path inspection. Electrical symptoms after rain mean the light should stay off until the water path is corrected.
Questions People Usually Ask
Is water inside an outdoor light always dangerous?
No. Temporary fogging can be normal. Standing water, droplets after 24–48 hours, corrosion, GFCI trips, burning smells, or wet electrical parts are the signs that change the risk level.
Can I leave the cover off to dry the light?
Only with the power off, and only as a temporary drying step. Leaving a fixture open long-term invites insects, dirt, and more moisture.
Should outdoor lights be completely airtight?
Not always. Some fixtures need controlled ventilation or drainage. A fixture that is sealed badly can trap humid air and fog repeatedly. The goal is controlled water management, not sealing every opening.
Why does the light work again after it dries?
Drying can temporarily restore contact and insulation. It does not fix the leak path. If the same light fails after the next rain, water is still reaching the wrong place.
For broader fixture suitability guidance, see UL Solutions’ landscape and outdoor lighting guidance.