
Water inside a mailbox post light usually does not mean the lens failed first. In many cases, rain is getting behind the fixture from the post cap, screw holes, or cable entry before it ever reaches the visible lens area.
The most useful checks are the top cap, backplate seam, cable hole, gasket compression, and any rust around screws or socket contacts.
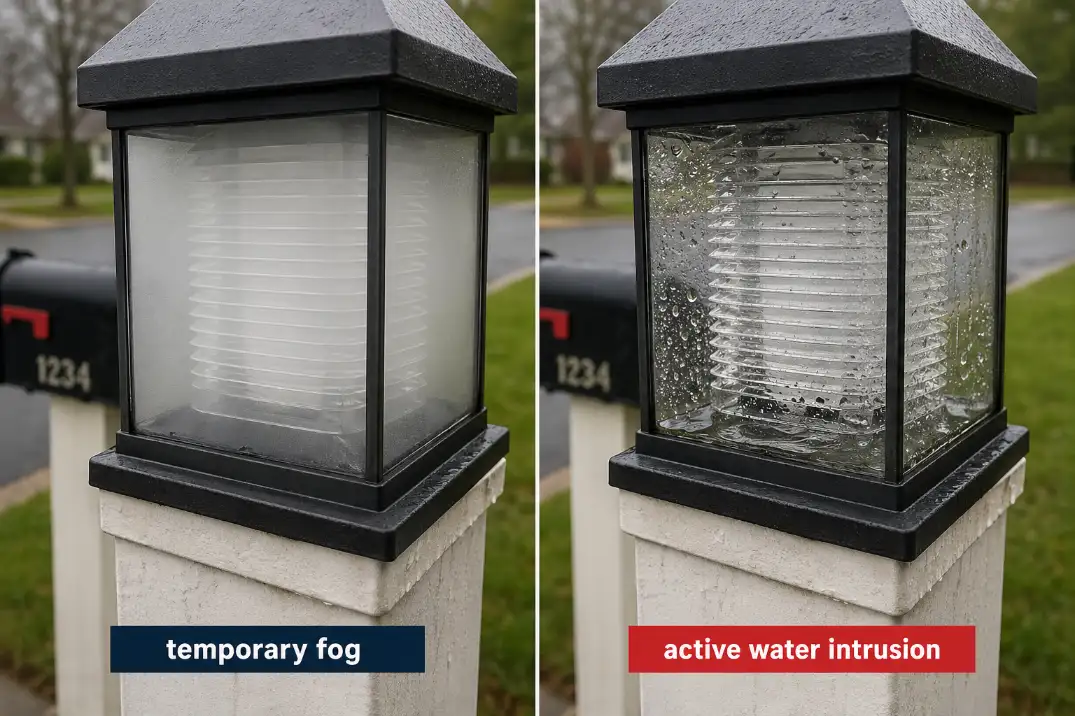
Fog that clears within 24 hours can be normal condensation. Droplets, pooling, flickering, or a GFCI trip within 6–48 hours after rain usually means active water entry. The key distinction is simple: lens moisture is the symptom; the mounting and cable path are usually the mechanism.
Why Mailbox Post Lights Leak So Easily
A mailbox post light sits in a harsher spot than many homeowners expect. It is low, exposed, close to irrigation, near road splash, and often mounted to wood or vinyl that moves with weather.
A porch light under an eave may only see wind-driven rain. A mailbox post light can be hit from the top, side, bottom, and back.
The leak usually starts above the fixture
Most people look at the lens first because that is where water is visible. That makes sense visually, but it often leads to the wrong fix. Rain can collect on a flat post cap, run behind the fixture, follow the cable, and enter the housing from the rear.
A healthy installation sheds water outward. A weak one holds water against the backplate. If the mounting area stays wet for more than 30–60 minutes after rain stops, the fixture is already fighting the post design.
Roadside exposure changes the failure pattern
Mailbox lights near driveways, sprinklers, and curbs deal with repeated wetting, not just storms. A fixture sprayed for 10–20 minutes several times per week can fail faster than one exposed to occasional rain.
That is why this issue behaves more like driveway outdoor lighting moisture exposure than a simple bad fixture. The water arrives from more directions and repeats often enough to expose weak seams.
Quick Diagnostic Checklist
Use this before replacing the bulb or sealing the lens:
- Fog clears within 24 hours and does not form droplets.
- Water droplets or pooling remain inside the lens after 24–48 hours.
- Rust appears around screws, socket contacts, or the lower lens seam.
- The light flickers or trips a GFCI after rain, snowmelt, or irrigation.
- The cable hole behind the fixture has no drip loop, bushing, or seal.
- The post cap slopes toward the light instead of shedding water away.
- The issue returns after one or two storms even after the fixture is dried.
The most useful clue is repeat timing. If the fixture works when dry but fails after wet weather, the installation path matters more than the bulb.
If you are worried about safety or electrical damage, start by learning what causes condensation inside outdoor lights before attempting any repairs.
The Installation Detail That Decides the Outcome
This is where mailbox post lights often differ from ordinary wall-mounted exterior lights. The fixture may be “outdoor rated,” but the mounting detail can still be wrong.
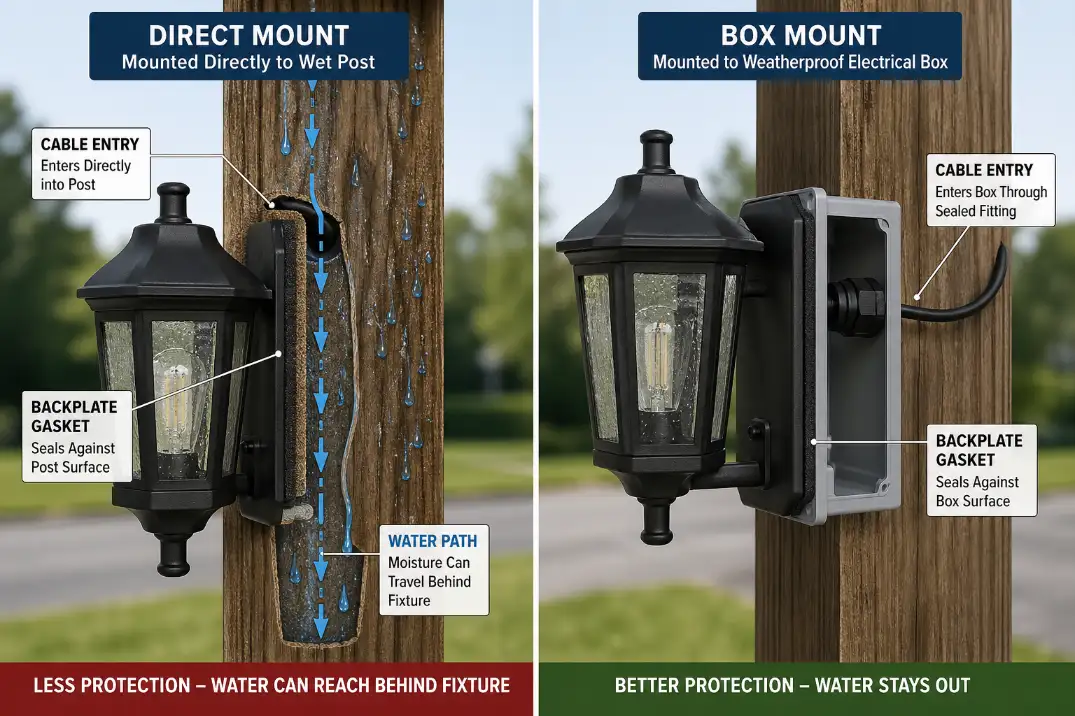
Direct-to-post mounting is the weak point
Many mailbox lights are screwed directly to wood, vinyl, or a decorative post sleeve. That can work only if the surface is flat, stable, dry behind the fixture, and properly sealed at penetrations. If the post face is uneven or softened by moisture, the backplate never compresses evenly.
Wood posts are the most vulnerable because they swell after rain and shrink during dry weather. That movement can open a small gap behind the fixture. Even a 1/16-inch gap at the upper seam can feed water into the backplate during a long storm.
If the fixture is mounted over a raw drilled hole instead of a weatherproof box or sealed mounting cavity, the repair should focus on the installation detail before the fixture brand, bulb, or gasket.
A weatherproof box changes the failure pattern
A proper weatherproof electrical box gives the fixture a more stable mounting surface and protects wire connections better than a raw hole through the post. It does not make the installation immune to water, but it moves the weak point away from the fixture body and toward the box seals, connectors, and cable entry.
If there is no box and the wire simply disappears into the post behind the light, repeated water intrusion is more likely. This is especially true on hollow vinyl posts, where water can enter above and travel unseen inside the post cavity.
IP rating does not save a bad entry point
An outdoor-rated or wet-location fixture is still only as good as its installation. A rated fixture can leak if the cable enters from above, the gasket is crushed unevenly, the screw holes are unsealed, or the post cap channels water behind the backplate.
This is a condition readers often overestimate. A better fixture helps, but it will not overcome a bad water path.
What People Usually Misread First
Fog is not always failure
A small amount of fog inside an outdoor lens can happen when warm moist air cools overnight. In humid areas such as Florida or along the Gulf Coast, brief fogging may appear after a temperature drop and disappear once the fixture warms.
That becomes a problem when fog turns into droplets, droplets collect at the bottom, or moisture remains after two dry days. Condensation is a moisture balance issue. Water intrusion is an entry-path issue.
The bulb is rarely the root cause
Changing the bulb often looks like a fix because the fixture dries while it is open. Then the next storm brings the problem back. If the same mailbox post light burns through bulbs, flickers after rain, or shows greenish corrosion, water control has to come before part replacement.
For a broader distinction between harmless moisture and actual fixture failure, water inside outdoor light fixtures explains the signs that matter most.
Caulking the lens can make the problem worse
A bead of caulk around the front lens feels logical, but it often seals the wrong side of the problem. If water is entering from behind, front caulk can trap moisture inside and block the fixture’s intended weep path.
The better question is not “How do I seal the lens tighter?” It is “Where is water reaching the back of the fixture?”
Where Water Actually Gets In
Mailbox post lights usually leak through a few repeatable paths. They do not deserve equal suspicion.
1. The top seam or post cap
This is the first place to check. A flat, cracked, undersized, or backward-sloped post cap can send water directly behind the fixture. In freezing northern states, small cap cracks can widen through freeze-thaw cycles and create a seasonal leak that appears every winter or spring.
A good cap should overhang slightly and shed water away from the fixture face. If the top of the post stays wet for hours after rainfall, the light is being asked to survive poor drainage.
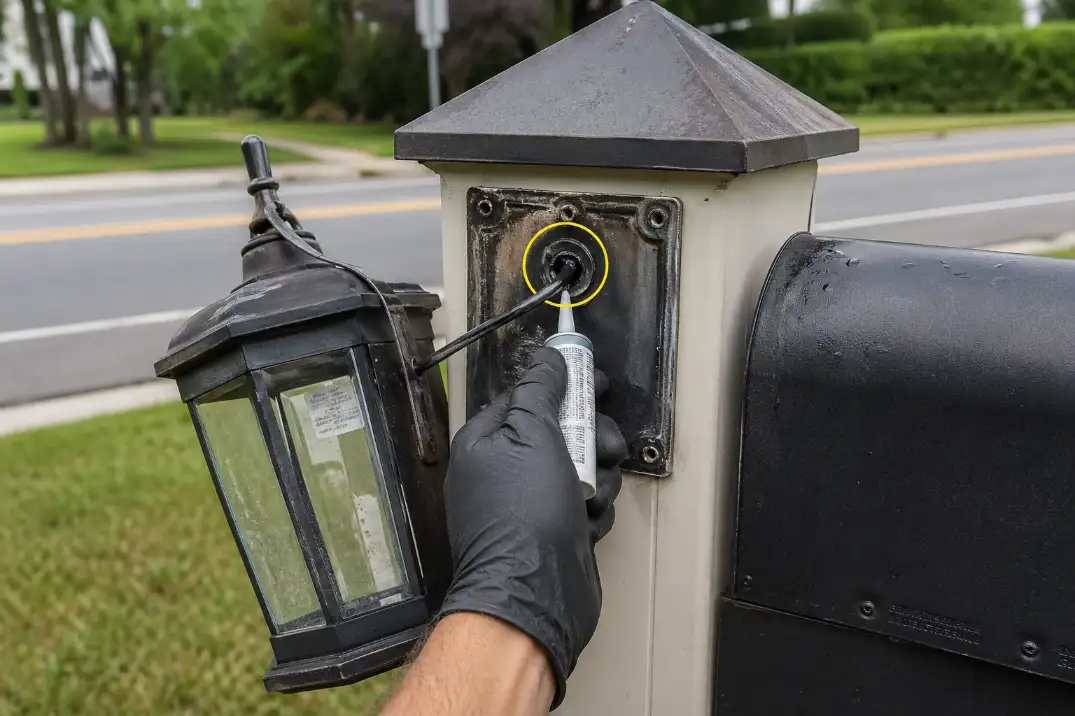
2. The cable entry hole
The cable entry is often the most underestimated leak path. Water can travel along the cable jacket and enter the fixture or connection area. If the cable drops from above or runs straight into the post without a drip loop, it can act like a water guide.
Seal around the outer cable sheath, not just the individual wires. If the fixture uses low-voltage wiring, keep connectors out of standing water inside hollow posts or wet cavities.
The same failure logic appears in why water gets in through cable entry points, but mailbox posts make it easier for water to hide behind the fixture.
3. Mounting screws
Screws can create leaks even when the fixture feels tight. Oversized holes, softened wood, missing washers, or unsealed screw penetrations can let water follow the threads.
Over-tightening is not a cure. It can warp the backplate, crush the gasket unevenly, and create a new gap at the top edge.
4. The lens gasket
The lens gasket matters, but it is not always the main culprit. Replace it if it is brittle, torn, flattened, or no longer rebounds when pressed. If the gasket is more than 5–7 years old and exposed to full sun, replacement is usually reasonable.
But if the wettest area is behind the fixture or moisture returns after a new gasket, the rear entry path is still open.
Best Fix Sequence
The strongest repair sequence is water-shedding first, cable and screw sealing second, fixture repair last. Doing it backward is why many mailbox post lights fail again after the next storm.
Step 1: Turn power off and dry the fixture
Shut power off before opening the fixture. Let the housing dry fully. In warm dry weather, 24 hours may be enough. In cool or humid weather, allow 48 hours.
Look for rust, white mineral residue, green corrosion, swollen wood, cracked caulk, and dark staining behind the backplate. Those clues reveal the water path better than the lens alone.
Step 2: Correct the post cap and drainage
If the post cap is flat, cracked, or sloped toward the fixture, fix that before sealing the light. The cap should move water away from the fixture, not toward it.
Pro Tip: If water beads on the post cap and runs toward the light, sealing the front lens will not solve the real problem. Change the drainage path first.
Step 3: Seal the cable entry correctly
Seal the cable entry where the outer jacket enters the fixture, box, or post. Use exterior-rated materials suited to the post and cable type. When possible, route the cable so water drips off before it reaches the entry point.
Do not bury wet wire connectors inside a hollow post and assume the fixture seal will protect them. If wire nuts, splices, or low-voltage connectors are damp, the problem has moved beyond the lens.
For that situation, corroded wire splices outdoors is the more relevant repair path.
Step 4: Reset screws without distorting the fixture
Remove rusted or loose screws. Seal the penetrations, use proper exterior-rated fasteners, and tighten evenly. The goal is even compression, not maximum force.
If the post material is soft enough that screws no longer hold, the mounting surface has failed. Replacing the light without repairing the post will repeat the leak.
Step 5: Replace the gasket or fixture only after the path is fixed
A new gasket helps only when the lens seam is actually the leak. Replace the entire fixture if corrosion has reached the socket, photocell, internal contacts, or insulation.
This is where routine repair stops making sense. Once water reaches live electrical parts, drying and caulking are not enough.
Repair Priority Guide
| Condition | Most Likely Cause | Best Next Move |
|---|---|---|
| Fog clears within 24 hours | Normal condensation | Monitor and keep drain paths open |
| Droplets return after rain | Active water entry | Inspect cap, rear seam, and cable hole |
| Rust below screw heads | Screw-path leak | Seal holes and reset fasteners evenly |
| Water appears after sprinklers | Side spray exposure | Redirect spray or shield fixture |
| GFCI trips after storms | Moisture reaching wiring | Shut power off; do not reset repeatedly |
| Moisture inside wire nuts or box | Unsafe wet connection | Stop DIY testing and call an electrician |
| New gasket did not help | Rear entry path | Fix post drainage and cable entry |
Conditions That Change the Fix
Wood posts need drainage more than sealant
Wood moves with moisture. A thick perimeter bead of caulk around a wood-mounted fixture may look protective, but it can split as the post swells and shrinks. It can also trap water behind the backplate.
The better approach is a sound cap, sealed penetrations, firm mounting material, and a clear path for water to leave.
Hollow posts can hide water lower down
Vinyl and metal posts can collect water internally. The outside may look dry while the inner cavity stays damp. If wiring runs through that cavity, water may reach the fixture from behind or below.
This is why a clean-looking mailbox post can still produce repeat failures after rain. The post may be acting like a wet conduit.
Sprinklers create a different pattern than rain
Rain usually wets the cap and exposed face. Sprinklers often hit the lower seam, side of the fixture, or cable area at a repeated low angle. In dry climates such as Arizona, irrigation spray can be a bigger risk than rainfall because it is frequent and targeted.
If the light is close to irrigation, compare wetting direction before repairing.
Solar path lights exposed to irrigation spray covers the same overlooked pattern: repeated side spray can matter more than a heavy storm.
When DIY Repair Should Stop
Minor fog, a worn gasket, or a visible screw leak can often be handled with careful repair. Electrical symptoms change the decision.
Stop using the fixture and shut power off if the GFCI trips repeatedly, water is visible inside a junction box, wire connectors are wet, insulation looks damaged, or the socket contacts are pitted.
Do not keep resetting a GFCI to “test” whether it holds. The trip is the warning, not the inconvenience.
If failures appear only after storms and involve more than one outdoor light, the problem may not be limited to the mailbox fixture. Why outdoor lights fail after rain can help separate a single fixture leak from a wider wiring or supply problem.
Bottom Line
Water intrusion in mailbox post lights is usually not solved by a new bulb or a tighter bead of caulk around the lens. The real failure path is usually above, behind, or along the cable. Start with the post cap, backplate, screw holes, cable entry, and any missing weatherproof box.
If moisture clears within a day and never forms droplets, monitor it. If water pools, corrosion appears, the light flickers, or a GFCI trips after rain, treat it as active intrusion.
The strongest fix is not more sealant everywhere. It is a better water route away from the fixture and safer protection around the wiring.
For broader outdoor electrical safety guidance, see the Electrical Safety Foundation International.