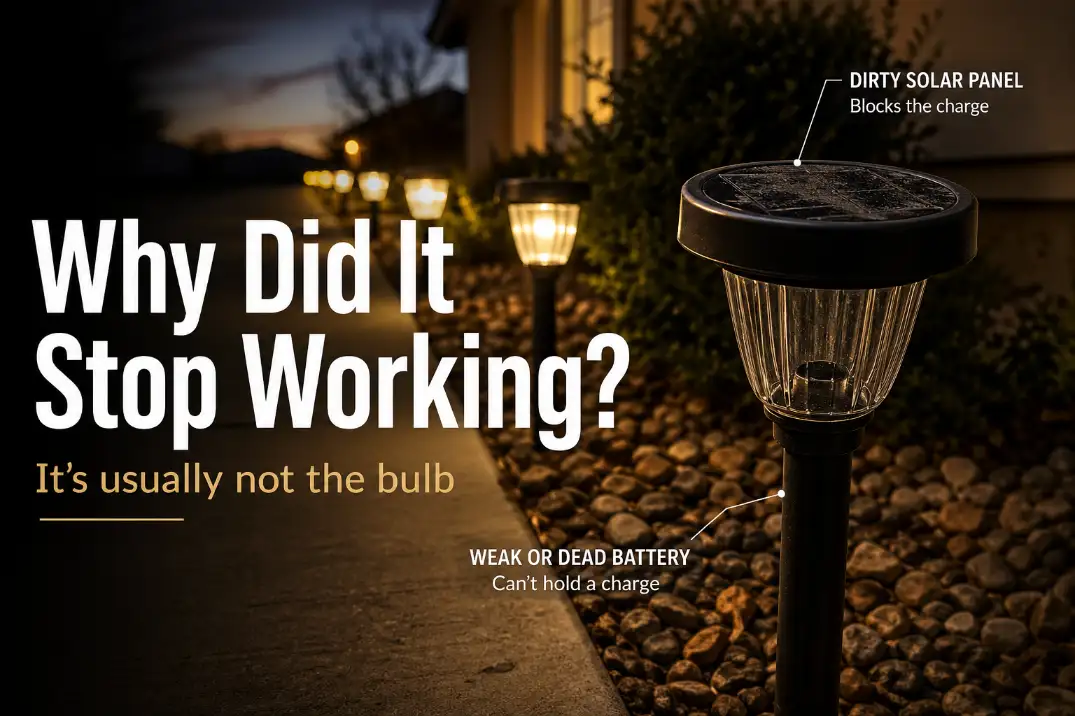
Solar lights usually stop working because the charging path breaks down before the LED itself fails. The panel may not be collecting enough sun, the rechargeable battery may no longer hold charge, the sensor may be fooled by nearby light, or moisture may be interrupting the contacts.
Start with the checks that actually separate those problems: clean the panel, charge the light in direct sun for 6–8 hours, cover the panel for 30–60 seconds after dark, and compare runtime.
A healthy small solar path light should usually run for several hours after a bright sunny day. If it glows for only 10–30 minutes, suspect the battery or charging conditions before blaming the bulb.
If a brand-new solar light never turned on, treat it differently: pull tabs, switches, battery seating, protective film, and first-charge time matter more than aging parts.
Quick Diagnosis by Failure Pattern
| What You See | Most Likely Cause | Fastest Useful Test | What to Do Next |
|---|---|---|---|
| Brand-new light never worked | Pull tab, switch, battery not seated, no first charge | Check tab, switch, battery, and charge 24 hours | Fix setup before replacing parts |
| Worked before, now runs under 1 hour | Weak battery or poor charging | Full sun test for 6–8 hours | Replace battery if runtime stays poor |
| Works when panel is covered | Sensor is still seeing light | Test away from porch or streetlights | Move or shield the light |
| Improves in a sunnier spot | Location is the problem | Move one light for two nights | Trim shade or relocate |
| Fails after rain or sprinklers | Moisture or corrosion | Open battery compartment | Dry, clean, or replace |
| No response with good battery | Panel, board, or wiring failure | Try known-good rechargeable battery | Replace fixture if still dead |
If the light stopped suddenly overnight
A sudden failure usually points to a switch, loose battery contact, moisture, sensor confusion, or circuit failure before normal battery aging. Check whether the switch was bumped off, the battery shifted, or recent rain left dampness inside the compartment.
Also look for a new artificial light source. A porch light, garage light, or security fixture can keep a charged solar light from turning on. If the light does not respond after the panel is covered and a known-good rechargeable battery is installed, the fixture is likely beyond a simple charging issue.
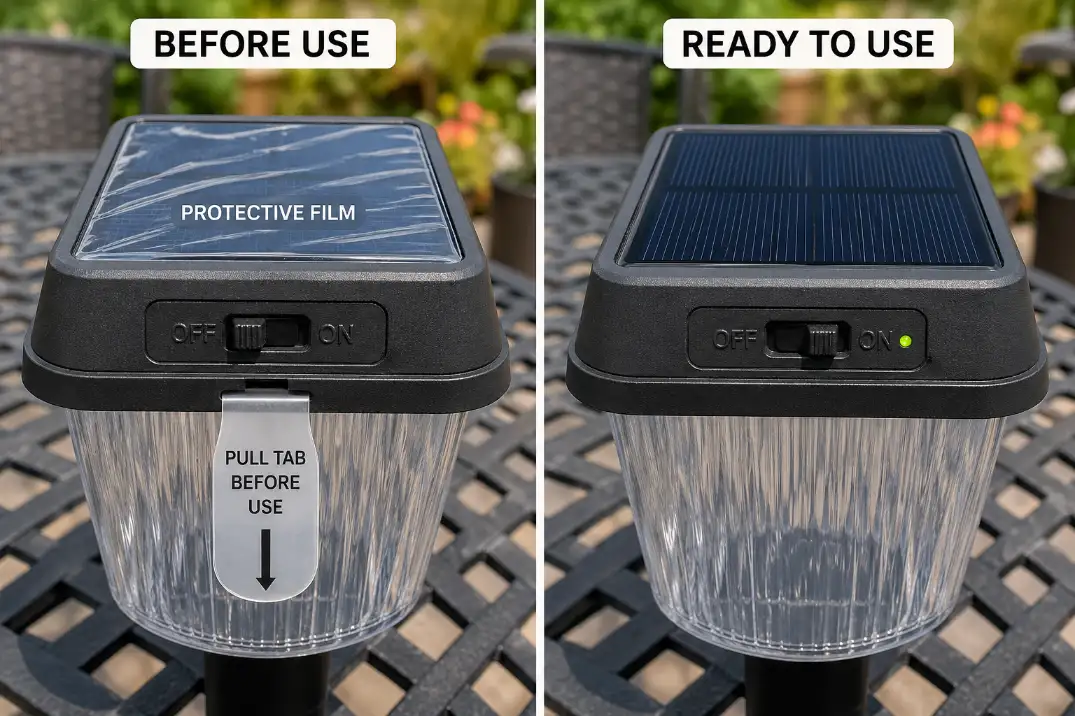
Brand-New Solar Lights Need a Different First Check
A new solar light that never turned on should not be diagnosed like an older light that slowly lost runtime. New fixtures often ship with a battery pull tab, a small switch, protective film over the panel, or a battery that is not fully seated.
Give new solar lights one full day of direct sun before judging them. Some need 24 hours outdoors before the first reliable nighttime cycle. If the light turns on only after the panel is covered, the sensor works.
If it does not respond after the switch, tab, battery, and first charge are checked, the unit may be defective.
Pro Tip: Remove any clear film from the solar panel. It is easy to miss, especially on small black panels.
Single Light vs a Whole Row Failing
One light failed
When only one solar light stops working, suspect something local to that fixture: a weak battery, loose contact, dirty panel, damaged switch, cracked housing, or water inside the battery compartment. Move that one light into a sunnier location before assuming the whole product line is bad.
If another light works in the same spot but the failed one does not, the fixture is the problem. If the failed light works elsewhere, the location was the problem.
Several lights got weaker together
When a whole row fades at the same time, shared conditions become more likely. Cloudy weather, seasonal shade, new plant growth, irrigation spray, mulch buildup, or shorter winter days can reduce performance across multiple fixtures.
If all the lights are the same age and model, the batteries may also be aging together. That points to maintenance, not a mystery electrical failure.
The Failure Hierarchy: What Usually Goes Wrong First
Solar lights are simple systems, but the order of failure matters. The LED is visible, so people blame it. The real failure is usually upstream.
1. Sun exposure fails first
The panel cannot charge the battery if the fixture receives too little direct light. A solar light may sit outside all day and still charge poorly if it is shaded by shrubs, fences, porch columns, roof overhangs, or nearby walls. Two or three hours of weak light is not the same as 6–8 hours of direct sun.
This is why solar garden lights blocked by overgrown bushes often fade gradually rather than stop suddenly.
2. The rechargeable battery weakens
Most small solar path lights use 1.2V rechargeable NiMH AA or AAA batteries. After repeated charge cycles, heat exposure, and undercharging, they may hold only a fraction of their original usable capacity.
A common failing pattern is normal brightness for a few minutes, then fast dimming, flickering, or shutoff within 10–30 minutes.
3. The sensor gets confused
Solar lights use the panel or a small photocell to decide when it is dark. If artificial light hits the sensor at night, the fixture may stay off even with a charged battery.
That is why solar lights that do not turn on near streetlights can look dead when they are actually reacting to the wrong signal.
4. Moisture interrupts the system
Water damage can create corrosion at the battery contacts or board. That can make the light flicker, turn on late, shut off early, or fail after rain. Rust, white crust, green residue, swollen batteries, or repeated failure after irrigation are stronger clues than light fogging alone.
5. The panel, board, or LED finally fails
True panel, circuit board, or LED failure happens, but diagnose it after the simpler checks. If the light does not respond to a clean panel, full sun, darkness, and a known-good rechargeable battery, the fixture is likely past practical repair.
What People Usually Misread First
A dim light is not proof of a weak bulb
A dim solar light usually means the LED is receiving weak or unstable power. The LED is the symptom; the charging path, battery, or contacts are the mechanism.
Replacing the LED assembly usually wastes time unless the fixture has visible LED damage, broken wiring, or a burned board.
“Outside all day” does not mean “fully charged”
This is the most common overestimate. A fixture may be outdoors for 10 hours but receive only 2 hours of useful direct sun. Shade timing matters more than total daylight.
A light on the east side of a fence may charge in the morning and sit shaded all afternoon. A light along a north-facing wall may never receive strong sun at all.
Weather is not always the root cause
Cloudy weather can reduce runtime, but it should not permanently kill a decent fixture by itself. The more important pattern is repeated undercharging. Replacing the fixture may not solve anything if the new light goes into the same poor location.
The Sunny-Spot Test Is the Best Shortcut
Before buying parts, move one weak solar light to the brightest location you have. Clean the panel, switch it on, and let it charge in direct sun for 6–8 hours. Then test it after dark.
If it improves, the original placement is the problem. If it does not improve, inspect the battery, contacts, panel cover, and circuit.
This test is especially useful around walls, trees, roof overhangs, and narrow side yards. The same logic applies to solar lights losing power along north-facing walls.
What the result tells you
If the light runs several hours in the sunny test spot, move the fixture, trim the obstruction, or accept that the original location cannot support that light.
If it still runs under 1 hour after a clean panel and strong sun, the battery is the better suspect.
If it does not turn on at all with a known-good rechargeable battery, the circuit, switch, contacts, or panel may have failed.

Battery Problems: When Replacement Helps and When It Does Not
Battery replacement is one of the few solar light repairs that often makes sense. But it only works when the rest of the charging system is still doing its job.
Use the correct rechargeable battery
Most small solar lights are built around rechargeable NiMH cells, often AA or AAA size. Match the battery chemistry, size, and voltage listed in the fixture. A regular alkaline battery is not a long-term fix because it is not designed for daily charging and can leak.
A higher-capacity battery is not automatically better. If the panel is small, shaded, or weak, it may not fully recharge a larger-capacity cell during a normal day.
Do not judge the battery by voltage alone
A weak rechargeable battery can show voltage with no load and still collapse when the LED draws power. A better field test is runtime. If the fixture still runs less than about 1 hour after a clean panel and full sunny charge, try a correct new rechargeable battery.
When the new battery fails quickly
If a new battery works for one or two nights and then the problem returns, the battery was probably not the root cause. The panel may not be refilling it, the sensor may be misreading darkness, or moisture may be interrupting the circuit.
Solar Panel Problems: Dirt, Clouding, Angle, and Damage
The panel is the beginning of the system. If the panel underperforms, every other part looks worse than it is.
Dirt and film reduce charging
Dust, pollen, bird droppings, mulch splash, hard-water spots, and protective film can all reduce panel output. Clean the panel with a damp microfiber cloth. Avoid abrasive pads because scratched plastic can scatter light and make charging worse.
Yellowed plastic is different from dirt
A dirty panel can be cleaned. A yellowed, cloudy, UV-damaged cover may not recover much. If the panel cover looks milky even after cleaning, the fixture may never charge like it did when new.
Angle matters, but not as much as shade
Angle helps, especially in winter, but it cannot compensate for heavy shade. A slightly imperfect panel in open sun will usually outperform a perfectly angled panel under shrubs.
For poor exposure zones, sun exposure issues with solar lights can help separate panel direction from actual sunlight availability.
Sensor Problems: When the Light Is Charged but Stays Off
A solar light that stays off is not always dead. Sometimes it is waiting for darkness that never arrives.
The cover test
After dark, cover the solar panel completely with your hand or a dark cloth for 30–60 seconds. If the light turns on, the battery, LED, and basic circuit are probably working. The issue is sensor input.
This happens near porch lights, garage sconces, streetlights, reflective windows, security lights, and bright landscape lighting.
Reflection can confuse the fixture
Artificial light does not have to shine directly into the panel. Light bouncing off glass, pale siding, stone, or glossy doors can delay activation.
The fix is usually placement, not repair: turn the head away from glare, move the light farther from the artificial source, or shield the sensor side.
Moisture Problems: Why Some Lights Fail After Rain
Water damage often appears as a delayed failure. A solar light may survive the rain itself, then start flickering or shutting off early several days later as corrosion forms.
Where moisture enters
Common entry points include the battery door, switch seam, panel edge, lens seam, cable entry point, or cracked housing. Solar path lights in mulch beds are vulnerable because damp soil and organic material hold moisture around the base.
For broader water-related failure patterns, water inside outdoor light fixtures is useful when the problem involves visible condensation, pooling, or repeated moisture intrusion.
When drying makes sense
Drying is worth trying when the compartment is damp but the contacts are still mostly clean. Open the battery compartment and leave the fixture in a dry place for 24–48 hours. Then reinstall a correct rechargeable battery and test it after a full charge.
When drying stops making sense
If moisture returns after every sprinkler cycle or rainstorm, drying the fixture is only a temporary reset. Solar lights hit by irrigation spray are especially vulnerable, which is why solar path lights exposed to sprinkler spray often fail repeatedly even after cleaning.
If the board is corroded, the housing is cracked, the panel cover is yellowed, and the contacts are damaged, replacement is usually smarter than another repair attempt.
Why Solar Lights Stop Working After a Few Months
A light that works well for a short period and then declines usually has one of three patterns.
The installation was marginal from day one
The light may have worked during long sunny days, then failed once the season changed, plants grew, or cloudy weather arrived. The fixture did not suddenly become worse. The daily charging window got smaller.
The battery aged faster than expected
Heat, deep discharge, cheap cells, and repeated undercharging can shorten battery life. A solar light in full Arizona sun may receive plenty of light but still age quickly because the battery and plastic housing run hot.
If the same pattern keeps happening across different fixtures, why solar outdoor lights fail so quickly may be a better lens than treating each light as a separate defect.
Moisture slowly reached the contacts
A small leak may not matter on day one. After weeks of damp nights or irrigation overspray, corrosion can create enough resistance to weaken the light. “Worked fine until recently” does not always mean the panel or LED suddenly failed.
What Not to Replace First
The fastest repair is not always the first part that comes to mind.
Do not replace the LED first
The LED is visible, so it gets blamed. Unless it is physically damaged, burned, or disconnected, it is usually not the first failure point.
Do not install a bigger battery as a cure-all
A larger-capacity rechargeable battery may sound like an upgrade, but it can disappoint if the panel cannot refill it. Capacity only helps when the panel has enough sun and output to charge the battery properly.
Do not seal every seam before finding the leak
Adding silicone everywhere can trap moisture inside if the fixture is already damp. Dry the fixture first, identify the entry point, and only seal areas that do not block drainage or service access.
Do not replace the whole set before testing one light
If several lights are weak, test one fixture in a better location first. If it recovers, the set may not be bad. The site may be starving every light in the row.
What Changes by Climate and Season
Humid and coastal areas
In humid Florida yards or coastal California conditions, moisture and corrosion deserve more attention. Salt air and damp nights can degrade small battery contacts faster than expected.
Hot, dry climates
In dry desert regions, the issue may be less about water and more about battery stress, brittle plastic, and cloudy panel covers. Strong sun helps charging, but high heat can shorten rechargeable battery life and age cheap housings.
Cold northern winters
Shorter winter runtime is not automatically failure. Cold batteries deliver less usable energy, and snow-covered panels cannot charge properly. The warning sign is poor recovery after warmer weather and longer sun return.

Step-by-Step Fix Order
1. Clean the panel and lens
Wipe the solar panel and lens with a damp microfiber cloth. Remove mud splash, pollen, dust, hard-water marks, and leftover film. Give the light one full sunny day before judging the result.
2. Confirm the switch and battery position
Check the on/off switch and open the battery compartment. Make sure the battery is seated correctly and the contacts are touching firmly.
3. Run the darkness test
Cover the panel for 30–60 seconds after dark. If the light turns on, the sensor is responding and the fixture is not completely dead.
4. Run the sunny-location test
Move one problem light to a known sunny location for 6–8 hours. If it works there, solve the site. If it does not, continue to the battery and moisture checks.
5. Try a correct new rechargeable battery
Use the same chemistry and voltage specified for the light. If the light recovers normal runtime, the old battery was the main issue. If the new battery only helps briefly, the panel, placement, or circuit is likely preventing proper recharge.
6. Inspect for moisture and corrosion
Open the fixture and look closely at the battery contacts, switch area, and visible board. Dry minor dampness for 24–48 hours. Do not keep repairing a fixture that repeatedly takes in water.
When Solar Lights Are Worth Repairing
Repair makes sense when the problem is isolated: a dirty panel, weak rechargeable battery, poor placement, loose battery seating, or sensor confusion. Replacement makes more sense when several weak points appear together.
Repair it when:
- The panel cleans up clearly.
- The light improves in a sunny test location.
- A correct new battery restores several hours of runtime.
- The sensor works when the panel is covered.
- Moisture is minor and does not return.
Replace it when:
- It does not respond to a known-good rechargeable battery.
- The panel cover is permanently cloudy or yellowed.
- The battery contacts are heavily corroded.
- The housing is cracked or no longer seals.
- Water keeps returning after drying.
- The board has visible corrosion.
The clean decision rule is simple: if the light responds to cleaning, full sun, darkness, or a correct new rechargeable battery, repair it. If it does not respond to any of those tests, replace the fixture.
Questions People Usually Ask
Why did all my solar lights stop working at once?
Look for shared causes first: cloudy weather, seasonal shade, irrigation changes, mulch buildup, nearby artificial lighting, or batteries aging together.
Can solar lights stop working because they get too much sun?
Too much sun is rarely a charging problem, but heat and UV exposure can age batteries, plastic housings, and panel covers.
Should I replace solar light batteries every year?
Not automatically. Replace them when runtime stays poor after cleaning the panel and charging in full sun. In many yards, 1–3 seasons is a realistic range.
For broader official guidance on how photovoltaic solar energy works, see the U.S. Department of Energy.