Outdoor step lights usually fill with water because the fixture cannot drain, the gasket has stopped sealing, or the back box is staying wet behind the faceplate. Rain touching the lens is rarely the whole problem.
The first useful checks are simple: whether droplets remain inside the lens after 24 hours, whether rust or green corrosion appears near screws or terminals, and whether the light flickers only after rain.
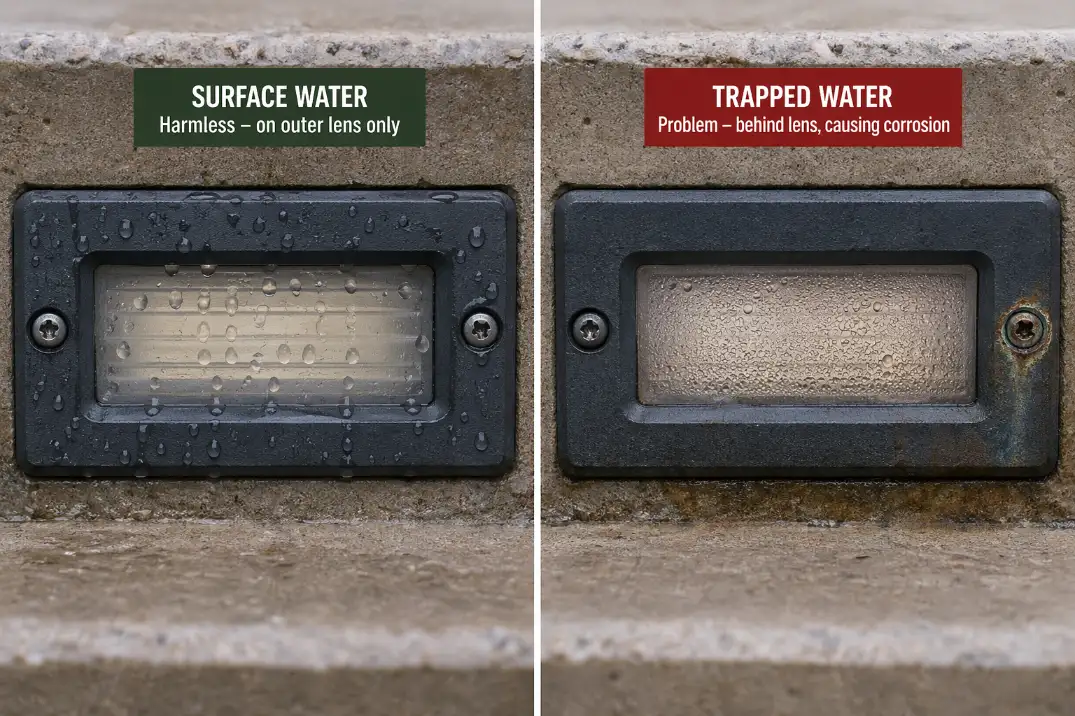
A wet stair surface is not the same as water intrusion. Surface water should dry within 2–6 hours in mild weather. Water trapped behind the lens after a full dry day is a failure signal.
Water appearing near the wire entry or back box is more serious because replacing the bulb or wiping the lens will not stop it from coming back.
Quick Diagnostic Checklist
- Water on the outside of the lens only: usually normal splash exposure.
- Droplets inside the lens after 24 hours: gasket, lens seal, or housing leak.
- Water at the bottom of the fixture cavity: poor drainage or backward tilt.
- Flickering after rain: moisture reaching contacts, splice points, or LED electronics.
- GFCI trips more than once: stop resetting and isolate the wet section.
- Several stair lights fail together: suspect wiring, splices, or transformer behavior.
What People Usually Misread First
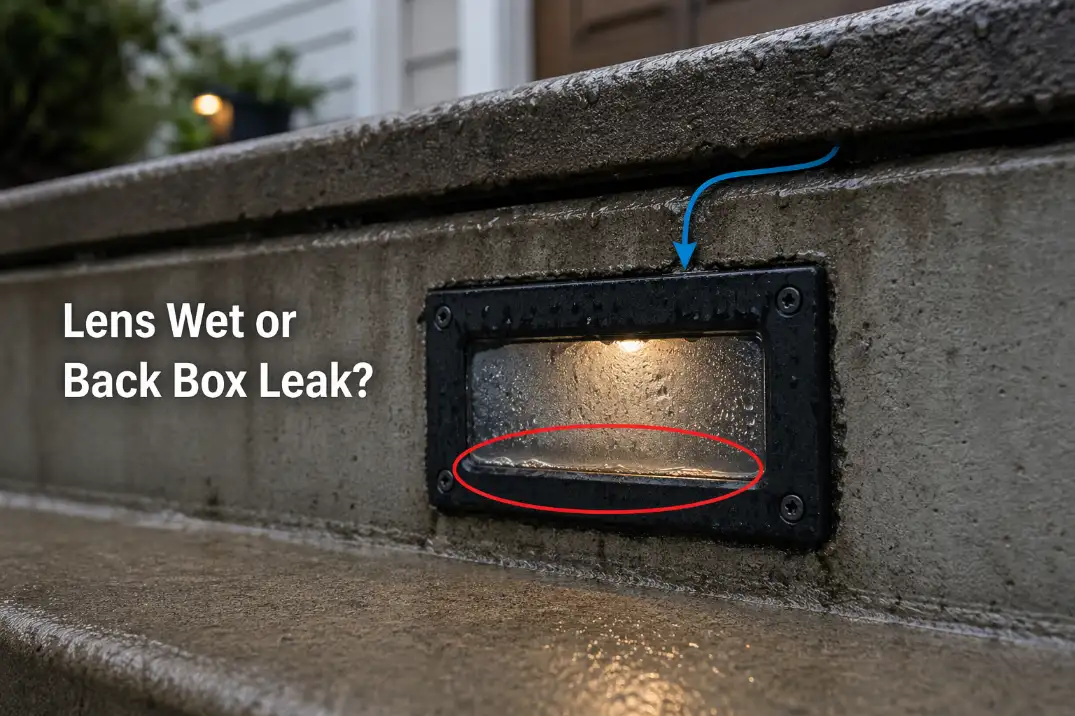
The visible wet spot is not always the leak
The lens gets blamed first because it is the part everyone can see. That is sometimes correct, but step lights are different from wall fixtures. They sit low, close to splashback, and often inside masonry, deck framing, or stair risers that hold moisture longer than open siding.
A stair light can look like it is leaking through the faceplate when water is actually entering from the cable opening, back box, or a small gap behind the housing. That is why the broader patterns in Water Inside Outdoor Light Fixtures matter, but step lights need a more specific drainage check.
Many exterior lights are exposed to temperature swings, making condensation inside exterior light fixtures a common concern for homeowners.
Fogging matters less than pooling
Light haze inside a lens after a cold night can be normal. Actual pooled water is different. If you see a bead line at the bottom of the lens, droplets that survive a dry afternoon, or repeated staining below the fixture, the issue has moved beyond condensation.
A useful threshold: fog that clears during the next dry period is usually minor. Water that remains after one full dry day should be treated as intrusion.
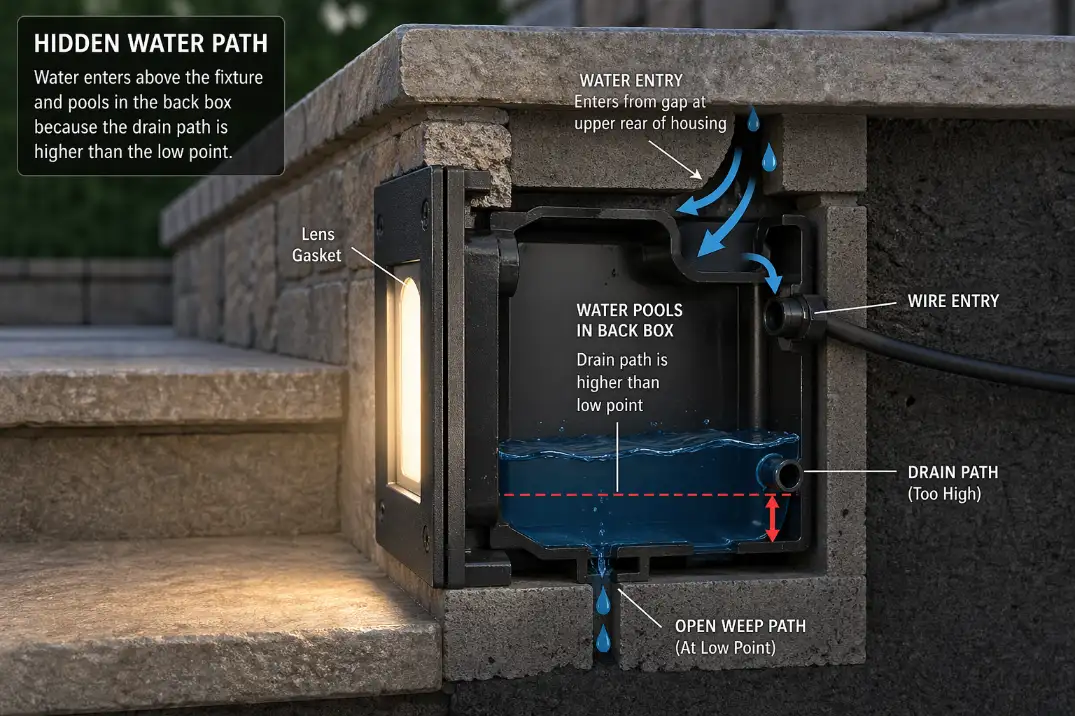
The Step-Light Detail Most Fixes Miss
The back box matters more than the lens
Many recessed step lights sit in a sleeve or box. If that cavity stays wet, a new lamp or gasket may only delay the next failure. This is common on concrete, stone, stucco, and deck stairs where water can move behind the visible surface.
The strongest clue is where the first water appears. Behind the lens points to the gasket or face seal. Around the wire entry points to the back box. At the bottom of the housing points to drainage or tilt.
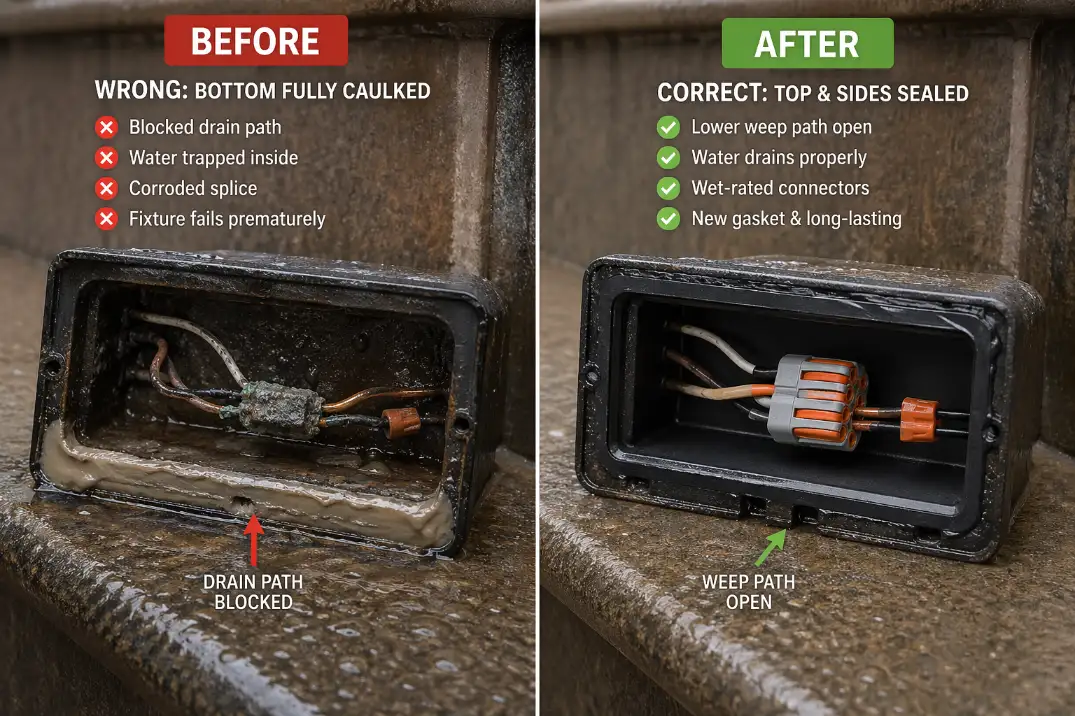
A sealed faceplate can still trap water
Caulking the whole faceplate often feels logical, but it can make the problem worse. If water is entering from behind and the lower edge is sealed shut, the fixture becomes a small reservoir.
The better repair is selective: seal the top and side entry points where appropriate, keep the intended weep path open, and replace failed gaskets rather than burying the fixture in caulk.
The fixture must not sit in water
Step lights are commonly mounted 4–12 inches above stair treads, which puts them directly in the splash zone. In humid Florida conditions, shaded masonry may stay damp most of the day. In northern states, water trapped around 32°F can freeze, expand, and widen small gaps over repeated cycles.
That is why a fixture can be “outdoor rated” and still fail if the installation lets water pool inside or behind it.
Wet-Rated, IP-Rated, or Actually Draining?
Ratings matter, but they do not override poor installation. Damp-rated fixtures belong in covered areas with indirect moisture. Wet-rated fixtures are designed for direct rain or splash. IP-rated fixtures add more specific dust and water-resistance language, but even a strong rating cannot compensate for a wet back box, blocked drain path, or damaged cable entry.
For most exposed step lights, a wet-location rating is the baseline. In high-splash areas, coastal moisture, or stairs hit by irrigation, a better-sealed fixture may be worth it. But the deciding factor is still drainage: a healthier installation sheds water; a failing one stores it.
If the wet area seems to start where the cable enters the housing, the issue is closer to the failure pattern explained in Why Water Gets In Through Cable Entry Points than a simple lens leak.
What the Symptom Points To
| What you see | Most likely cause | Best next move | Do not assume |
|---|---|---|---|
| Water on outer lens only | Normal rain or splash | Check drying within 2–6 hours | The fixture is leaking |
| Droplets inside lens | Failed gasket or lens seal | Inspect gasket and screws | A new bulb fixes it |
| Water in housing bottom | Poor drainage or tilt | Clear weep path, check slope | More caulk helps |
| Flicker after rain | Wet contacts or splice | Open and dry connection area | LED module is the only issue |
| Multiple lights fail | Shared wiring moisture | Check splices and cable route | Every fixture failed separately |
| GFCI trips | Leakage from wet components | Shut off and isolate circuit | Resetting is repair |
The Repair Order That Saves Time
1. Dry it before judging it
Turn off power first. For low-voltage systems, shut off the transformer. For line-voltage stair lights, use the breaker. Remove the lens or faceplate if the fixture design allows it, then let the cavity dry for 24–48 hours.
A wet fixture hides its own evidence. Once dry, you can see compressed gaskets, cracked lens edges, rusted screws, mineral trails, and corroded terminals more clearly.
Pro Tip: Take one photo before opening the fixture and one after. The first wet mark often reveals whether water came through the face seal or from behind.
2. Replace the gasket before adding sealant
A flattened gasket is one of the most common causes. If it feels hard, stays compressed, or no longer fills the corners evenly, replace it. Tighten screws evenly, but do not warp the faceplate.
Sealant should support the design, not redesign it. Avoid sealing the bottom edge unless the manufacturer specifically calls for it. Blocking the lower escape path can trap water that would otherwise drain.
3. Fix wet connections properly
If corrosion has reached the wire connection, this is no longer just a fixture-face issue. Outdoor splices need wet-rated connectors, not tape-only repairs or indoor wire nuts. If copper is blackened or brittle beyond the stripped end, trimming and remaking the connection is usually better than cleaning the tip.
This is where many repairs fail. A new faceplate gasket cannot overcome a wet splice hidden behind the stair riser. The repair logic overlaps with Corroded Wire Splices Outdoors because the weak point is often the connection, not the lamp.
When to Stop DIY Troubleshooting
Stop and get the circuit checked if a GFCI trips more than once, a line-voltage fixture has water inside, corrosion is visible on conductors, or the light flickers when the stair is wet. Repeated resets are not harmless; they are a sign that moisture may be creating leakage current.
Low-voltage systems are safer, but water still damages them. A 12V or 15V stair-light run can flicker, dim, overload a transformer, or corrode downstream connections. If the last few lights on a run are weaker than the first few, moisture may be combining with voltage drop, especially on cable runs over 50–75 feet.
For rain-triggered electrical symptoms beyond a single fixture, Why Outdoor Lights Fail After Rain gives a broader troubleshooting path.
When Replacement Makes More Sense
Repair makes sense when the housing is solid, the lens is intact, the gasket is replaceable, and corrosion is limited. Replacement makes more sense when the lens is cracked, the housing is warped, the fixture repeatedly fills after gasket work, or water has reached an integrated LED board.
Integrated LED step lights are less forgiving than bulb-based fixtures. Once water reaches the driver or LED board, drying may not restore reliable output. If the light stays weak after 48 hours of drying or flickers again during the next rain, replacement is usually the cleaner decision.
Sprinklers can also shorten the life of an otherwise decent fixture. Daily spray creates more wetting cycles than occasional storms. If irrigation hits the stair lights directly, adjust the pattern as part of the repair; otherwise the same moisture problem can return. That failure pattern is covered more closely in Sprinkler Spray Damages Outdoor Lights.
Questions People Usually Ask
Can I drill a drain hole in the fixture?
Only if the fixture design allows it and you know where the wiring sits. Drilling blindly can damage wires, void the fixture listing, or create a new leak path. If the fixture has no workable drain path, replacement is often safer.
Should outdoor step lights be waterproof?
They should be rated for their exposure, but “waterproof” is often misunderstood. The real goal is not that water never touches the fixture. The goal is that water does not collect, reach electrical parts, or remain trapped inside.
Why does only one stair light fill with water?
Usually because that fixture has a local defect: bad gasket pressure, a tilted housing, a cracked lens, or a nearby drainage path. If several lights fail after the same storm, look at shared wiring and splice points instead.
For broader official electrical safety guidance, see the Electrical Safety Foundation International.