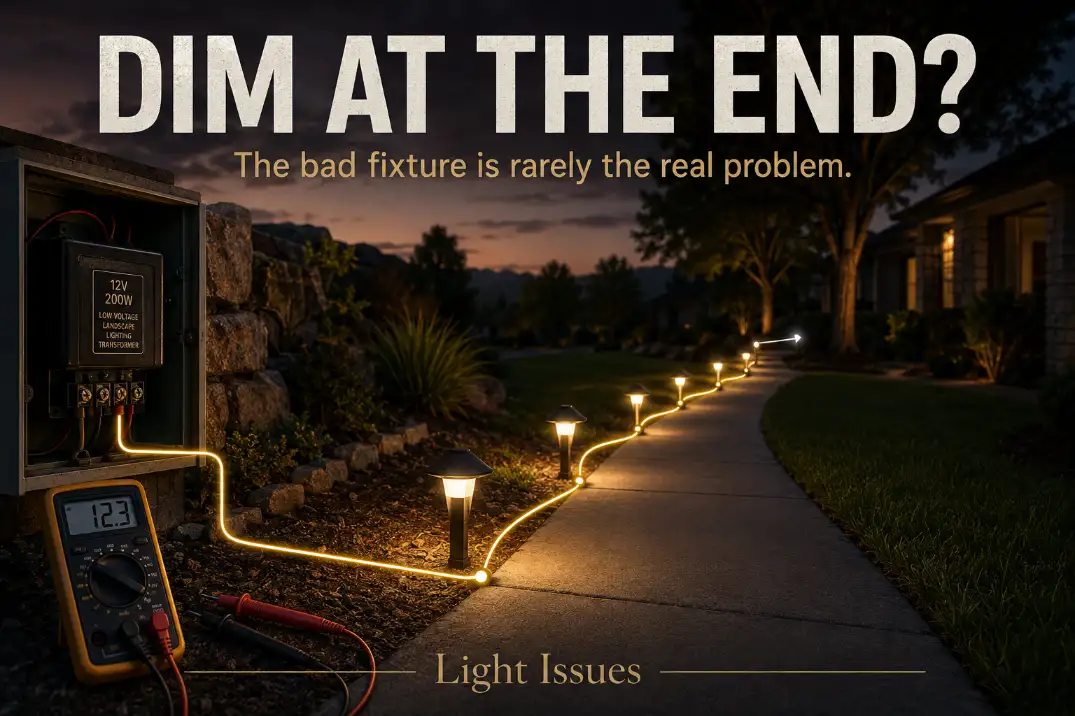
Low voltage landscape lighting problems usually start somewhere other than the fixture you notice first. A dim path light may be the final symptom of voltage drop 80 feet away.
A dead group of lights may come from one wet splice, not several failed lamps. A system that turns off after 10 to 30 minutes often points to overload, heat, or a short rather than a bad timer.
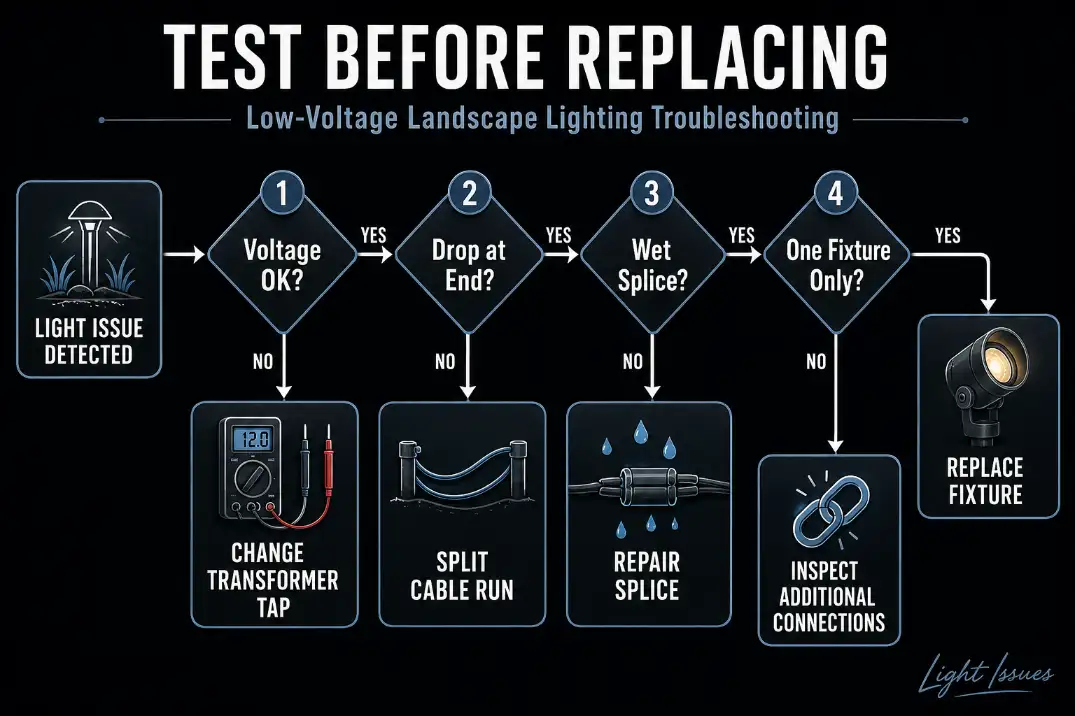
Start with the pattern: whole system off, one branch dead, far-end fixtures dim, or failure after rain. Then test transformer output, voltage at the first and last fixtures, and the first connection before the failure.
A healthy 12-volt system should usually keep the farthest fixture above about 10.5 to 11 volts under load. If it drops below that, replacing bulbs is usually the wrong first move.
Start With the Pattern, Not the Fixture
The fastest diagnosis comes from reading where the problem appears. Low-voltage lighting is a connected system, so the visible failure often sits downstream from the actual cause.
| What you see | First test | Likely mechanism | Do not do first |
|---|---|---|---|
| All lights are off | Check outlet, GFCI, timer, transformer output | No power, failed control, transformer issue | Replace fixtures |
| First lights bright, last lights dim | Measure first and last fixture voltage under load | Voltage drop or overloaded run | Buy a bigger transformer |
| One branch is dead | Test before and after the branch splice | Failed splice or cut cable | Dig up every fixture |
| Fails after rain or irrigation | Inspect wet splices and fixture bases | Moisture intrusion, corrosion, leakage path | Assume random lamp failure |
| Turns off after 10–30 minutes | Check load, heat, shorts, transformer behavior | Thermal protection or overload | Blame the photocell first |
The first bad light is a clue, not a verdict
If three lights work and the fourth is dead, the useful area is usually between the third and fourth fixture. If one side of the yard fails while the other side works, the transformer is less likely than the branch connection feeding that side.
This distinction saves time. Fixture replacement makes sense only after the system delivers stable voltage to that fixture.
Test under load, not just at the transformer
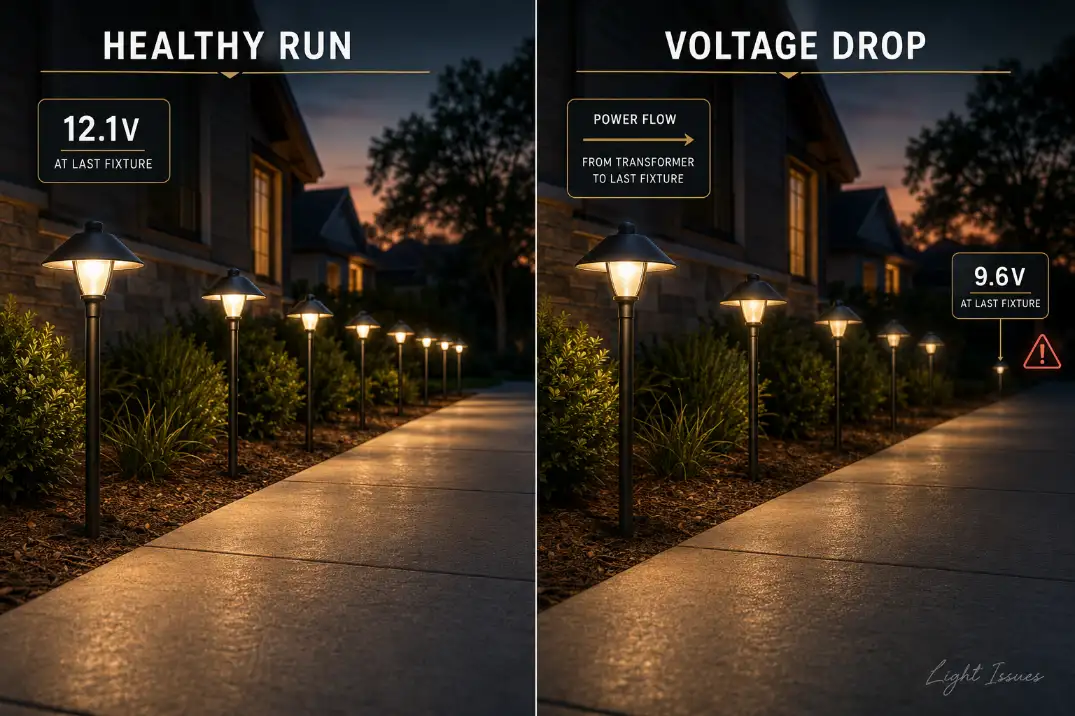
A transformer can show normal voltage with no meaningful load attached. The real test is what happens when the lights are connected and running. If the transformer reads around 12 volts but the last fixture drops below about 10.5 volts, the problem is delivery, not just the fixture.
For end-of-line fading, Voltage Drop in Outdoor Lighting Systems is the more relevant diagnosis than a bulb replacement guide.
Quick Diagnostic Checklist
Use this order before buying parts.
1. Confirm transformer output
Check that the outlet has power, the GFCI has not tripped, the timer or photocell is calling for power, and the transformer is producing low-voltage output. Depending on the transformer tap, output may be around 12 to 15 volts.
If there is no output on the low-voltage side but the transformer has household power, the issue is likely transformer, timer, photocell, internal protection, or wiring at the transformer.
2. Compare near and far voltage
Test the first fixture, a middle fixture, and the last fixture while the system is running. A small drop is normal. A large drop that changes brightness, flicker, or startup behavior is not.
A healthier run may show the first fixture near 12 volts and the last fixture still around 11 volts or higher. A failing run may show 12 volts near the transformer and 9.5 to 10 volts at the far end.
3. Separate weather-linked failure from age
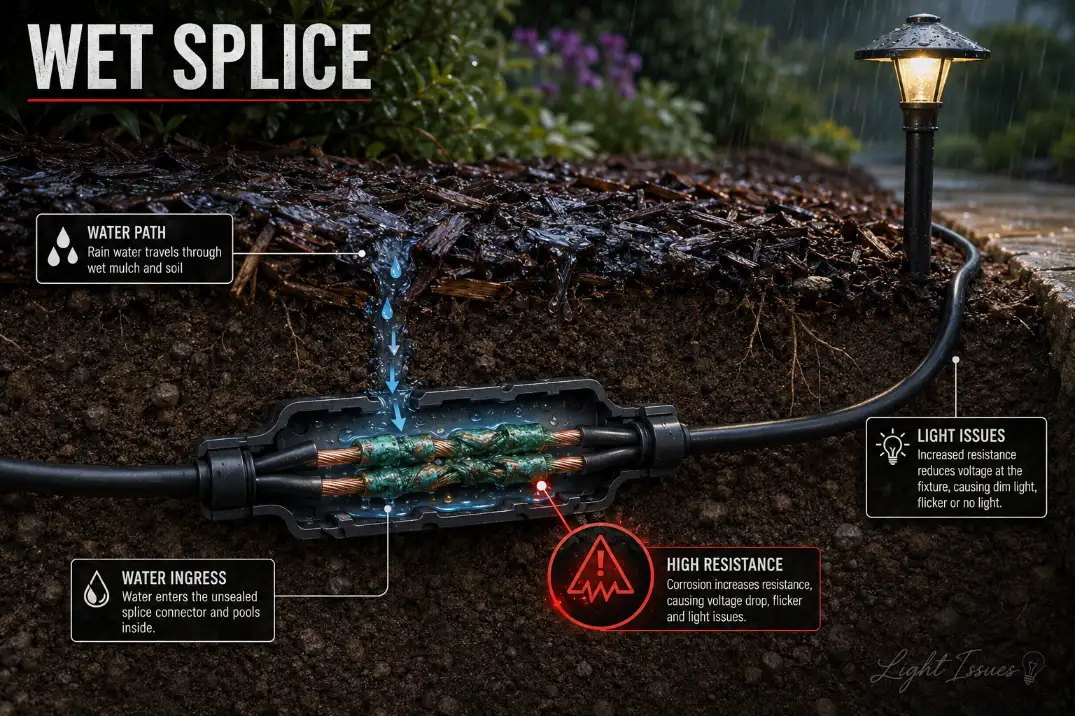
If the lights fail after rain, sprinkler cycles, snowmelt, or heavy dew, moisture is evidence. A bad lamp does not usually care whether the mulch stayed wet for 12 hours. A splice, socket, or fixture body often does.
4. Find the first failed point
Do not start at the last fixture just because it is dark. Work from the transformer outward until voltage changes, disappears, or becomes unstable. The first failed point is usually more valuable than the most visibly failed fixture.
The Layout Pattern Usually Tells You Where to Look
Low-voltage systems fail in patterns. Reading the layout prevents random digging and unnecessary fixture replacement.
End-of-run dimming means delivery loss
When lights fade gradually along a run, the cable is losing voltage before power reaches the farthest fixtures. This is common with long daisy-chain layouts, undersized cable, too many fixtures on one run, or old connections adding resistance.
The key comparison is first fixture versus last fixture. If the first fixture is bright and the last fixture is weak, the fixture at the end is probably not the original problem. The cable path is.
A stronger transformer may not fix this. If the first fixture already receives healthy voltage while the last fixture is low, the better repair is usually splitting the run, shortening the path, using heavier cable, or rebalancing the layout.
One dead branch points to a splice or cable break
If one branch is dead and the rest of the yard works, think connection first. Look where that branch leaves the main cable. This is where cheap pierce connectors, taped wire nuts, and shallow buried splices usually fail.
Recent yard work matters. Edging, planting, aeration, trenching, hardscape repairs, and dog digging can damage cable without making the break obvious at the surface.
When a lighting failure follows yard work, Underground Lighting Cables Damaged: Causes, Signs, and How to Fix Them fits the pattern better than replacing fixtures.
Whole-system failure starts at controls and supply
If every light is off, do not start in the flower bed. Check the outlet, GFCI, timer, photocell, transformer input, and transformer output first. A whole-system outage is more likely to be supply or control related than simultaneous fixture failure.
This is also where safety matters most. The low-voltage side is safer to test, but the transformer still connects to 120-volt household power.
Where the System Usually Fails
Transformer load and heat
A transformer should not be loaded to its full rating. A practical rule is to keep the connected lighting load at about 80 percent or less of transformer capacity. On a 150-watt transformer, that means roughly 120 watts of connected load, not 150 watts.
If the system shuts off after 10 to 30 minutes, runs hot, hums loudly, or repeatedly trips protection, the transformer deserves attention. But do not overdiagnose it. If the transformer output is stable and only one branch fails, the transformer is probably not the first repair priority.
For whole-system cycling, overload, or unstable output, Transformer Problems in Low Voltage Systems is the better next step.
Cable gauge and run length
Cable size and distance control how much voltage reaches the fixtures. A short run with a few LED fixtures may work fine on lighter cable. A long run across a front walk, driveway edge, or large planting bed may need 12-gauge cable or a different layout.
The mistake is assuming available wattage equals good voltage. A transformer may have enough capacity while the far end still receives too little usable voltage.
Pro Tip: If the first fixture is normal and the last fixture is weak, measure before upgrading the transformer. The problem is often path resistance, not transformer size.
Splices and connectors
Splices fail more often than buried cable. They sit in mulch, soil, irrigation spray, coastal moisture, freeze-thaw movement, and fertilizer residue. In humid Florida yards or coastal California sites, corrosion can build quickly. In northern states, winter movement can loosen shallow connections over time.
A proper buried splice should be rated for direct burial or wet locations. If you find ordinary wire nuts wrapped in tape underground, treat them as temporary at best. They may look sealed while the copper inside is black, green, brittle, or wet.
Why the Obvious Fix Fails
Replacing bulbs does not fix bad delivery
Bulb replacement is reasonable when one lamp fails and voltage at that fixture is stable. It is usually wasted effort when several lights dim together, the last fixtures fade, the same position fails repeatedly, or the problem changes after rain.
The bulb is the visible endpoint. The mechanism may be resistance, moisture, low voltage, or a damaged cable path.
Tightening bad connectors is not a repair
A loose connector may work after you touch it because the metal briefly makes better contact. That does not make it reliable. If the connection has corrosion, water inside, damaged insulation, or weak mechanical grip, tightening it only resets the countdown.
Recurring failures in mulch beds, wet garden edges, and sprinkler zones usually need sealed direct-burial splices, not another squeeze with pliers. For that failure pattern, see Corroded Wire Splices Outdoors.
Upsizing the transformer too early can hide the problem
A bigger transformer fixes capacity problems. It does not fix a wet splice, undersized cable, excessive run length, or a bad branch connection. In some systems, extra capacity only delays the next failure while the weak point keeps heating, corroding, or dropping voltage.
A higher voltage tap can help compensate for distance, but only if the run is measured. If the first fixture is already receiving strong voltage and the last fixture is weak, raising the tap can overfeed the near fixtures while barely correcting the far end.
Measurement Guide: What the Numbers Mean
Use measurements to decide, not guess. The numbers below are practical diagnostic ranges, not a substitute for manufacturer instructions.
| Test point or condition | Healthier signal | Problem signal |
|---|---|---|
| Transformer output | About 12–15V depending on tap | 0V, unstable output, repeated shutdown |
| First fixture under load | Near intended operating voltage | Very high while far end is weak |
| Last fixture under load | Usually above 10.5–11V | Below about 10.5V with dimming or flicker |
| Loaded vs. unloaded test | Readings stay similar | Voltage looks fine unloaded but drops under load |
| Runtime | Stable for several hours | Trips, fades, or shuts off after 10–30 minutes |
| Moisture timing | Same behavior wet or dry | Fails after rain, irrigation, or 6–24 hours of wet soil |
The loaded test matters most
Testing disconnected cable can create false confidence. A weak splice may pass voltage when there is almost no load, then fail once fixtures draw current. That is why the loaded reading at the first and last fixture is more useful than a single transformer reading.
The voltage spread matters more than one number
One reading rarely tells the whole story. A 12.2-volt reading near the transformer and a 10.9-volt reading at the far end may be acceptable. A 12.4-volt reading near the transformer and a 9.7-volt reading at the far end tells you the run is losing too much before the final fixtures.
What Changes Under Different Conditions
Rain and irrigation expose weak points
Water does not have to flood a fixture to create trouble. It can enter through cable entry points, cracked seals, tilted fixtures, or buried connectors.
A failure that appears after sprinklers run for 15 minutes may be tied to direct spray. A failure that appears the next morning may be tied to soil staying wet overnight.
If the system works dry but fails wet, Why Your Outdoor Light Works Fine Until It Rains is closer to the problem than a general transformer checklist.
Heat can expose overload
In hot climates, transformer boxes mounted in direct sun can run warmer. If the system works briefly and then shuts down, heat and load deserve more attention. A transformer near its limit has less margin when ambient temperatures are high.
Freezing weather stresses shallow connections
In northern winters, freeze-thaw cycles can move shallow cable and loosen marginal splices. A connection that survived summer may become intermittent after soil expands, contracts, and pulls lightly on the cable.
When Diagnosis Should Stop
Some problems are no longer good DIY troubleshooting.
Stop if the GFCI or breaker keeps tripping
A repeated trip is not a nuisance to bypass. It means the system may have leakage, a short, water intrusion, or a fault on the supply side. Resetting once for testing is different from repeatedly forcing the system back on.
Stop if anything is hot, melted, or buzzing loudly
Warm transformer cases can be normal, but excessive heat, melted insulation, burned smells, or loud electrical buzzing are stop signs. Do not keep testing a system that shows heat damage.
Stop near pools, fountains, or unknown line-voltage wiring
Water features raise the stakes. If the lighting system runs near a pool, fountain, pond, wet hardscape, or unknown buried electrical route, bring in a qualified professional. The repair boundary is not just whether the light works; it is whether the installation remains safe.
Practical Repair Priorities
Fix connections before fixtures
Replace wet, corroded, taped, loose, or pierce-style problem connections with sealed connectors rated for direct burial. This is often the highest-return repair because one bad splice can affect several fixtures.
Rebalance long runs
For long paths, driveway borders, and large planting beds, avoid making one cable run do all the work. Multiple shorter runs, hub-style layouts, or better cable sizing can reduce voltage difference across the system.
If only the far end fails, Outdoor Lights Losing Power at the End of the Line matches the failure pattern more closely than broad outdoor lighting troubleshooting.
Replace fixtures last, but not never
Fixture replacement makes sense when voltage is stable at the fixture leads, nearby lights are normal, the splice is sound, and the fixture still fails. That points to socket damage, internal water intrusion, failed LED electronics, or a damaged housing.
The rule is simple: replace the fixture when the system has proven it can feed the fixture correctly.
Questions People Usually Ask
Can low voltage landscape lights shock you?
The 12-volt side is much safer than household voltage, but the transformer still connects to 120-volt power. Shut off power before working on connections, and do not open line-voltage components unless qualified.
Why do the lights work during testing but fail later?
Short tests may not reproduce heat, load, or moisture conditions. A system that works for 5 minutes but fails after 30 minutes may be overheating, overloaded, or reacting to a wet connection as moisture migrates.
Should every fixture receive exactly 12 volts?
No. A small difference is normal. The problem is a large drop that affects brightness or reliability. If the first fixture is healthy and the last fixture is below about 10.5 volts under load, diagnose the run.
Is repair still worth it on an old system?
Repair makes sense when the transformer is stable, the layout is understandable, and the failures are limited to a few splices or fixtures. Replacement starts making sense when cable routes are unknown, insulation is brittle, multiple branches have been patched repeatedly, or the system has no clean diagnostic path left.
Key Takeaway
Low voltage landscape lighting diagnosis is not about guessing which fixture looks guilty. It is about following the power path in order: transformer, first fixture, last fixture, branch connection, moisture exposure, and load behavior.
The best repairs usually improve delivery. Sealed splices, balanced runs, correct cable size, and transformer capacity with margin solve more recurring problems than replacing the most visible failed light.
Once the system tests clean, fixture replacement becomes a precise repair instead of an expensive guess.
For broader electrical safety basics, see the U.S. Consumer Product Safety Commission.