
Quick Solution Summary
If newly installed outdoor lights are not receiving power from the main electrical line, the problem usually lies somewhere along the circuit path between the breaker panel and the first lighting fixture. In most residential systems, electricity flows through a switch, GFCI outlet, junction box, or transformer before reaching the lights. A loose connection, wiring mistake, or tripped safety device at any point along that chain can stop power completely.
Start by checking the circuit breaker and resetting nearby GFCI outlets, since outdoor lighting circuits often share protection devices with exterior outlets or garage wiring. Next, inspect the junction box connections where the main supply line meets the outdoor lighting cable. In many installations, wires may look connected but actually have poor contact inside the connector.
If the lights are part of a low-voltage landscape lighting system, verify that the transformer is receiving power and delivering the correct output voltage, typically between 11–14 volts. By tracing the electrical path step by step—from the breaker panel outward—you can usually locate the interruption in a matter of minutes.
Quick Diagnostic Checklist
Before assuming a fixture or cable is defective, run through these basic checks.
Start with these quick tests:
-
Confirm the circuit breaker is fully ON and not partially tripped
-
Reset any nearby GFCI outlets controlling the outdoor circuit
-
Make sure the wall switch connected to the lights is ON
-
Verify the transformer (if installed) has power
-
Inspect junction box wire connections for loose conductors
-
Test voltage at the first light fixture or cable run
Sometimes power disappears after landscaping or digging around the yard. If trenching or edging work happened recently, damaged underground cables may be responsible. Problems like these often resemble the issues described in Why Pathway Lights Stop Receiving Power After Yard Work.
Understanding How Power Reaches Outdoor Lights
Outdoor lighting systems typically follow a predictable electrical path. Understanding this path makes troubleshooting much easier.
Typical circuit flow:
Breaker panel
↓
Wall switch
↓
GFCI outlet or outdoor junction box
↓
Transformer (for low-voltage systems)
↓
Underground cable
↓
First fixture
If power stops anywhere along this route, the lights will not turn on.
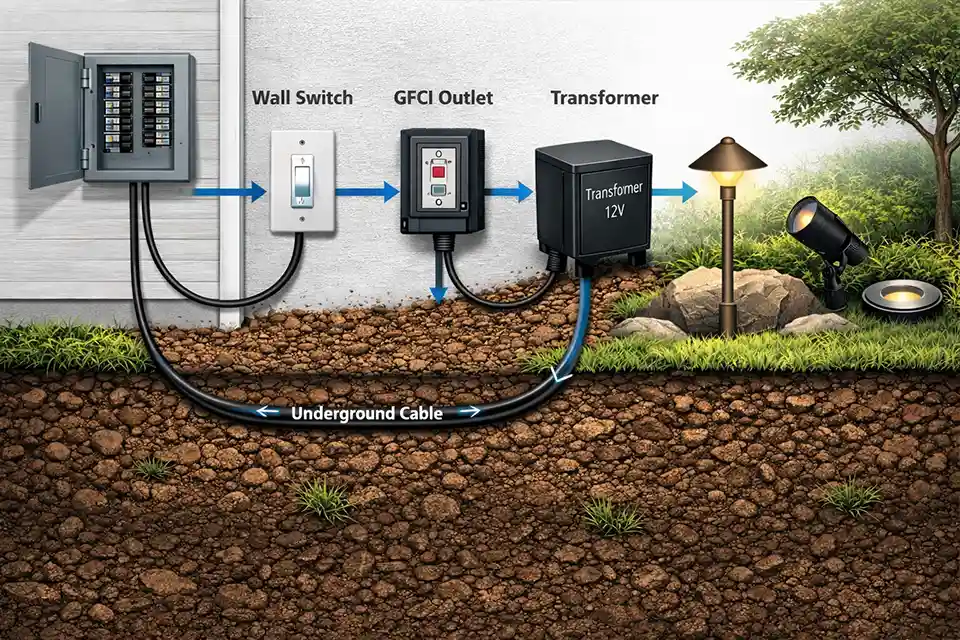
Testing each point sequentially allows you to isolate the failure quickly.
For example:
-
Breaker panel reads 120V
-
Junction box reads 120V
-
Fixture reads 0V
This indicates the interruption exists somewhere in the cable between those points.
Line Voltage vs Low Voltage Lighting Systems
One important detail many homeowners overlook is the type of outdoor lighting system installed.
Line Voltage Lighting (120V)
These fixtures connect directly to household electrical wiring.
Common features:
-
120V supply voltage
-
wired directly to junction boxes
-
often controlled by wall switches or timers
If these lights fail immediately after installation, wiring mistakes inside the junction box are the most common cause.
Low Voltage Landscape Lighting (12V)
Many modern landscape systems use a transformer to reduce voltage from 120V to around 12V.
Typical components include:
-
transformer
-
timer or photocell
-
low-voltage cable
-
multiple landscape fixtures
If the transformer does not receive power or is incorrectly wired, none of the lights will operate.
Voltage testing at the transformer output should normally show 11–14 volts.
Common Installation Mistakes That Stop Power
Many new outdoor lighting systems fail due to simple wiring mistakes during installation.
| Installation Issue | Signal | Fix | Difficulty |
|---|---|---|---|
| Neutral wire not connected | Fixtures completely dead | Reconnect neutral conductor | Easy |
| Line and load wires reversed | Switch or GFCI behaves incorrectly | Rewire correctly | Moderate |
| Transformer not connected to power | Low-voltage lights remain off | Connect transformer input | Easy |
| Loose wire nuts | Lights work intermittently | Retighten connections | Easy |
| Incorrect breaker connection | Circuit never energizes | Verify breaker wiring | Advanced |
Loose outdoor wiring connections are particularly common in new installations. Even slightly weak wire nut connections can interrupt the circuit entirely, similar to the problems discussed in Loose Outdoor Wiring Connections and How to Fix Them Safely.
In many cases, tightening the connection restores power immediately.
Underground Cable Damage During Installation
Outdoor lighting wires are commonly buried 6–12 inches underground, depending on local electrical code and cable type. During installation, it is surprisingly easy to nick or cut these cables with shovels, trenchers, or landscaping tools.
Damage may occur when:
-
digging trenches after wiring is placed
-
installing edging or irrigation systems
-
driving stakes for landscape fixtures
If the conductor is severed, power will never reach the lights. If the insulation is damaged but the conductor remains intact, voltage may drop significantly.
Voltage losses of 40–80% are common when cables are partially damaged.
A deeper explanation of these failures can be found in Underground Lighting Cables: Damage, Causes, Signs, and How to Fix Them.
Step-by-Step Method to Trace Power Loss
The most reliable way to identify the issue is to trace voltage through the system.
Step 1: Check the Breaker Panel
Locate the breaker controlling the outdoor circuit.
Turn it OFF, wait about 10 seconds, then switch it back ON. Some breakers appear active but remain internally tripped.
Step 2: Reset All GFCI Outlets
Outdoor circuits often run through GFCI protection.
Reset nearby outlets located in:
-
garages
-
patios
-
exterior walls
-
basements
If the GFCI repeatedly trips, moisture or wiring faults may exist further along the circuit.
Outdoor lighting problems sometimes appear after storms or wet weather, especially when moisture reaches electrical connections as explained in Why Your Outdoor Light Works Fine Until It Rains.
Step 3: Test the Junction Box
Use a multimeter or non-contact voltage tester.
Check for 110–125V AC between the hot and neutral wires. If voltage exists here but not at the lights, the cable or fixture wiring is likely responsible.
Step 4: Test the Transformer
If the lighting system uses low voltage, check two points:
-
Transformer input voltage (should read about 120V)
-
Transformer output voltage (typically 11–14V)
If the transformer receives power but outputs nothing, it may be overloaded or defective.
Step 5: Check the First Fixture
Open the first light fixture on the circuit.
Inspect for:
-
loose wire nuts
-
moisture inside the fixture
-
reversed wiring connections
If the first fixture works but others do not, the problem may lie further along the cable run.
Sometimes this type of partial failure happens when only part of the yard loses power, similar to the scenarios explained in Why Outdoor Lights Stop Working on One Side of the Yard.
Environmental Factors That Can Affect New Installations
While wiring mistakes are the most common cause, environmental conditions sometimes contribute to power problems.
Examples include:
-
High humidity above 80% in Florida causing early corrosion in outdoor boxes
-
Freezing winters in northern states stressing underground wiring insulation
-
Dry desert soil in Arizona shifting and exposing shallow cables
-
Coastal moisture in California accelerating metal connector corrosion
These conditions rarely cause immediate failures alone but can worsen weak connections.
Frequently Asked Questions
Why would brand-new outdoor lights have no power?
The most common reasons include loose wiring connections, tripped GFCI outlets, transformer issues, or damaged underground cables during installation.
Can a GFCI outlet control outdoor lighting?
Yes. Many outdoor lighting circuits are wired through GFCI outlets to meet electrical safety codes. If the outlet trips, power to the lights will stop completely.
How can I test outdoor lighting voltage?
Use a multimeter to measure voltage at junction boxes, transformers, and fixtures. Line-voltage systems should read about 120V, while low-voltage systems usually operate between 11–14V.
Should outdoor lighting have its own breaker?
Dedicated circuits are recommended for large lighting systems or installations exceeding 300–400 watts of total load.
For additional guidance on safe outdoor lighting installation and electrical practices, the U.S. Department of Energy provides helpful resources on outdoor lighting systems.
Key Takeaways
When newly installed outdoor lights are not receiving power from the main line, the issue is usually found somewhere along the electrical path between the breaker panel and the first fixture. Tripped GFCI outlets, loose junction box connections, transformer problems, or damaged underground cables account for most failures.
By checking each step in the circuit—panel, switch, GFCI, transformer, cable, and fixtures—you can quickly isolate the point where power stops flowing. Once identified, the fix is often straightforward and may involve tightening connections, resetting safety devices, or repairing a damaged cable.