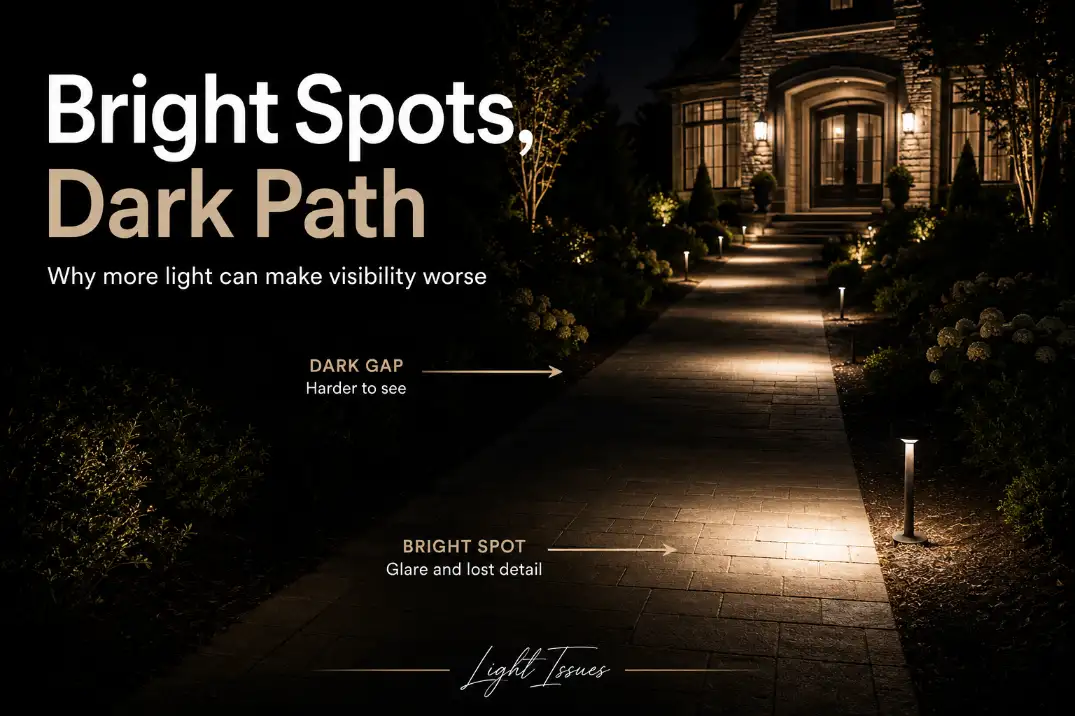
Outdoor lights usually create bright spots and dark gaps because the light pattern does not match the surface being lit. The most likely causes are fixture spacing, beam spread, mounting height, and aiming—not a lack of wattage.
A repeating pattern of bright circles every few feet usually points to layout or optics. A gradual fade from the first fixture to the last points more toward voltage drop or cable sizing.
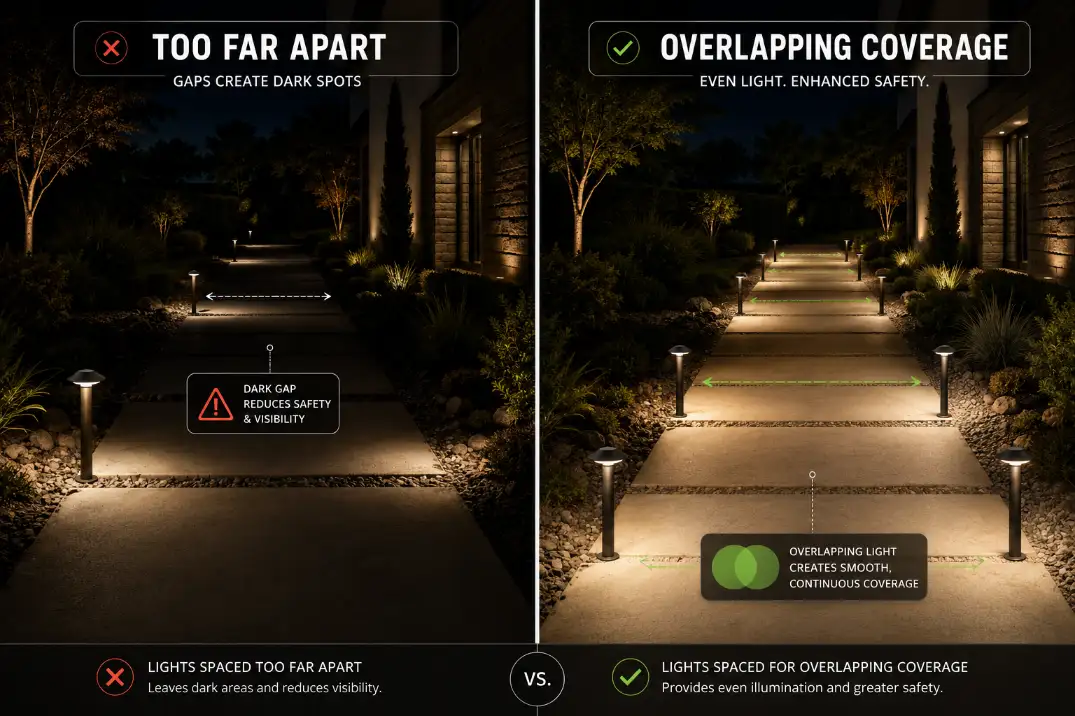
As a practical threshold, if each fixture creates only a 3- to 4-foot useful pool but the fixtures are spaced 8–10 feet apart, the dark gaps are built into the design.
Start by checking whether the light pools overlap, whether the beam is too narrow, and whether glare is forcing your eyes to adapt to the brightest spot instead of the walking surface.
Quick Answer: When Bright Spots Mean the Layout Is Wrong
The biggest clue is repetition. If every fixture creates the same bright circle with the same dark space between fixtures, the system is probably doing exactly what its layout allows. That is different from a failing bulb, timer issue, or moisture problem.
| What to check | Usually workable | Likely to create bright spots and gaps | What it means |
|---|---|---|---|
| Path light spacing | 5–8 ft apart | 9–12+ ft apart with low fixtures | Coverage is not overlapping |
| Fixture height | 18–24 in above grade | Under 12 in for broad coverage | Beam hits the ground too soon |
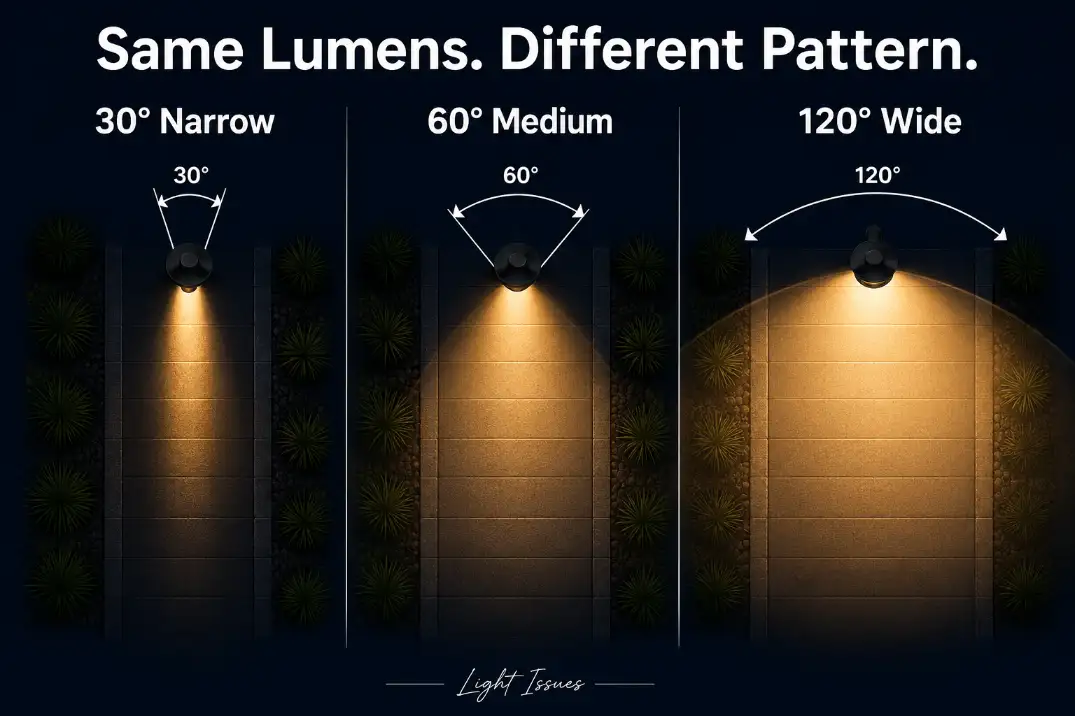
| Beam spread | 90–120° for paths and surfaces | 10–40° narrow beam | Light is concentrated too tightly |
| Path light output | 100–200 lumens in many residential paths | 300+ lumens with narrow optics | More brightness may increase glare |
| Night test timing | 45–60 min after sunset | Judging at dusk only | Ambient light hides real gaps |
A hot spot does not only fail to light the gap. It can make the gap look darker because your eyes adapt to the brightest patch first. That is why “brighter bulb” fixes often disappoint.
If the light is simply missing the walkway, driveway, or planting feature entirely, the problem may be more about targeting than uneven spacing. In that case, Why Outdoor Lights Miss the Target Area is the better diagnosis path.
What People Usually Misread First
They blame brightness before beam shape
Lumens tell you how much light a fixture produces. They do not tell you where that light lands. A 300-lumen fixture with a narrow beam can create a harsh dot on the ground, while a 150-lumen fixture with a wider distribution may make the path easier to read.
This is the most common wasted fix: installing brighter bulbs in fixtures that already create glare. The bright spot gets stronger, the dark gap stays dark, and the walkway feels less comfortable.
They underestimate fixture height
Mounting height changes how much room the beam has to spread before it reaches the ground. A path light mounted around 18–24 inches above grade usually has more useful spread than a very low fixture sitting 8–12 inches above mulch or stone.
That does not mean taller is always better. A taller fixture with poor shielding can create eye-level glare. The useful goal is not height by itself; it is a softer, wider pool of light without exposing the source.
They forget the surface is part of the system
Dark mulch, wet asphalt, charcoal pavers, and deep planting beds absorb light. Pale concrete, snow, and light gravel reflect more of it. That means the same fixture spacing can look acceptable on a tan concrete walk and patchy on a dark stone path.
In wet climates, rain can make contrast sharper. A dark walkway after a Midwest storm or a humid Florida evening may show gaps that were less obvious when the surface was dry.
Beam Angle Matters More Than the Bulb Label
Beam angle is often the missing spec. Narrow beams are useful for accenting trees, columns, walls, and sculpture. They are not ideal when the job is to make a walking surface read clearly from edge to edge.
Narrow beams create dots
A 10–40° beam concentrates light into a small area. That can look dramatic on a tree trunk or stone column, but on a path it often creates a bright circle under each fixture and darkness between fixtures.
Wider beams create continuity
A 90–120° distribution is usually more useful for path lighting, patio edges, and low-level area coverage. The light does not need to be intense if the pools overlap. In fact, lower-output fixtures with wider spread often look calmer and work better than high-output fixtures with tight optics.
Medium beams need context
A 60° beam can work in some settings, especially when fixtures are closer together or mounted higher. But if the path is wide, dark, curved, or bordered by dense plants, a medium beam may still leave the edges unreadable.
This is why broader Outdoor Lighting Placement Problems often show up only after the system is installed. The fixture may be good, but the beam shape, spacing, and surface do not match.
Match the Pattern to the Fixture Type
Different fixtures create different bright-and-dark failures. Treating every uneven lighting problem as a path-light spacing issue can send you in the wrong direction.
| Fixture type | Common pattern | Most likely cause | Best first fix |
|---|---|---|---|
| Path lights | Bright dots with black gaps | Too far apart or too narrow | Reduce spacing or widen spread |
| Wall lights | Scallops and vertical bands | Fixture spacing or wall distance | Change spacing, lens, or fixture style |
| Step lights | One tread edge bright, next step dark | Poor placement or low output angle | Adjust height, aim, or fixture location |
| Uplights | Hot disk on wall or tree trunk | Beam too narrow or too close | Pull fixture back or use wider beam |
| Driveway lights | Edges visible, center dark | Edge-only layout | Add cross-coverage or wider fixtures |
Path lights need overlap, not dots
A path should not look like a row of islands. If one fixture gives useful visibility for about 5 feet of path length, spacing it 5–6 feet from the next fixture may work. Spacing it 10 feet away probably creates a gap unless the fixture has a very wide distribution or the surface reflects well.
Wall lights fail as scallops
Wall-mounted fixtures often create alternating bright fans and dark vertical bands. That can be attractive on a facade, but it is not ideal near garage doors, entries, or steps where people need steady visual information.
Driveway lights often define edges but miss the task
Low fixtures along a driveway can outline the border while leaving the center dark. That may look finished from the street but still fail when someone is backing out, turning, or walking across the drive. If the lights are not reaching the actual target area, Outdoor Lights Missing Target Areas can help separate fixture placement from power or bulb issues.
Where Dark Gaps Show Up First
Curved walkways
Curves expose weak spacing quickly. On a straight path, small gaps may still feel manageable because the eye follows a predictable line. On a curve, the inside edge can disappear. Tightening spacing by 1–2 feet on curves often matters more than increasing brightness.
Steps and grade changes
Steps need edge recognition, not decorative glow. If the tread edge is bright but the next step is flat and dark, the fixture is lighting the wrong surface. This is one place where routine bulb upgrades stop making sense quickly. Once the step geometry is wrong, more output just creates harder contrast.
Planting beds and seasonal growth
A fixture placed correctly in April can be partly blocked by shrubs in July. If trimming or temporarily moving a branch restores the light pattern immediately, the system did not need new bulbs. The beam path was blocked.
This is especially common with solar lights tucked into dense planting beds. When uneven output is part of the issue, How to Fix Solar Lights With Uneven or Dimming Output is more useful than treating every dark gap as a layout failure.
The 15-Minute Night Test
Do this before replacing fixtures or buying brighter bulbs.
- Wait 45–60 minutes after sunset.
- Turn off porch, garage, and interior spill light if possible.
- Walk the route in both directions at normal eye height.
- Mark every point where the path edge, step edge, or driveway line disappears.
- Measure the dark gap length.
- Move one fixture temporarily and compare the pattern.
- Test aim and beam spread before increasing wattage.
Pro Tip: Take a photo from standing eye height, not from above. Overhead photos make bright spots look less harsh than they feel while walking.
If the last lights in the run are dimmer than the first lights, do not keep adjusting spacing as your main fix. A gradual end-of-line fade is more consistent with cable length, load, or transformer output, and Voltage Drop in Outdoor Lighting Systems is the better next step.
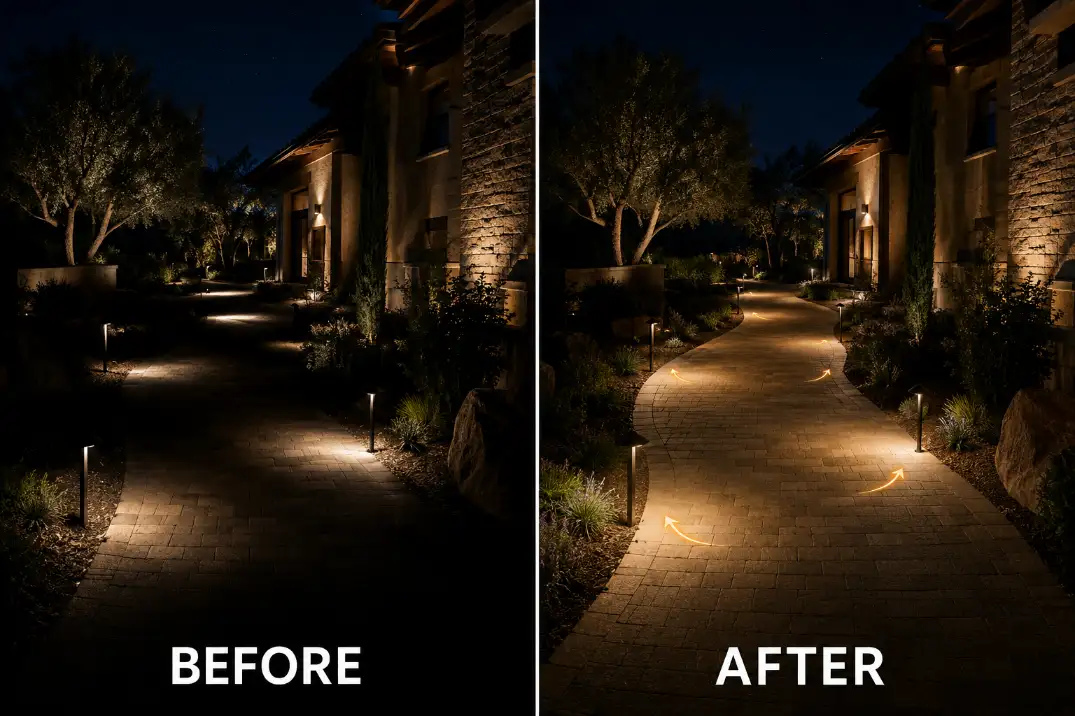
What Actually Fixes Bright Spots and Dark Gaps
Re-aim before replacing
For adjustable fixtures, soften the angle first. A light aimed straight down creates a tight pool. A small change in aim can stretch the coverage across the walking surface, as long as it does not shine into someone’s eyes.
Reduce spacing when coverage cannot overlap
If each fixture creates a usable 4-foot pool and the fixtures are 9 feet apart, the layout is asking too much from the fixture. Adding one or two properly placed lights may look cleaner than forcing existing lights to work harder.
Change the fixture when the optics are wrong
Some fixtures are accent lights pretending to be path lights. Narrow spots, decorative lanterns, and exposed-source fixtures can create drama, but they often fail at calm ground coverage. If the fixture produces glare and a hard-edged pool no matter how you aim it, replacement makes more sense than another bulb swap.
Use color temperature only as a comfort adjustment
Color temperature will not fix spacing. Still, it affects how harsh the contrast feels. Warm white light around 2700K–3000K usually looks softer on stone, wood, mulch, and planting beds. Cooler 4000K+ light can make hot spots feel sharper, especially on pale concrete or wet pavement.
When Weather or Moisture Is Not the Main Cause
Moisture problems usually look different. They cause flickering, intermittent operation, tripped GFCI outlets, corrosion, or lights that fail after rain. They do not normally create a neat repeating pattern of bright circles and dark gaps.
That distinction matters. If the pattern was bad from day one, look at layout and beam spread first. If the pattern changed after rain, freezing soil, irrigation, or a storm, inspect for tilted fixtures, loose stakes, fogged lenses, or water inside housings before redesigning the system.
Coastal moisture in California, freeze-thaw movement in northern states, and irrigation overspray in dry Arizona yards can all shift or degrade fixtures over time. But the symptom still guides the diagnosis: repeating dots suggest optics; random failures suggest site damage or electrical trouble.
The Bottom Line
Bright spots and dark gaps are usually caused by uneven light distribution, not too little brightness. The strongest fixes are spacing, beam spread, mounting height, and aim. Brighter bulbs only help when the pattern is already even and the entire area is too dim.
If the lights create repeating dots, fix the layout. If the light fades down the run, check power. If the pattern changed after weather or plant growth, inspect the site before replacing equipment. Good outdoor lighting should not look like separate pools of light. It should make the route readable without making the fixtures the main thing you notice.
For broader guidance on reducing glare and using better-shielded outdoor lighting, see DarkSky International.