If your outdoor lights switch on normally but the path, steps, gate, driveway edge, or entry zone still stays dark, this is usually not a power failure. It is a coverage failure.
The light exists, but it is not landing where the task is. That distinction matters because people often waste time replacing bulbs, cleaning lenses, or blaming the transformer when the real problem is beam placement, fixture type, spacing, or mounting height.
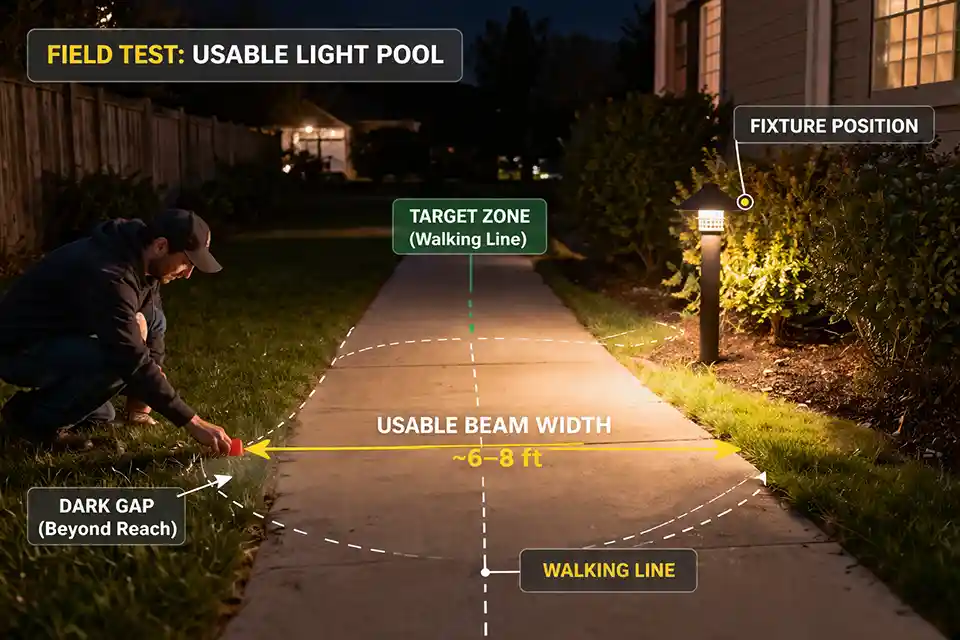
Start with three checks before touching the system: stand about 15 to 20 feet back and see where the beam actually lands, measure the dark gap between usable light pools, and identify the exact target that remains underlit.
A fixture can look bright from the yard and still fail to light a 4-foot walkway or the front edge of a step. That is what separates this problem from a dimming or voltage issue. In a power problem, the fixture usually looks weak. In a coverage problem, it looks fine while the area you care about stays unsafe or visually incomplete.
Quick Diagnostic Checklist
- The fixture looks bright, but the walking or entry surface still looks dim
- Dark gaps between usable light areas are wider than about 2 to 3 feet on steps or about 6 feet on a path
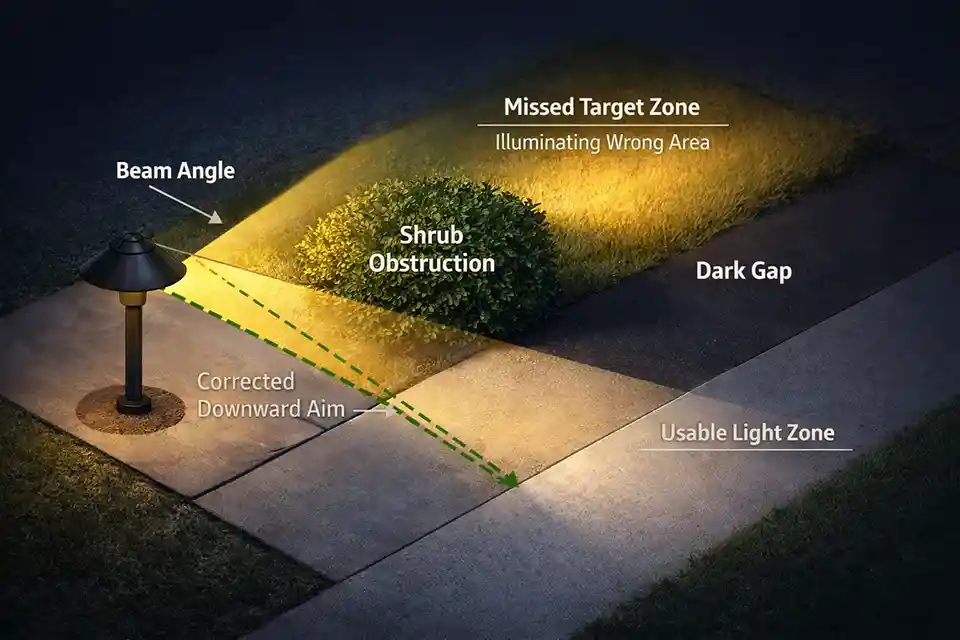
- The beam lands on walls, shrubs, mulch, or decorative stone instead of the target zone
- One fixture is trying to light an area that needs a different fixture type
- The system looked “active” from the street even when the important surface was never clearly lit
- More lamp brightness improved glare more than visibility
This page is about coverage, not whether the lights work
A lot of outdoor lighting advice collapses different problems into one bucket. That is where weak troubleshooting starts. “My outdoor lights aren’t lighting the area I need” does not automatically mean the system is underpowered, broken, or too dim. Often it means the wrong light is being asked to do the wrong job from the wrong position.
The real question is: what surface or object is supposed to be visible?
This is the part people skip. A path light does not need to make the whole yard brighter. A step light does not need to wash the wall. A driveway light does not need to illuminate the shrubs. The job is not “more light.” The job is enough usable light on the specific target area.
That is why this issue deserves its own page instead of being folded into a broad “outdoor lights not working” article. A working fixture that misses its target is a design and aiming problem first, not a repair problem first.
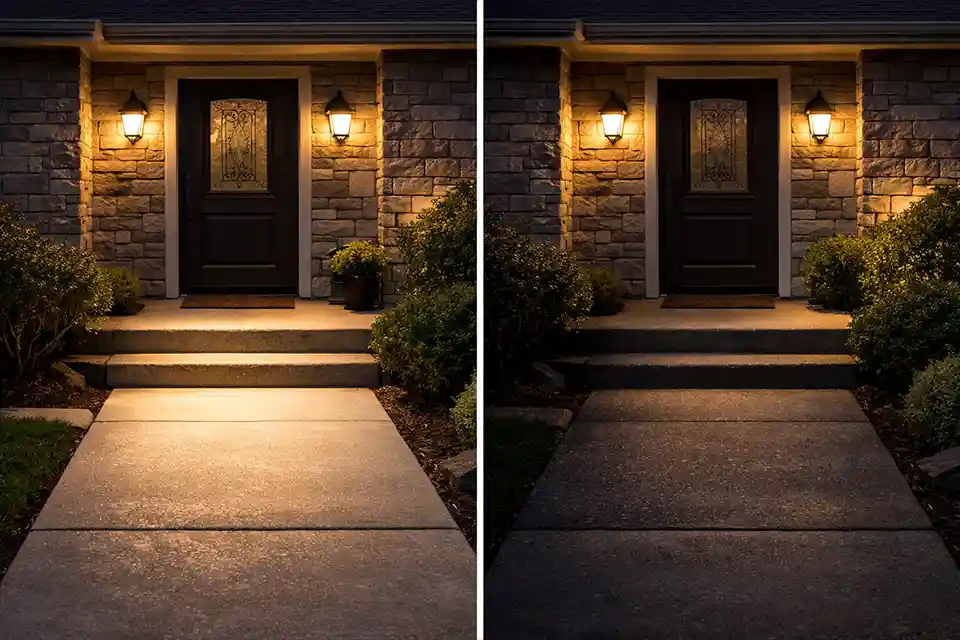
Bright fixture, dark target is the classic clue
If the lamp source is obvious but the surface remains hard to read, the failure is usually geometric. The beam is too wide, too narrow, too high, too blocked, or simply pointed at the wrong thing.
This is also why adding brightness often disappoints. It increases the most visible part of the mistake.
A lot of owners overestimate fixture output and underestimate beam control. That is one reason Poor Outdoor Light Placement Causing Dark Spots and Glare overlaps with this symptom, but the priority here is narrower: not glare as a general outcome, but usable light missing from the intended zone.
The highest-value diagnosis is target by target
The biggest improvement in this article is not listing more causes. It is sorting the problem by what is staying dark.
Walkways: the usual failure is spacing, not weak bulbs
For a path, continuity matters more than dramatic hotspots. If the fixture pools do not overlap at least slightly, the path may look “lit” in pieces but still feel visually broken. In many residential layouts, spacing around 4 to 6 feet works better than stretching fixtures to 7 or 8 feet and hoping the gaps disappear.
What usually gets misread on paths
People notice the bright circle around each fixture and assume the route is covered. But the real question is whether a person can read the path between fixtures without visual interruption. If the dark transition between pools is longer than about 6 feet, the layout is often asking too much from each fixture.
What actually fixes it
Move fixtures toward the walking line, reduce spacing, or switch to a fixture with a more appropriate spread. Bulb swaps usually rank lower here than layout correction.
Steps and entries: the real problem is often beam height
Steps fail differently from paths. A light can brighten the porch wall and still leave the front step edge visually weak. This happens when fixtures are mounted high and aimed outward rather than down toward the tread or landing.
Why this area is less forgiving
A path can tolerate modest inconsistency. A step cannot. If the front edge of a tread is still ambiguous from a few feet away, the light is not doing its job no matter how bright the fixture looks from the driveway. Even a 1- to 2-foot shift in where the beam lands can decide whether the step reads clearly or disappears into contrast.
What actually fixes it
Lower the aiming angle, add a shielded step light, or dedicate a small directional fixture to the landing instead of asking a porch flood to handle everything.
Driveway edges and side yards: the wrong fixture type is common
These zones often suffer from fixture-task mismatch. A decorative path light is not a good substitute for broader edge guidance across a large apron. A flood that works near a garage door may also miss a long side-yard walking line if it spreads too broadly and loses intensity where it matters.
In these areas, the problem is often not poor installation quality. It is that the wrong distribution pattern was chosen for the target shape. That is also where Outdoor Lighting Power Supply Issues Losing Power can distract people from the main issue. If the fixture looks stable but the edge line never becomes readable, start with distribution before chasing voltage.
What people usually waste time on first
Installing a brighter lamp
This is the most common time-waster. If the beam misses the target, more output mainly creates stronger glare, brighter spill, and harsher contrast. The intended area can actually feel darker because your eyes adapt to the brightest visible source.
Cleaning lenses as the main fix
Dirty lenses matter, but usually less than people think. A dirty lens can soften output. It rarely explains why the same gate latch, tread edge, or path transition has always been underlit since the day the fixture was installed.
Calling it a wiring issue too early
People often overestimate electrical faults because they sound technical and definitive. But if the fixture reaches normal brightness quickly, stays stable for hours, and still misses the target, this is usually not the first place to spend time. A real power issue is more likely when brightness drops after 30 to 60 minutes, or when far-end fixtures look distinctly weaker than near-end ones.
The one-night test that separates layout problems from hardware problems
This is where the page can beat generic SERP content: give the reader a fast field test instead of another broad explanation.
Step 1: define the dark target
Pick one exact failure point: first step edge, gate handle zone, 5-foot section of walkway, driveway border, or house number area. Do not troubleshoot the whole yard at once.
Step 2: mark where the light actually lands
At night, use temporary markers or even small stones to outline the usable light pool. Ignore decorative glow. Mark only the area where the surface or object is clearly readable.
Step 3: compare target width to usable beam width
If the target is a 4-foot-wide walking surface but the usable beam only covers 2.5 to 3 feet where it lands, you are not dealing with “not enough overall light.” You are dealing with a mismatch between beam shape and target.
Step 4: test one move before replacing anything
Shift a fixture 18 to 24 inches, narrow the spacing, or re-aim one light downward by roughly 10 to 15 degrees. Then compare the same target again. One temporary correction often reveals more than a full round of speculative parts replacement.
Pro Tip: If a single test reposition dramatically improves the target zone, stop shopping for brighter lamps. The layout already told you the real problem.
When the standard fix stops making sense
There is a point where repeated adjustment is just disguised redesign.
Re-aiming stops making sense when one correction creates a new failure
If tilting a fixture fixes the path but blinds the entry, or narrowing the spread fixes the steps but leaves the driveway edge dark, the system is no longer suffering from a small aim problem. It is revealing a fixture-selection problem.
Replacement starts making more sense when the job itself is wrong
A decorative path light asked to illuminate a stair landing, a floodlight asked to handle precise edge guidance, or a solar accent light asked to cover a side-yard route will keep disappointing because the task never matched the hardware.
That is when the right move is not another tweak. It is assigning the right fixture to the right target.
This is also where solar setups can confuse the diagnosis. If the light already misses the target and also fades after a few hours, placement may not be the only issue. In that case, Sun Exposure Issues with Solar Lights can become part of the decision instead of a separate annoyance.
Comparison Guide: symptom, likely cause, best fix, wasted fix
| Symptom | Most Likely Cause | Best Fix | Fix That Usually Wastes Time |
|---|---|---|---|
| Path lights are on, but the route feels patchy | Excessive spacing | Reduce gaps to around 4 to 6 feet or reposition along the walking line | Installing brighter bulbs first |
| Porch light is bright, but the step edge stays weak | Beam aimed too high or too far out | Re-aim downward or add dedicated step lighting | Cleaning the lens and assuming it is solved |
| Driveway edge stays dark while nearby wall is bright | Wrong beam spread for target shape | Use broader controlled coverage aimed at the edge zone | Swapping identical lamps repeatedly |
| One entry feature stays unreadable | Fixture-task mismatch | Add a small directional light to the exact target | Trying to force a nearby fixture to do everything |
| Far fixtures look weaker after some runtime | Power or charging issue | Check voltage path or solar charging conditions | Repositioning working fixtures endlessly |
What makes this page more useful than a generic troubleshooting article
Generic articles usually answer “why are my outdoor lights bad?” This page answers a narrower and more useful question: “why is the light on, but the intended area still not visible?” That is a better diagnostic frame because it forces the decision back to target coverage.
It also avoids one of the biggest SEO traps in this topic: sounding complete by listing every possible outdoor lighting issue. That is not what this searcher needs. This searcher needs help deciding whether the problem is spacing, beam geometry, wrong fixture type, poor aiming, or a less likely electrical weakness.
If aging and declining performance are part of the pattern, Why Outdoor Lights Stop Working Over Time can support that broader diagnosis. But this page should win by staying selective, not by turning into a master list.
For broader guidance on responsible home outdoor lighting, see DarkSky’s home outdoor lighting guide.
Snippet: Outdoor lights can work fine and still miss the area that matters. Learn how to diagnose coverage problems and fix the real cause.