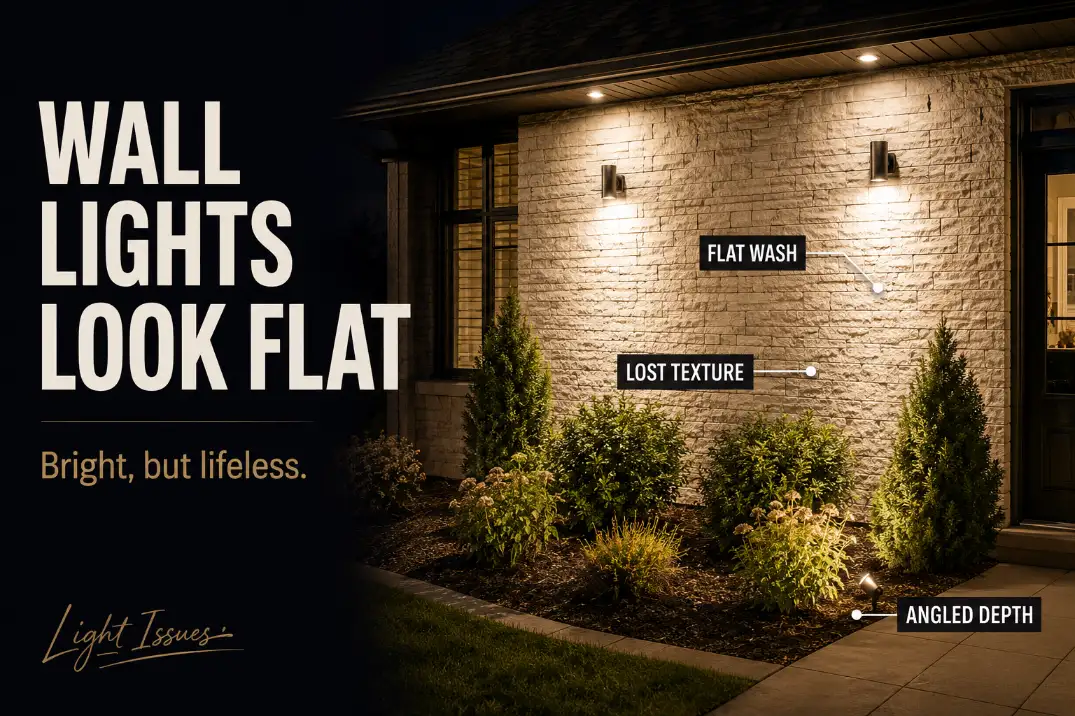
Wall lights make landscaping look flat when they light the wall, plants, and ground from the same direction the viewer is looking.
That front-facing wash removes the small shadows that make stone, leaves, bark, mulch, and planting layers readable. The scene may be bright, but it has no depth.
Start with four checks: one bright wall plane, weak plant outlines, a hot patch near the fixture, and window reflection that overpowers the view outside.
Check the scene 30–45 minutes after sunset, not at dusk, because leftover ambient light can hide the problem. If the wall is bright but the planting still looks lifeless from 15–25 feet away, the fix is usually angle or beam control before more lumens.
This is different from a yard that is simply too dark. A dark yard lacks coverage. A flattened yard may have plenty of light, but the light is arriving from the wrong direction.
Why Wall Lights Flatten Outdoor Texture
Wall lights flatten landscaping when they erase edge contrast. Texture depends on small shadows. A shrub needs separation between leaves.
Stone needs shadow along raised edges. Bark needs shadow inside grooves. Mulch needs contrast between high and low pieces.
When a wall light throws a broad wash straight across those surfaces, the eye loses the cues that separate one layer from another. The house may look cleaner, but the landscape looks thinner.
The symptom is brightness without shape
The most useful clue is not whether the area is visible. It is whether the area still has form. If the shrubs look like one dark mass, the stone wall looks like a painted backdrop, or the planting bed looks flatter after the wall lights turn on, the problem is not simple underlighting.
That is why replacing a 600-lumen lamp with an 800- or 1,000-lumen lamp often fails. More output strengthens the same flat direction. It may make the wall easier to see, but it does not create the side shadows that give the landscape depth.
A practical threshold: if plant shape still disappears from 15–25 feet away while the wall itself is clearly bright, brightness is not the main problem.
Wall wash is not always wrong
Flat wall wash has a place. It can work well on smooth stucco, painted siding, house-number areas, simple entry backdrops, and clean architectural surfaces where the goal is an even glow. Wall wash is a finish effect. Grazing is a texture effect.
It becomes a problem when the same technique is expected to reveal surface detail. Stone, brick, bark, layered shrubs, ornamental grasses, and rough planting beds usually need angled light, not just a smooth wash.
If the goal is a clean wall glow, wall wash can be right. If the goal is landscape depth, it is often the wrong tool.
A similar pattern shows up when outdoor lights create bright spots and dark gaps. The issue is not always the total amount of light. It is where the useful contrast lands.

Missing Texture Shows Where the Angle Fails
Texture is usually lost before safety is lost. That is what makes this problem easy to misread.
The walkway may still be usable, the door may still be bright, and the fixture may look normal from close range. But from the patio chair, driveway, or front walk, the landscape has no readable layers.
Surface detail needs side shadow
A shallow side angle reveals more than a straight-on beam because it lets raised surfaces cast small shadows. Even a 20–35 degree change in light direction can make leaves, stone edges, and bark grooves read more clearly.
This is the difference between visibility and depth. Visibility tells you the light reached the area. Depth tells you the light reached it from a useful angle.
For rough stone, brick, or layered planting, a fixture that skims from the side often reveals more relief than a wall light that shines outward from the house.
The improvement does not always require more light. It often requires less frontal light and more directional control.
Wall height is commonly overestimated
People often assume a wall fixture mounted 6–8 feet above the ground should be high enough to light the landscape well. Height helps spread light, but it does not guarantee form.
A high wall light can still flatten everything if its beam faces outward from the same direction as the viewer.
The condition that gets underestimated is the viewing point. A light can look fine when you stand under it and still look flat from the driveway, seating area, back door, or indoor window.
Judge the lighting from the place where someone actually pauses for 10–15 seconds at night.
Pro Tip: Turn one wall light off for 5 minutes and look from the main viewing point. If the planting suddenly has more shape from nearby spill light, the wall light is overpowering the scene.
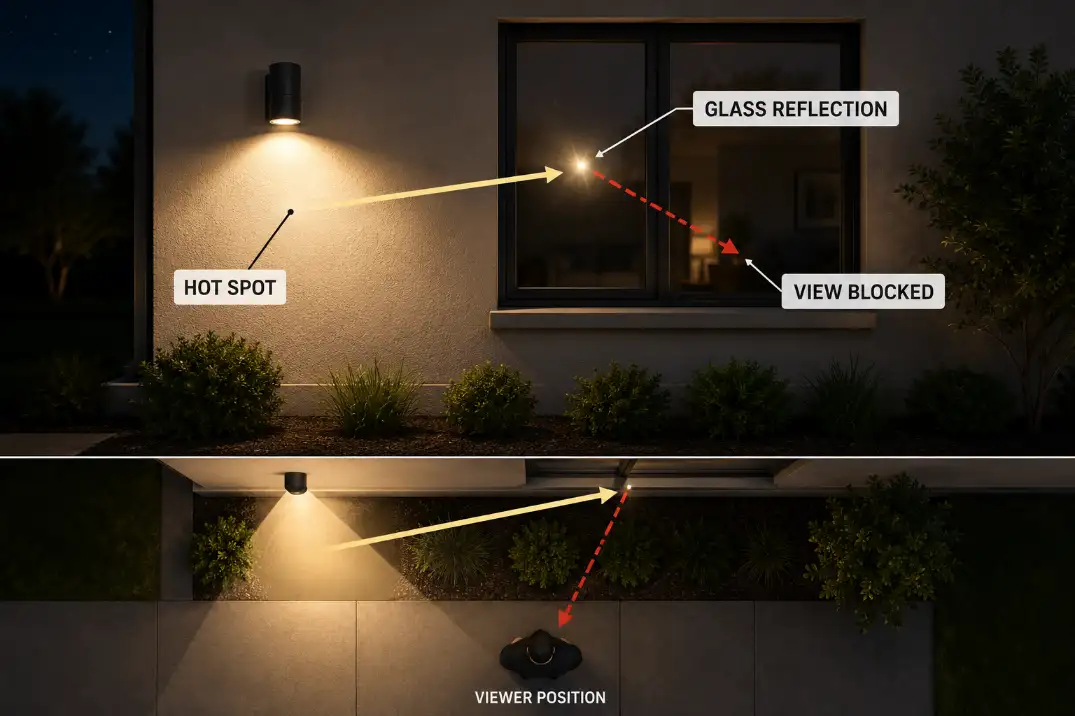
Hot Spots and Window Reflection Are Placement Clues
A hot spot or glass reflection is more useful than it looks. It tells you where the beam is going. If the beam is landing in the wrong place, a nicer bulb will not change the geometry.
Hot spots show beam concentration
A hot spot is not just a bright area. It is a bright area that steals attention from the rest of the scene. On a wall-lit landscape, it often appears as a bright oval below the fixture, a shiny patch on stone, or a harsh highlight across glossy leaves.
If that hot spot remains obvious after dimming the lamp by about 20–30%, the problem is probably distribution, not output. A softer lamp may reduce discomfort, but the same beam will still hit the same surface too directly.
This is where many fixes waste time. Changing from warm white to cooler white, buying a decorative fixture with the same spread, or swapping bulbs without changing direction can make the fixture look different in daylight while leaving the nighttime problem intact.
When the beam is aimed poorly, the better starting point is poor outdoor light placement, not bulb shopping.
Window reflection shows the wrong viewing path
Window reflection is a separate warning sign. If the wall light reflects in glass, the viewer may see the glowing fixture or bright wall instead of the planting outside. This often becomes obvious from indoors after the room lights are dimmed.
Use a simple test. Stand inside with the room lights off for 30 seconds. Look toward the glass. Then turn the exterior wall light off for 5 minutes.
If shrubs, walkway edges, or wall detail become easier to read when the wall light is off, the issue is not the window. The beam is entering the reflection path.
That is a placement problem first. A shield, lower output, narrower beam, or changed angle may help. But changing color temperature alone rarely fixes reflection if the fixture itself is still visible in the glass.
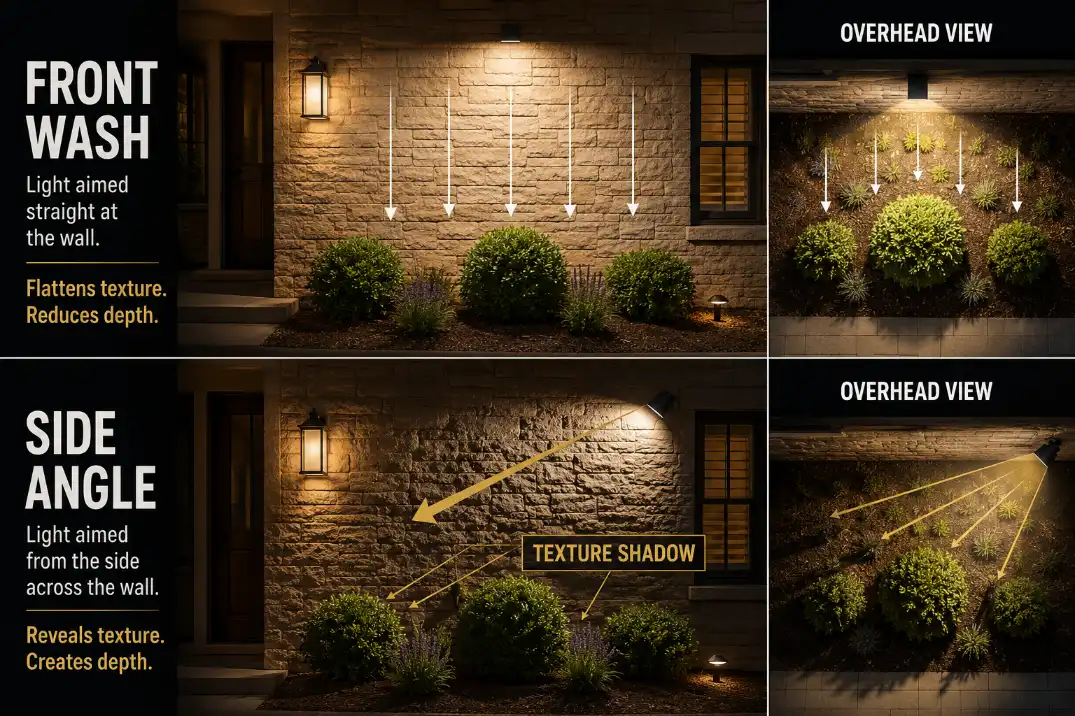
Grazing Light Works When Texture Is the Goal
Grazing light is useful because it does the opposite of flat wall wash. Instead of spreading evenly across the surface, it skims across relief so raised areas and recessed areas separate.
Grazing should skim, not blast
As a practical starting point, wall washing usually places the fixture farther from the wall, often 12 inches or more, with a wider beam that softens the surface.
Grazing usually works closer to the surface, often around 12 inches or less, with a narrower beam around 15–30 degrees when the goal is stronger surface detail.
Use those numbers as a starting point, not a final design rule. A rough stone wall may need the fixture slightly farther out so the shadows do not become too harsh.
A smoother brick surface may need a closer angle to show relief. A shrub line beside the wall may need a side accent instead of true wall grazing.
The healthier result is contrast without glare: the wall has visible relief, plants keep their outline, and the fixture itself does not dominate the view from 20 feet away. The failing result is a bright wall, weak plant edges, and one obvious fixture glow.
Grazing can become too dramatic
Grazing is not automatically better. On very rough stone, a steep angle can create heavy shadows that look theatrical.
On glossy leaves, it can create sparkle instead of shape. On light stucco, it may exaggerate surface flaws that were barely noticeable during the day.
That is where a routine fix stops making sense. If every adjustment makes the wall texture louder but the planting bed less readable, the goal should shift.
Instead of forcing the wall light to solve everything, use a separate accent aimed across the plant face, path edge, or main texture feature.
This matters because brighter fixtures can reduce usable visibility when they kill contrast. A wall that looks impressive in a product photo may still make steps, edges, and planting forms harder to read.
That is the same visibility trap behind brighter outdoor lights making visibility worse when glare and contrast are ignored.
Better Angle: What Actually Fixes a Flat Landscape
The better angle is chosen from the viewing point, not from the fixture. Stand where the landscape matters most: the patio chair, front walk, driveway, porch step, or indoor window.
Then decide what should have shape. It might be a stone wall, a shrub mass, an address planter, a small tree, or a walkway edge.
Start with the object that should have depth
If the object has no edge shadow, move the light direction before changing output. A side angle, shielded beam, lower fixture, or separate accent light usually changes the result more than a stronger lamp.
Small adjustments can matter. Moving a fixture 12 inches outward from the wall, lowering an accent light, or aiming 15 degrees away from the viewer can change a flat scene more than replacing the lamp. The best result usually has less obvious light and more obvious landscape.
Separate wall light from landscape light
The cleanest fix is often to let the wall light handle human use near the door while a separate fixture handles texture. A wall sconce can stay modest, warm, and comfortable. A small accent light can graze stone, catch the side of a shrub, or define a path edge.
This is especially important when the wall light misses the actual target. It may light the siding beautifully while leaving the plant form unreadable.
If the lit surface and the intended landscape feature are not the same thing, the problem may overlap with outdoor lights that miss the target area.
Quick Fix Priorities
Do not adjust everything at once. Change the condition most likely to affect depth first.
| Condition | What It Means | What to Change First |
|---|---|---|
| Smooth wall looks even and comfortable | Wall wash may be doing its job | Leave it alone or dim slightly |
| Stone or shrubs look flat | Light is too frontal | Add side angle or grazing accent |
| One harsh oval sits under the fixture | Beam is concentrated too close | Shield, dim, or change distribution |
| Window shows fixture reflection | Beam is entering the glass view path | Re-aim or block direct fixture view |
| Plants vanish from 15–25 feet away | Edge contrast is too weak | Create texture shadow before adding brightness |
After each change, let your eyes adapt for 10–15 minutes. Then check the scene from the main viewing point and one secondary point, such as the driveway or an indoor window. If the landscape has more shape but the fixture itself draws less attention, the adjustment is moving in the right direction.
Quick Diagnostic Checklist
- The wall is bright, but shrubs or stone texture disappear from 15–25 feet away.
- A hot oval under the wall light remains obvious after a 20–30% dimming test.
- The fixture reflection is stronger than the outdoor view when seen through a window at night.
- Texture improves when one wall light is turned off for 5 minutes.
- The landscape looks acceptable at dusk but flat 30–45 minutes after sunset.
- The viewer notices the fixture before noticing the plant, wall, or path edge.
Questions People Usually Ask
Should wall lights point up or down for landscape texture?
Downlight is usually better for entry comfort and glare control, but it does not automatically create landscape texture. Uplight or side light often reveals more depth when it is shielded and aimed across the surface rather than toward the viewer.
Is 3000K too bright-looking for wall lights?
Color temperature is not the same as brightness. A 3000K wall light can look comfortable if it is shielded and aimed well, while a lower-output 2700K light can still flatten the landscape if it washes the wall from the wrong direction.
Can dimming fix flat wall lighting?
Dimming can reduce glare and hot spots, but it cannot create texture by itself. If the scene stays flat after a 20–30% reduction, change the angle, beam spread, or fixture position before reducing output further.
For broader official context on choosing efficient lighting and controlling light levels at home, see the U.S. Department of Energy lighting guide.