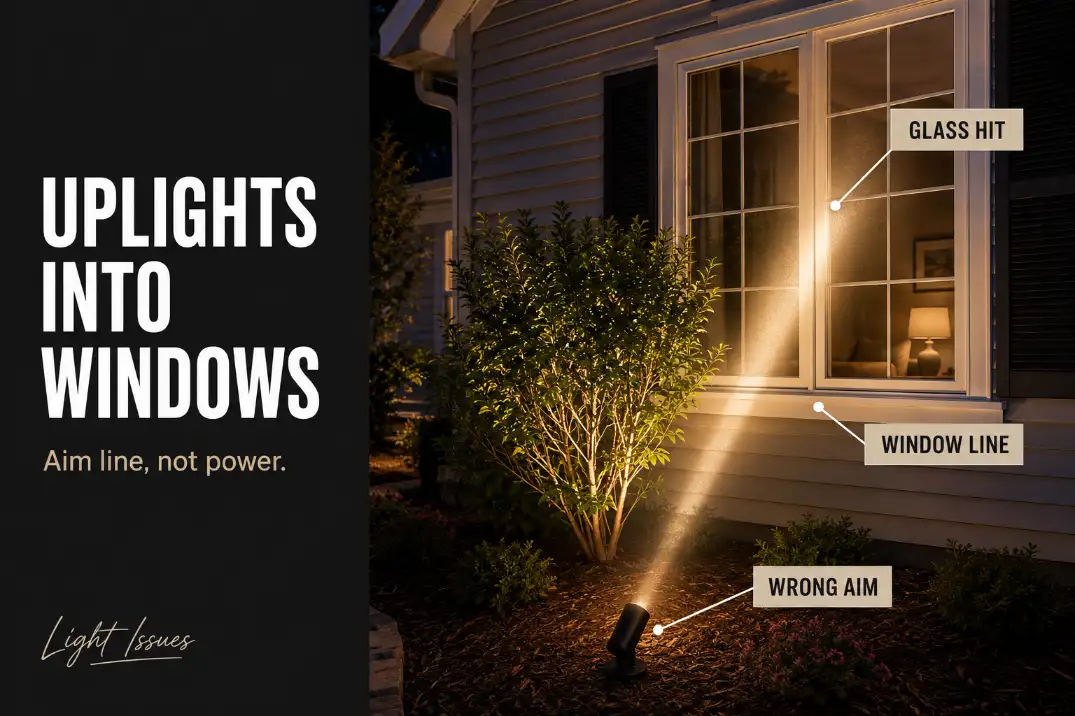
Garden uplights usually shine into windows because the beam crosses the glass line instead of stopping on the plant, trunk, wall texture, or garden feature it was meant to light.
The first checks are simple: look from inside the room after 10–15 minutes of darkness, check whether the bright center of the beam lands on glass, and confirm whether the fixture is aimed through the planting instead of onto it.
This article is mainly about your own garden uplights hitting your own windows. The same beam-control logic also applies when light reaches a neighbor’s window, but that adds a property-line and privacy problem.
For this issue, the core distinction is more direct: normal garden uplight behavior makes the plant brighter than the glass. Problem behavior makes the glass brighter than the plant.
Wrong Aim
The target is where the beam stops
A garden uplight is not fixed just because it points generally toward a shrub. The real target is the surface that catches and stops the beam.
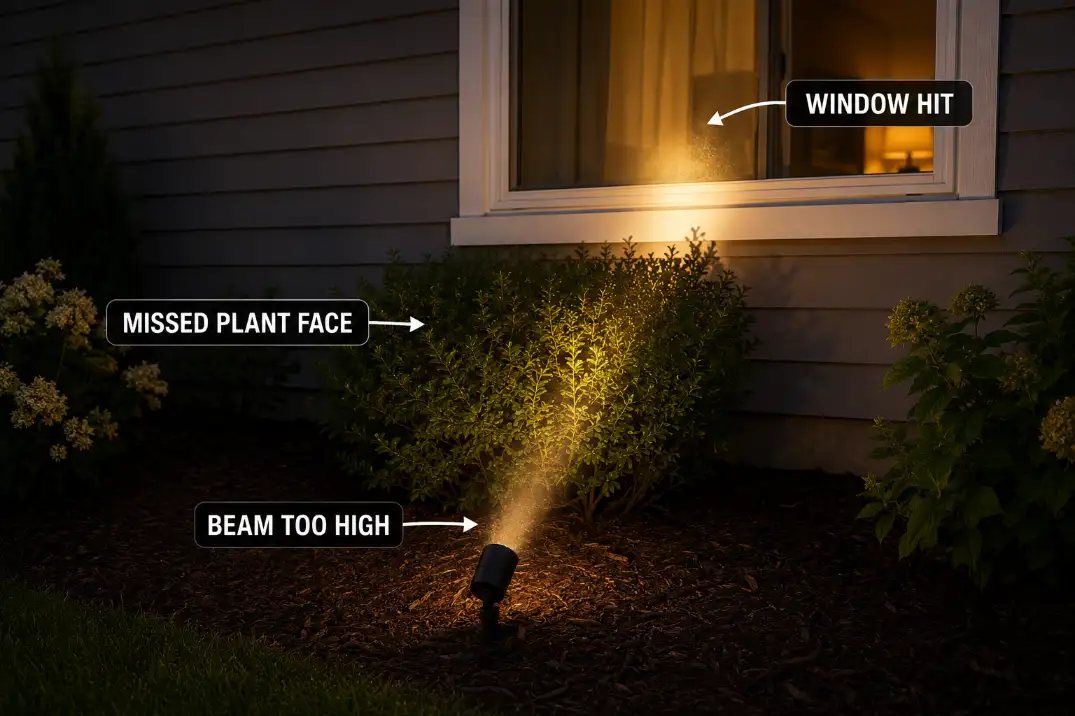
If the brightest part of the cone slips above the foliage, passes through open branches, or clears the top of the planting by 12–18 inches, the window may become the final landing surface.
That mistake can be hard to see from the garden bed. From outside, the shrub seems to be in front of the light. From inside, the glass shows the truth: the beam is still entering the window line.
A better field check is to stand 8–15 feet away from the planting and look across the beam path, not straight down at the fixture. If the bright center is traveling past the plant face instead of breaking on leaves, bark, or stone, the aim is too high or too direct.
The same mistake appears in many placement problems: the light is working, but the useful light lands on the wrong surface.
That pattern is covered more broadly in Fix Poor Outdoor Light Placement, where the issue is not always the fixture itself but the surface it is allowed to hit.
Dimming is often the wrong first fix
The common wasted fix is replacing the lamp with a dimmer one before correcting the aim. A dimmer bulb only makes the wrong beam less bright. It does not make the beam belong to the plant.
Start with the fixture angle. Lower the head until the brightest center of the beam lands on the lower or middle face of the shrub, not above it.
On many adjustable low-voltage fixtures, a 10-degree change is visible immediately. A 20-degree change can remove the window hit completely when the fixture is already close to the right target.
Pro Tip: Judge the first correction from inside the room. Window glare is a viewer-position problem, so the room view is the deciding view.
Glass Reflection
A window can glare even when the fixture is not obvious
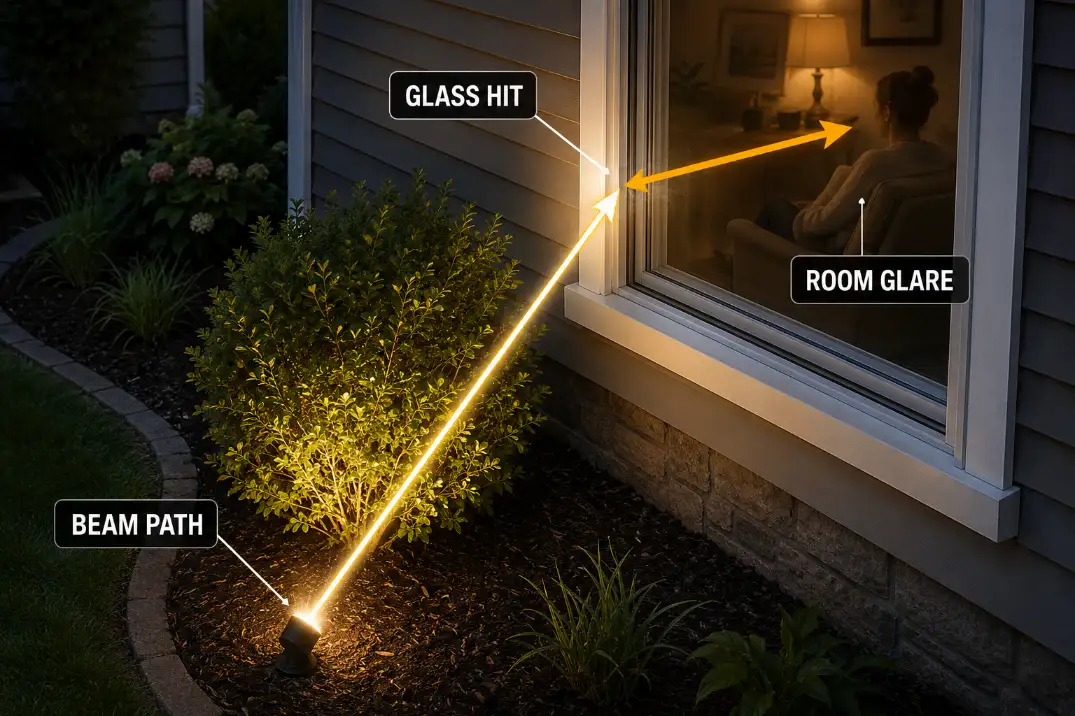
Window glass behaves differently at night. Once the room is darker than the exterior light hitting the glass, the window can act like a mirror.
The fixture does not always need to shine straight into the room. It can strike the glass face and bounce back as a bright oval, streak, or reflected hot spot.
This is the part people often misread. They look outside, see a shrub in front of the fixture, and assume the plant is blocking the light. But if the beam is touching the glass at an angle, the room may still catch the reflected glare.
The useful distinction is symptom versus mechanism. A glowing window is the symptom. The mechanism may be a direct beam, a reflected beam, or a visible fixture source. Those fixes overlap, but they are not identical.
| What you see from inside | More likely mechanism | Better first move |
|---|---|---|
| Bright oval on the glass | Beam is hitting the window face | Re-aim down or sideways |
| Visible lamp point | Fixture source is in the sight line | Add shield, hood, or louver |
| Branch shadows on glass | Beam is too steep or shrub is too open | Pull fixture back or lower aim |
| Plant stays underlit | Target is being missed | Aim at the plant face before dimming |
| Glare remains after lower output | Direction problem remains | Change beam path or fixture control |
This belongs in the glare family, not just the brightness family. Why Outdoor Lights Create Glare explains the larger pattern: discomfort often comes from where the light goes and what the viewer can see, not from lumens alone.
Reflection gets worse when the beam faces the glass squarely
A beam aimed straight toward a window has little room to disappear. Even if it touches leaves first, the remaining light can keep traveling into the glass plane.
A slight side angle usually performs better because the beam grazes the plant and sends the reflected path away from the viewer.
The condition homeowners often overestimate is plant coverage. A shrub in front of a window is not automatically a glare shield.
If the branches are thin, newly pruned, narrow at the bottom, or open in winter, the beam can pass through gaps and still hit the glass.
Tall Shrub Shadow
A taller plant does not always block the beam
A tall shrub can help only when its foliage catches the beam before the beam reaches the window.
If the fixture is placed too close to the base and aimed steeply upward, the lower branches may block part of the light while the bright center climbs through the upper gaps. From inside, that can look like glare mixed with uneven branch shadows.
For many foundation shrubs, a fixture position around 12–30 inches from the plant base is easier to control than a fixture pressed tight against the trunk or stem cluster.
Too close creates a steep beam. Too far away can send the light across the bed and toward the house before the plant catches it.
The comparison that matters is not tall versus short. It is dense target versus open filter. A compact evergreen face may stop the beam cleanly.
A taller, airy shrub may create dramatic shadows while still allowing glare through the window line.
Pruning can reveal a problem that was already there
A light that behaved well in June may hit the window after pruning, winter thinning, wind damage, or seasonal leaf drop. The fixture did not necessarily get brighter. The plant stopped acting like a reliable target.
That is why a one-night fix is not enough near windows. Recheck the beam after trimming and again the next night. If the glare returns after the foliage opens, the installation was depending on plant density instead of controlled aim.
A related failure happens when exterior lights flatten the wall or planting bed instead of revealing texture.
If the wall or glass becomes the brightest plane, Wall Lights That Flatten the Landscape is a useful nearby pattern because it explains how front-facing light can erase depth while making reflective surfaces more noticeable.
Beam Control
Aim first, shield second, replace third
Beam control works best after the fixture is aimed at the right target. A shield cannot save a beam that is pointed directly at the window.
A dimmer lamp cannot make a missed target look intentional. The order should be simple: aim first, add cut-off second, move or replace the fixture third.
Beam spread matters more than raw output near glass. A 15–30 degree beam is often easier to control on narrow shrubs, small ornamental trees, or trunks.
A 35–60 degree beam can look softer on a broad planting face, but it spills more easily onto siding, windows, and neighboring views.
Near window glass, a garden uplight should behave more like a controlled accent than a small floodlight. The healthier condition is controlled contrast: the plant has visible texture, the window stays quiet, and the fixture source is not visible from the room.
The failing condition is spill: the plant looks underlit while the glass, wall, or blinds become the brightest surface.
Once the window becomes brighter than the plant, you are dealing with the same basic failure described in Outdoor Lights Miss Target Area: the fixture is producing light, but not delivering it to the job.
Use a shield only when the beam path is almost right
A hood, snoot, louver, glare shield, or shielded well light can help when the beam is already aimed at the plant but a small amount of spill still reaches the glass. It is not the first correction for a fixture that is obviously pointed at the window.
Pro Tip: If the window glow drops sharply when you hold a temporary piece of cardboard beside the fixture, the problem is spill control. If the glow barely changes, the main beam is probably aimed wrong.
Window Line
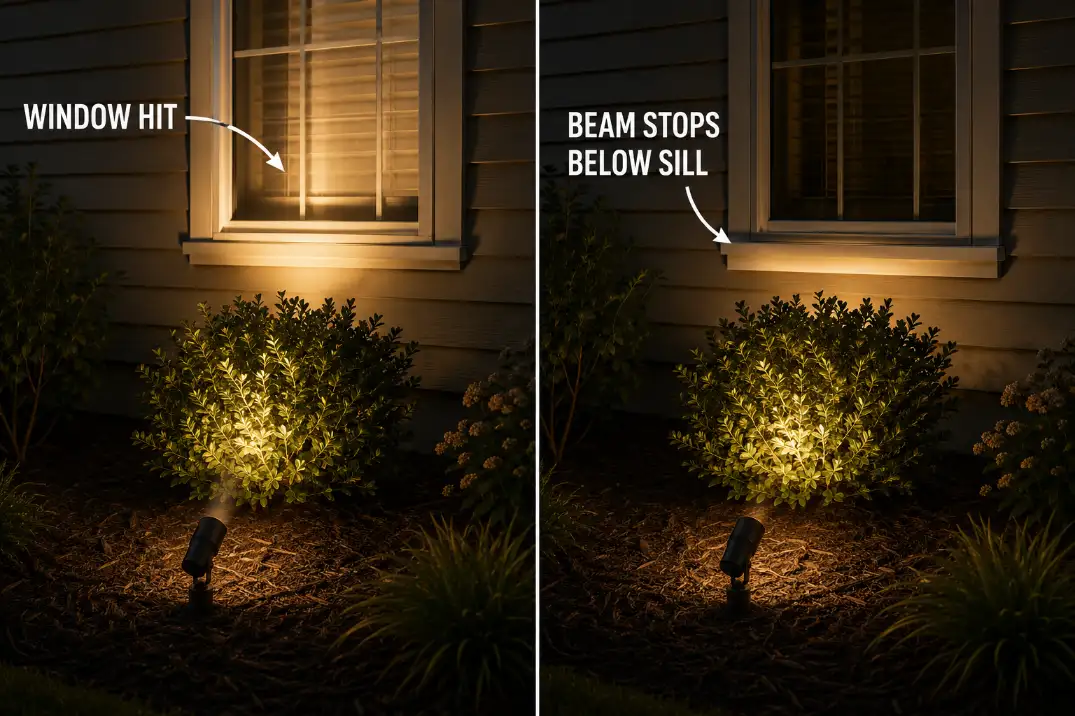
The window line is the stop line
The most useful rule is simple: the beam should stop before it enters the glass plane. The plant edge is not the real boundary. The window line is.
In practice, that means the brightest center of the beam should land below the sill, beside the glass, or on a textured surface that absorbs light. If the center of the beam crosses the lower window edge, the installation is not controlled enough for that location.
Do not rely on curtains or blinds as the main fix. They hide the symptom from one room, but the beam is still spilling into the wrong plane.
That can still create glare outside, disturb a bedroom later at night, or create a neighbor-facing problem if the angle continues across the yard.
For the property-line version of this issue, Stop Outdoor Lights Shining Into Neighbor Windows explains why direction control is usually more effective than simply reducing brightness.
Routine adjustment stops working when every useful angle hits glass
Sometimes the fixture is just in the wrong place. If it sits directly under a narrow shrub in front of a window, every attractive uplight angle may still pass through the plant and into the glass. That is the point where small tuning stops making sense.
Move the fixture to the side, light the shrub from an angle, choose a narrower beam, or use a different target.
A nearby trunk, boulder, low wall, or side-facing planting mass can often create a better night scene than forcing an uplight under a window.
Re-Aim Test
Step 1: Check from the actual room view
Turn the garden lights on and wait 10–15 minutes after full darkness. Stand where someone normally sits, walks, or sleeps inside the room. Do not judge the glare with your face pressed against the glass.
Look for four signals: a bright oval on the window, a visible lamp point, branch shadows on the glass, or a glow on blinds. If the room is brightly lit, dim the interior lights briefly so the exterior reflection is easier to see.
Step 2: Move the beam in small changes
Outside, lower or rotate the fixture in small increments. A 1-inch change at the fixture head can move the beam several inches by the time it reaches the plant or window. Recheck from inside after each meaningful adjustment.
If the beam now stops on the plant and the glass quiets down, keep the fixture. If the plant becomes too dark when the glare disappears, the original setup was relying on spill rather than controlled target lighting.
Step 3: Stop tuning when the location is wrong
If two clear aim changes still leave a window glow, stop treating the problem as fine-tuning. Add a shield only if the beam is already landing on the correct target. Otherwise, move the fixture, change the beam angle, or light a different feature.
Recheck after 24 hours, then again after pruning or seasonal thinning. A good fix should survive normal plant changes, not only one perfect evening.
Questions People Usually Ask
Should garden uplights point straight up?
Usually no, not near windows. Straight-up aiming only works when the target fully catches the beam and no glass sits in the beam path. Near a house, a lowered or side-angled beam is usually easier to control.
Will warmer light stop the window glare?
Warmer light can feel softer, but it will not fix a beam aimed into glass. A 2700K lamp may be more comfortable than a cooler white lamp, but aim, cut-off, and fixture placement still decide whether the window catches glare.
Is the fixture too bright if the window glows?
Not automatically. A glowing window is more often a target, reflection, or source-control problem. Reduce brightness only after the beam is aimed correctly and the glass still feels too strong.
When the same glare pattern affects more than one fixture, the safest rule is to keep exterior light aimed only where it is needed and shielded from nearby glass; the NPS Outdoor Lighting Principles summarize that approach clearly.