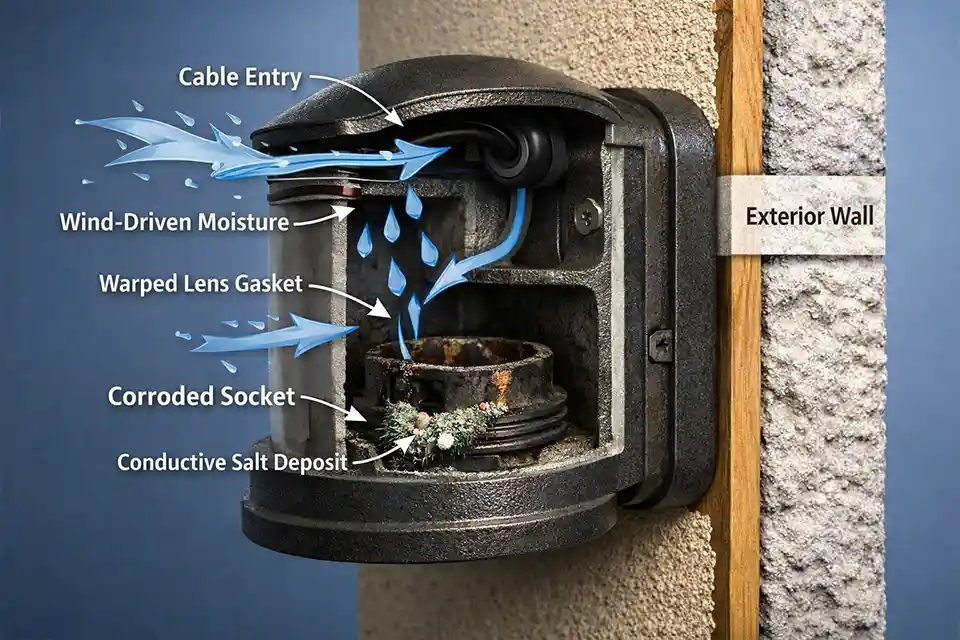
Salt air usually is not the first fault. The usual pattern is smaller and more damaging: wind-driven moisture gets past a tired gasket, rear cable entry, or socket cavity, then airborne salt leaves a conductive residue that keeps the inside of the fixture damp longer than it should stay damp.
Start with three checks that actually separate a real problem from harmless fogging: droplets still visible more than 24 hours after dry weather, white or green crust around screws or the socket, and failures that appear within 1 to 12 hours of fog, sea spray, or a light rinse.
That is different from ordinary condensation. A vented outdoor fixture can haze lightly on a cool night and clear within 30 to 60 minutes after the housing warms. A leaking coastal fixture does not clear cleanly.
The lens stays beaded into the next day, the lamp flickers after dusk, or a GFCI-protected circuit trips within seconds to 2 minutes of turning on. If the windward side of the house fails first while sheltered fixtures still behave normally, treat that as intrusion plus corrosion, not cosmetic moisture.
Why coastal fixtures fail sooner
Within roughly 1 to 3 miles of open coastline, especially on the windward side of a house, salt residue turns small sealing defects into recurring electrical faults. The visible symptom may be dimming, random shutoff, or nuisance tripping. The underlying mechanism is different: damp contamination creates a leakage path across parts that should stay isolated.
The backside of the fixture deserves more suspicion than the front lens. A coastal light can look sealed from the street and still pull in moisture from the rear wire opening, a split grommet, or a mounting plate that never sealed flat to the wall.
If the conductors enter from above, or if there is no 3- to 6-inch drip loop before the cable reaches the entry point, water can follow the wire into the housing. That failure path is more common than cracked glass, which is why Why Water Gets In Through Cable Entry Points maps so closely to what happens on ocean-facing installs.
The first damage also tends to show up at screws, sockets, and terminations before it becomes obvious at the lens. On 120-volt fixtures that often means nuisance GFCI trips. On 12- to 15-volt landscape heads, it more often shows up as weak output, flicker, or early lamp failure after a few damp evenings.
For anyone dealing with damp or cloudy exterior lights, this article on why outdoor light fixtures get condensation inside offers a clear explanation.
What people usually misread first
The most misleading sign is condensation by itself. A little haze is a symptom, not a diagnosis. A healthy vented fixture can breathe and still be fine. The useful question is whether the moisture clears predictably and whether the metal parts stay clean.
A normal condensation event is brief and light. It forms as haze, not heavy beads or a visible water line, and it clears when the fixture warms. If haze turns into droplets, or droplets remain into the next dry afternoon, that is no longer a “watch it” condition.
Coastal residue lowers the threshold because a mildly damp fixture with salt contamination behaves worse than an equally damp inland fixture. The distinction outlined in Why Is There Condensation Inside My Outdoor Light Fixture? matters here, but near salt air the tolerance window is narrower.
| What you see | What it usually means | Healthier condition | Failing condition |
|---|---|---|---|
| Light haze on a cool morning | Brief thermal condensation | Clears in 30–60 minutes | Returns daily and progresses to droplets |
| Beads or a visible water line | Actual intrusion | No standing water after a dry day | Droplets remain beyond 24 hours |
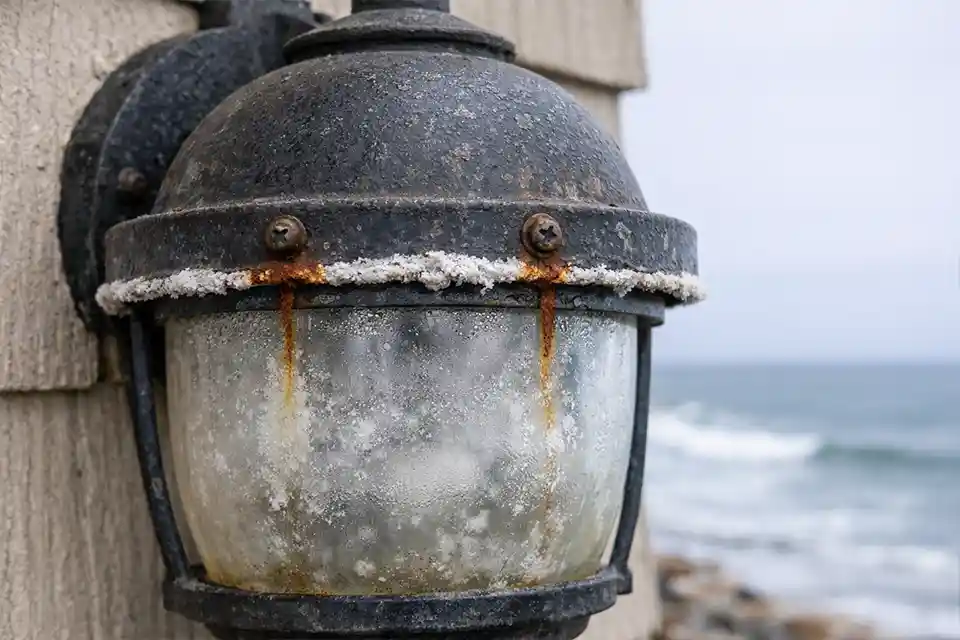
| White or green crust at screws or socket | Salt contamination and corrosion | Metal stays bright after wiping | Residue returns after 1–3 damp cycles |
| GFCI trip after humid evenings | Leakage path developing | No trip in humid weather | Trips within seconds to 2 minutes |
| Repeated dimming or early lamp death | Corroded contacts increasing resistance | Stable output for months | Flicker or dropout after damp nights |
What people overestimate is heavy rain. What they underestimate is repeated light exposure to salt mist and nights at 85% to 95% humidity. Several mild damp cycles can do more long-term harm than one hard storm followed by a full sunny dry-out.
Quick diagnostic checklist
- Droplets or a pooled line remain inside the lens more than 24 hours after dry weather
- The light fails within 1 to 12 hours of fog, sea spray, sprinkler mist, or washing
- White, green, or black residue is visible on screws, sockets, or splices
- The same fixture has already been dried or resealed once and fails again within 2 to 6 weeks
- The ocean-facing side of the property shows more trouble than sheltered fixtures
If three or more of those are true, stop blaming bulbs, timers, or photocells first. The pattern is usually moisture intrusion with corrosion already underway.
Why the obvious fix wastes time
The biggest time-waster is sealing the front seam because it is the part you can see. A bead of silicone around the lens edge feels logical, but in coastal cases it often solves the wrong problem.
If the leak path is the rear plate, wire opening, fastener penetrations, or a gasket that no longer compresses evenly, front-edge caulk only hides the symptom. Sometimes it makes things worse by trapping moisture that otherwise could have vented out.
The next mistake is drying the fixture and calling it fixed. Drying proves only that water was present. It does not prove the contacts survived, the insulation stayed sound, or the entry path was corrected.
Once pitting starts, resistance rises and failures become more repeatable. That is why Corrosion in Outdoor Light Connections is often the real explanation behind lights that “worked again for a week” and then slipped right back into flicker or nuisance tripping.
A better repair sequence is plain but effective: de-energize the circuit, open the housing fully, inspect the socket and terminations under bright light, remove residue, and check whether the sealing surfaces are still flat.
Replace a hardened gasket instead of trying to revive it with sealant. Correct the cable path before reassembly. If the mounting plate does not sit flat, fix that interface instead of building a caulk dam around the visible edge.
Pro Tip: On ocean-facing walls, a low-pressure fresh-water rinse of fixture exteriors every 3 to 6 months can slow salt buildup, but it is maintenance only. It does not cure a leaking entry point.
When repair stops making sense
Repair is still reasonable when the housing is intact, the socket metal cleans up bright, the lens seat is flat, and the problem started recently. In that case, a new gasket, corrected cable path, clean terminations, and proper remounting can restore service.
A practical threshold is repeat performance: if the fixture stays clear and stable through 2 to 4 weeks of normal coastal exposure, the repair probably addressed the real fault.
Replacement is the better call when deep pitting, swollen wire insulation, recurring GFCI trips after one careful repair, or moisture in the wall box show up together. That is the point where the routine fix stops making sense.
You are no longer repairing a leak; you are managing corrosion damage that will keep returning. The same boundary shows up in Water Inside Outdoor Light Fixtures, where visible water is no longer just an annoyance but evidence that the enclosure has lost control of its environment.
When you do replace, do not just buy the same shape in a shinier finish. Look for a true wet-location-rated fixture with corrosion-resistant hardware, an inspectable gasket, and a mounting setup that protects the wire entry instead of depending on a perfect bead of caulk. “Marine grade” can buy time, but it does not forgive poor cable routing or a bad wall seal.
The shortest accurate diagnosis is this: water is the symptom, but the salt-contaminated entry path is the real fault. If droplets remain past a dry day, corrosion is visible, or the fixture fails again after one careful repair, stop spending time on cosmetic sealing and decide based on the condition of the contacts, gasket surfaces, and wiring cavity.
For broader corrosion and marine exposure guidance, see AMPP.