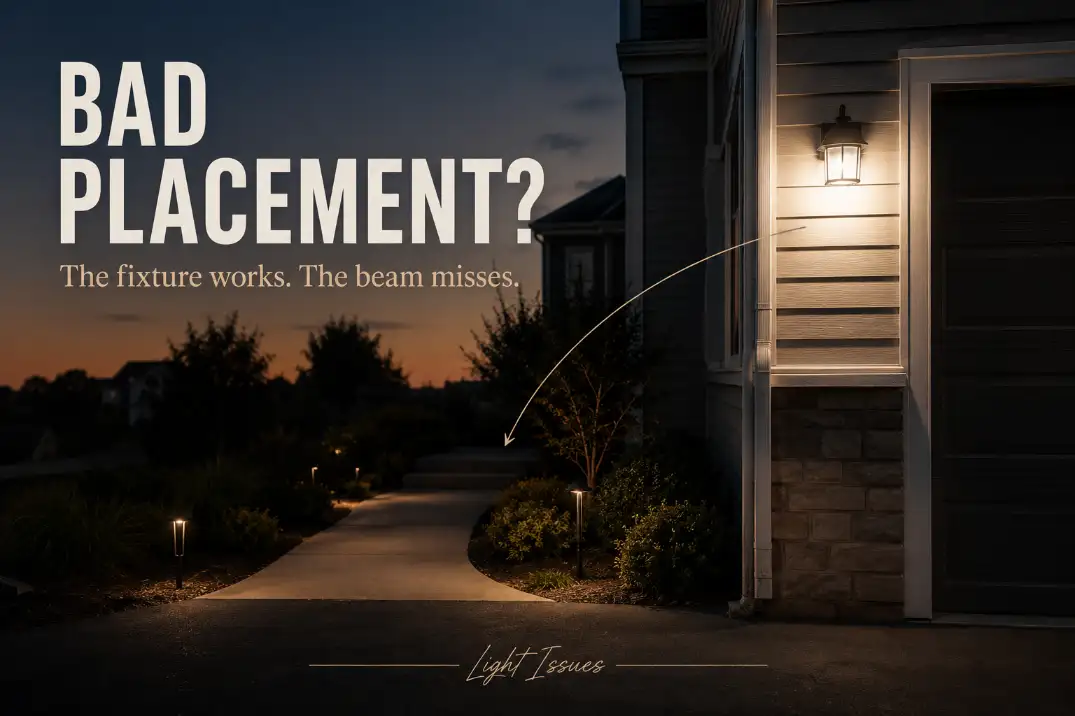
Poor outdoor light placement is usually a beam-targeting problem, not a reason to replace every fixture.
Start by checking where the brightest part of each beam lands, whether glare hits your eyes before it hits the ground, and whether shrubs, posts, railings, or parked vehicles are blocking the useful spread.
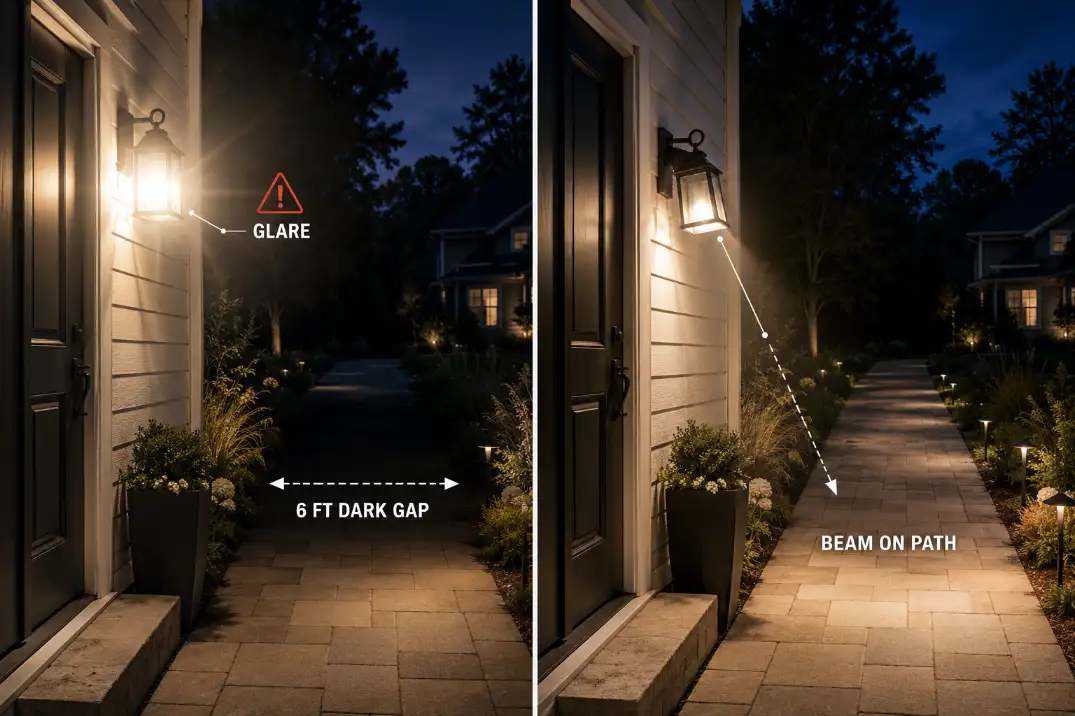
At night, stand 20 to 30 feet away from the area and look for dark gaps longer than 6 feet, bright spots within 3 feet of a fixture, or a beam aimed at siding instead of the walking surface.
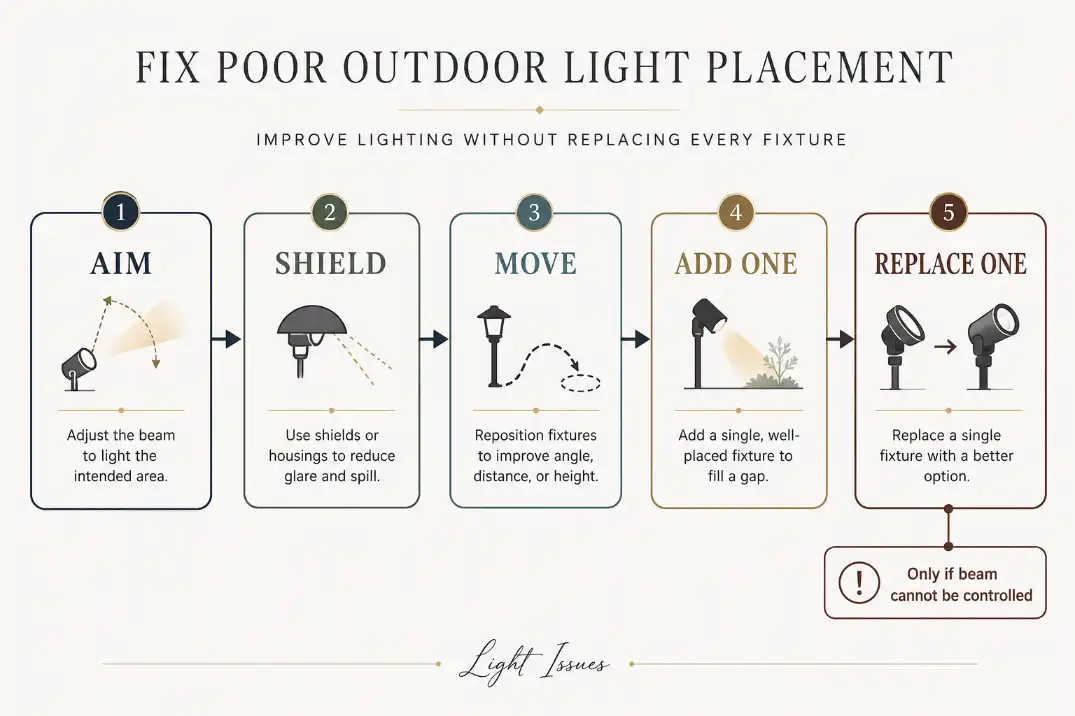
The right order is simple: re-aim first, shield glare second, shift movable fixtures third, clear obstructions fourth, add one targeted light if needed, and replace only the fixture that cannot control its beam.
Buying brighter bulbs too early often makes the same bad placement more obvious.
Do This 15-Minute Night Test First
Test from the route people actually use
Do not judge outdoor lighting while standing under the fixture. That position almost always looks brighter than the walkway, driveway edge, or step approach that actually matters. Instead, walk the route the way a guest, delivery driver, or family member would use it.
Check the view from the sidewalk, driveway, front step, side gate, and any turn in the path. A fixture can look strong from the porch and still fail 10 feet away where the walkway bends. That is one reason many homeowners misdiagnose placement as weak output.
If the light is working but the beam misses the task surface, the problem overlaps with outdoor lights that miss the target area. The fixture may be fine; the useful surface may simply be outside the beam.
Mark the dark gaps and glare line
Use your phone camera from two or three standing positions. You are not trying to take a perfect photo. You are looking for the pattern: glare near the fixture, usable light on the ground, and dead zones between them.
A practical threshold: if a walking route has an unlit gap longer than about 6 feet, people will notice it. If the fixture is bright enough to make you squint from 15 to 20 feet away, glare is likely reducing visibility instead of improving it.
Wet concrete, pale siding, snow, and glossy garage doors can make this worse because they reflect light back toward eye level.
Change one variable at a time
Adjust only one fixture head, bulb output, shield, or stake position before retesting. If you move three things at once, you may improve the scene without knowing which change mattered.
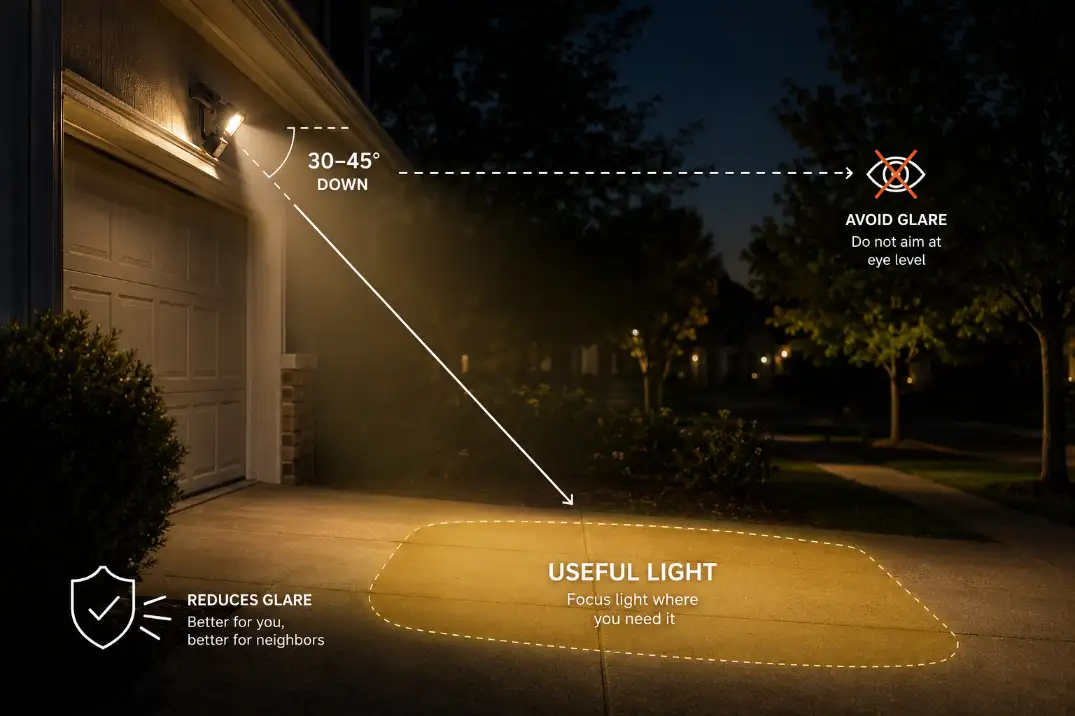
For adjustable floodlights, start with a downward aim around 30 to 45 degrees. For low-voltage path lights, move one light 12 to 24 inches toward the dark gap and check whether the beam overlap improves. Small moves often matter more than larger lamps.
Match the Fix to the Fixture You Already Have
Wall lights and porch sconces
Porch lights and wall sconces are often expected to do too much. They can mark the door, brighten the lock area, and help people recognize the entry, but most decorative wall fixtures are not designed to light a 25- or 30-foot walkway.
A typical wall light near a door works best when the light source sits around 66 to 72 inches above the walking surface. If it is much higher, the beam may skip over the step edge.
If the lamp or glass is fully exposed at eye level, the fixture may feel harsh even with a modest bulb.
The common mistake is replacing the sconce with a brighter one when the real problem is that the first step, turn, or landing needs its own lower task light.
Floodlights and garage lights
Floodlights are useful when they cover the ground people cross. They are frustrating when they blast across the yard, into windows, or toward the street. A garage-mounted floodlight at 8 to 12 feet high should usually aim down toward the driveway or walking route, not straight outward.
If the center of the beam lands on a tree canopy, garage door, or neighbor-facing fence, more lumens will not fix the useful coverage. It will only increase contrast. This is how a yard can feel both overlit and unsafe at the same time.
Path, step, and low-voltage lights
Path lights fail differently. They usually create dotted pools instead of continuous guidance. For most residential paths, 6 to 8 feet between fixtures works better near curves, steps, and narrow walkways.
Spacing around 8 to 10 feet can work on simple straight paths. Once spacing stretches past 12 to 15 feet, many low fixtures become decorative markers rather than reliable walking light.
Step lights should reveal the tread edge, not just the wall beside the stairs. If the light makes the riser glow but the step edge disappears, the fixture is not serving the safest surface.
| Existing fixture | Common placement failure | No-replacement fix | Replace only if |
|---|---|---|---|
| Wall sconce | Lights siding more than the step | Lower output, add shield, add small step/path light | Lens throws uncontrolled glare in every direction |
| Garage floodlight | Shines at eye level or across yard | Aim 30–45 degrees downward, add visor | Head cannot aim low enough |
| Path light | Creates dotted pools with dark gaps | Move 12–24 inches, tighten spacing | Too few fixtures for the route length |
| Solar stake light | Blocked by shrubs or poor exposure | Move to clearer sun and target zone | Panel or battery cannot support runtime |
| Step/deck light | Misses tread edge | Re-aim toward walking plane | Fixture location cannot reach the step surface |
Fix Glare Before Adding More Light
Shields often beat stronger bulbs
Glare is not just uncomfortable. It hides detail. When a fixture shines into your eyes, your pupils contract, and nearby dark areas look even darker. That is why a porch can feel too bright while the walkway still feels hard to read.
Before adding output, try a shield, visor, lower-lumen bulb, frosted lamp, or downward aim. A 700-lumen lamp placed and shielded well can be more useful than a 1,500-lumen floodlight aimed across the yard.
This is especially important around pale concrete, white siding, light garage doors, and snow in northern states. Those surfaces can bounce light back toward the viewer and make a reasonable fixture feel harsher than expected.
Warmer light can reduce harsh contrast
Color temperature does not fix bad placement, but it can affect comfort. Outdoor residential lighting around 2700K to 3000K usually feels softer than cooler blue-white light.
Cooler light may seem crisp at first, but it often makes glare more noticeable on hard surfaces and wet pavement.
The condition readers often overestimate is brightness. The condition they underestimate is contrast. If the brightest spot near a fixture appears several times brighter than the walking surface next to it, the eye reads the area as uneven even when there is plenty of total light.
For yards with strong hot spots beside dark gaps, the issue is closer to outdoor lights with bright spots and dark gaps than to a simple “not enough light” problem.
When glare means the fixture type is wrong
Some fixtures cannot be tuned into good task lights. Decorative lanterns with clear glass and visible bulbs often throw light upward, outward, and sideways with little control. You may soften them, but you cannot make them behave like downlights.
A useful stopping rule: if two meaningful changes — such as lowering output and adding a shield, or re-aiming and changing the bulb — still leave the same dark gap, stop tweaking that fixture. The fixture may be fine for decoration but wrong for the job you are asking it to do.
Pro Tip: If a fixture looks bright from the street but does not reveal the step, turn, or walkway edge, keep the fixture for curb appeal and solve the safety problem closer to the ground.
Adjust Placement Before Replacing Fixtures
Move low-voltage fixtures before buying more
Low-voltage path and landscape lights are often the easiest to improve because their locations are flexible. Moving a stake light 12 to 24 inches can shift the beam from mulch onto the walking edge. Rotating an accent light slightly can stop it from lighting a tree trunk while leaving the nearby path dark.
This is where the “replace everything” mindset wastes money. If a fixture is working, has a usable beam, and can be moved safely, location is the first repair.
If the whole layout still feels scattered after small adjustments, the symptoms may match outdoor lights that look random. Random-looking outdoor lighting is usually a rhythm and target problem, not a sign that every fixture is bad.
Tighten spacing where the route changes
Straight walkways are forgiving. Curves, steps, landings, driveway edges, gates, and grade changes are not. Those are the places where lighting should become more intentional.
A common healthier pattern is lower-output fixtures placed closer together near decision points, rather than one strong fixture trying to cover the whole route. A 30-foot path with three evenly useful pools of light will usually feel safer than one harsh light near the door and darkness near the sidewalk.
Do not space every fixture by the same number if the route itself is not consistent. Put light where people need to choose direction, see an edge, avoid a trip point, or find a handle.
Clear seasonal obstructions from the beam path
Plant growth can turn a decent lighting layout into a poor one without any electrical failure. Shrubs that grow 6 to 12 inches into the beam path can block low fixtures.
Ornamental grasses can hide path lights by late summer. In colder regions, snowbanks can bury low fixtures or reflect glare upward.
In humid climates like Florida, fast plant growth and lens film can change coverage within a season. In drier Arizona yards, dust on lenses and pale hardscape can create a different problem: reduced output combined with sharper glare. The fixture may not have changed, but the site around it did.
What You Can Change Without Rewiring
Safe homeowner adjustments
Many placement improvements do not require opening electrical boxes or replacing hardwired fixtures. You can usually re-aim adjustable heads, clean lenses, trim vegetation, move low-voltage stake lights, change bulbs within the fixture’s rated limits, and add approved glare shields.
You can also test a temporary battery or solar light near a dark step or turn before committing to a permanent addition. If the temporary light solves the visibility problem for two or three nights, that tells you the missing piece is location, not necessarily fixture quality.
Where the fix becomes electrical work
Moving a hardwired wall box, adding a junction box, trenching cable, repairing corroded wiring, or opening a wet fixture is different from adjusting placement. Those jobs can involve code requirements, weatherproof connections, GFCI protection, and proper cable burial.
If a fixture trips a GFCI, flickers after rain, has water inside the housing, or loses power intermittently, do not treat it as a placement problem. Placement may be poor, but the first concern is electrical safety and moisture control.
That distinction matters because poor coverage is a symptom; beam direction, obstruction, fixture type, or power condition is the mechanism. A dark walkway after a rainstorm is not diagnosed the same way as a dark walkway caused by a badly aimed porch light.
When Selective Replacement Actually Makes Sense
The beam shape cannot reach the target
Replacement makes sense when the fixture cannot direct light where it needs to go. A decorative lantern with a bare visible bulb cannot become a precise downlight. A fixed floodlight that will not tilt low enough cannot be forced to cover the driveway properly. A path light with a weak, narrow beam may not serve a wide walkway no matter where it is placed.
The decision is not “old versus new.” It is “controllable versus uncontrollable.” If the fixture can be aimed, shielded, or moved into a useful position, keep it. If the fixture throws light everywhere except the target, replace that one fixture selectively.
One added fixture can outperform five replacements
If the porch light looks good but the bottom step is dark, replacing the porch light may still leave the step dark. A small step light, low path light, or discreet downlight near the failure point may solve the actual problem with less disruption.
This is especially true when the area needing light is 20 to 40 feet away from the existing mounting point. Asking one house-mounted fixture to cover that distance usually creates glare near the house and weak visibility farther out.
If your main issue is distance rather than aim, compare the pattern with outdoor lights that don’t reach far enough.
Motion lights need separate sensor judgment
Motion lights can confuse the diagnosis because the lamp and sensor may fail in different ways. The lamp may light the area well, while the sensor watches the wrong zone.
Or the sensor may trigger from cars, branches, or pets while the beam still misses the walkway.
Most motion sensors respond better when movement crosses the detection zone instead of coming straight toward it. If the light turns on too early, too late, or constantly, adjust the sensor separately from the lamp head.
When the fixture reacts to the wrong activity, the problem may be closer to an outdoor motion sensor light that is too sensitive than to basic placement.
Quick Diagnostic Checklist
- Stand 20 to 30 feet away and check whether glare reaches your eyes before useful ground light appears.
- Look for dark gaps longer than 6 feet along walkways, steps, gates, or parking routes.
- Aim adjustable floodlights 30 to 45 degrees downward before increasing output.
- Move low-voltage path lights 12 to 24 inches toward the failed coverage area.
- Tighten spacing near curves, steps, and turns before adding brighter bulbs.
- Clear shrubs, grasses, snow buildup, dirt, and lens film from the beam path.
- Stop adjusting after two meaningful changes if the same dark gap remains.
The Best Fix Is Usually Selective
Poor outdoor light placement rarely requires a full replacement project. The better repair is to preserve what already works and correct only the part that fails. Re-aim adjustable fixtures. Shield glare.
Move low-voltage lights closer to the route. Trim the beam path. Add one small light near the step, turn, or driveway edge that actually needs visibility.
Replace a fixture only when it cannot aim, shield, or control its beam well enough to serve the target.
That approach costs less, creates less glare, and usually improves the yard faster than swapping every light for a brighter version of the same mistake.
For broader official guidance on outdoor lighting efficiency and controls, see the U.S. Department of Energy’s Lighting Design.