Outdoor lights usually do not reach far enough because the light is being spent too early. The beam lands near the wall, spreads too wide, hits shrubs or trim, or creates glare before it reaches the place you actually need to see. A stronger bulb may help only after placement, beam angle, and obstruction checks pass.
The first useful checks are simple: where does the brightest part of the beam land, can you identify objects 30–50 feet away, and does the fixture shine into your eyes before it lights the target?
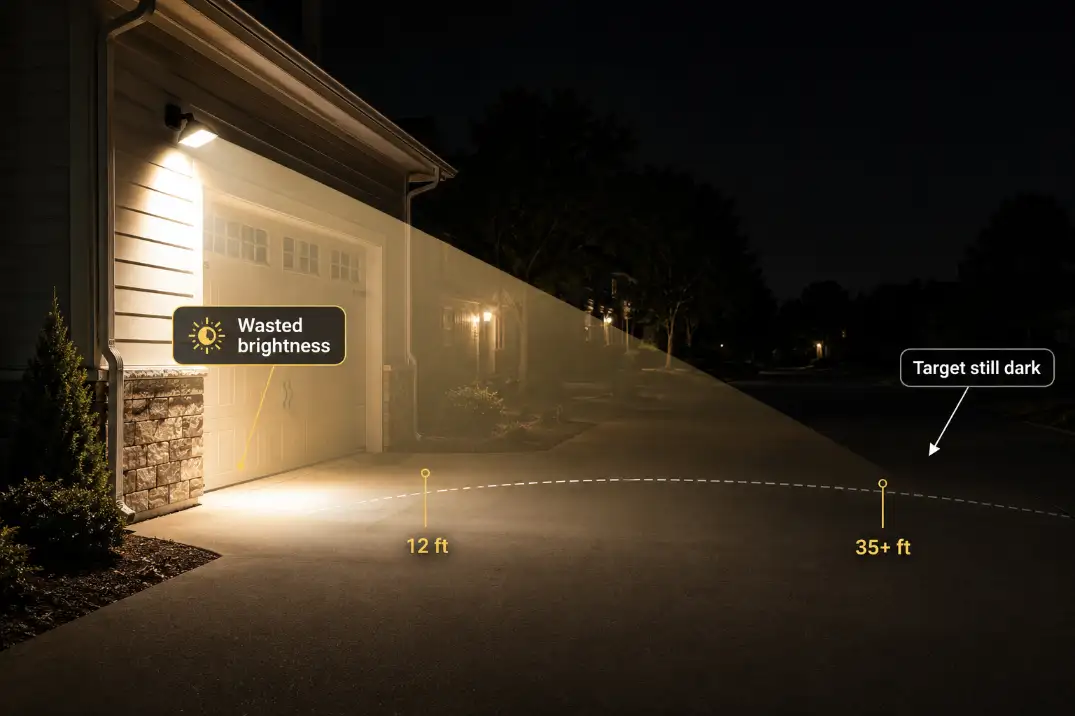
If the first 10–15 feet are bright but the driveway end, gate, or back corner stays dark, this is usually a coverage problem, not a power problem. Power problems tend to dim, flicker, or weaken the whole light. Reach problems create one bright patch and one dark zone.
Outdoor lights usually do not reach far enough when the beam lands too close to the fixture, spreads too wide, or creates glare before reaching the target.
If the first 10–15 feet are bright but the area 30–50 feet away is dark, fix aim, height, beam angle, and obstructions before buying a brighter light.
How Far Should Outdoor Lights Actually Reach?
There is no single correct reach for every outdoor light. A porch light does not need to perform like a driveway security light, and a backyard flood should not be judged by how bright it looks from directly underneath.
| Area or task | Useful reach target | What matters most |
|---|---|---|
| Porch, entry, or side door | 8–15 feet | Face visibility without glare |
| Short walkway or steps | 10–25 feet | Even coverage and edge visibility |
| Driveway apron | 25–40 feet | Beam aim and mounting height |
| Side yard, gate, or trash area | 30–50 feet | Beam control and obstruction clearance |
| Large backyard zone | 50+ feet | Multiple fixtures or a better fixture location |
A practical threshold: if you cannot identify a step edge, gate latch, parked object, or person’s outline from the target area after the light has been on for 5–10 minutes, the light is not reaching far enough in a useful way.
The Real Reason Outdoor Lights Fall Short
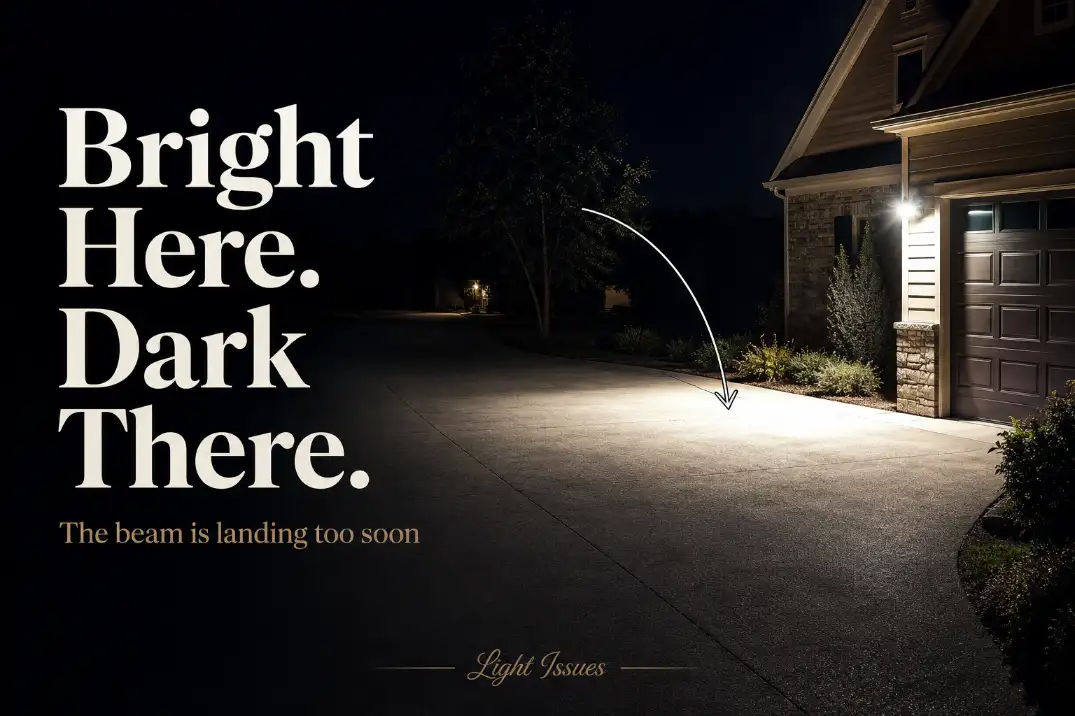
The beam is landing too soon
The most common pattern is a bright patch close to the fixture and weak visibility beyond it. A wall-mounted floodlight placed 7–8 feet high and angled sharply downward may put its strongest light only 12–18 feet from the wall. That looks bright near the house but does very little for a driveway, shed, fence gate, or back corner 35–50 feet away.
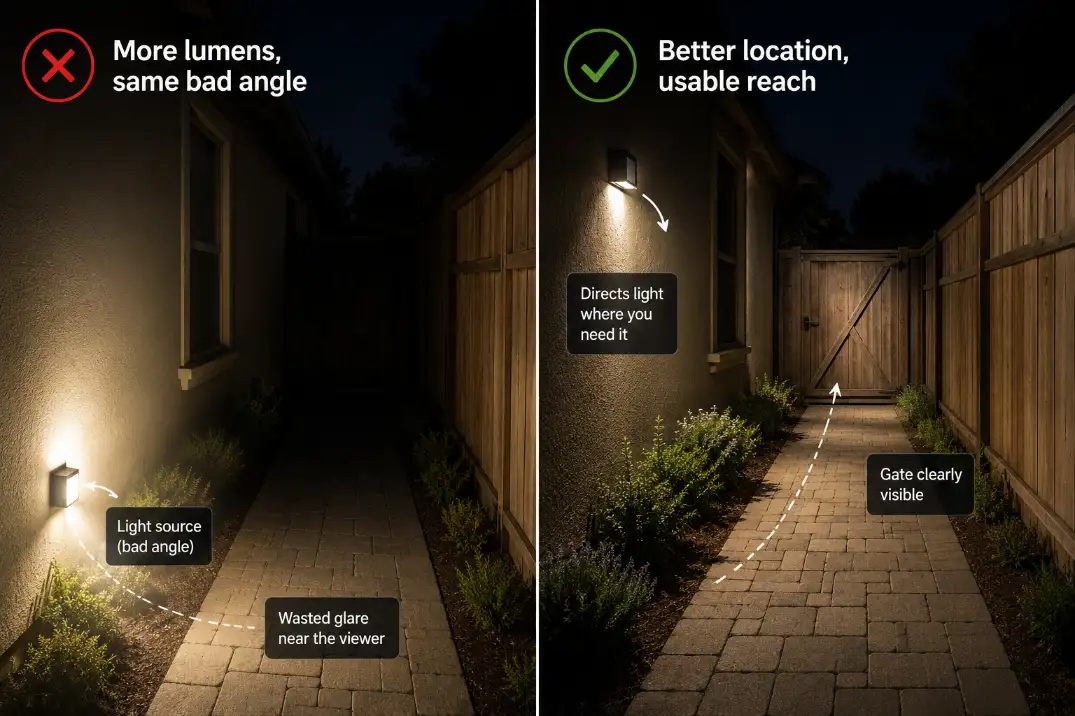
This is why replacing the bulb often disappoints. More lumens can make the near zone harsher without improving the far zone. The symptom is darkness at distance; the underlying mechanism is poor beam placement.
The beam is too wide for the distance
Wide floodlights are useful for patios, garage aprons, and short entry zones. They are less effective when the target is far away because the light spreads over too much area. A fixture can be powerful and still feel weak if its beam is scattered across siding, pavement, shrubs, and open air before it reaches the target.
For a long driveway or side yard, a controlled beam often beats a wider one. This is where many homeowners overestimate brightness and underestimate beam shape.
The fixture location is wrong for the job
Many outdoor lights are mounted where the old junction box already existed, not where coverage is actually needed. Under an eave, beside a column, too close to a corner, or behind trim, a fixture may never throw light cleanly outward.
If the light is technically working but pointing at the wrong surface, the issue is closer to outdoor lights missing the target area than to a weak fixture.
Quick Diagnostic Checklist
Use this before buying a brighter fixture:
- The first 10–15 feet are bright, but the target area 30–50 feet away remains dim.
- The fixture is mounted below about 8 feet and angled sharply downward.
- The beam hits siding, shrubs, steps, parked vehicles, or pavement before the intended area.
- The light turns on correctly, but the activated area still does not become usable.
- Two lights overlap in one bright patch while another area stays dark.
- The fixture face is visible from the walking path, causing glare before useful illumination.
The important clue is contrast. A good layout puts usable light where people walk, park, unlock gates, or approach doors. A poor layout creates a hot spot and leaves the actual decision area dark.
The 5-Minute Night Test
Stand where the light is supposed to help
Do not judge the light from below the fixture. Stand at the driveway end, gate, side-yard path, shed door, or dark corner. If the target is 40 feet away, test from 40 feet away.
Look for practical visibility, not just brightness. Can you see a step edge? Can you identify a latch? Can you tell whether an object is on the ground? If not, the light is not doing its job.
Walk back toward the fixture
At the halfway point, check whether the fixture itself is brighter than the area it is supposed to illuminate. If your eye is pulled toward the glowing lens, glare is probably making the far area look darker than it really is.
Mark where the beam center lands
The beam center should usually land near the target zone, not directly below the light. For a driveway, that may mean 25–40 feet out from the garage wall. If the brightest spot is only 10 feet out, re-aiming should come before replacing.
Pro Tip: Test after full dark, not at dusk. Outdoor lights often look more effective during twilight than they do once surrounding contrast increases.
What People Usually Misread First
“It must need more lumens”
Sometimes it does, but that should not be the first assumption. If the fixture already creates glare, sharp shadows, or a bright circle near the house, more output usually makes the bad part worse before it makes the useful part better.
A better rule is this: if you can clearly see pavement texture within 10 feet but cannot identify objects at 35–40 feet, aim, height, and beam spread deserve attention before lumens.
“The sensor range is the same as the light range”
Motion sensor range and light reach are separate. A sensor may detect movement 50–70 feet away while the light only covers the first 25–35 feet well. That mismatch is common with all-in-one security lights.
| What happens | More likely sensor issue? | More likely light reach issue? |
|---|---|---|
| Light never turns on when someone walks through the area | Yes | Maybe |
| Light turns on, but the far area stays dark | No | Yes |
| Light detects cars but misses people near the edge | Yes | No |
| Light creates glare but poor visibility | No | Yes |
If the light does not activate at night at all, that is a different failure pattern than poor reach. In that case, motion sensor light won’t turn on at night is the more relevant diagnostic path.
“Cooler light will throw farther”
A cooler color temperature can look sharper, but it does not fix bad aim. A 5000K light may make nearby concrete look brighter while the far target remains underlit. Color temperature changes perception. Beam control changes coverage.
How Distance, Beam Angle, and Height Change the Fix
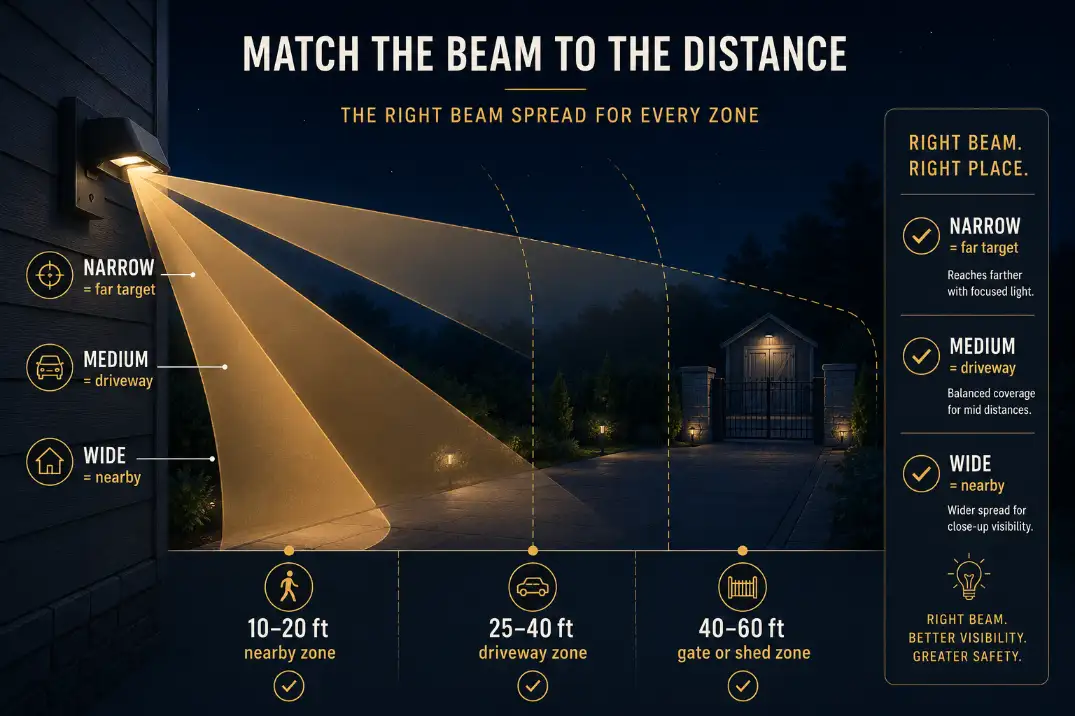
Pick the beam angle after you know the distance
The word “floodlight” is not specific enough. Two floodlights can behave very differently depending on beam spread.
For nearby coverage, such as a patio or short driveway apron, a wide 90–120 degree beam can work well. For medium-distance coverage across a driveway or side yard, a 40–60 degree beam often gives better useful reach. For a specific far target, such as a gate, shed door, or narrow side passage, a beam under about 40 degrees may perform better than a wide flood.
The narrower beam is not always “better.” It is better only when the job requires distance or a defined target. Wide beams still make sense when the goal is soft coverage close to the house.
When shopping, do not compare floodlights by lumens alone. Check whether the product lists beam angle, adjustable heads, shielding, and outdoor rating. If beam angle is not listed, the fixture may be harder to predict for long-distance coverage.
Raise the fixture when the angle is too steep
Height gives the beam room to travel. A fixture mounted at 6–7 feet often has to be aimed downward to avoid shining into eyes, which shortens reach. Mounting closer to 9–12 feet can let the beam travel farther while still pointing safely downward.
This is especially important around garages and side yards, where lights are often installed at old box locations. The box may be convenient, but convenience is not the same as coverage.
When the mounting point is the limiting factor, the broader layout issues in outdoor lighting placement problems matter more than the bulb rating.
Use more than one fixture when the area is long
One oversized fixture is often asked to solve too much. Long driveways, L-shaped walkways, deep backyards, and side yards with gates usually need layered coverage.
That does not mean flooding the entire property. It means placing useful pools of light where decisions happen: the gate latch, trash pad, step edge, parking area, shed door, or back entrance.
For a yard that remains dark after lights were added, the better question is often not “Which fixture is brighter?” but “Where does the next useful pool of light need to begin?” The same logic applies when diagnosing a backyard still dark after lights.
When More Lumens Are Actually the Right Fix
More lumens make sense only when the beam is already landing in the right zone and the fixture is not blocked, dirty, poorly mounted, or glaring into the viewer’s eyes.
As a rough residential guide, 700–1,300 lumens can work for entries, garage aprons, and compact areas. Larger driveways, side yards, and backyard zones often need 1,500–3,000 lumens if the beam is controlled well.
Fixtures above 3,000 lumens should be used carefully because they can create glare, neighbor complaints, and darker-looking shadows if mounted too low or aimed poorly.
The useful comparison is not “old bulb versus brighter bulb.” It is “correctly aimed light versus wasted light.” A lower-output fixture aimed into the right zone can outperform a brighter fixture aimed into the ground.
Why Bright Spots and Dark Gaps Happen Together
Overlap wastes output
Two lights pointed toward the same driveway center can create one harsh bright zone while the side gate or far corner remains dark. The eye adjusts to the bright area, so the darker area feels even worse.
If your property has alternating glare and darkness, the issue is closer to outdoor lights causing bright spots and dark gaps than to simple underpowered lighting.
Glare makes reach look worse
Glare is not just uncomfortable. It reduces usable visibility. When the fixture face is visible from the walking path, driveway, or seating area, your eye adapts to the bright source instead of the darker target area.
That is why aiming a light straight outward can seem logical but fail in practice. It may push light farther, but it also puts the brightest object directly in view. A good adjustment improves the target without making the fixture itself dominate the scene.
Shadows can matter more than brightness
A shrub, fence post, column, parked vehicle, or tree branch can block the beam and create a dark pocket behind it. This is commonly underestimated because the fixture still looks bright.
In humid Florida yards, fast-growing hedges can change coverage in one season. In northern states, snow can reflect light upward in winter, then disappear and leave the same setup feeling weaker. In dry Arizona conditions, dust on lenses and darker ground surfaces can make a wide beam look flatter and shorter.
Conditions That Change the Result
Wet, dusty, or coastal environments
Outdoor lights lose effective reach when lenses haze, collect mineral deposits, or hold moisture. Coastal homes in California and Gulf Coast areas often see faster lens film and corrosion because salt and humidity cling to exterior fixtures.
Clean the lens before judging the fixture. If the reach improves after cleaning but drops again within a few weeks, the issue may be sealing, fixture quality, or repeated exposure.
For exposed driveways, open walls, and coastal settings, an outdoor-rated fixture with at least IP65 protection is usually a better long-term choice than a decorative fixture that only looks sealed.
Low-voltage systems can fade at the far end
If several landscape lights get weaker farther from the transformer, the issue may not be beam aim. It may be voltage drop. This is more likely when the first fixtures in the run look normal but the last fixtures are dim, yellowish, or inconsistent.
That pattern is different from one wall light failing to reach a target. If the weakness follows cable distance, voltage drop in outdoor lighting systems is the better explanation.
Seasonal growth changes coverage
A light that worked in January may fail in July once leaves fill in. Patio furniture, parked vehicles, trash bins, and garden structures can also interrupt the beam.
This is why trimming plants may help when branches are physically blocking light, but it is not a universal fix. If the beam already lands too close to the wall, trimming shrubs will not make the light reach the driveway end.
When the Standard Fix Stops Working
Stop adjusting and consider relocating or replacing the fixture when the beam cannot reach the target without shining into eyes, windows, the street, or neighboring property. That is the point where routine fixes stop making sense.
A light that reaches farther by spilling into windows, traffic lanes, or a neighbor’s yard is not a successful fix. That is light trespass, not better coverage.
A poor mounting position cannot always be rescued by aiming. If the fixture is too low, tucked under an eave, blocked by architecture, or 50–60 feet away from the target, a different location may solve more than a stronger fixture ever will.
The best fix is often modest: one better-aimed head, one additional fixture closer to the target, or one narrower beam. The worst fix is usually oversized brightness from the same bad location.
Questions People Usually Ask
Can one outdoor light cover an entire backyard?
Sometimes, but not well if the yard is deep, uneven, or blocked by trees, fences, furniture, or grade changes. For yards deeper than about 50–60 feet, separate lighting zones usually work better than one powerful flood.
Should I use a floodlight or spotlight?
Use a floodlight for broad nearby coverage and a narrower beam for distance. If the goal is a gate, shed, driveway end, or side-yard path, beam control matters more than making the whole area glow.
Why does the light look bright but still not help me see?
Because brightness near the fixture is not the same as useful light at the target. Glare, early beam drop, wide spread, and dark adaptation can make a bright fixture perform poorly.
The Bottom Line
Outdoor lights do not reach far enough when the beam lands too soon, spreads too widely, hits obstructions, creates glare, or starts from the wrong mounting position.
Check where the light actually lands before replacing the fixture. If the target is 30–50 feet away, the solution is usually better aim, better beam control, more height, or another light closer to the area — not simply more brightness everywhere.
For broader official guidance on home outdoor lighting design, see the U.S. Department of Energy.