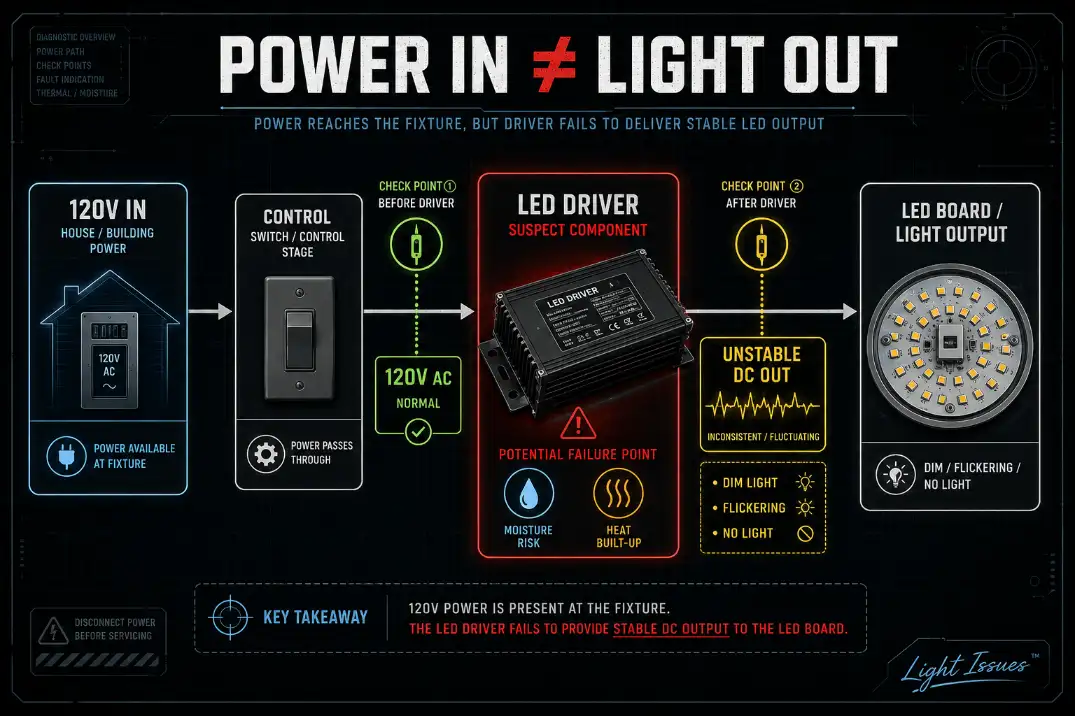
Outdoor LED driver failure usually shows up as rhythmic flickering, delayed start, dim output, sudden shutoff, or a fixture that looks dead even though power is reaching it.
The driver is the small power supply that converts incoming AC power into controlled DC output for the LED array. When it weakens, the light may pulse every 1–3 seconds, hesitate for 10–30 seconds before turning on, or shut off after 15–60 minutes as heat builds inside the housing.
The first useful checks are simple: see whether only one fixture is affected, look for moisture or corrosion near the driver, and separate control problems from driver-output problems. A bad photocell can keep a good light off.
A failing driver usually creates unstable electrical behavior: flashing, buzzing, heat shutdown, or missing DC output. That distinction matters because replacing the whole fixture too early wastes money, while replacing only the driver is pointless if water has already reached the LED board.
The Signs That Point Most Strongly to Driver Failure
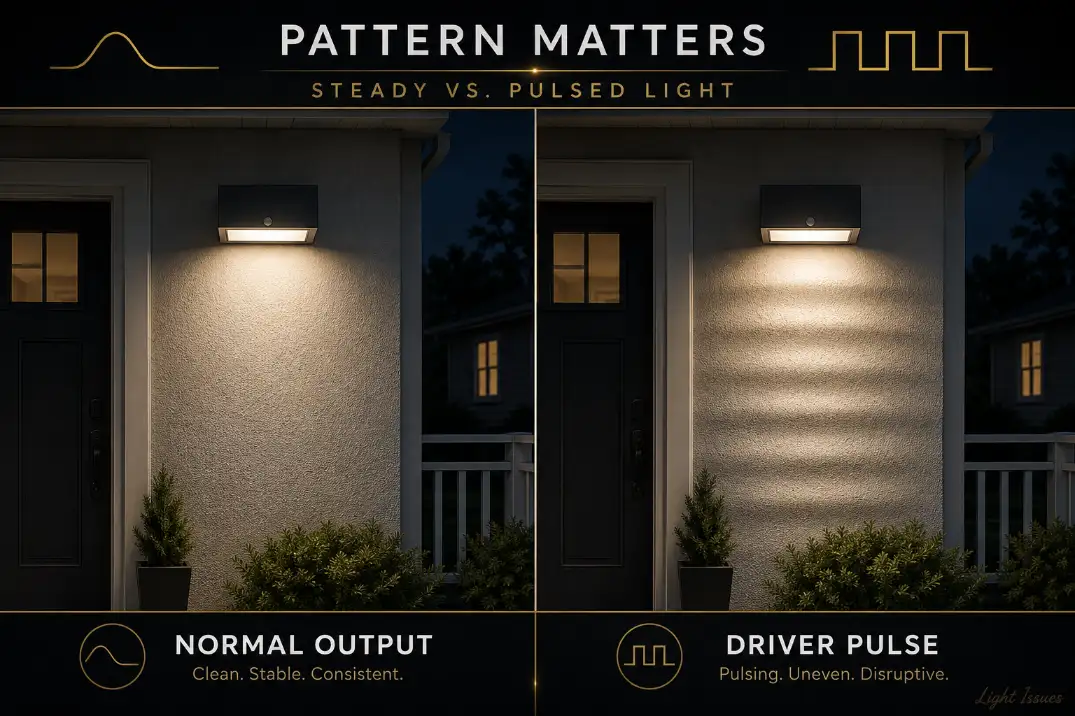
Rhythmic flicker matters more than occasional blinking
A failing LED driver often creates a repeatable pulse. The fixture may flash once per second, blink several times, brighten and fade, then go dark. Loose wiring usually behaves less predictably: it changes after wind, vibration, or movement.
If one fixture flickers while nearby fixtures stay steady, the driver or local connection becomes a strong suspect. If every light on the same circuit flickers together, one fixture’s driver is less likely to be the root cause. Look upstream at the switch, transformer, neutral, shared splice, or voltage supply.
This is where homeowners often replace the wrong part. Flicker is not automatically “bad LEDs.” The LED chips may only be reacting to unstable current. The driver is the part that decides whether the LED array receives clean power or pulsing output.
Delayed start is not normal LED warm-up
A healthy outdoor LED fixture should turn on almost immediately. A 1–2 second pause may be normal with some controls, but repeated failed starts, a 10–30 second delay, or a light that only turns on after cycling the switch points toward driver weakness.
Cold weather can expose this faster. In northern states, a driver with aging capacitors may start normally in mild weather but become unreliable once nights drop below 20°F. That is not the fixture “warming up” like an old lamp. It is the driver struggling to stabilize output.
Heat shutdown narrows the diagnosis
A fixture that turns on normally and then shuts off after 15, 30, or 60 minutes often has a heat-related driver problem. Drivers generate heat, and sealed outdoor fixtures can trap it.
A compact black fixture on a west-facing wall in Arizona may run much hotter than the evening air temperature suggests.
A dead fixture can have many causes. A fixture that fails only after it has been running for a while gives you a more useful clue: the driver may be reaching its thermal limit, entering protection mode, or breaking down under heat.
What Usually Kills an Outdoor LED Driver
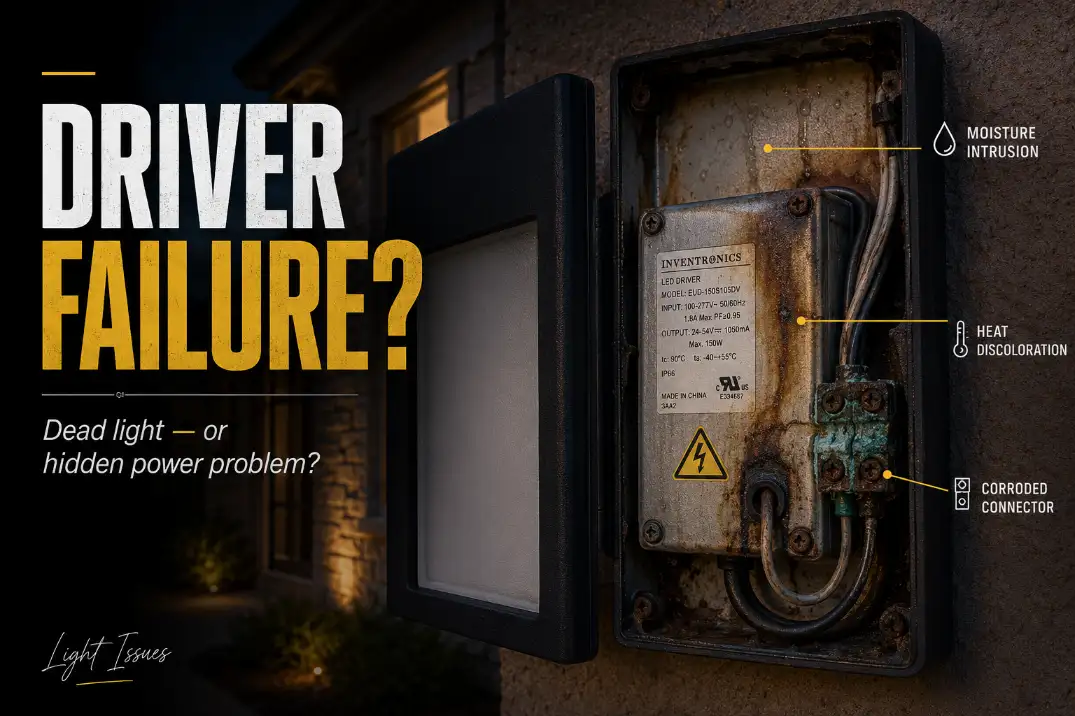
Moisture beats age more often than people expect
Outdoor driver failure is often blamed on cheap LEDs, but moisture is usually the first thing worth investigating. Water does not need to flood the fixture.
Condensation, sprinkler spray, coastal air, or rain entering through a cable gland can corrode terminals and weaken the driver through repeated wet-dry cycles.
In humid Florida conditions or coastal California locations, a fixture may never look soaked yet still stay damp internally.
If the light works fine until rain arrives, inspect sealing, drainage, and wire entry points before assuming the LED board has simply worn out.
For exposed outdoor fixtures, IP65 is a useful minimum reference because it indicates dust-tight protection and resistance to water jets. Around sprinkler spray, pool areas, or coastal exposure, IP66 or IP67 protection may be more appropriate.
But IP ratings do not save a poor installation. A loose cable entry can still let water track along the wire into the driver compartment.
The same moisture logic applies across fixture styles, and it is worth understanding before replacing parts blindly in Moisture Damage in Outdoor Lighting Explained.
Heat shortens driver life before the fixture looks damaged
Drivers are electronic power supplies. Heat ages capacitors, solder joints, insulation, and internal protection components. The outside of the fixture may still look fine while the driver inside has been cooked for years.
A useful field signal: if the driver housing or the metal compartment around it is too hot to touch comfortably after 30 minutes of operation, heat should move high on the suspect list. That is not a laboratory measurement, but it is a practical decision clue.
Replacing a failed driver with the same model in the same sealed heat trap may restore the light for a while, but it does not change the condition that killed the first driver.
Repeated failure points upstream
A single driver failure after five to seven years may simply be age, heat, or moisture. Two or more driver failures on the same run within 6–12 months is different. That pattern points toward upstream stress: voltage spikes, poor neutral connections, generator output issues, lightning-related surges, transformer mismatch, or weak shared splices.
Standard US line-voltage fixtures are commonly fed by 120V AC. Many outdoor LED drivers accept a wider range, such as 100–277V AC, but that does not mean they tolerate repeated surges or poor connections forever.
In low-voltage systems, long cable runs can create another problem: a fixture at the end of the line may receive 9–10 volts instead of a healthy 12V supply.
If several fixtures dim, flicker, or fail together, move upstream before buying more replacement drivers. The diagnosis overlaps with the power-path issues explained in Voltage Drop in Outdoor Lighting Systems.
Quick Diagnostic Checklist
Use this before buying a driver:
| Signal | What it suggests | First move |
|---|---|---|
| One fixture pulses every 1–3 seconds | Driver output instability | Inspect local driver and connections |
| All lights flicker together | Upstream power issue | Check switch, transformer, circuit, or shared splice |
| Light works until rain | Moisture path | Inspect gasket, cable entry, and splice |
| Light shuts off after 15–60 minutes | Heat-stressed driver | Check enclosure heat and ventilation |
| Fixture is dead but input power is present | Driver or LED board | Inspect driver output and board condition |
| Replacement driver fails quickly | Cause was not corrected | Look for moisture, surge, heat, or mismatch |
Pro Tip: Diagnose one fixture locally, but diagnose a group of failing fixtures upstream. That one distinction prevents a lot of wasted replacements.
Read the Driver Label Before Buying a Replacement
Wattage is not enough
A replacement driver is not chosen by wattage alone. A 30W driver with the wrong output type can damage the LED array or fail immediately. The most important match is usually output behavior: constant current or constant voltage.
Many integrated LED fixtures use constant-current drivers, often marked with outputs such as 350 mA, 700 mA, or 1050 mA. Many LED tape, strip, and some landscape products use constant-voltage drivers, commonly 12V or 24V DC. These are not interchangeable.
If the original driver says “Output: 24–42V DC, 700 mA,” do not replace it with a random 24V constant-voltage supply. It may fit physically and still be electrically wrong.
The label tells you the repair boundary
Before ordering anything, look for:
| Label item | Why it matters |
|---|---|
| Input voltage | Must match the supply, such as 120V AC or 100–277V AC |
| Output voltage range | Must match the LED array’s required range |
| Output current | Critical for constant-current fixtures |
| Wattage | Should meet or exceed load without changing output type |
| Dimming type | Non-dimmable, TRIAC, 0–10V, or other control method |
| Location rating | Damp, wet, or IP rating must match exposure |
If the driver is potted, sealed into the fixture, unlabeled, or not physically accessible, driver-only replacement may not be practical. In that case, full fixture replacement is usually cleaner than improvising a driver that almost matches.
How to Confirm the Driver Without Guessing
Rule out controls first
Photocells, timers, motion sensors, smart switches, and dimmers can all create driver-like symptoms. A photocell stuck in daylight mode can keep the fixture off. A motion sensor in test mode can cycle the light. A non-compatible dimmer can cause shimmer, buzzing, or flicker.
Many outdoor LED drivers are not compatible with standard wall dimmers. A non-dimmable driver, TRIAC dimmable driver, and 0–10V driver may all power LEDs, but they do not respond to controls the same way.
If the fixture behavior changes with timer or photocell conditions, compare the symptom with Outdoor Lights Not Turning On After Timer or Photocell before condemning the driver.
Inspect before testing voltage
Turn power off before opening the fixture. Look for brown marks, swelling, cracked potting, rusted screws, white mineral residue, green corrosion, water droplets, or a burnt smell near the driver. These are decision-useful signs. Dust is cosmetic. Corrosion at the driver leads is not.
If the LED board itself is blackened, cracked, or water-stained, the driver may not be the only damaged part. Replacing the driver alone may restore nothing.
Test only within your safety level
Line-voltage testing can expose 120V power and should be handled by someone qualified. The goal is simple: confirm whether the driver receives proper input and whether it produces stable output.
For low-voltage landscape systems, the checks are usually more approachable. If transformer output is correct but voltage at the fixture is low, the problem may be cable length, undersized wire, overload, or a poor splice.
If input at the fixture is correct and driver output is missing or pulsing, the driver becomes the stronger suspect.
Fixes That Work, and Fixes That Waste Time
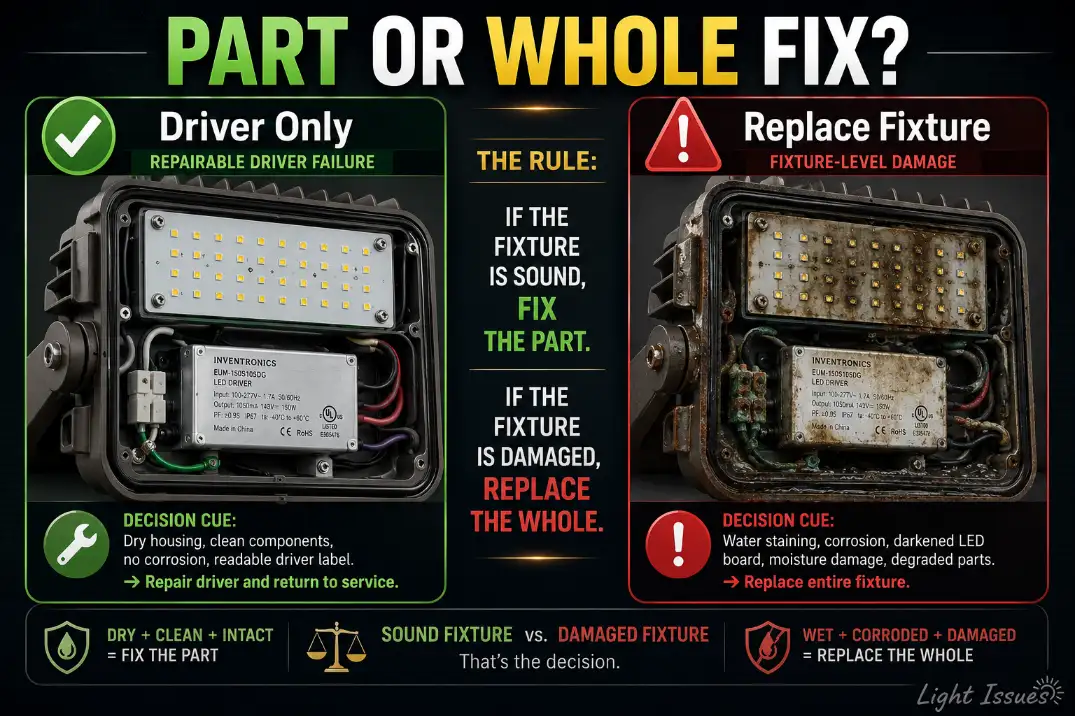
Replace the driver only when the fixture is still worth saving
Driver replacement makes sense when the housing is dry, the lens is intact, the LED board looks clean, and the replacement driver matches the original output type, current, voltage range, dimming method, rating, and physical fit.
It does not make sense when the fixture has standing water inside, failed gaskets, a burned LED board, severe corrosion, or a driver that is sealed into a non-serviceable fixture.
A useful boundary: if the replacement driver costs more than 40–50% of a comparable outdoor-rated fixture and the fixture already shows moisture or heat damage, full replacement is usually the better call.
Do not “upgrade” the driver blindly
A stronger driver is not automatically safer. Higher wattage capacity may be fine only if the output current and voltage behavior still match the LED array. Overdriving LEDs can create more heat, faster lumen loss, and another failure.
Random universal drivers are also risky. They may fit the space and still fail on dimming compatibility, location rating, temperature rating, or output range.
Fix the cause before installing the new part
A new driver will not last in the same failed environment. Improve the cable entry seal, replace corroded splices, keep drainage paths open, confirm the fixture rating, and reduce trapped heat where possible.
Over-sealing is a common overestimated fix. More silicone does not always mean better protection. If it traps condensation inside the housing or blocks drainage, it can make the next failure faster.
Underestimated fix: strain relief. A slightly loose connector can let water track along the wire into the driver compartment. That small path can matter more than the main lens gasket.
Driver Failure vs LED Board Failure vs Supply Trouble
| Symptom | Stronger suspect | What to do next |
|---|---|---|
| Rhythmic flashing from one fixture | Driver or local connection | Inspect driver output and wiring |
| Gradual dimming over years | LED aging or heat stress | Compare output, lens condition, and board discoloration |
| Dead fixture with confirmed input power | Driver or LED board | Inspect driver label, output, and board condition |
| Several fixtures fail together | Supply-side problem | Check transformer, circuit, surge, or shared splice |
| Failure after rain | Moisture path | Inspect cable entry, gasket, splice, and driver compartment |
Gradual dimming deserves special care. LEDs often lose output slowly instead of burning out instantly. If the fixture has become weaker over years but still runs steadily, the driver may not be the main problem.
That distinction is covered more directly in Outdoor LED Lights Dim Over Time.
Sudden flicker, cycling, delayed start, or heat-related shutoff points more strongly toward the driver, connection, or control circuit.
Questions People Usually Ask
Can I replace only the LED driver?
Yes, if the driver is accessible, labeled, and the fixture is otherwise dry and undamaged. The replacement must match output type, output current or voltage, dimming method, and outdoor rating.
If the driver is sealed into the fixture or the LED board is damaged, replacing the whole fixture is usually more practical.
Why did the replacement driver fail so quickly?
Fast repeat failure usually means the original cause remained. Moisture intrusion, heat buildup, surge exposure, wrong driver type, poor splices, or incompatible dimming can kill a new driver quickly. If a new driver fails in weeks or months, stop replacing parts and diagnose the system.
Is flickering always caused by a bad driver?
No. Flickering can come from a failing driver, loose connection, incompatible dimmer, voltage drop, transformer issue, or photocell/control problem.
One fixture flickering in a steady rhythm points more toward the driver. Several fixtures flickering together points upstream.
When to Call an Electrician
Call an electrician when the fixture is line voltage, the breaker trips, the GFCI trips repeatedly, wiring is charred, multiple fixtures fail together, or you cannot safely confirm whether power is present.
Also call if the fixture is mounted high, tied into a complex control system, or connected to generator-backed power.
For low-voltage landscape lighting, homeowners can often inspect fixtures, clean visible corrosion, and check transformer settings.
But repeated driver failure still needs a power-path diagnosis. In that situation, the driver is often the messenger, not the root cause.
The best repair is the one that changes the condition that caused the failure. For one isolated fixture, a matched driver and corrected seal may solve it. For a pattern across several lights, the driver is rarely the whole story.
For broader official guidance on LED system reliability and why drivers can fail before the LEDs themselves, see the U.S. Department of Energy.