
If outdoor lights stopped turning on immediately after you installed a timer or photocell, the fixture usually is not the main problem. The more likely failure is in the new control path: line and load may be reversed, a digital timer may be missing a neutral, the timer may not actually be in an ON window, or the photocell may still be seeing enough light to keep the circuit open.
The fastest first checks are simple: put the timer in manual ON, cover the photocell completely for 60–120 seconds, and verify the light is getting switched power when the controls are supposed to be calling for it.
That is different from an outdoor light that slowly gets worse over a season. Gradual decline points more toward moisture, corrosion, or a failing connection.
A no-on condition that starts the same day the control was added is usually a setup problem, not a worn-out fixture problem. That distinction saves time. Replacing the bulb first often feels productive, but in this specific scenario it is often the wrong first move.
What to Check in the First 10 Minutes
Start with a quick control-path check
Use this order before taking the fixture apart:
- Confirm the breaker and any GFCI feeding the outdoor circuit are on.
- Put the timer into manual ON or override mode.
- Cover the photocell fully for 2 minutes.
- Check whether the timer display or clock is powered.
- Verify line power is entering the timer and switched power is leaving it.
- Confirm the timer model needs a neutral or does not.
- Test voltage at the fixture only when the controls should be ON.
For a standard line-voltage exterior light, what matters is whether roughly 120 volts reaches the fixture when the timer is ON and the photocell is in darkness. For a low-voltage landscape system, the transformer may show about 12 volts at its output, yet the far fixtures may still stay dark if the run is long or compromised.
If the circuit trips, treat that first
A tripped GFCI or dead outdoor receptacle can make a brand-new timer look defective when the real problem is upstream power loss. If the lights quit as soon as the new control was installed or the circuit trips when the load tries to come on, the issue is already outside normal programming territory. In that case, the pattern is closer to Outdoor Lights Tripping GFCI Outlets than to a simple bad timer.
Pro Tip: If manual ON works but AUTO does not, do not start rewiring the fixture. That usually means the load path is at least mostly intact.
What the Symptom Usually Means
The biggest mistake here is treating every dark fixture as the same failure. It is not. A blank timer display, a timer that works in manual mode only, and a photocell that responds when covered are three different diagnostic paths.
| What happens after installation | Most likely meaning | Lower-value first guess | Best next check |
|---|---|---|---|
| Timer display is blank | No line power, missing neutral, or dead feed | Burned-out bulb | Test line and neutral at timer |
| Manual ON works but AUTO does not | Schedule, clock, mode, or dusk-setting problem | Bad fixture | Check time, AM/PM, active days, override status |
| Covering the photocell turns the light on | Stray light or poor photocell placement | Fixture failure | Reposition or shield the photocell |
| Covering the photocell for 2 minutes does nothing | No power into photocell or no output from it | Repeated timer resets | Test power in and power out at the sensor |
| Light cycles on and off | Photocell sees the light it controls | Breaker issue | Move the sensor out of the fixture beam |
| Far landscape lights stay dark | Voltage drop, damaged run, or bad splice | Bad timer programming | Measure voltage toward the end of the run |
A 30–90 second delay after covering a photocell is still within normal behavior for many units. No response after a full 2 minutes is more meaningful. That is the kind of threshold that actually helps separate normal delay from a real fault.
The Most Common Installation Mistakes
Line and load are reversed
This is still the most common install-side miss. Many timers and photocells need one conductor bringing constant power in and another carrying switched power out. If line and load are swapped, the timer may stay blank, power up oddly, or appear to function while never actually feeding the fixture.
The key point is that the dark fixture is only the symptom. The underlying mechanism is that the switched hot never reaches the light in the right way. That makes the bulb look guilty when it is not.
The new timer needs a neutral
Older switches often worked with just line and switched hot. Many digital, astronomical, and smart timers do not. They need a neutral to power the internal relay, screen, memory, or wireless features. That is why a simple switch replacement can suddenly create a no-light problem even though the old switch worked fine for years.
This is also where messy exterior boxes become expensive in time. If the neutral bundle is loose, misidentified, or tied into other conductors carelessly, the timer may behave inconsistently or not power at all.
Once the diagnosis starts pointing toward a loose or misgrouped conductor, it begins to overlap with Loose Outdoor Wiring Connections: How to Fix Them Safely and Permanently.
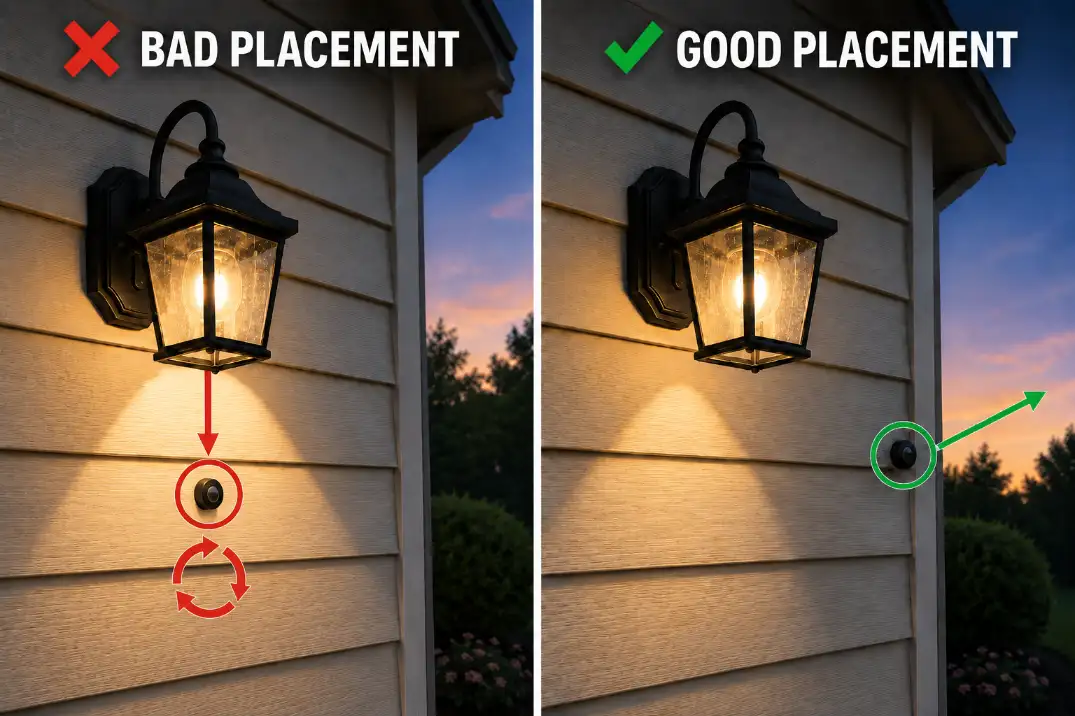
The photocell is seeing light it should not see
A photocell does not understand “night.” It only understands light level. If it sees enough light from a porch fixture, a glass storm door, white siding, a garage coach light, or even a nearby streetlight, it can keep the circuit open.
This is one of the most misread parts of the problem. People often overestimate how dark the location feels to them and underestimate how much reflected light the sensor eye is actually seeing. In practice, moving the photocell a few inches can do more than replacing it.
When a Timer and Photocell Fight Each Other
The timer should define the allowed hours
The cleanest logic is simple: the timer decides when the system is allowed to operate, and the photocell decides whether it is dark enough during that allowed period. That means the timer might allow operation from 5:00 p.m. to 11:00 p.m. in winter, or from 7:30 p.m. to 11:30 p.m. in summer.
This matters because people often blame the photocell first when the timer window is wrong. In northern states, it can be dark by 4:45 p.m. in December. If the timer does not allow power until 6:00 p.m., the lights staying off at 5:15 p.m. is not a photocell failure.
The photocell should only decide darkness
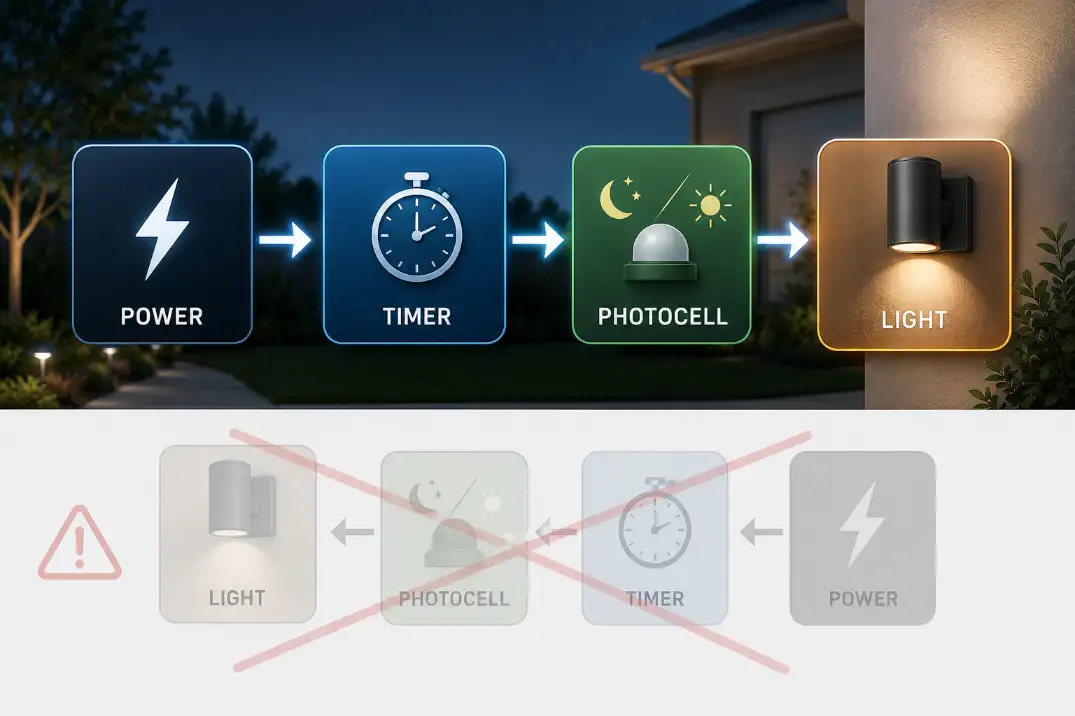
Inside that allowed window, the photocell’s job is narrower: turn the light on when it is actually dark enough. The clean control sequence is:
Power source → timer window → photocell darkness response → outdoor light
That one sequence explains why two good devices can still leave the light off. If either control is open, the light stays off. The problem is not that the system is “confused.” The problem is that two controls are being asked to work in the wrong order or with the wrong settings.
Motion lights add a third layer
If the fixture is also a motion light, then there may be a third control in play: a motion sensor with its own dusk threshold, test mode, delay, or manual override.
A timer can send power correctly while the motion head still refuses to turn the lamp on. When a motion fixture enters the picture, it is worth comparing the behavior with Outdoor Motion Sensor Light Not Working before blaming the timer alone.
If This Is a Low-Voltage Landscape Lighting System
Start at the transformer, not the fixture
Low-voltage landscape lighting changes the order of diagnosis. The timer or photocell may be built into the transformer, plugged into it, or installed upstream at the 120-volt outlet feeding it. In that setup, “the lights do not turn on” can mean the transformer never got power, the timer is inactive, the photocell is fooled by light, or the cable run is losing usable voltage before it reaches the last fixtures.
The fastest separator is manual ON at the transformer. If manual ON wakes the system up, the timer or photocell side becomes much more suspicious. If manual ON does nothing, go upstream first: outlet power, GFCI, breaker, transformer reset, and transformer output.
Long runs can imitate control failure
A run that is bright near the transformer but weak or dead 80–150 feet away is not behaving like a simple timer problem. That usually points toward voltage drop, a damaged cable, or a failing splice.
When that pattern shows up, it is more useful to compare it with Outdoor Lights Losing Power at the End of the Line than to keep changing timer settings.
Fixes Worth Doing — and Fixes That Usually Waste Time
Worth doing first
The highest-value fixes are the ones that actually separate causes. Manual ON, a fully covered 2-minute photocell test, line/load confirmation, neutral verification, and GFCI checks do that quickly.
Repositioning the photocell is also high-value because it addresses one of the most common real-world mistakes without adding new failure points.
A light that worked until the first heavy rain after installation deserves a different priority. In that case, moisture at the box, gasket, or splice becomes more likely than a bad schedule or a weak sensor.
That pattern lines up more closely with Why Your Outdoor Light Works Fine Until It Rains than with a pure timer issue.
What usually wastes time
The biggest time-waster is replacing the bulb first when the light failed immediately after the new control was installed. Bulbs fail, but the timing is wrong for that to be the best first bet. The next common time-waster is factory-resetting the timer over and over when the display is blank or unstable. Resets help programming mistakes, not missing neutrals or reversed conductors.
Another low-value move is sealing a damp exterior box without repairing the damaged connection inside it. If the copper is green, blackened, powdery, or brittle, the problem is already beyond cosmetics. That is where Corrosion in Outdoor Light Connections becomes more useful than another round of timer testing.
Know when the standard fix stops making sense
A normal timer or photocell replacement stops making sense when the circuit shows repeated GFCI trips, scorched connectors, melted insulation, standing water in the box, aluminum wiring, or unclear shared neutrals. At that point, the issue is no longer “why will the light not turn on?” It is whether the circuit is suitable and safe for the control that was added.
Hardwired 120-volt systems deserve a clear stop point. If you cannot confidently identify line, load, neutral, and ground, that is not the moment to keep guessing with live conductors.
Quick Answers
Why does my outdoor light work in manual mode but not automatic mode?
Because manual mode bypasses part of the schedule logic. If manual ON works, the fixture and load path may still be fine. That points more toward wrong time settings, incorrect mode, or photocell logic than toward a dead light.
Can I use a timer and photocell on the same outdoor light?
Yes. In most setups, the timer should limit the allowed hours and the photocell should decide whether it is dark enough during those hours. If either one is open, the light stays off.
Why did my old switch work but my new timer does not?
Because the old switch may not have needed a neutral, while the new timer does. That is one of the most common reasons a simple switch swap turns into a no-power complaint.
Should I replace the photocell if covering it does nothing?
Not immediately. First verify that the photocell is receiving power. If it has no incoming power, replacing it solves nothing. If it has incoming power but still provides no output after a full 2-minute darkness test, replacement becomes more reasonable.
Bottom Line
When outdoor lights do not turn on after installing a timer or photocell, the highest-probability problem is the control path, not the fixture itself.
Work in order: confirm upstream power, use manual ON, cover the photocell for 60–120 seconds, verify line/load/neutral, and only then decide whether the sensor or timer actually failed. That sequence is what turns a vague “it stopped working” complaint into a fast diagnosis.
For broader electrical safety guidance around home electrical products, see the U.S. Consumer Product Safety Commission.