
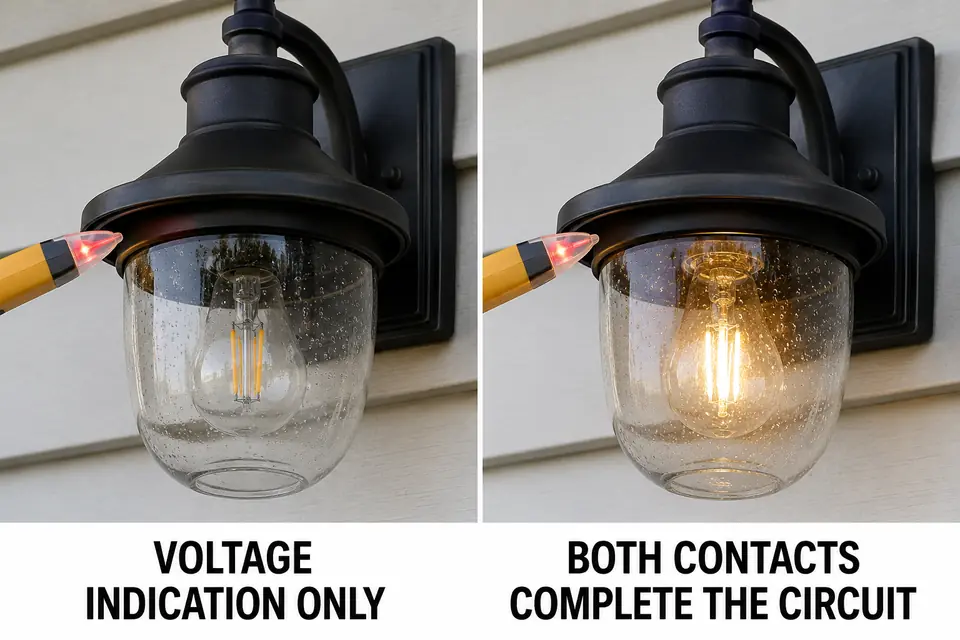
The diagnosis turns on one distinction: detecting voltage near an outdoor socket is not the same as proving that the socket can complete a stable circuit through the bulb. A non-contact tester may react, another check may suggest power, or the lamp may flash briefly before going dark. None of those results confirms that the socket can carry the bulb’s load.
A screw-base bulb depends on two separate connections—the center contact at the bottom of the socket and the surrounding threaded shell. If either surface is recessed, corroded, heat-damaged, or no longer holding firm contact, electrical energy may be present without the bulb lighting.
The useful first test is not another power indication. It is a compatible bulb that has just operated normally in another suitable fixture. If that known-good bulb also remains dark, the original bulb is no longer the leading explanation. The diagnosis has moved to the socket and its concealed connections, which should be assessed only with the circuit de-energized.
What “Power at the Socket” May Actually Mean
Treat the original power finding as a clue, not a verdict. A non-contact voltage detector can sense an energized conductor without confirming the return path, socket contacts, or the connection’s ability to work under load.
A brief flash from the bulb is equally limited evidence. It may mean the lamp temporarily found contact as it shifted into position. That points toward an unstable connection rather than a healthy socket.
A conventional screw-base socket normally supplies one side of the circuit through the center contact and the other through the threaded shell. Both must meet the corresponding surfaces on the bulb. One functioning contact and one failed contact can produce the confusing combination of apparent power and no light.
If usable power has not actually been established at this individual fixture, return to a broader outdoor-light power-loss diagnosis. Breaker, GFCI, switch, and branch-circuit checks belong there rather than inside this socket-level test.
Warning Sign: Turn off the correct circuit before removing the bulb or inspecting the socket. Never put fingers, tools, probes, or cleaning materials into an energized socket, and do not attempt to reposition a contact while power is available.
Center Contact and Threaded Shell Problems
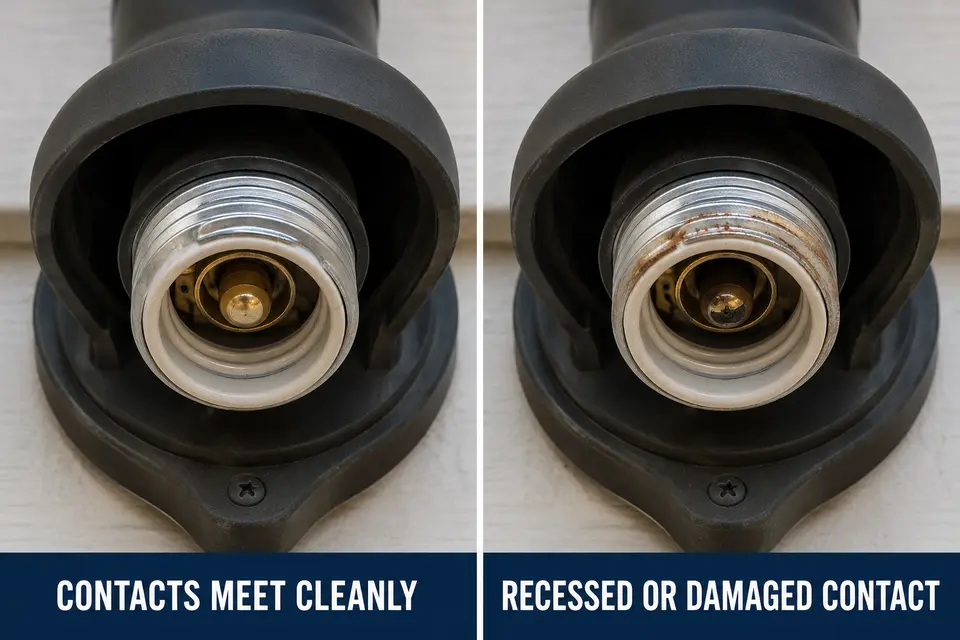
The socket fails if either of its two contact surfaces cannot meet the bulb reliably. With the circuit off and the bulb removed after cooling, the visible position and condition of those surfaces can explain why a sound bulb remains dark.
The center contact should look intact, centered, and positioned to meet the small metal pad on the bottom of the bulb. A contact that appears flattened deep into the socket, pushed to one side, loose, pitted, or heat-darkened may no longer reach the bulb consistently.
Screw-base bulbs can vary slightly in base geometry, so a marginal contact may work with one bulb and fail with another. That does not make the socket serviceable; it shows that the connection has become dependent on small differences in fit.
The threaded shell provides the second connection. Heavy oxidation, damaged threads, deformation, or corrosion can interrupt contact even when the bulb screws in and appears fully seated.
Do not investigate suspected contact failure by tightening the bulb harder, wiggling it while energized, or trying to lift the center contact. A flash or change in operation when the bulb moves is already meaningful evidence: the connection is unstable and can generate heat.
A Known-Good Bulb Test
The bulb test is useful only when the substitute bulb has already proved that it works. A newly purchased bulb is not automatically known-good; it could be defective, damaged, or unsuitable for the socket.
Use a compatible replaceable bulb that has just illuminated normally in another appropriate fixture. Turn off the circuit, allow the existing bulb to cool, and make the substitution. Restore power only long enough to observe the result without touching the bulb or fixture, then switch the circuit off again before inspection.
If the known-good bulb operates steadily, the original bulb was the variable. If it remains dark, the fault has narrowed toward the socket, its internal connections, or an incomplete supply or return path. The result rules out the first bulb more strongly than it proves one exact hidden failure.
A bulb that flashes, cuts in and out, or responds to its physical position crosses a different threshold: stop testing it. If similar behavior affects other fixtures or occurs independently of this socket, follow the wider diagnosis for outdoor lights working intermittently.
Heat and Corrosion Damage Clues
Visible heat or corrosion changes the decision from “test again” to “leave it off.” Brown or black discoloration, pitting, blistered material, cracked ceramic or plastic, melting, or a persistent burned odor indicates that the problem is no longer limited to a bulb that will not light.
A poor contact can generate concentrated heat without immediately tripping a breaker. That is why a bulb that works only in one position should not be treated as merely difficult to seat. The changing result may expose a contact surface that no longer holds firmly under normal use.
Corrosion creates a similar progression. Light oxidation can increase resistance; heavier green, white, or rust-colored deposits can interrupt contact. Moisture may also have reached components behind the socket, so the visible deposit does not reveal the full extent of the damage.
When corrosion has been cleaned before and returns, the deposit is the symptom rather than the repair target. That repeat pattern belongs in the separate diagnosis of corrosion that returns after an outdoor socket is cleaned, where the gasket, drainage, and condensation path can be evaluated.
Keep the fixture off when the socket is loose, scorched, cracked, melted, heavily corroded, or producing an unstable result. Surface cleaning cannot restore lost contact pressure, repair heat-damaged material, or confirm the condition of concealed connections.
When Socket Replacement Requires a Professional
Professional service begins where the known-good-bulb test ends but the cause remains behind the visible socket. At that point, the remaining possibilities include the socket’s internal leads, the supply or return connection, and damage extending into the fixture or mounting box.
The boundary is even clearer when the socket moves inside the fixture, visible contacts are damaged, weather sealing must be disturbed, or the light works only with the bulb in a particular position. Repeated bulb substitutions cannot correct those conditions.
An electrician can determine whether the socket is a replaceable component in an otherwise sound fixture or whether heat, corrosion, age, and water intrusion justify replacing the complete light. The existing framework for deciding whether an outdoor light should be repaired or replaced applies once the condition extends beyond an isolated contact fault.
Leave the fixture off until it is assessed if there is scorching, cracking, melting, a burned odor, persistent corrosion, or intermittent contact. The practical decision model is simple: a working control bulb rules out the original bulb, visible damage rules out continued testing, and unresolved socket-level failure moves the repair behind the professional boundary.
For additional guidance on shutting down circuits before electrical work, see the Electrical Safety Foundation International’s DIY electrical safety guidance.