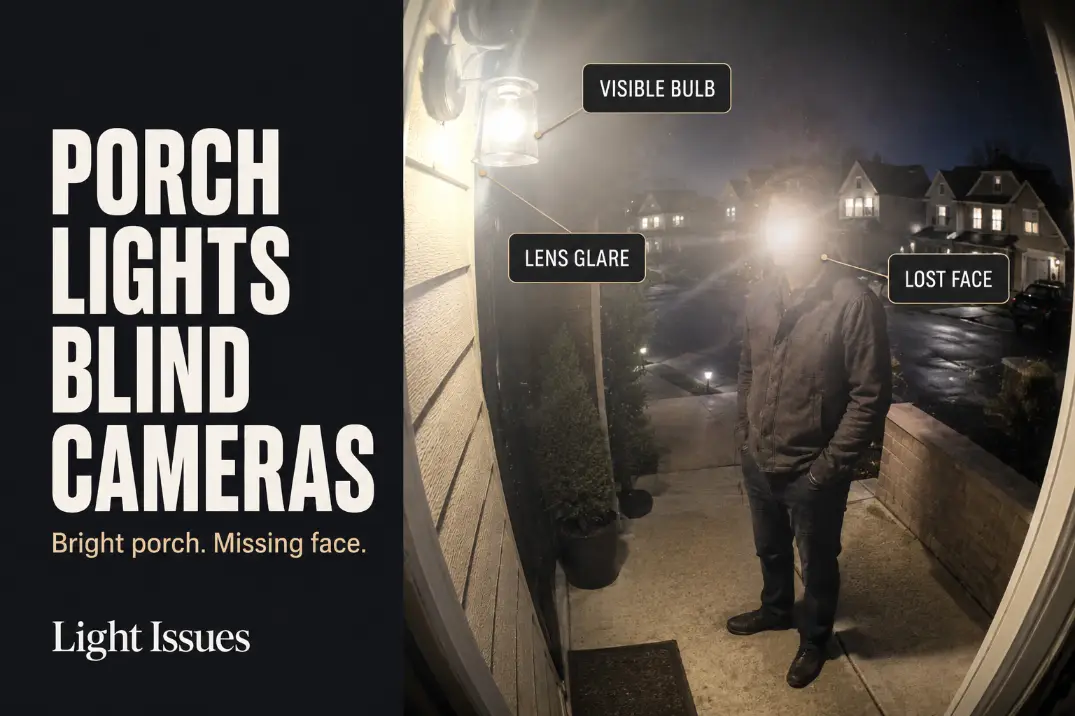
A porch light blinds a doorbell camera when the camera exposes for the brightest object near the lens instead of the visitor’s face.
Your eye may read the entry as bright and safe, but the camera may prioritize a visible bulb, shiny glass shade, bright wall patch, or reflected night-vision light.
Start with three checks: look for the light source inside the live preview, test face detail from 5 to 8 feet away, and watch whether the image pulses or changes mode during a 30-second approach.
This is different from a weak camera, poor Wi-Fi, or a slow motion alert. Those problems usually affect the whole clip.
Porch light glare creates a more specific failure: the porch looks well lit, but the face turns pale, flat, shadowed around the eyes, or unreadable right where identification should happen.
Lens Angle
The camera is not judging the scene like your eyes
Most doorbell cameras use a wide lens so they can see the mat, package area, visitor, porch edges, and door frame from one fixed position.
That wide view is useful, but it can also catch the porch bulb, glowing shade, or a hard reflection near the lens side of the frame.
If the bulb or bright shade appears in the upper 20% to 30% of the live preview, the camera may lower exposure for the whole scene. The entry can still look bright in person while the face becomes the weaker object in the recording.
A 600-lumen exposed bulb 12 inches from the camera’s lens line can cause more footage damage than a shielded 900-lumen fixture that stays outside the camera view.
The problem is not always the amount of light. It is which surface or source the camera treats as the exposure priority.
Side-mounted sconces are the common failure point
The most common porch setup problem is a wall sconce mounted beside the doorbell, not far above it. If the doorbell sits around 44 to 52 inches above the porch floor and the sconce uses clear or open glass, the lower bulb area can sit directly in the camera’s wide-angle view.
That is why replacing the porch bulb with a brighter one often makes the footage worse. It strengthens the object that is already confusing the camera.
If the same kind of washout also happens around driveway or side-yard fixtures, the broader mechanism is explained in Why Outdoor Lights Create Glare.
On a porch, the failure is more compressed because the light, lens, visitor, wall, and door are all crowded into a few feet.
Bulb Reflection
Clear glass is usually the first suspect
Clear bulbs, clear seeded glass, glossy black trim, polished metal, and shiny fixture edges can create small reflections that look harmless in person. On camera, those bright points can behave like direct glare.
The fastest test is to open the live camera view and cover the porch bulb for 5 seconds without moving the camera. If the face, siding, door trim, or package area becomes easier to read, the bulb or shade is part of the problem.
If the image stays hazy after the light is covered, then lens dirt, moisture, camera angle, or night-vision reflection becomes more likely.
That short test separates the symptom from the mechanism. The symptom is a washed-out visitor. The mechanism may be a visible bulb, reflected bulb, bright shade edge, or bounced light entering the lens.
Frosted bulbs do not hide a bad source
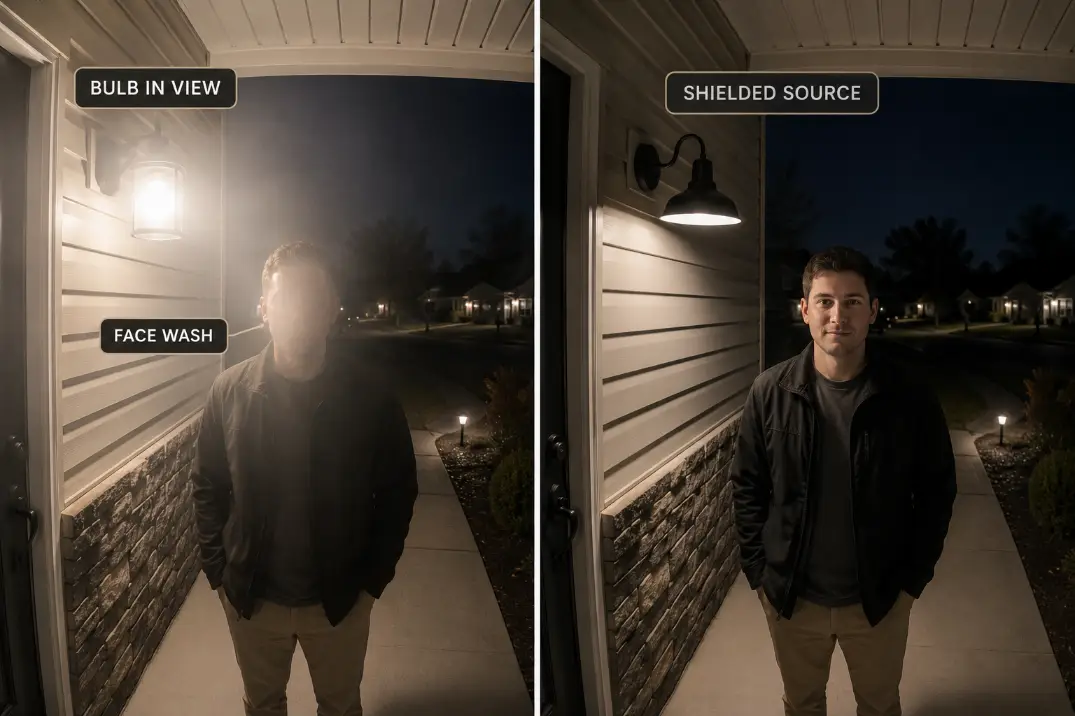
A frosted bulb can soften a harsh porch light, but it does not fix a fixture that still glows inside the camera view. Frosted glass spreads light. Shielding controls light direction.
This is where decorative bulb swaps waste time. A warm Edison-style bulb, frosted globe, or lower-watt bulb may look better from the sidewalk, but the doorbell camera can still fail if the glowing source remains visible to the lens.
Aim Check: Judge the porch light through the doorbell camera preview, not from the street. Your eyes adjust better than the camera does.
Wall Bounce
The bulb can be hidden and still blind the camera
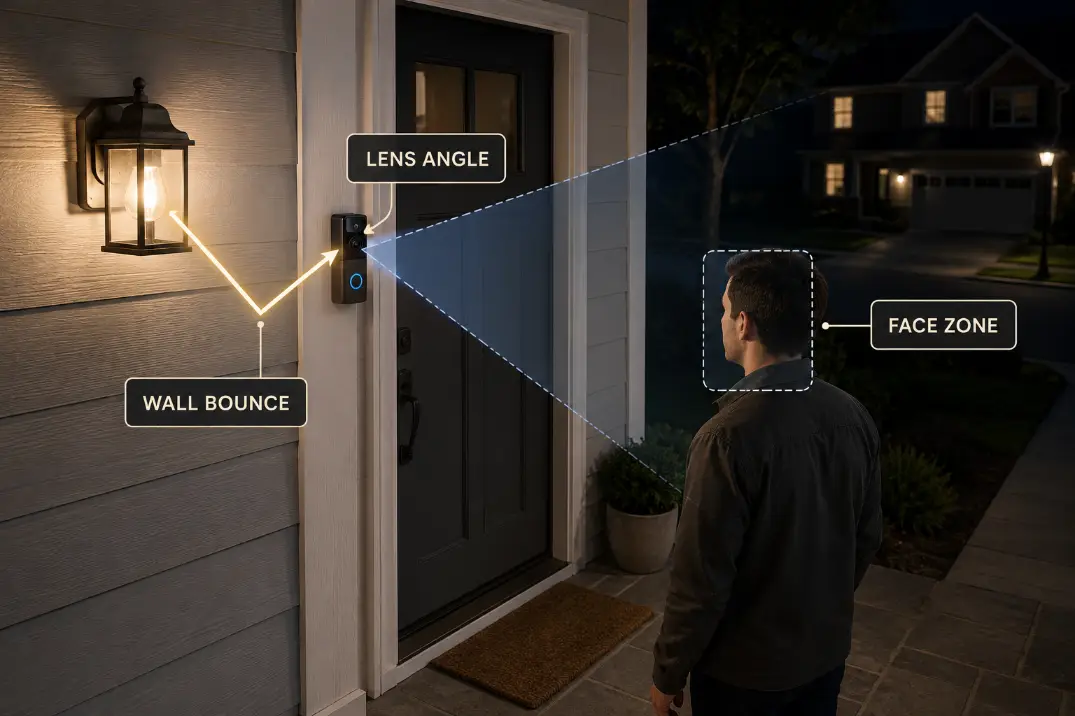
Sometimes the porch bulb does not appear in the preview at all. The camera is blinded by the wall instead. White trim, pale siding, glossy painted doors, glass storm doors, stucco, and light porch ceilings can bounce the fixture’s light back toward the lens.
A nearby bright surface can become the light source the camera exposes for. That is why lowering wattage may disappoint.
A 450-lumen bulb aimed into glossy white trim can create a worse camera hotspot than a 700-lumen shielded source aimed down across the mat and step.
The useful correction is to move the hotspot below the camera’s attention zone. The mat, first step, threshold, and visitor path can be lit without making the wall beside the camera the brightest object in the frame.
If your entry lighting also creates harsh shadows around locks or handles, the related failure pattern is covered in Back Door Security Lights That Create Lock Shadows.
The same principle applies: light should reveal the useful target, not blast the nearest surface.
The bounce test should be done from the visitor position
Stand where a visitor naturally pauses, usually 3 to 6 feet from the door. Watch the live preview while someone turns the porch light off for 10 seconds, then back on. Do not move the camera during the test.
If the face improves when the porch light turns off, the light is hurting the image. If the face gets worse, the camera needs light, but not from that angle.
If a wall patch becomes bright while the eyes and cheeks stay dull, wall bounce is the real mechanism.
| Camera preview signal | Most likely cause | Better first fix |
|---|---|---|
| Bulb visible in frame | Direct lens glare | Hide the source from the camera |
| Bright wall patch near lens side | Wall bounce | Aim light down and away from trim |
| Face turns pale and flat | Overexposure | Reduce glare before adding lumens |
| Eyes stay dark under bright porch | Light misses face plane | Re-aim toward visitor zone |
| View pulses or flips modes | Night vision conflict | Stabilize source and reflection |
| Haze stays with light off | Dirty lens or moisture | Clean and inspect camera housing |
Face Visibility
The real test is the face zone, not porch brightness
For a doorbell camera, the useful target is face visibility from about 5 to 8 feet away. That is where a visitor usually pauses, looks toward the door, reaches for the bell, or sets down a package.
If the face is unreadable there, the porch light is not helping the camera, even if the entry looks bright in person.
A healthier setup creates soft, even light across the face plane. A failing setup creates one bright object and one poorly exposed face.
The difference usually shows in a 15-second walk test: start at the porch edge, walk toward the door, pause at normal speaking distance, and turn slightly as a delivery driver would.
If the forehead and cheeks blow out while the eyes go dark, the light is too close to the lens line, too frontal, or bouncing from the wrong surface. If the entire face stays dim while the siding glows, the light is landing on the wall instead of the visitor.
This is the condition many people overestimate: a bright entry. A bright entry is cosmetic if it does not preserve facial detail.
For the broader outdoor-lighting version of that mistake, see Why Brighter Outdoor Lights Can Make Visibility Worse.
Night Vision Conflict
The camera may be trapped between color and infrared
Doorbell cameras often move between color footage, low-light color, and infrared-style night vision depending on the light level. A porch light can confuse that decision.
The wall may be bright enough to keep the camera in color mode, while the visitor’s face is still badly exposed. Or the camera may switch modes as reflections change during movement.
A practical warning sign is instability. If the image pulses, brightens, darkens, or flips between color and night vision within 10 to 20 seconds as someone approaches, the camera is not seeing one clean lighting condition.
The light level near the lens may be too uneven, too reflective, or too close to the camera.
Do not treat that as a settings problem first. Camera settings may reduce the symptom, but they rarely fix the cause if the porch light is still bouncing into the lens.
Read the mode signal before changing hardware
Use the live preview like a diagnostic tool. If color mode stays stable and the face is readable, the lighting is probably good enough. If color mode stays stable but the wall is bright and the face is dark, wall bounce is more likely than a bad camera.
If the view pulses or switches modes, reflection and night-vision conflict are more likely. If haze remains even with the porch light off, clean the lens and inspect for moisture before changing the fixture.
A stronger bulb can make this worse if a glass storm door, glossy trim, metal house number, or nearby window reflects the camera’s own night-vision light. The camera is already fighting reflection. More light adds another competing source.
The standard bulb swap stops making sense when the camera cannot hold a stable exposure for at least 30 seconds while someone stands and moves naturally near the door. At that point, fix the light path before replacing the camera.
This is also where camera-specific lighting advice matters more than a generic porch fixture guide. Outdoor Lights That Ruin Security Cameras goes deeper into the camera-side failure patterns that ordinary outdoor lighting advice often misses.
Better Porch Aim
Hide the source, light the visitor zone
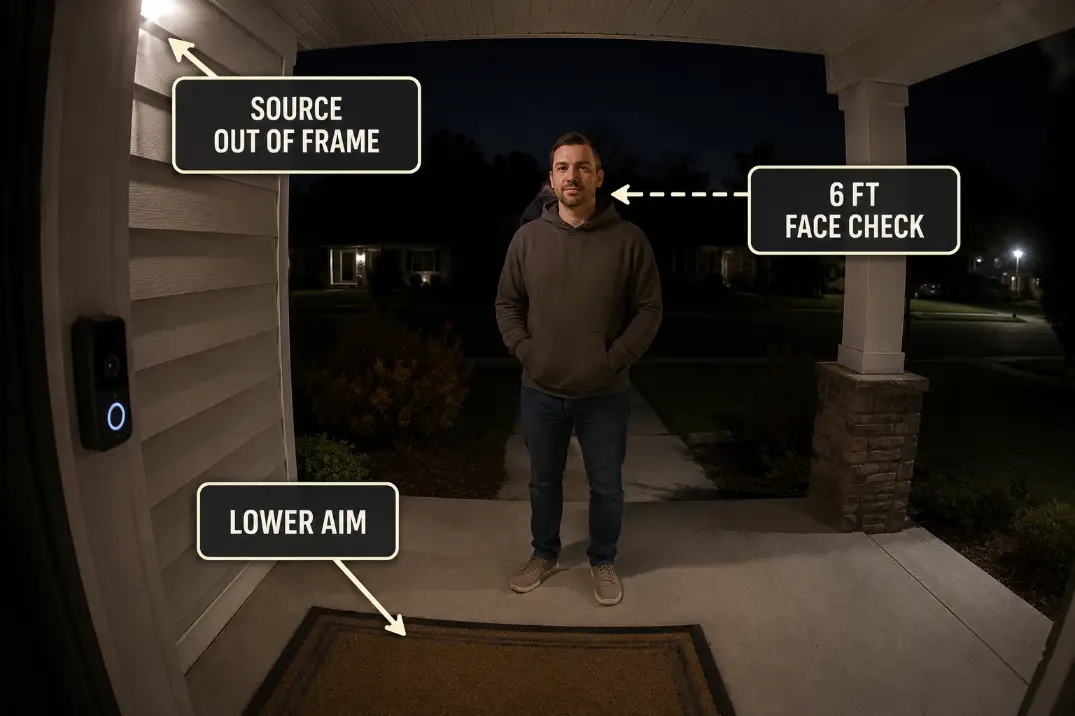
The better porch aim is simple: the glowing source should stay out of the camera view, while the light lands where a person stands.
That usually means a shielded downward fixture, a lower-glare bulb, or an adjustable light aimed down and slightly forward across the entry path.
The brightest patch should sit below face height, not on the wall beside the camera. A soft pool across the threshold, mat, first step, and approach line is usually more useful than a dramatic wall wash.
A practical target is a warm 2700K to 3000K porch light in a shielded fixture, often around 400 to 800 lumens for a small entry.
Larger porches may need more total output, but only if the source remains controlled. Output should increase after glare is solved, not before.
Use the 6-foot face check before buying anything
After changing the bulb, shade, or aim, open the live preview and stand 6 feet from the door. Face the camera for 3 seconds. Then walk toward the door and turn slightly.
The fix is working if the face stays readable, the bulb is not visible, the wall is not the brightest object, and the camera does not hunt between modes.
A new camera is a bad first fix if the bulb is still visible in the preview. First change source visibility, fixture shielding, and aim. If those changes fail, then camera placement or hardware becomes a more reasonable boundary.
For broader fixture aiming principles, How to Aim Outdoor Security Lights explains why useful target zones matter more than lighting the whole scene.
Quick diagnostic checklist
- Check the live preview 20 to 30 minutes after sunset, not during fading dusk.
- Look for a visible bulb, glowing shade, bright trim patch, or glass reflection.
- Test face detail from 5 to 8 feet away, not just porch brightness.
- Cover the bulb for 5 seconds and see whether the image improves.
- Watch for exposure pulsing or night-vision switching during a 30-second approach.
- Re-aim or shield the source before replacing the bulb with something brighter.
- Consider a new camera only after glare, wall bounce, and lens cleanliness are ruled out.
When a new fixture actually makes sense
A new fixture makes sense when the existing porch light cannot hide the source from the camera. Clear-glass lanterns, exposed decorative bulbs, and side sconces with no cutoff are often poor matches for doorbell cameras, even when they look attractive on the house.
At that point, the better buying direction is not “brightest porch light.” It is a shielded, low-glare fixture that supports camera footage. Best Outdoor Lights for Security Cameras is the more useful next step when the existing porch fixture keeps fighting the doorbell view.
Questions People Usually Ask
Should I turn off night vision if the porch light is bright?
Only if the camera holds clean color footage without face wash. If the porch light creates glare or wall bounce, turning off night vision may hide one symptom while leaving the exposure problem in place. Test both modes with someone standing 6 feet from the door.
Is a motion porch light better for a doorbell camera?
It can be, but only if it turns on before the person reaches the face zone. If the light triggers late, the most useful frames may already be missed.
A steady low-glare porch light often gives more reliable footage than a harsh light that activates at the last second.
Do I need a new doorbell camera?
Not first. Replace or move the camera only after the bulb is hidden from the preview, wall bounce is reduced, the lens is clean, and the camera can hold a stable image for at least 30 seconds.
If the same washout remains after those checks, then camera placement or hardware may be part of the problem.
For direct guidance on camera night-vision glare and reflected infrared light, see Google Nest’s night vision video quality guide.