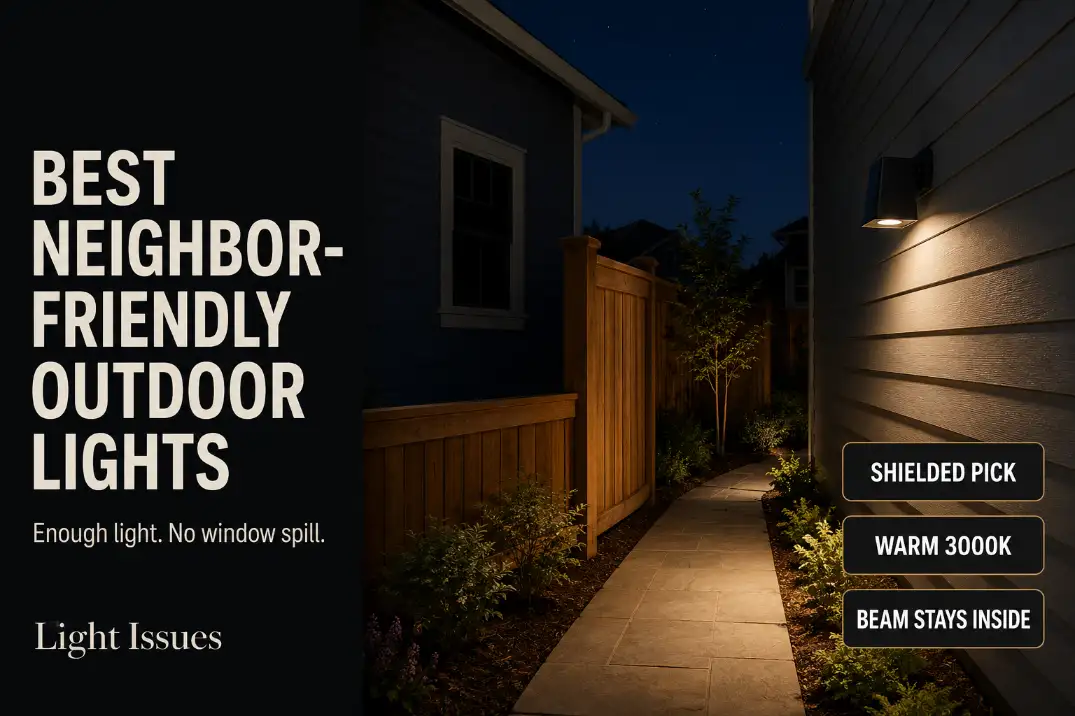
The best neighbor-friendly outdoor lights are shielded first, warm second, and bright only where the yard actually needs light. Most complaints come from one of four buying mistakes: a visible lens at fence height, a cool white beam, a wide spill pattern, or a motion sensor that reacts beyond the property line.
Before buying, check whether the fixture source is visible from about 5–6 ft eye height at the fence, whether the brightest beam crosses the boundary, and whether a motion light stays on longer than 60 seconds after movement stops.
A neighbor-friendly light is not always the lowest-lumen light. A 600-lumen exposed fixture can feel harsher than a 900-lumen shielded fixture because the exposed source is what the neighbor sees. The useful buying order is simple: control the source, warm the color, aim the beam, then adjust brightness.
| Neighbor problem | Best first buy | Why it works |
|---|---|---|
| Bright lens visible from fence | Shielded wall light | Hides the source before reducing output |
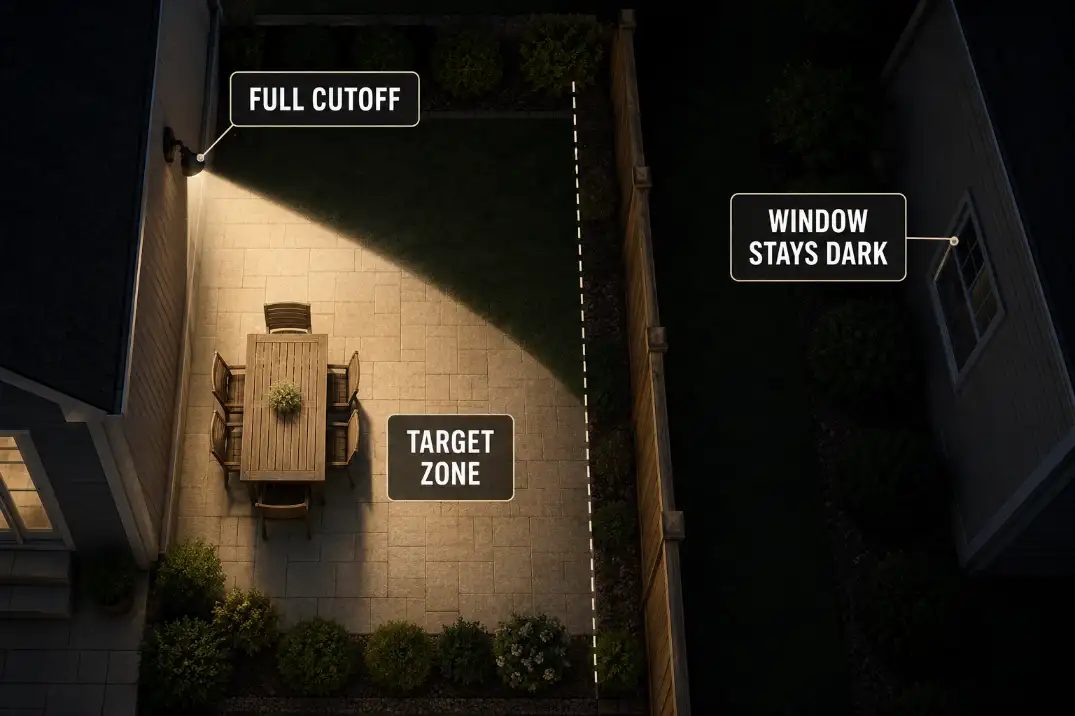
| Beam reaches a window | Full-cutoff fixture | Stops upward and sideways spill |
| Side yard flashes at night | Adjustable motion light | Narrows trigger range and on-time |
| Fence edge needs soft marking | Low-spill fence or step light | Keeps light low and local |
| Yard feels cold or sharp | 2700K–3000K warm light | Reduces harshness across distance |
Best Shielded Lights
Start with the fixture shape
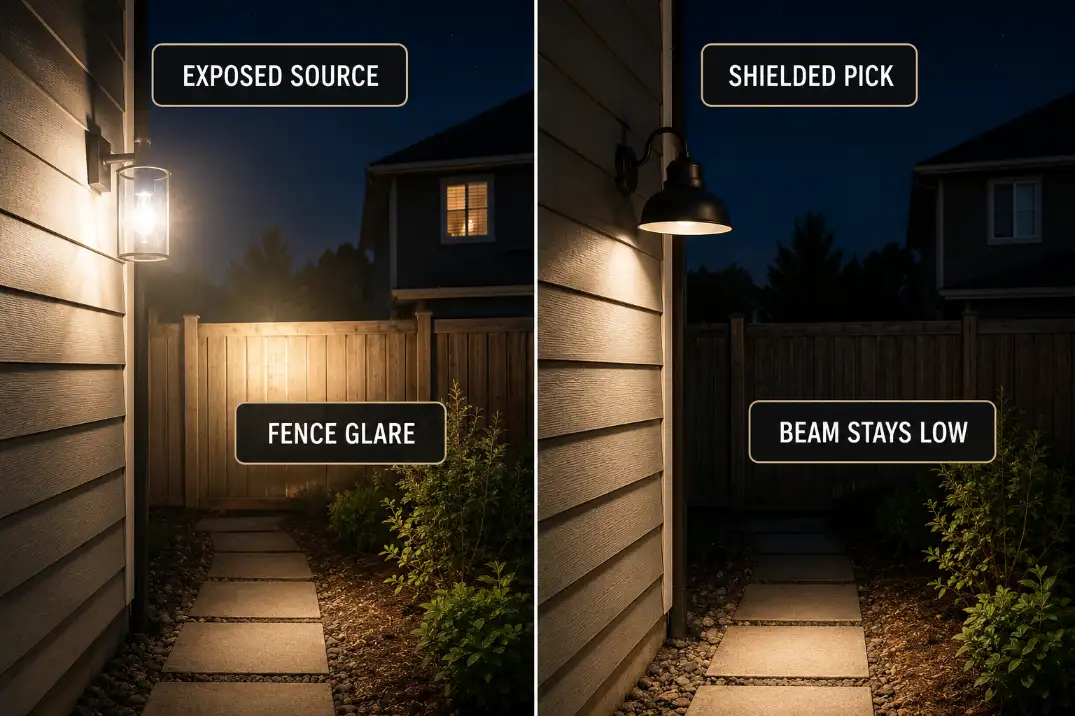
Shielded outdoor wall lights are the strongest first choice for most neighbor-sensitive homes because they solve the source problem. The light can still be useful at the door, gate, trash area, or side path, but the bulb or LED board is not visible from the neighbor’s side.
Look for a hood, deep shade, louvered face, full-cutoff housing, or down-facing design. Clear-glass coach lights are the common trap.
They look polite during the day, but at night the bare bulb becomes the brightest point in the scene. Frosted glass softens the source, but shielding changes the direction of the light.
LOW-GLARE FIRST PICK — Shielded outdoor wall lights are the safest first buy when the fixture sits near a fence, bedroom window, shared driveway, or narrow side yard. Hide the source before increasing brightness.
🟧 SHOP SHIELDED OUTDOOR WALL LIGHTS
Use the fence-line source test
Do not judge the fixture from your patio only. Stand near the shared fence after dark at normal eye height. If the lens or bulb is the brightest thing you see, the light is still neighbor-facing even if the ground near your door looks properly lit.
A healthy fixture should make the walking surface, lock area, or step edge visible while keeping the source secondary. A failing fixture does the opposite: the eye sees the lamp first and the task area second.
Best Warm Lights
Choose 2700K–3000K for shared edges
Warm white light usually behaves better around neighbors because it feels less sharp across distance. For porches, patios, fence lines, and side yards, 2700K–3000K is the safest range. If the fixture is close to a bedroom window or shared patio, 2200K–2700K can feel even softer.
Cold 4000K–5000K light is often overestimated because it looks clean and bright on the package. Outdoors, it can turn a small spill problem into a harsh one, especially on pale siding, white vinyl fencing, wet concrete, or light-colored pavers.
SOFTER NIGHT OUTPUT — Warm white outdoor LED lights make sense when the beam is already controlled but the yard still feels sharp, cold, or too visible from the neighbor side.
🟧 SHOP WARM WHITE OUTDOOR LIGHTS
Warm bulbs do not fix exposed fixtures
A warm bulb can reduce harshness, but it cannot hide a visible source. If the bare bulb still faces a fence or window, switching from 5000K to 2700K is only a partial improvement. The color changes; the glare path remains.
This is where buyers often waste time. They try lower wattage, warmer bulbs, dimmers, and smart schedules, while the fixture shape keeps sending light sideways. If the source is still visible from the fence after the bulb change, replace the fixture rather than weakening the light until your own entry feels unsafe.
Best Fence Lights
Keep fence lighting low and local
Fence lights work best when they define an edge rather than light the whole yard. A good fence light marks a gate, side path, step, or seating boundary with a small pool of light. It should not turn the fence into a row of glowing dots.
For shared fences, lower side-mounted lights are usually safer than fence-top lights. A fixture mounted about 18–36 inches above the ground is easier to control than one placed near standing eye height.
The beam should face down and back into your yard, not outward through the fence line.
FENCE-LINE CONTROL — Low-spill fence and step lights are best for gates, side paths, deck edges, and patio borders where you need orientation instead of a broad yard wash.
🟧 SHOP LOW-SPILL FENCE LIGHTS
Use fence lights only where the edge needs help
A smaller light every useful zone is usually better than one strong fixture trying to cover 40 ft of fence. Soft 3–6 ft pools near a walking edge feel calmer than a continuous bright strip along the boundary.
If the real issue is privacy at the shared edge, fixture placement matters as much as product type. A fence light that points outward can make the boundary feel more exposed, while a downward light can support movement without announcing the whole yard.
For more fence-specific planning, Shared Fence Outdoor Lighting Privacy is the closer diagnostic path.
Solar fence lights can work, but only when the output is low and the face is shielded. Many cheap solar fence lights are not too powerful, but they still create annoying visible dots because the LED is aimed straight out.
Best Motion Lights
Buy adjustability, not maximum range
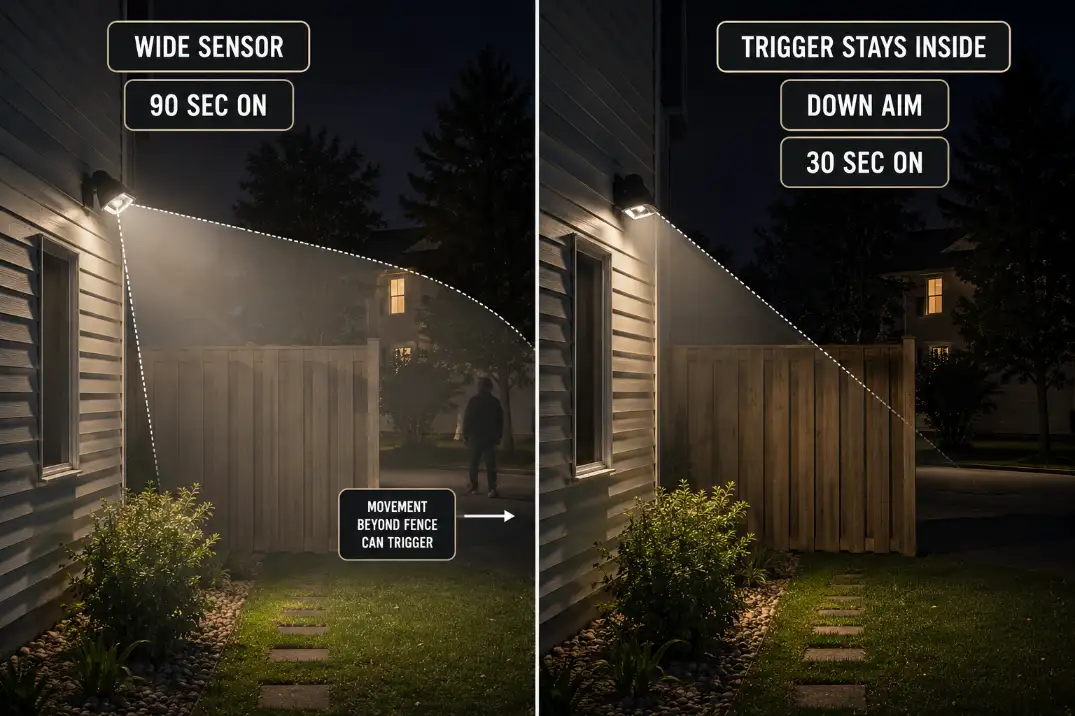
Motion lights can be neighbor-friendly when the lamp heads and sensor are adjustable. The mistake is buying the strongest range available for a small suburban lot. A 60–70 ft trigger range may help a long rural driveway, but it often creates false triggers on sidewalks, shared driveways, cars, pets, and neighbor movement.
For side yards, gates, and back doors, a 20–35 ft detection zone is usually more useful. Hold time should normally sit around 30–60 seconds. Longer 90–180 second settings make each false trigger feel more intrusive, especially near bedroom windows.
CONTROLLED TRIGGER PICK — Adjustable motion sensor outdoor lights are the right buy when you need security coverage but want shorter range, shorter on-time, and tighter beam direction.
🟧 SHOP ADJUSTABLE MOTION SENSOR LIGHTS
Separate the sensor problem from the light problem
A motion light can annoy neighbors in two different ways. The beam may face the wrong direction, or the sensor may trigger from the wrong movement. Dimming the fixture does not fix a sensor that watches the street. Lowering sensitivity may not fix lamp heads aimed at a second-floor window.
The better product filter is adjustable heads, adjustable sensor range, adjustable timer, downward aiming, warm or selectable color temperature, and a manual override. Fixed wide-angle sensors are less forgiving in narrow lots.
When the trigger area crosses the property edge, the failure pattern is closer to Motion Sensor Lights Surprise Neighbors than a simple brightness issue. In that situation, the fixture needs a smaller detection zone before it needs more lumens.
Best Low-Spill Fixtures
Low-spill is not the same as low brightness
Low-spill fixtures are for homes that still need useful light but cannot afford glare. They include full-cutoff wall lights, hooded security lights, recessed step lights, shielded path lights, downward fence lights, and controlled motion fixtures.
This is the better distinction than “bright versus dim.” A low-spill fixture can deliver 500–1000 useful lumens onto a door, step, or path without sending the source into the neighbor’s view. A scattered 1500–2500 lumen floodlight may look stronger on the box but perform worse in a tight yard.
If the buying need is security-specific, Best Low-Glare Outdoor Security Lights is the stronger comparison because it narrows the decision to fixtures that protect visibility without exposing the lens.
| Fixture type | Buy when | Neighbor-friendly signal | Avoid when |
|---|---|---|---|
| Full-cutoff wall light | Door or side wall faces a neighbor | Source hidden from side view | Wall is too high and beam cannot be aimed low |
| Hooded motion light | Security zone needs controlled trigger | Heads and timer adjust separately | Sensor is fixed at wide range |
| Low fence light | Gate or path edge needs marking | Small pool stays on your side | Fixture faces outward |
| Recessed step light | Stairs or deck edges need safety | Light stays below eye level | Clear face points across yard |
| Shielded path light | Walkway needs soft guidance | Cap blocks upward glare | Spacing creates runway dots |
| Shielded floodlight | Larger task zone needs coverage | Beam stays below window line | Small yard only needs local light |
Replace when dimming makes the yard unsafe
Dimming is a tuning tool, not a fix for bad fixture geometry. If you must reduce brightness so much that steps, locks, uneven paving, or a gate latch become hard to read within 6–10 ft, the fixture is wrong.
This is the boundary where replacement starts making sense. A controlled fixture should keep the task visible while reducing neighbor spill.
A poor fixture forces a tradeoff: safe for you or tolerable for them. The right buy removes that tradeoff.
For visibility, glare is often more damaging than people expect. A light can be brighter and still make the yard feel less readable because it creates hard shadows and a visible source.
That is why Outdoor Security Lights Without Glare is a useful supporting guide before upgrading to a stronger fixture.
Features to Avoid
Avoid attractive fixtures with exposed sources
The most neighbor-unfriendly outdoor lights often look normal in product photos. Clear-glass coach lights, exposed LED flood panels, upward-facing decorative lights, and cool white security floods can all look residential while behaving badly at night.
The warning sign is not style. It is source visibility. If the bulb, LED board, or clear lens would be visible from the fence, sidewalk, bedroom window, or shared driveway, the fixture is risky even if the lumen number seems modest.
When the complaint is a window issue, do not treat it as generic brightness. The real question is whether the beam or bare source reaches the glass. Stop Outdoor Lights Shining Into Neighbor Windows is the better fix path when the window angle is the main failure.
Avoid fixed wide sensors on small lots
A fixed 180-degree motion sensor can be useful in the right setting, but it is often too blunt for a narrow suburban side yard. If the sensor watches more of the street than the entry, every adjustment becomes a compromise.
Also be careful with dusk-to-dawn floodlights near shared edges. A short motion flash may be tolerable if it is aimed properly. A bright fixture glowing for 8–10 hours through the night is more likely to feel like a permanent nuisance.
If your current fixture mostly needs re-aiming rather than replacement, Aim Outdoor Security Lights can help you decide whether the beam can be corrected before buying a new unit.
The safest buying order
Buy neighbor-friendly outdoor lights in this order: shielded fixture, warm color, controlled beam, adjustable controls. Brightness comes after those choices, not before them.
For most homes, the best setup is a shielded 2700K–3000K wall light at the door, low-spill fence or step lights for edges, and an adjustable motion light with a 30–60 second hold time for active security zones.
Avoid clear glass, exposed LED panels, fixed wide sensors, cool white output near windows, and any fixture that makes the source visible from the property line.
For broader official guidance, see the National Park Service outdoor lighting principles.