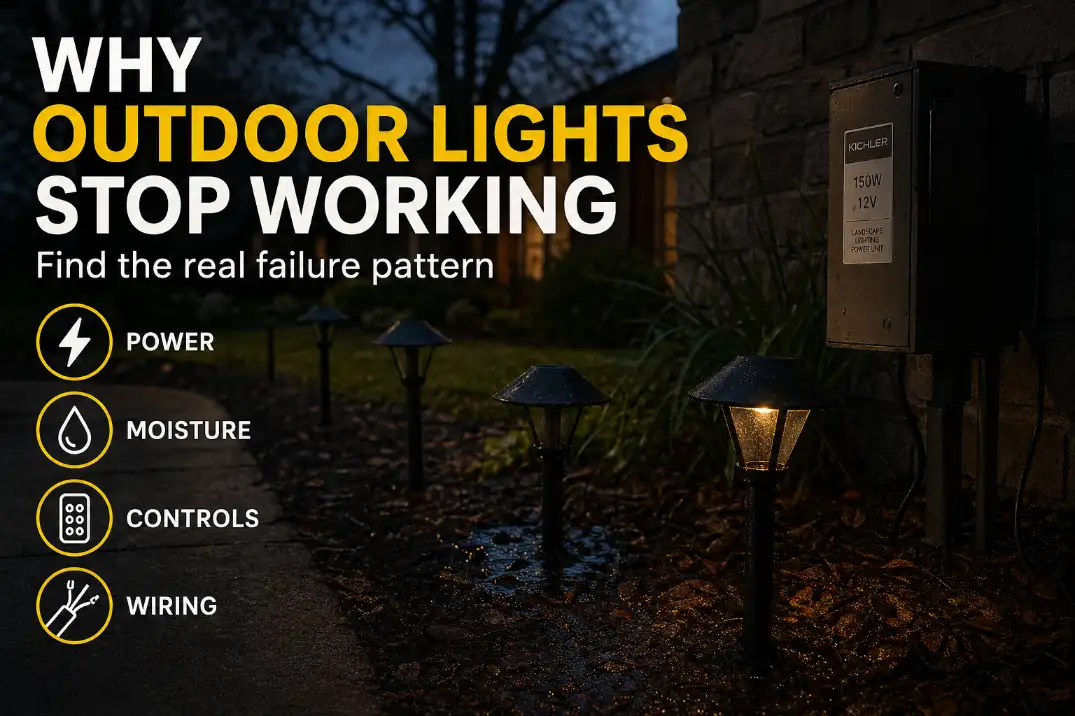
Outdoor lights usually stop working because one layer of the system has failed: power supply, controls, wiring, moisture protection, fixture electronics, or solar charging.
The fastest diagnosis is not replacing every bulb. It is identifying the failure pattern first: all lights are out, one fixture is out, one run is out, the lights fail after rain, they shut off after 5–30 minutes, or solar lights fade before midnight.
That pattern matters. A whole-system failure points upstream to the breaker, GFCI, outlet, transformer, timer, photocell, or main feed. A single dead fixture points to the bulb, socket, connector, fixture lead, or internal LED board.
A failure that appears after rain and recovers after 24–48 dry hours is usually moisture-related, even if the fixture looks dry from the outside.
Use this page as a diagnostic hub: find the pattern, then follow the specific repair path.
Start With the Failure Pattern
Outdoor lighting problems become much easier when you stop thinking fixture by fixture and start thinking in layers.
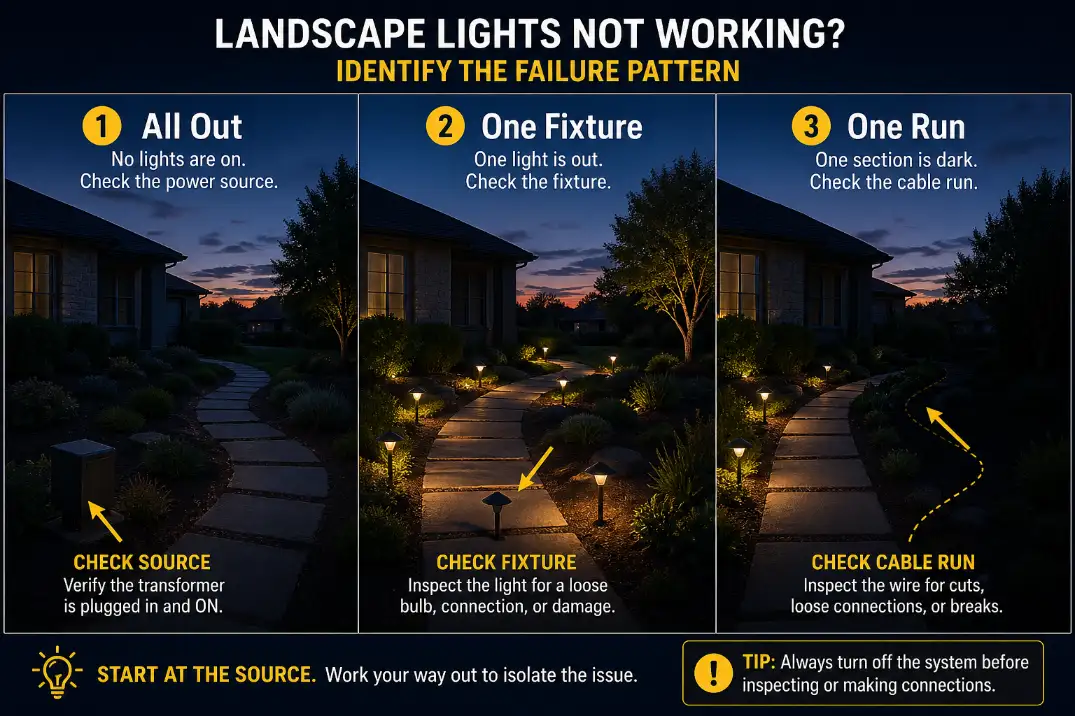
All outdoor lights are off
If every light is out, begin upstream. Check the breaker, GFCI outlet, outdoor receptacle, transformer, timer, photocell, smart plug, and main switch before opening fixtures.
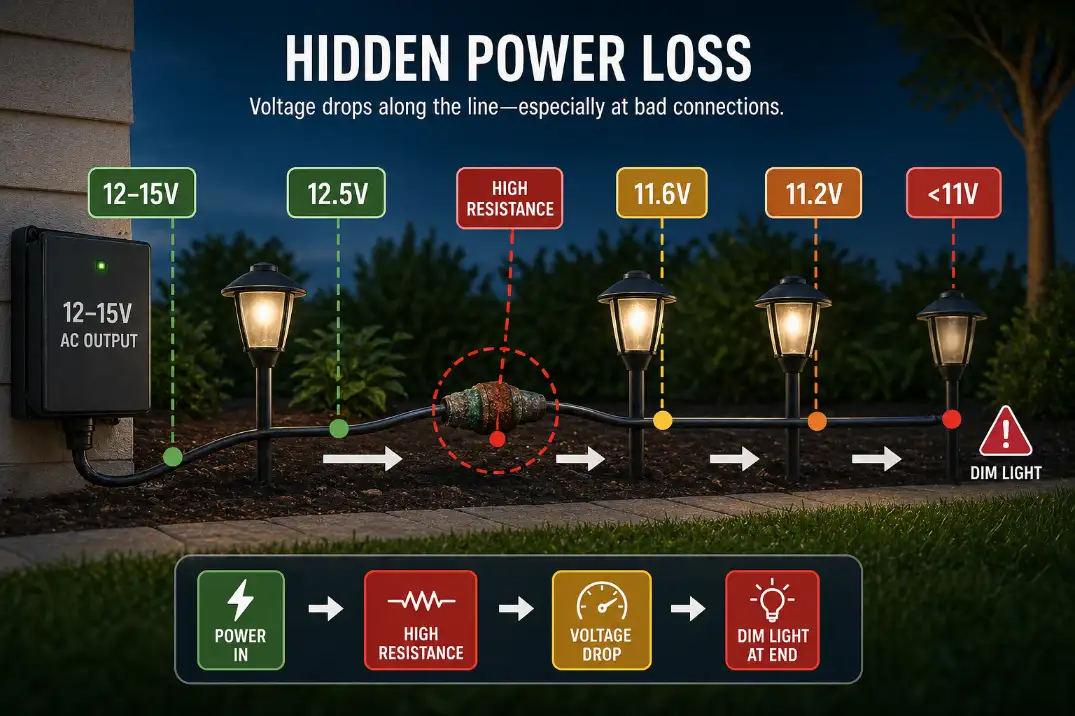
For low-voltage landscape lighting, the transformer commonly sends about 12–15 volts to the lighting run. If the transformer has no output, the fixtures are not the first problem. If the transformer has output but no lights come on, the issue may be in the main cable, first splice, hub, or control setting.
A common wasted fix here is replacing several bulbs across the yard. All bulbs rarely fail at once.
One fixture is out
A single failed light is usually local. Look at the bulb, socket, wire lead, connector, splice, gasket, fixture base, or internal LED board. If the rest of the system is bright and stable, the transformer is less likely to be the first suspect.
For integrated LED fixtures, there may not be a replaceable bulb. Once water reaches the driver or LED board, replacement may make more sense than repeated patching.
One side or one run is out
If one side of the yard is dark while the rest works, think cable path. A cut underground cable, loose hub, damaged splice, or voltage drop can remove a whole group of fixtures.
This pattern often shows up after edging, digging, fence work, planting, aeration, or irrigation repair. If the failure appears within 24–72 hours of yard work, cable damage deserves more attention than fixture age.
For a deeper run-based diagnosis, use Outdoor Lights Not Working on One Side of the Yard as the next step.
Lights fail after rain
Rain-related failure usually means moisture is reaching a weak electrical point. The problem may be inside the fixture, at a cable entry, in a buried splice, inside a wall box, or along damaged insulation.
A light does not need to be visibly full of water to fail. A damp connector or small leakage path can be enough to trip a GFCI, cause flickering, or weaken a low-voltage connection.
If the lights work when dry but fail after storms, irrigation, snowmelt, or humid nights, Why Outdoor Lights Fail After Rain is the more specific repair path.
Lights turn off after a few minutes
Lights that turn on and then shut off after 5–30 minutes usually point to heat, overload, transformer protection, a failing connection, or voltage drop under load.
That is different from a fixture that never turns on. A weak connection may pass current briefly, then fail as resistance and heat increase. A transformer may start normally, then shut down when the load exceeds capacity.
If this is the main symptom, Outdoor Lights Turning Off After a Few Minutes gives the more focused troubleshooting path.
Solar lights fade before midnight
Solar lights fail differently because every fixture is its own small system: panel, battery, light sensor, LED, switch, and internal wiring.
A solar light that gets fewer than 4–6 hours of usable direct sun may fade early even if the LED is fine. A light that runs 8 hours in summer may run only 2–4 hours in winter because of shorter days, lower sun angle, shade, cold batteries, and cloudy weather.
For solar-specific troubleshooting, start with Why Solar Lights Stop Working.
Match the Outdoor Light Type to the Failure
“Outdoor lights” is a broad phrase. A low-voltage path light, a line-voltage porch light, a solar stake light, and plug-in string lights do not fail the same way.
| Light type | First place to look | What people often assume incorrectly |
|---|---|---|
| Low-voltage landscape lights | Transformer, cable, splice, voltage drop | Every fixture failed at once |
| Line-voltage wall or post lights | Breaker, GFCI, switch, fixture wiring | It is safe to open live wiring |
| Solar lights | Sun exposure, panel, battery, sensor, moisture | The battery is always the first problem |
| Plug-in outdoor lights | GFCI outlet, cord, weather cover, plug connection | The outlet is permanently dead |
| Integrated LED fixtures | Driver, LED board, heat, water intrusion | There is always a replaceable bulb |
If the fixture is connected to household line voltage rather than a low-voltage transformer, shut power off at the breaker before opening anything. Repeated GFCI trips, burn marks, melted parts, exposed copper, or water inside electrical boxes should be treated as safety issues, not routine maintenance.
The Main Causes, Ranked by Diagnostic Value
Not every possible cause deserves the same attention. Start with the causes that explain the largest pattern first.
1. Power source failure
When everything is off, power is the first layer. Check the breaker, GFCI, outlet, switch, timer, transformer input, and transformer output.
A tripped GFCI can shut down an entire outdoor lighting circuit. Sometimes it trips after rain because water is creating leakage somewhere downstream. Resetting it may bring the lights back temporarily, but if it trips again, the reset is not the fix.
The useful distinction is this:
| What you find | What it usually means | Better next step |
|---|---|---|
| No input power to transformer | Breaker, outlet, GFCI, switch, cord, or upstream issue | Check source power first |
| Input power but no output | Transformer, timer, fuse, overload, or internal failure | Check controls and protection |
| Output exists but one run is dead | Cable, splice, hub, connector, or run layout issue | Trace the failed run |
That separation prevents expensive guessing.
2. Timer, photocell, or smart control problems
Some outdoor lights are not broken. They are being told to stay off.
Timers lose settings after outages. Photocells can be fooled by porch lights, streetlights, reflective glass, garage lights, or nearby security lighting. Smart plugs may disconnect from Wi-Fi or lose schedules after app changes.
The clue is manual mode. If the lights work manually but fail automatically, the power path may be fine. The control layer is the problem.
3. Moisture intrusion
Moisture is one of the most underestimated causes of outdoor light failure. Homeowners often expect to see standing water inside the lens before blaming water. In reality, the failure point may be hidden.
Moisture can enter through fixture gaskets, cable entries, mounting screws, conduit openings, buried connectors, cracked housings, or poor drainage around the fixture base.
Look for fogged lenses, green corrosion, white residue, rust staining, flickering after rain, GFCI trips during wet weather, or lights that recover after drying.
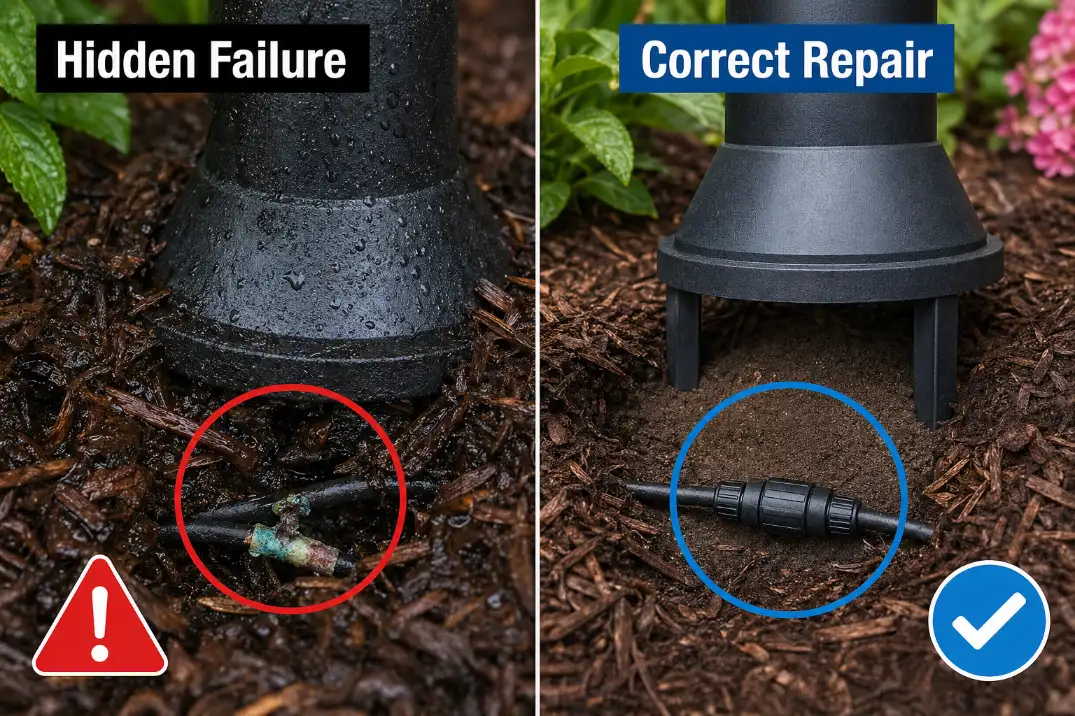
4. Corroded splices and weak connectors
Outdoor lighting systems rely on many small connections. Each one can become the weak point.
A corroded splice is not just ugly. It increases resistance, reduces voltage, creates heat, causes flicker, and can eventually kill a fixture or a whole run. This matters especially in low-voltage systems because they have less margin for loss.
A splice buried in wet mulch or soil is more likely to fail than a protected connection above grade. If the connector is cracked, loose, discolored, swollen, or crusty, it deserves attention before you blame the fixture.
For connection-specific repair logic, see Corroded Wire Splices Outdoors.
5. Cable damage
Outdoor lighting cable is vulnerable because it often runs through places where people later dig, edge, plant, trench, or repair irrigation.
The cable does not have to be fully cut. A nicked jacket can let water reach copper. The lighting may still work for days or weeks before corrosion grows enough to cause failure.
Cable damage is more likely when one zone suddenly fails, the failure appears after yard work, fixtures beyond one point are dead, or the problem worsens after rain.
6. Voltage drop and overloaded runs
Low-voltage landscape lights can fail even when the transformer works. Long cable runs, undersized wire, too many fixtures, poor splices, and unbalanced layouts can all reduce voltage by the time power reaches the far fixtures.
A system may start at 12–15 volts near the transformer but deliver much less at the end. If a fixture receives below roughly 10.5–11 volts under load, performance may become unreliable depending on the fixture.
The symptom is usually not total failure at first. It may begin as dimming, color shift, flicker, or the last few fixtures failing before the closer ones.
For end-of-run issues, Voltage Drop in Outdoor Lighting Systems is the stronger supporting guide.
7. Solar charging failure
Solar lights are often misdiagnosed because the visible symptom is darkness, but the real problem is charging. Shade from trees, shrubs, roof overhangs, north-facing walls, dirty panels, cloudy weather, and low winter sun can all reduce charge.
Replacing the battery is reasonable after aging, but it is often done too early. If the panel only receives 2–3 hours of weak sun, a new battery will still disappoint.
8. Fixture age and internal LED failure
Age matters, but it should not be the first explanation for every failure. Outdoor fixtures usually fail early because water, heat, poor connections, or voltage problems stress them.
Integrated LED fixtures can fail when the driver, LED board, seal, or internal wiring is damaged. Once water reaches the electronics, the practical fix is often replacement, not another bulb or more caulk.
What People Usually Misread
They treat the bulb as the system
A burned-out bulb is possible, especially when one fixture is out. But a bulb does not explain a dead transformer, repeated GFCI trip, one dark run, or rain-triggered failure.
The better rule: replace a bulb only when the failure is local and the fixture is dry.
They ignore timing
Timing often tells the truth. A failure after rain, after irrigation, after yard work, after 10 minutes, or after sunset is not random.
A light that dies after 10–20 minutes is a different problem from a light that never turns on. A system that fails after rain and recovers after two dry days is a different problem from a permanently dead circuit.
They seal the wrong thing
More caulk can trap water if the fixture needs drainage. Sealing the lens does not fix water entering through a cable path or buried connector.
A good repair follows the water path, not just the visible stain.
Safe Troubleshooting Flow
Step 1: Switch to manual mode
If the system has a timer, photocell, smart plug, or app schedule, try manual mode first. If the lights work manually, the control layer deserves attention before wiring or fixtures.
Step 2: Identify the scope
Decide whether the issue affects all lights, one fixture, one run, wet-weather performance, or runtime. This one step prevents most unnecessary repairs.
Step 3: Check upstream power
Check the breaker, GFCI, outlet, switch, and transformer input. For plug-in lights, inspect the outdoor outlet cover and cord connection. For low-voltage systems, confirm the transformer is actually receiving power.
Step 4: Check transformer output
If the transformer has input power but no output, check timer settings, photocell behavior, overload protection, secondary fuse, and reset options. If some runs work and one does not, the transformer is less likely to be the only issue.
Step 5: Find the first failed point
In a run where some lights work and others do not, find the boundary. The first failed fixture, connector, hub, or cable segment often marks the problem area.
Pro Tip: Take a quick photo before disconnecting wires. It makes it much easier to put the system back correctly.
Step 6: Look for weather timing
Ask whether the failure appears after rain, sprinklers, snowmelt, pool splash, or humid nights. Wet-weather timing often points to moisture intrusion or ground-fault leakage.
Step 7: Measure voltage under load
For low-voltage systems, voltage readings are most useful when the lights are connected and on. An unloaded wire can show decent voltage and still fail under real demand.
Step 8: Stop when the issue becomes unsafe
Stop DIY troubleshooting if you see repeated breaker or GFCI trips, melted connectors, burn marks, exposed copper, water inside line-voltage boxes, damaged buried cable, or unknown household wiring.
What Usually Wastes Time
Replacing every bulb
Replacing every bulb makes sense only if the fixtures are old and independently failing. It does not solve a dead power source, bad timer, transformer issue, cut cable, or wet splice.
Replacing the transformer too early
A transformer replacement is premature if only one fixture or one run is out. Test input, output, and run behavior first.
Resetting the GFCI repeatedly
A repeated trip is a warning. Resetting it again and again does not remove the fault. It only delays finding the wet fixture, damaged cable, or leakage path.
Replacing solar batteries without checking sun
A new battery cannot compensate for bad placement. If the panel does not get enough direct sun, runtime will stay poor.
Sealing the lens while ignoring the base
If water enters through the cable entry, mounting point, or buried connector, sealing the lens will not solve the failure. It may even trap moisture.
Repair or Replace: Make the Right Call
| Situation | Better repair | Replace or call when |
|---|---|---|
| One dry fixture is out | Test bulb, socket, connector | LED board or driver has failed |
| Corroded splice | Replace with outdoor-rated waterproof connector | Wire is brittle, blackened, or damaged |
| One run is dim or off | Check voltage drop, cable path, hubs, splices | Layout is overloaded or cable is damaged |
| Water inside fixture | Fix entry path, drainage, gasket | Housing, seal, or electronics are damaged |
| Repeated GFCI trip | Stop using circuit and find fault | It trips again after reset or involves line voltage |
| Burn marks or melted parts | Do not use | Call an electrician immediately |
| Solar fades early | Improve sun exposure, clean panel, test battery | Panel, board, housing, or battery has failed |
Replace connectors before fixtures when corrosion is visible
A bad connector can make a good fixture look dead. If the splice is clearly compromised, replace the connection before assuming the fixture failed.
Replace fixtures when the housing no longer protects the electronics
A cracked housing, warped gasket, failed cable seal, or water-damaged LED board usually means the same problem will return.
Rework the run when the layout is the problem
If end fixtures repeatedly dim, flicker, or fail, the system may need shorter runs, heavier-gauge wire, balanced loading, or a hub-style layout.
What Changes by Weather and Location
Outdoor lights fail faster when the site keeps pushing water, heat, salt, soil movement, or shade into weak points.
In northern states, freeze-thaw cycles can open small gaps around fixture bodies, cable entries, and mounting points. In rainy Midwest regions, saturated soil can keep buried connectors wet for days. Near pools, chlorinated splash and humidity speed corrosion. In coastal areas, salt air can attack contacts even when fixtures are not visibly wet.
Dry climates have their own pattern. In hot Arizona-style conditions, heat can stress LED drivers and fixture housings, while irrigation becomes the main moisture trigger. A light does not need frequent rain to suffer water damage if sprinklers hit it every morning.
The site condition often explains why the same repair keeps failing.
Questions People Usually Ask
Why did all my outdoor lights stop working at once?
A whole-system failure usually points to the power source, GFCI, breaker, transformer, timer, photocell, outlet, or main feed. It is unlikely that every bulb failed at the same time.
Why do my outdoor lights stop working after rain?
Rain exposes weak seals, wet splices, damaged cable jackets, ground-fault leakage, and corrosion. If the lights recover after drying, moisture is more likely than a simple bulb failure.
Why do my outdoor lights come on and then shut off?
That usually points to overload, heat, transformer protection, failing connections, or voltage drop under load. The shutdown delay matters: 5–30 minutes is often a clue.
Should I replace the transformer first?
Only if testing shows no output, overload failure, or internal transformer damage. If one fixture or one run is out while the rest works, start with wiring, splices, hubs, and voltage at the failed section.
Are solar lights diagnosed the same way?
No. Solar lights depend on sun exposure, battery condition, panel cleanliness, sensor behavior, and internal moisture protection. Poor charging often appears as weak runtime, not immediate total failure.
Final Takeaway
Outdoor lights stop working because a specific layer fails: power, control, transformer, wiring, moisture protection, fixture electronics, or solar charging. The right repair starts by identifying the pattern.
All lights out means check upstream. One fixture out means inspect locally. One run out means trace the cable path. Failure after rain means follow moisture. Shutdown after a few minutes means check load, heat, voltage, and protection. Solar fading means check charging before blaming the battery.
The most common wasted fixes are replacing every bulb, resetting a tripping GFCI repeatedly, sealing the wrong part of the fixture, and replacing solar batteries before checking sun exposure. A strong repair fixes the cause, not just the symptom.
For broader outdoor electrical safety guidance, see the Electrical Safety Foundation International outdoor decoration safety tips.