Outdoor lights usually miss the target area because the beam lands in the wrong place, not because the fixture has failed. The most likely causes are poor aim, the wrong beam spread, fixture placement that cannot reach the target, or an obstruction blocking the usable light.
Start by checking three things after dark: where the brightest patch lands, whether the bulb or LED emitter is visible from normal eye height around 5–6 feet, and whether the target area is actually darker than nearby siding, lawn, shrubs, or pavement.
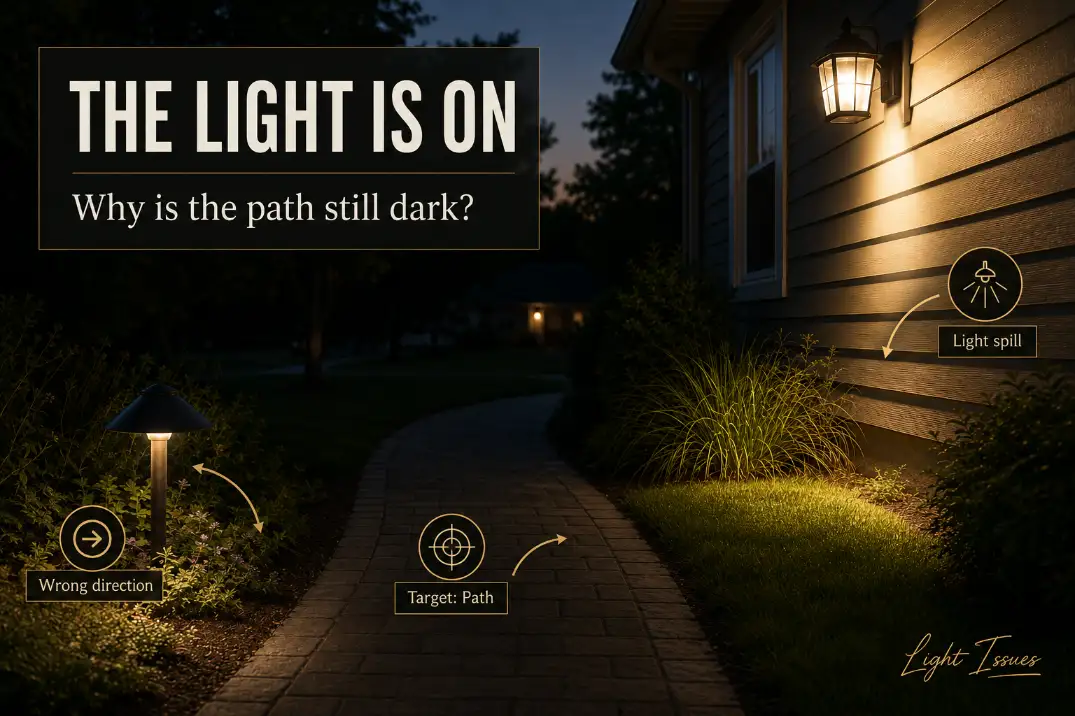
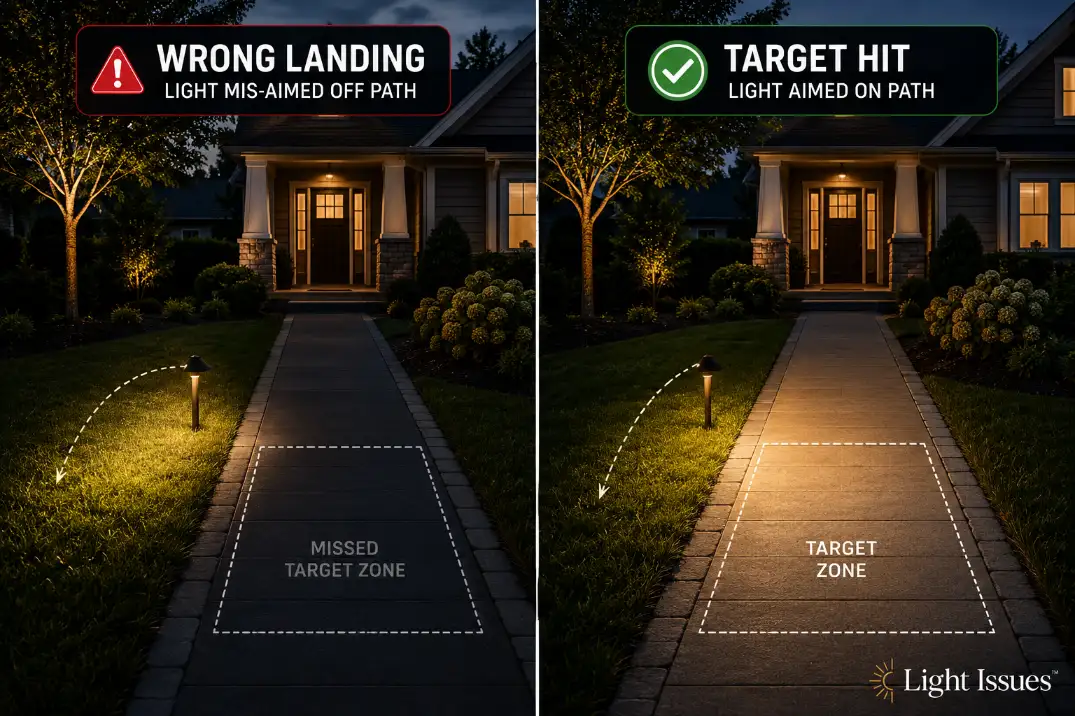
A missed target is different from an outage. The light turns on, but the usable light lands 2–3 feet or more away from the walkway, driveway, step, gate, or entry zone you meant to illuminate. If the fixture is bright but the area still feels unsafe, the symptom is darkness; the mechanism is beam geometry.
The First Check: Where the Beam Actually Lands
A useful outdoor light puts its strongest usable light on the surface or object that matters. That might be the first 3–5 feet in front of a door, the latch side of a gate, the edge of a driveway, or the centerline of a walkway. If the brightest patch falls on grass, siding, a tree trunk, or the far side of a driveway, the light is working but working in the wrong place.
Hot spot beats fixture position
Do not judge the fixture by whether it looks centered on the wall or lined up with the path. Judge it by where the hot spot lands. For walkways and steps, the strongest usable area should usually fall within about 12–24 inches of the walking line or tread edge. If it lands several feet away, the problem is not cosmetic alignment; it is performance.
This is where many homeowners misread the issue. A brighter bulb may make the wrong surface brighter while leaving the target mostly unchanged. If a wall, lawn, fence, or shrub is brighter than the surface you walk on, output is being wasted.
Missed aim is not the same as a coverage gap
A missed target has light nearby, just not where it should be. A coverage gap has no fixture positioned to reach the area at all. If the hot spot is 3–4 feet off the walkway, start with aiming. If the whole area sits beyond the useful reach of the fixture, placement is the bigger problem.
That distinction matters because Outdoor Lighting Placement Problems are rarely fixed by wattage alone. The fixture has to be in a position where the beam can reach the target cleanly.
Match the Miss to the Fixture Type
Different fixtures miss in different ways. A floodlight that overshoots a driveway is not failing for the same reason as a path light buried behind ornamental grass. Use the fixture type to narrow the diagnosis before replacing parts.
| Fixture type | Target it should hit | Most common miss | First fix |
|---|---|---|---|
| Path light | Walking edge and path surface | Lights mulch, lawn, or plantings | Rotate beam, move closer, clear growth |
| Wall sconce | Door handle, landing, approach | Lights siding more than threshold | Add downward task light or change fixture |
| Floodlight | Driveway, side yard, garage apron | Overshoots target or creates glare | Aim down, shield, split coverage |
| Step light | Tread edge and elevation change | Lights riser but hides tread edge | Reposition or add lower side lighting |
| Uplight | Tree, wall, column, feature | Hits lawn or creates a narrow stripe | Adjust distance and beam angle |
Safety lighting and accent lighting are not the same job
A fixture that looks attractive may not make a surface easier to use. Accent lights are allowed to graze walls, highlight trunks, or create depth. Safety and task lights need to reveal edges, level changes, handles, walking lines, and parking zones quickly.
The mistake is expecting one decorative fixture to do both jobs. A porch lantern may glow nicely from the street and still fail to define the step below it. A bullet spotlight may make a tree look dramatic while leaving the adjacent path dark.
The 3-Point Night Test
Test outdoor lights at night from the places people actually use, not from directly under the fixture. This takes only a few minutes and usually reveals whether the problem is aim, glare, beam spread, or placement.
1. Stand at the approach point
Stand where someone first enters the area: the sidewalk, driveway edge, gate, or bottom of the steps. If the LED emitter or bulb is the brightest thing in view, the fixture may be creating glare instead of visibility. If you need to squint or turn your head, the beam is too exposed or aimed too high.
2. Stand on the target
Move to the exact area the light is supposed to help. Look down at the walking surface, step edge, door handle, or driveway boundary. If the brightest usable light is more than 2–3 feet away from that target, aim or placement is off.
3. Look back from the opposite side
Look back toward the fixture from the far edge of the target area. This shows spill and shadow patterns. If the target is dark but nearby vertical surfaces glow, the beam is being intercepted or aimed into the wrong plane.
Pro Tip: Take one phone photo from the same position before and after each adjustment. Spill, shadows, and glare are easier to compare in photos than from memory.
The Main Causes, Ranked by What Usually Matters
Not every possible cause deserves equal attention. Dirty lenses, bulb color, and fixture age can matter, but they are usually secondary when the beam visibly lands outside the intended area.
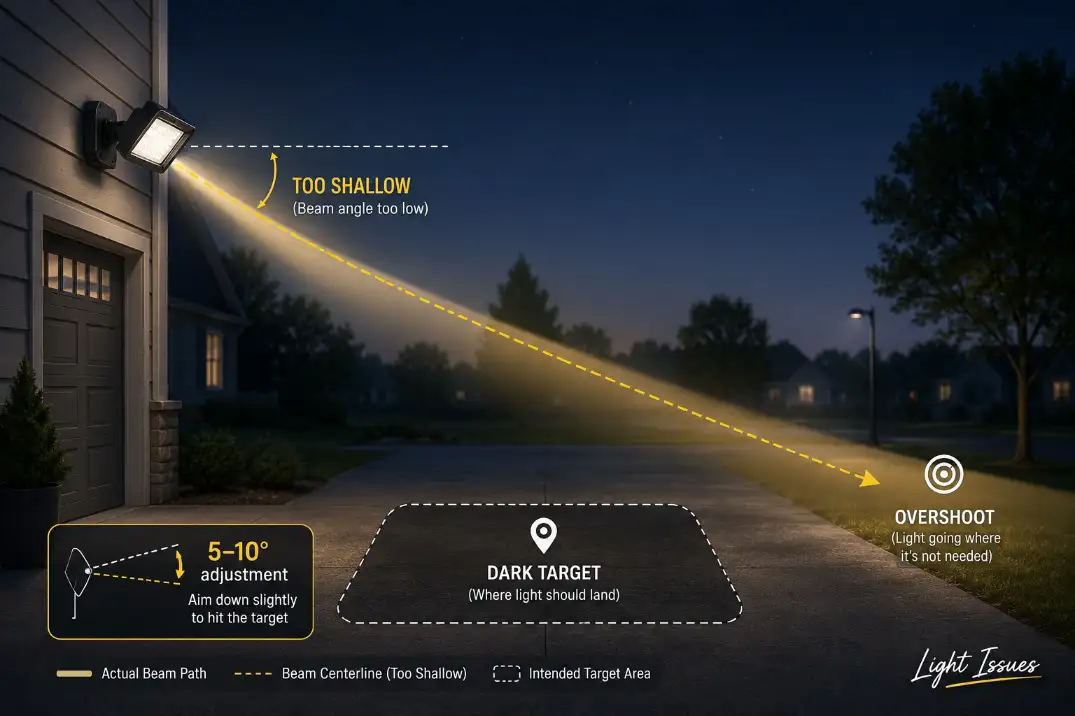
1. The fixture is aimed from the wrong height
Height changes where the beam lands. A wall light mounted around 6–7 feet high can work well for an entry if it sends light downward. A floodlight mounted 12–18 feet high needs a more careful downward angle or it can overshoot the driveway apron, side yard, or walkway below.
Low-voltage landscape lights are often only 12–24 inches above grade. That makes them vulnerable to mulch buildup, plant growth, and small changes in angle. A path light tilted just a little outward may brighten the planting bed while leaving the walking surface uneven.
2. The beam angle does not match the distance
Beam spread is often more important than total lumens. A narrow beam can look strong but cover only a small target. A wide beam can cover more surface but may lose intensity over distance.
As a starting point, path lights often perform better when spaced roughly 6–10 feet apart, adjusted closer near curves, steps, slopes, or narrow turns. Uplights near walls or vertical features often start around 12–24 inches from the surface, then need final adjustment after dark. These are not fixed rules, but they are better starting points than guessing by brightness alone.
A 900-lumen lamp in the wrong beam angle can perform worse than a 500-lumen lamp with the right spread. Lumens describe total output; they do not guarantee that the target receives the useful part of the beam.
3. The beam path is blocked
Landscaping changes the system after installation. Branches grow, ornamental grasses widen, seasonal pots move, and mulch rises around fixture bases. In humid areas like Florida, plant growth can change a clean beam path within weeks during the growing season. In northern states, snow piles can block low path lights for days at a time.
This condition is commonly underestimated because the fixture still looks visible from above. The beam travels low and sideways. A branch or grass clump 8–12 inches in front of the lens can absorb or redirect enough light to leave the target patchy.
4. The sensor and lamp heads are aimed at different zones
Motion lights add another failure pattern. The sensor may detect movement correctly while the lamp heads point at the garage wall, side fence, or lawn. If the light turns on at the right time but misses the driveway or walkway, the sensor is not the main issue.
If the activation is also unreliable, then the problem may overlap with Outdoor Motion Light Turning On and Off. But when the light activates normally and illuminates the wrong zone, fix the lamp-head aim first.
Why the Obvious Fix Often Fails
The obvious fix is usually a brighter bulb. That often makes the problem worse. If the beam misses the target, more output increases glare, spill, and neighbor-facing light without improving the surface you need to see.
Brightness cannot fix bad geometry
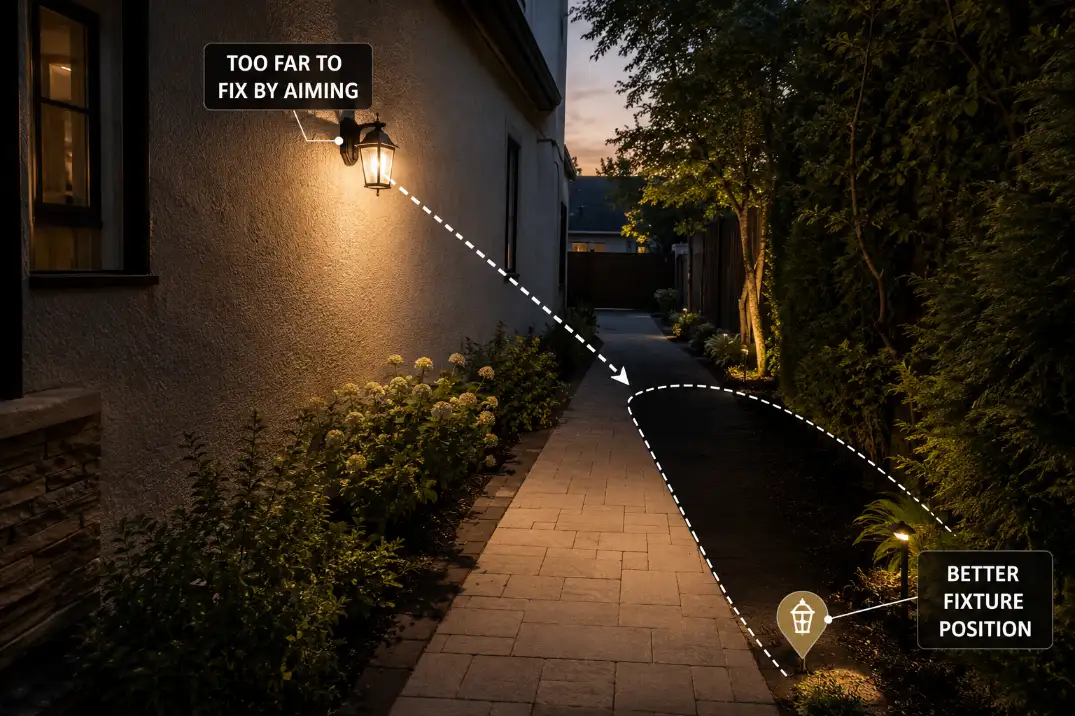
If the fixture is too far away, mounted on the wrong wall, or aimed across the target instead of onto it, brightness has limited value. Moving a light from 4 feet to 8 feet away from the target does not simply double the challenge; the surface can feel dramatically less illuminated. Distance, angle, and beam spread decide how much useful light arrives.
For a narrow walkway, several lower-output fixtures near the walking edge may work better than one bright source mounted far away. For a driveway, two controlled beams from useful angles often reveal edges better than one harsh floodlight from the garage peak.
Glare can hide the target
Glare is not proof of good lighting. It can make the target harder to see because your eyes adjust to the bright source. If the bulb or LED emitter is visible from the normal walking path, the fixture may be reducing visibility even while producing plenty of light.
Glare shields, louvers, hoods, frosted lenses, and deeper fixture housings can help when the location is otherwise good but the source is too exposed. They do not fix a fixture that cannot reach the target, but they can turn harsh spill into usable light.
Pro Tip: Match beam angle before increasing lumens. A better beam shape usually improves the target area more than a stronger bulb.
When Aiming Stops Making Sense
Small aiming changes should move the hot spot onto the target. If they only move the problem from one wrong surface to another, the fixture is in the wrong place or doing the wrong job.
Stop adjusting if the fixture creates a new problem
Aiming stops making sense when the fixture must point into someone’s eyes, across a neighbor’s yard, toward a window, or above horizontal to reach the target. It also stops making sense when a 5–10 degree adjustment swings the hot spot from the lawn to the wall without covering the walkway or driveway.
At that point, the fix is not another bulb swap. It is usually one of these:
- a wider beam lamp
- a shielded or downward-facing fixture
- a lower mounting position
- an additional fixture closer to the target
- relocation to a better angle
This is also where dark spots should be separated from electrical failure. If the same area is dark every night while nearby lights operate normally, suspect layout first. If sections flicker, dim, lose power, or work only sometimes, then the issue may be closer to Outdoor Lights Working Intermittently.
Conditions That Change the Result
Weather, surface color, and surroundings can exaggerate a missed target, but they usually do not create the problem by themselves.
Wet surfaces make glare more obvious
Wet concrete, pale stone, white garage doors, and glossy siding can bounce light toward the viewer. After rain, a driveway may reflect glare for several hours. In coastal areas of California or the Gulf Coast, damp surfaces can make poor aiming feel harsher than it does in dry weather.
The surface is not usually the root cause. It reveals uncontrolled beam direction. Shielding, downward aiming, or changing the fixture location usually helps more than simply switching to a warmer bulb.
Dark surfaces absorb useful light
Asphalt, dark pavers, mulch, and dense plantings absorb light. In dry desert landscapes with dark gravel or matte stone, the same fixture may appear weaker than it would on pale concrete. This may justify closer spacing or a wider beam, but it does not justify unlimited brightness.
A healthy lighting setup makes edges, handles, and elevation changes readable within a second or two. A failing setup forces you to slow down, guess at step edges, or rely on memory even though the fixture is on.
Moisture problems behave differently
Aiming problems are usually consistent. The same wrong area lights up night after night. Moisture problems often appear after storms, sprinkler cycles, or freeze-thaw exposure. If the light works until it rains, dims after irrigation, or trips protection, the problem is no longer mainly target accuracy. That pattern fits Moisture Damage in Outdoor Lighting Explained better than another aiming adjustment.
The Cleanest Repair Sequence
Use this order before buying new fixtures. It keeps the fix tied to the actual failure instead of guesswork.
- Mark the intended target area after dark.
- Find where the current hot spot lands.
- Check direct glare from 5–6 feet eye height.
- Clear anything within 6–12 inches of the beam path.
- Re-aim in 5–10 degree increments.
- Change beam angle if coverage is too narrow.
- Add shielding if the source is visible from the use area.
- Relocate or add a fixture if the current position cannot reach the target.
If the light turns on correctly but misses the driveway, steps, or walkway, this sequence usually finds the answer faster than replacing the motion sensor, changing color temperature, or jumping to a higher-lumen lamp.
Questions People Usually Ask
Why is my porch light bright but my steps are still dark?
The light is probably illuminating the wall or air around the fixture more than the tread edge. Porch lights often create visible glow without enough downward task light. A shielded downlight, step light, or better-aimed fixture usually helps more than a brighter decorative bulb.
Should outdoor floodlights point straight out or down?
Most floodlights should point downward enough that the beam lands on the intended ground area without exposing the lamp directly to normal viewing angles. If the light points straight out, it often creates glare and overshoots the target.
Why does my motion light turn on but miss the driveway?
The sensor and lamp heads are likely aimed at different zones. The sensor may detect motion correctly while the heads illuminate the garage wall, lawn, or side fence. Adjust the lamp heads separately from the motion sensor.
Is a wider beam better than a brighter bulb?
Often, yes. If the hot spot is too small or misses the target edge, a wider beam can improve usable coverage. A brighter bulb only helps after the beam shape and aim are already correct.
Final Takeaway
Outdoor lights miss the target area when useful light lands on the wrong surface. Start by locating the hot spot, checking glare from normal eye height, and matching the fixture type to the job. If the beam cannot land within a couple of feet of the intended walkway, step, gate, driveway, or entry zone after small adjustments, treat the issue as fixture selection or placement—not bulb strength.
For a broader standard on keeping exterior light useful, targeted, and limited to where it is needed, see DarkSky International’s Five Principles for Responsible Outdoor Lighting.