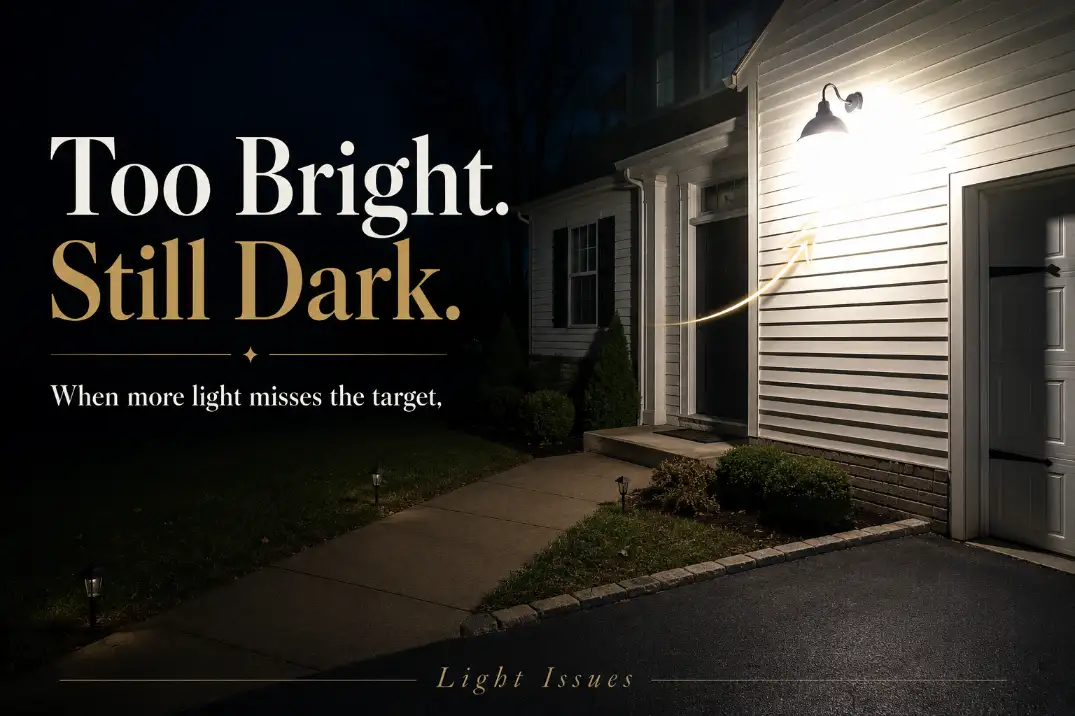
Outdoor lights usually make some areas too bright and others too dark because the light is being distributed poorly, not because the fixture is simply too weak.
The first checks that matter are beam direction, fixture height, spacing, and whether the light is hitting a wall, driveway, fence, shrub, or parked vehicle before it reaches the area people actually use.
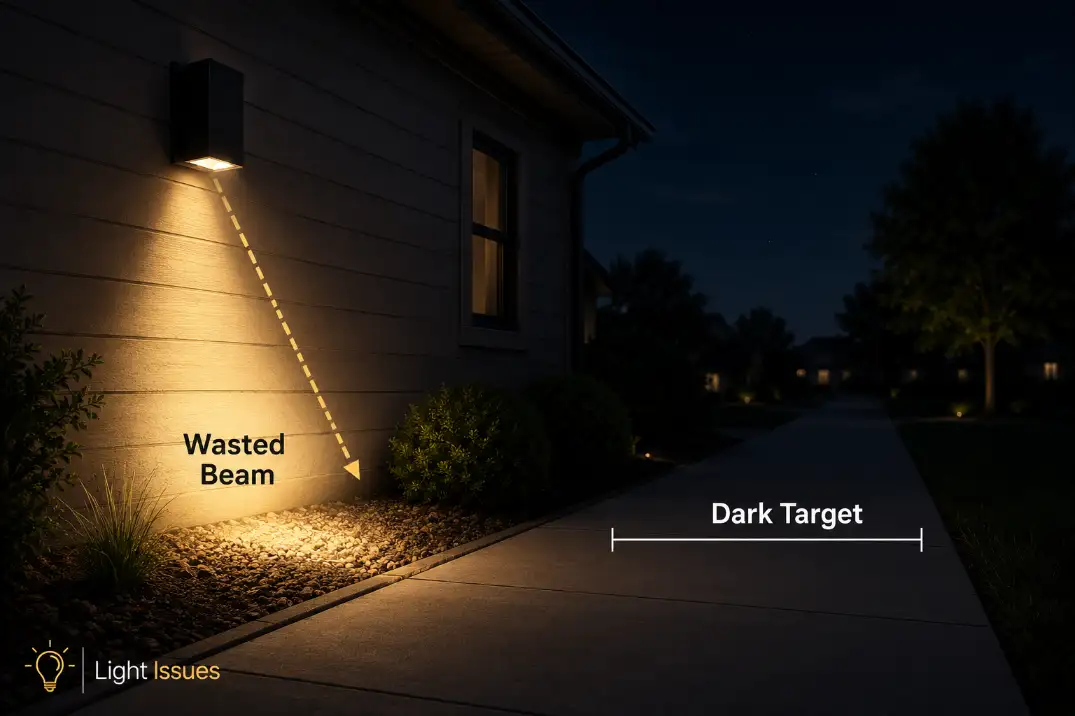
A common warning sign is a bright patch within 3–6 feet of the fixture while the walkway, steps, or driveway edge 15–25 feet away still looks dim.
That is different from a light that does not reach far enough. In that case, the beam may be aimed correctly but lacks throw or output.
Here, the light is present, sometimes aggressively so, but it lands in the wrong place. Adding a brighter bulb often makes the glare worse while the dark area barely changes.
Read the Pattern Before You Change the Bulb
Most uneven outdoor lighting problems fall into a few recognizable patterns. Matching the pattern first keeps you from buying a stronger fixture when the real fix is aim, shielding, spacing, or beam shape.
| What you see at night | Most likely cause | First fix to try |
|---|---|---|
| Bright wall, dark walkway | Fixture aimed too high or too close to wall | Aim downward and shield the source |
| Bright circle, dark edges | Beam angle too narrow | Use a wider beam or add side fill |
| Bright near fixture, dark far end | Fixture trying to cover too much distance | Add smaller lights at better spacing |
| Alternating bright and dark bands | Fixtures spaced too far apart | Reduce spacing or stagger placement |
| Glare from driveway or patio | Reflective surface or wet pavement | Lower output, redirect beam, or add shielding |
| Light feels harsh but visibility is poor | Eye-level glare causing contrast | Hide the LED source from normal view |
Brightness is not the same as visibility
A 1,600-lumen fixture aimed into white siding can be less useful than a 700-lumen fixture aimed cleanly across a walking surface. For basic movement around entries, paths, patios, and driveways, smooth coverage matters more than peak brightness.
The eye adapts to the brightest thing in view. If a garage wall or porch column is blasted with light, nearby steps and edges can look darker by comparison. That is why brighter LEDs sometimes make a yard feel worse after installation.
When this shows up as hard bright zones beside dark gaps, it often matches the pattern covered in Outdoor Lights Creating Bright Spots and Dark Gaps, especially around driveways, side yards, and entry walks.
The 2-Minute Glare Test
Before changing bulbs, test whether the fixture is helping visibility or fighting it. This simple check separates a true low-light problem from a contrast problem.
Stand where the darkness matters
Go to the darkest useful point: the walkway bend, driveway edge, gate latch, porch step, trash area, or side-yard path. Do this at full darkness, not at dusk. Dusk hides contrast problems that become obvious 30–60 minutes after sunset.
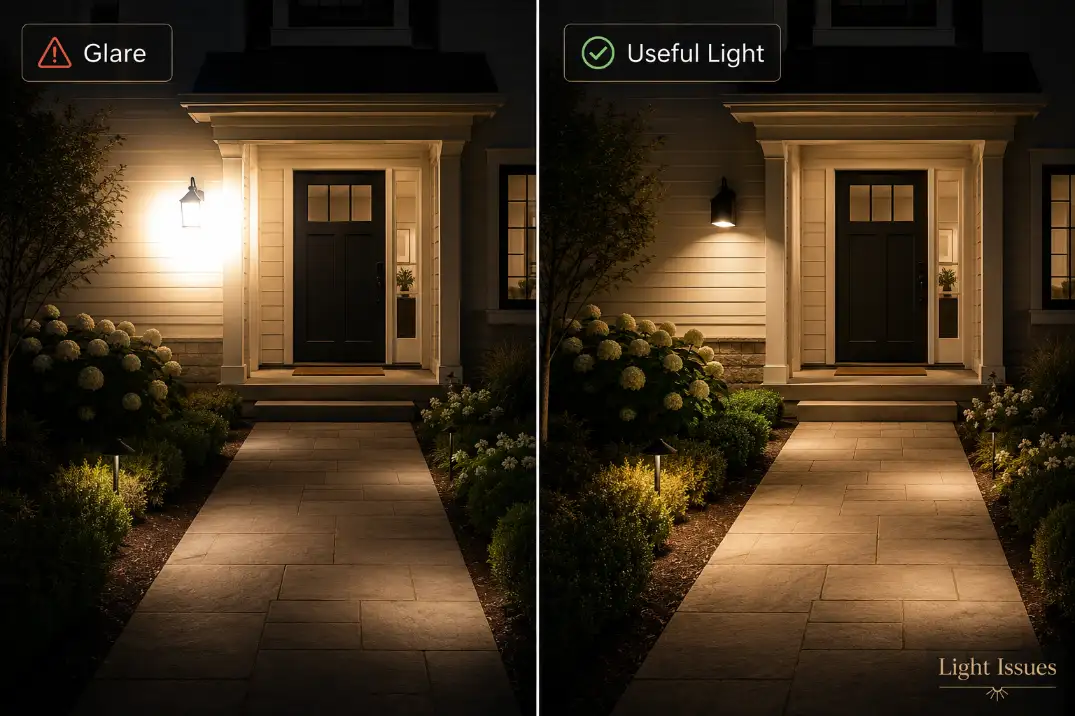
Look back toward the fixture. If you can see the LED source directly and it makes you squint, the fixture is producing glare. Useful outdoor light should land on the surface or object you need to see, not in your eyes.
Walk across the target zone
Move 10–20 feet across the area. Watch whether visibility improves smoothly or collapses into dark pockets. If the bright spot stays near the fixture while the useful area remains dim, the problem is not total output. It is direction, shielding, spacing, or beam shape.
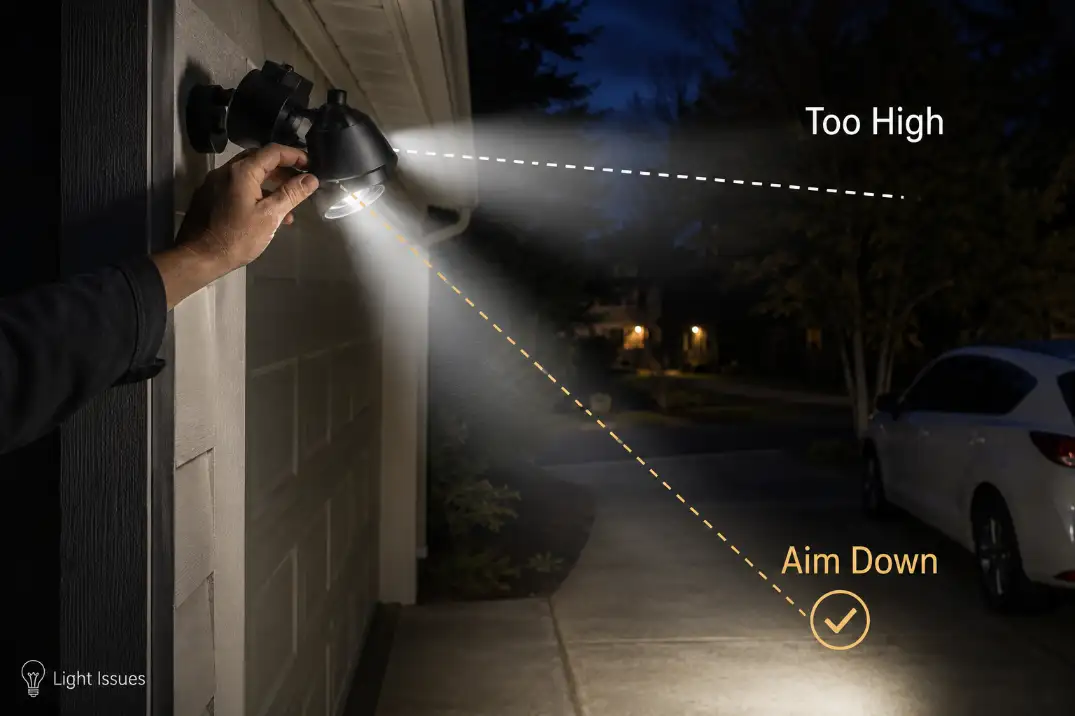
For adjustable heads, lower the beam in 5–10 degree increments. A small downward change can do more than doubling the lumen rating, especially when the light is mounted 10–14 feet high and aimed outward.
Pro Tip: If a fixture has two adjustable heads, aim one at the near walking surface and the other toward the farther target. Do not aim both heads at the same bright patch.
What People Usually Misread First
They overestimate bulb strength
The easiest part to change is the bulb, so it gets blamed first. But if the light already creates a hot spot, a stronger bulb usually feeds the hot spot. It may brighten the dark area slightly, but the contrast often gets worse.
A better test is to reduce glare before increasing output. If aiming or shielding improves the dark zone without changing the bulb, the fixture was not underpowered. It was misdirected.
They underestimate mounting height
Mounting height changes how light spreads. A wall light at 6–8 feet can work well for a porch or small entry. A floodlight at 12–16 feet needs tighter aiming and better shielding, or it throws light across eye level and past the useful surface.
Placement problems are often mistaken for product problems. A fixture can be bright, functional, and still installed in a position that makes even coverage impossible. That is why Outdoor Lighting Placement Problems are often the hidden cause behind harsh bright spots and stubborn dark areas.
They blame shadows on weak light
A dark patch is not always caused by low output. Sometimes a shrub, fence return, mailbox post, parked SUV, trash bin, or planter is cutting off the beam. Adding another light from the same direction repeats the same shadow.
The better fix is often side fill: a lower, smaller, or cross-aimed fixture from another angle.
Why the Obvious Fix Fails
The standard failed fix is replacing a fixture with a brighter one in the same location. It feels logical, but it often makes the problem more visible.
More output does not correct bad distribution
If a fixture sends most of its visible light into the first few feet of wall, pavement, or landscaping, extra output mostly brightens that same area. The target zone may remain weak because the beam never lands there cleanly.
This is why “more lumens” is a poor first move when the yard already has glare. Increase brightness only after the light is aimed, shielded, and spaced correctly.
Wider beams are not always better
A wide beam helps patios, short walkways, and small entry zones. It does not automatically solve long driveways, side yards, or deep backyards. In those spaces, a wide beam may spill light into useless areas while fading before it reaches the far target.
If the beam looks smooth but fades too soon, the issue may be closer to limited throw than glare. That is the situation explained in Outdoor Lights That Don’t Reach Far Enough.
Which Fixture Type Actually Fixes the Problem
Different fixtures solve different uneven-light problems. Replacing one fixture with another of the same style may change the look without changing the outcome.
Use path lights for walking edges
Path lights are useful when the problem is dark walking edges, step approaches, or garden paths. They are not meant to light an entire yard.
For many residential paths, spacing around 6–8 feet apart creates smoother guidance than placing a few bright fixtures far apart.
The mistake is using path lights like miniature floodlights. Low fixtures should mark edges and surface changes, not overpower the landscape.
Use floodlights only when they can aim below eye level
Floodlights work for driveways, service areas, and broad zones, but only when they can be aimed downward. If the LED source is visible from the driveway, sidewalk, or street, the fixture is likely creating glare.
A floodlight that cannot be tilted below eye level is a poor choice for comfort lighting. It may still detect motion, but it will not create pleasant or even visibility.
Use shielded wall lights near entries
Wall lights and sconces work best at doors, porches, garage entries, and short transitions. They become a problem when they are expected to light a full driveway, side yard, or backyard from one wall.
Shielded or downward-facing wall lights usually outperform exposed fixtures near eye level. They reduce the bright source your eyes adapt to, which helps nearby surfaces remain readable.
Use multiple smaller lights when one fixture is doing too much
If one light is expected to cover a patio, steps, grill, gate, and lawn edge, uneven coverage is almost guaranteed. Several lower-output lights usually create better visibility than one high-output source.
This is especially true in backyards with corners, fences, decks, trees, or grade changes. When a yard stays dark even after lights are added, the issue may resemble Why Your Backyard Is Still Dark After Installing Lights.
Spacing and Aiming Rules That Actually Help
Rules of thumb are not perfect, but they help decide when adjustment is still worth trying and when the layout needs another light.
For paths and short walks
Path lights often work best around 6–8 feet apart, depending on beam spread, fixture height, and how dark the surrounding area is. If you see bright islands separated by black gaps, the fixtures are too far apart or too narrow.
Staggering lights on opposite sides can reduce the runway effect, but only if the light still lands on the walking surface.
For driveways and side yards
A small wall-mounted fixture should not be expected to cover 30–40 feet of driveway evenly unless it is designed for that throw. Once the target area is more than 25–30 feet away, you often need either a better beam pattern, a second fixture, or a different mounting location.
For side yards, long narrow spaces usually need lengthwise coverage. A fixture aimed straight across the side yard may light the fence and leave the walking lane uneven.
For motion lights
Motion lights are often set too bright and too short. If the timer is set under 30–60 seconds, your eyes may still be adapting when the light shuts off. If the light turns on at full intensity and points across eye level, it can make the surrounding area feel darker for the first few seconds.
A better setup gives enough time to identify the area without creating a blinding burst.
What Changes Under Real Outdoor Conditions
Wet surfaces exaggerate glare
Wet pavement, smooth concrete, pale pavers, and glossy garage doors reflect light back toward your eyes. A driveway that looks acceptable in dry conditions can become harsh after rain or irrigation.
This is common in humid climates where surfaces stay damp longer, but it can happen anywhere after a storm. The fix is not always a warmer bulb. The better move is usually shielding, lower output, or a steeper downward aim.
Pale surfaces create false brightness
White siding, light stucco, pale fences, and unfinished concrete can make one part of the yard look extremely bright while the ground remains hard to read. The surface is receiving light, but the useful task area is not.
This is one of the most common reasons homeowners think their outdoor light is “too bright and too weak” at the same time.
Plants and vehicles create hard shadows
Trees, shrubs, parked cars, and fence corners can block light completely. Seasonal growth matters too. A fixture that worked in winter may fail in summer once leaves fill in.
Still, plants are sometimes over-blamed. If the fixture is already aimed into siding or across eye level, pruning will not solve the core distribution problem. It will only remove one obstruction from a poor lighting pattern.
When the Bright Area Is Actually Light Trespass
Sometimes the “too bright” area is not useful brightness at all. It is light trespass: spill going into a neighbor’s window, across the street, into the sky, or onto an area no one needs illuminated.
Useful light lands on a task area
A driveway edge, stair tread, gate latch, house number, walkway, or entry lock is a useful target. A second-story window, neighbor-facing wall, tree canopy, or open sky is not.
If the bright area is not helping someone move, identify, unlock, park, or avoid a hazard, it is likely wasted light.
Side spill can make your own yard darker
Light trespass does not only affect neighbors. It can also reduce your own visibility by creating glare and contrast. The more your eyes adapt to a bright vertical surface, the harder it becomes to read dark horizontal surfaces like steps and pavement edges.
Shielding, downward aim, and lower intensity often improve both neighbor comfort and your own visibility.
When Adjustment Stops Making Sense
There is a point where aiming and bulb changes are no longer the right repair. A fixture with poor optics will keep creating the same imbalance.
Replace the fixture when:
- the LED source is visible from normal walking positions;
- the fixture cannot tilt below eye level;
- there is no hood, visor, shield, or lens control;
- the lowest usable setting is still harsh;
- the hot spot remains after careful downward aiming;
- the target area needs side fill, not more forward throw;
- the mounting location forces the beam into a wall, fence, or neighbor-facing direction.
This is where a routine fix stops making sense. If the fixture consistently lights the garage face, lawn edge, fence, or neighbor-facing side instead of the intended surface, the problem may be closer to the one explained in Outdoor Lights Missing the Target Area.
Questions People Usually Ask
Will a brighter bulb fix dark spots?
Usually not if the area already has glare. A brighter bulb helps only when the whole area is evenly dim. If one surface is already too bright, more output usually increases contrast instead of improving visibility.
Why does my yard look darker after installing brighter LEDs?
Your eyes adapt to the brightest visible surface. If the LED creates a harsh bright patch on siding, concrete, or a garage door, the surrounding shadows can look deeper even though the fixture is producing more light.
Is warm white better for uneven outdoor lighting?
Warm white, usually around 2700K–3000K, often feels less harsh than cooler 4000K–5000K light. But color temperature does not fix bad aim. If the beam points into your eyes or into the wrong surface, warmer light only makes the problem slightly less uncomfortable.
Should I use one large light or several smaller lights?
Several smaller lights usually create smoother coverage for walkways, patios, steps, and driveways. One large light can work for a broad service area, but it needs proper height, shielding, and downward aim.
The Practical Rule
If outdoor lights make one area painfully bright while another stays dark, fix contrast before brightness. Aim the beam first. Shield the source second. Improve spacing third. Increase output last.
The best outdoor lighting is usually calmer than people expect. It does not blast one surface and hope spill light solves the rest. It puts controlled light where feet, steps, locks, gates, driveway edges, and walking routes actually are.
For broader official lighting terminology, see the U.S. Department of Energy Lighting Principles and Terms.