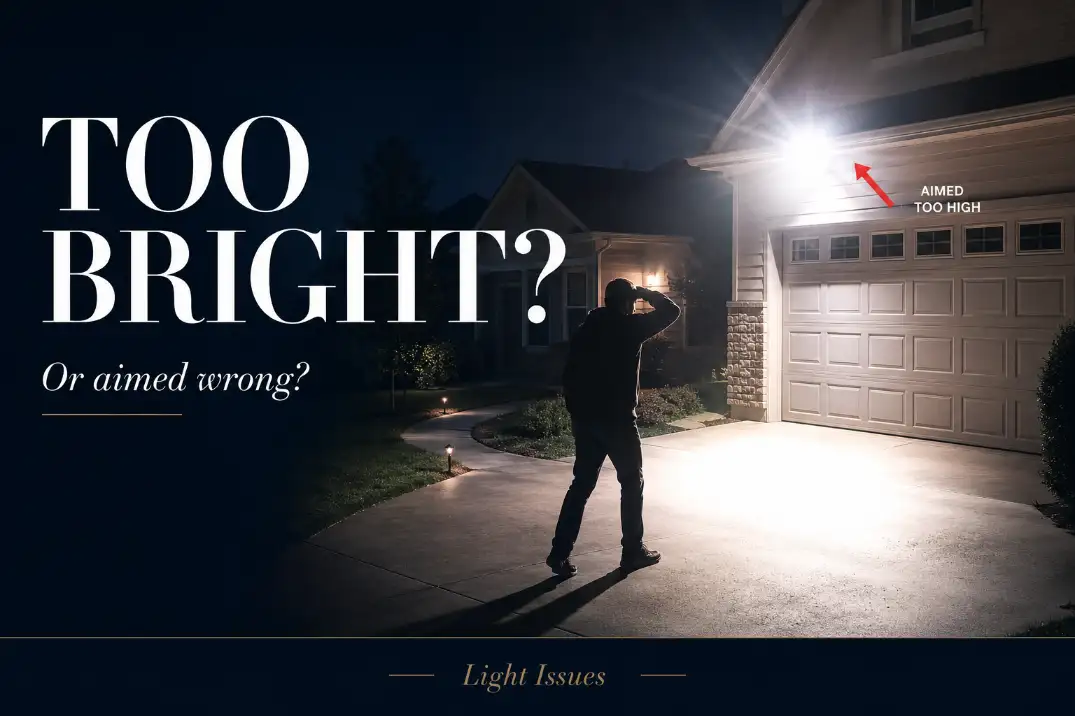
Outdoor lights create too much glare when the fixture becomes brighter to your eyes than the surface it is supposed to help you see.
The usual problem is not simply “too many lumens.” It is direct view of the LED, poor aiming, sharp contrast, or reflected light bouncing off wet pavement, glass, siding, or a garage door.
Stand 20–30 feet away from the light at night. If you see the bare LED, bulb, reflector, or lens before you notice the walkway, the fixture is producing glare.
A useful threshold is the 3–5 second squint test. If a normal viewing position makes you narrow your eyes almost immediately, the problem is not just brightness; it is uncontrolled light.
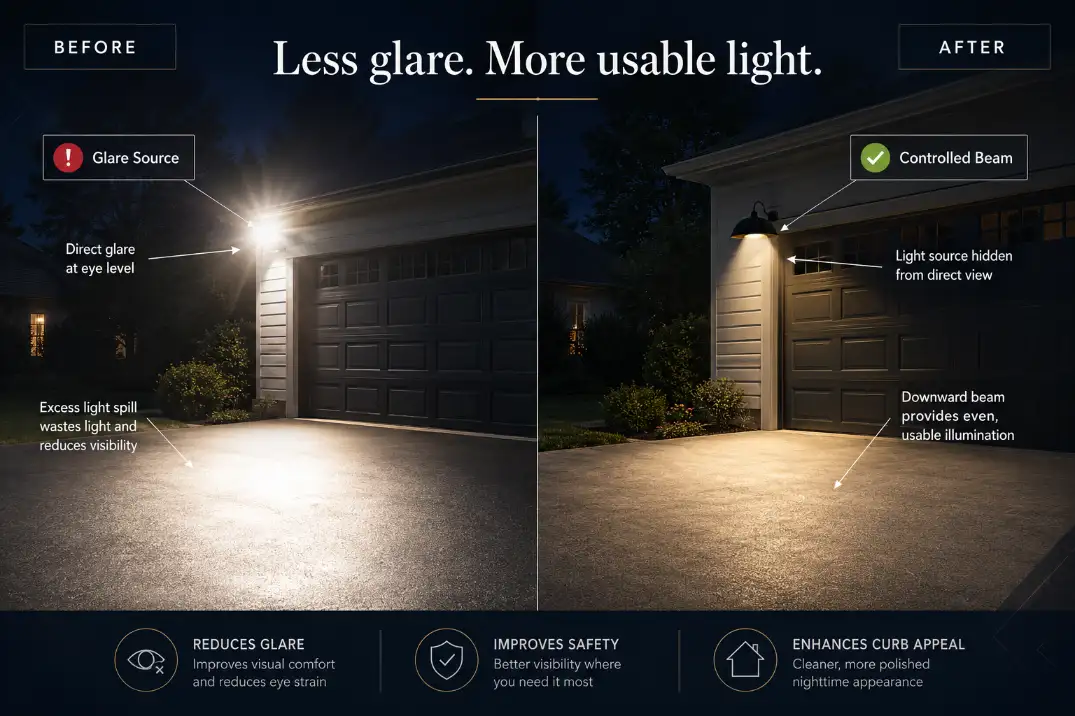
A well-aimed 1,500-lumen fixture can feel calmer than a badly aimed 800-lumen fixture because the first one lights the ground while the second one lights your eyes.
That distinction matters because dimmer bulbs often reduce the blast without fixing the reason the glare exists.
The Three Types of Outdoor Glare
Outdoor glare is easier to fix once you know which kind you are dealing with. Most harsh residential lighting falls into one of three patterns.
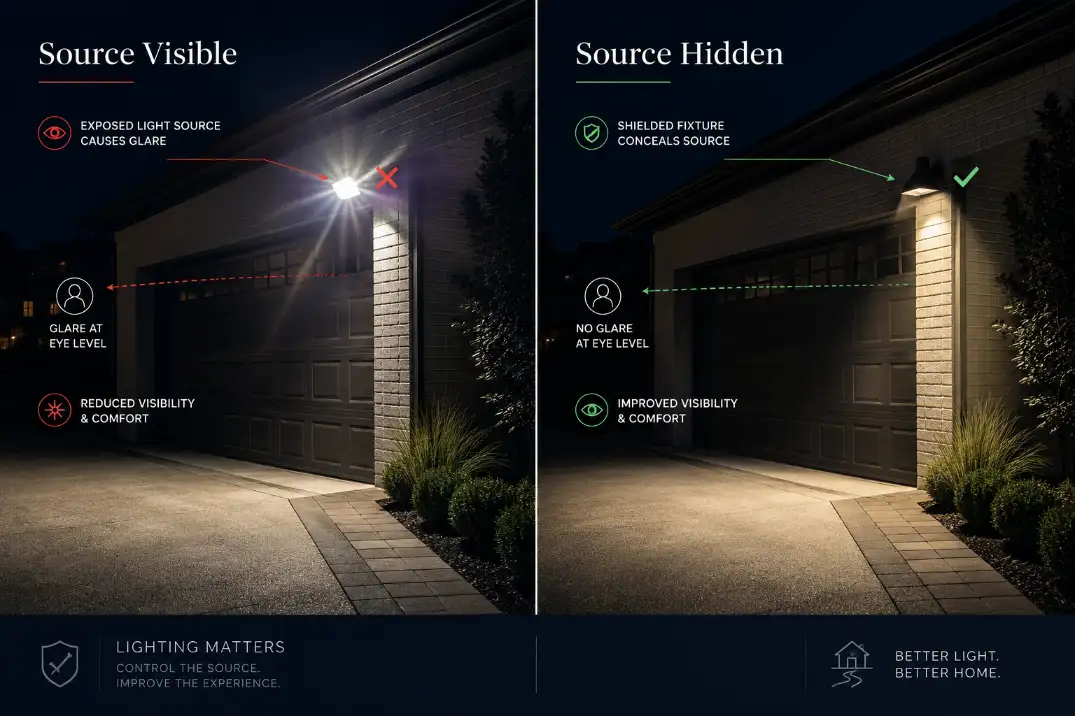
Direct glare: the light source is visible
Direct glare happens when you can see the LED chips, bulb, reflector, or bright lens from a walkway, driveway, patio chair, window, or the street. This is the most common and most repairable type. It shows up often on garage floodlights, motion lights under eaves, wall packs, and decorative fixtures with clear glass.
If the fixture itself is the first thing your eyes lock onto, the lighting is already working against you. Good outdoor lighting should reveal the surface, not announce the fixture.
Reflected glare: the surface throws light back
Reflected glare is easy to miss because the fixture may not look terrible on a dry night. Then rain, sprinkler water, glossy pavers, white siding, glass doors, or a light-colored garage panel bounce the beam back toward your eyes.
Wet concrete and sealed pavers can make glare feel noticeably worse for 30–60 minutes after rain or irrigation. In humid climates, coastal areas, and homes with evening sprinklers, this can make a fixture seem inconsistent even though the light output has not changed.
Contrast glare: one hotspot controls your vision
Contrast glare happens when a small area is blasted with light while nearby steps, edges, or planting beds stay dark. Your eyes adapt to the bright patch, making the surrounding area harder to read.
This is why a bright outdoor light can make a yard feel less usable. The issue is not that there is no light. It is that the light is concentrated in the wrong place.
If your yard has washed-out patches and dark gaps, the problem may overlap with Outdoor Lights Bright Spots and Dark Gaps.
What People Usually Misread First
The most common mistake is treating glare as a bulb problem before checking aim, shielding, and surface contrast. Sometimes the bulb is too bright. More often, the fixture is sending light into the wrong visual zone.
“The light is too bright” is only part of the diagnosis
A lower-lumen bulb can help when the fixture is already aimed correctly. But if the bare LED is visible from normal eye level, lowering output is a partial fix at best.
For example, an exposed 700-lumen bulb in clear glass at eye level can feel harsher than a shielded 1,500-lumen downlight. The symptom is brightness. The mechanism is uncontrolled light leaving the fixture sideways or outward.
This is also where a related issue can appear: a light may feel harsh even when the yard still has dark areas. In that case, the problem is closer to the pattern explained in Outdoor Lighting Glare Too Harsh than a simple brightness mismatch.
“More coverage” can reduce real visibility
Security lighting is often overestimated. Many homeowners assume a light is safer if it reaches farther. But a floodlight aimed 50–70 feet across a driveway may also shine into windshields, windows, neighbor-facing walls, or the viewer’s eyes.
Useful security lighting should make faces, steps, doors, gates, and pavement edges easier to read. If the fixture blinds people walking toward it, it is not improving visibility. It is creating a bright obstacle.
“Cool white means safer” is not always true
Cool-white LEDs in the 5000K–6500K range can look intense and sharp, especially in exposed fixtures. They are not automatically brighter than warm-white LEDs at the same lumen rating, but they often feel harsher outdoors.
For most residential entries, patios, porches, and paths, 2700K–3000K is usually more comfortable. Still, color temperature is secondary. A warm bulb in a badly aimed fixture can still produce glare.
Quick Diagnostic Checklist
Use these checks before buying a new fixture:
- You can see the LED, bulb, reflector, or bright lens from 20–30 feet away.
- The light makes you squint within 3–5 seconds from a driveway, walkway, patio, or window.
- The brightest patch lands on a wall, garage door, fence, or windshield instead of the walking surface.
- The beam is aimed nearly horizontal instead of downward.
- Glare gets worse after rain, sprinklers, or on glossy hardscape.
- A small hotspot looks washed out while nearby steps or edges stay dark.
- Tilting the light down 10–15 degrees noticeably improves comfort.
Pro Tip: Judge glare from where people actually stand or walk, not from directly under the fixture. A light can look fine at the wall and still be harsh from the driveway.
The Main Causes, Ranked by What Matters Most
Not every cause deserves equal attention. Start with the conditions that most directly change what your eyes experience.
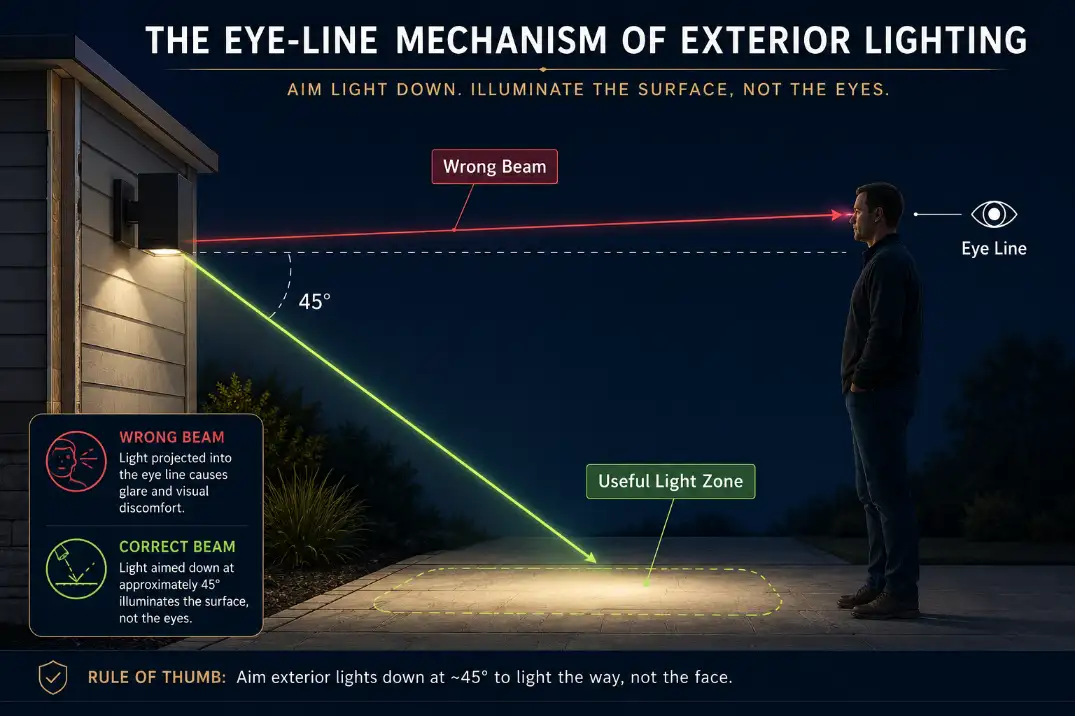
1. The fixture is aimed too high
This is the first suspect. Outdoor floodlights and motion lights are often pointed outward to “cover more area,” but that usually sends light into sightlines before it reaches useful surfaces.
For many residential fixtures, a downward aim of roughly 30–45 degrees works better than a straight-out beam. The brightest part of the beam should land on the ground, step, driveway edge, or entry zone—not beyond it.
If a fixture has to be aimed outward to reach the intended area, placement may be the deeper problem. That is when glare becomes part of the same failure pattern discussed in Fix Poor Outdoor Light Placement.
2. The light source is not shielded
A shielded fixture hides the LED or bulb and directs light downward. An unshielded fixture lets light spill sideways, upward, and into the viewer’s eyes.
Look for hoods, visors, louvers, recessed LEDs, opaque tops, deep lenses, or full-cutoff designs. Clear glass may look attractive during the day, but at night it can expose the bulb from too many angles.
3. The fixture is too powerful for its height
A high-output light mounted low is often uncomfortable. A 2,000-lumen fixture mounted around 7 feet high near a garage side door can feel harsh because it is close to eye level. The same output mounted higher, shielded, and aimed down may feel less aggressive.
For small entries, porches, and side doors, 400–800 lumens is often enough. Larger driveways may need more, but output should be controlled. More lumens without shielding usually creates more glare, not better lighting.
4. The surrounding scene has too much contrast
A single bright fixture in an otherwise dark yard forces your eyes to jump between extremes. That makes steps, uneven pavement, curb edges, and planting borders harder to judge.
Two lower-output lights placed carefully can outperform one powerful light because they reduce harsh bright-to-dark transitions. This is why some yards look technically illuminated but still feel uncomfortable or unfinished.
Which Fixes Work — and Which Ones Waste Time
The best fix order is simple: control direction first, hide the source second, reduce contrast third, and replace the fixture only when control is not possible.
| What you see | Most likely cause | Better first fix | Fix that often wastes time |
|---|---|---|---|
| Bare LED visible from driveway | Direct glare | Shield or replace with recessed source | Only lowering wattage |
| Washed-out hotspot with dark edges | Narrow or intense beam | Re-aim and soften distribution | Adding another harsh floodlight |
| Glare from a low-mounted floodlight | Too much output near eye level | Use a shielded lower-output fixture | Raising wattage for more reach |
| Glare worse after rain | Reflected glare | Aim lower and reduce surface hotspot | Blaming the motion sensor |
| Light enters windows | Poor cutoff or aim | Use shielded down-facing fixture | Switching color temperature only |
| Motion light feels blinding | Instant full output from darkness | Reduce range, aim down, lower output | Extending detection distance |
Start with aim before buying anything
Adjust the fixture at full dark, not at dusk. Tilt the head down 10–15 degrees and retest from the walkway, driveway, street-facing angle, and nearby windows.
If the light has two heads, avoid aiming both at the same central area. That creates a hotspot. Split the targets instead: one toward the driveway edge, one toward the path or gate.
Hide the source when aiming is not enough
If you can still see the LED, bulb, or reflector after re-aiming, the fixture needs shielding. A visor, hood, louver, deeper fixture body, or full-cutoff replacement can reduce glare without making the area unsafe.
This is where routine bulb swapping stops making sense. If three different bulbs still glare from the same viewing position, the fixture design is the problem.
Reduce output only after control is fixed
Lower output works best after the fixture is aimed and shielded. For a small entry, stepping down from 1,600 lumens to 800 lumens may be enough. For a narrow side path, 300–500 lumens can work when the beam is well controlled.
But cutting output too far can create a new failure: the glare feels weaker, but the walking surface becomes harder to see. If the whole layout swings between too bright and too dim, Outdoor Lights Too Bright or Too Dark is the better next diagnosis.
When Glare Becomes a Layout Problem
Sometimes the fixture is not defective. It is being asked to solve too many jobs from one location.
One light is covering too many zones
A garage floodlight may be expected to light the driveway, side gate, front walk, porch steps, and part of the yard. To reach all of that, the beam gets aimed outward. Then the lumen level gets increased. Then the glare becomes unavoidable.
The better solution is usually not a stronger fixture. It is separating the jobs. A shielded wall light can handle the entry. A lower path light can define the walkway. A motion light can cover the driveway approach without blasting the entire property.
Motion settings can make glare feel worse
Motion lighting feels harsher because your eyes may be adapted to darkness when the light suddenly turns on. A fixture that jumps to full brightness in less than a second can feel aggressive even if its lumen rating is not extreme.
Detection range matters. A motion light that triggers from passing cars or pedestrians 40–60 feet away is often doing too much. Tighter aiming, lower sensitivity, and a shorter detection zone usually create a more useful result.
For sensor-specific behavior, Outdoor Motion Sensor Light Too Sensitive goes deeper into that problem.
Neighbor-facing glare is a different warning sign
If the light makes your own walkway uncomfortable, it is glare. If it shines into a neighbor’s bedroom, crosses the property line, or hits a driver’s view from the street, it becomes light trespass as well.
That distinction matters because the fix is no longer just personal comfort; it is controlling where your light leaves the property.
Lower wattage may reduce the complaint, but it usually does not solve the direction problem. A shielded cutoff fixture, downward aim, shorter motion range, or relocated light is the better fix.
A good rule: if the light is useful only because it spills everywhere, the fixture is not controlled enough.
What to Choose If Replacement Makes Sense
Replacement makes sense when the source remains visible after aiming, when the fixture cannot tilt downward enough, when there is no practical way to add shielding, or when the beam creates a hard hotspot no matter which bulb you use.
Look for optical control, not just lower wattage
Choose fixtures with recessed LEDs, full-cutoff construction, downward-facing heads, hoods, louvers, or opaque tops. The package may mention “dark sky friendly,” “full cutoff,” “shielded,” or “downlight.” Those terms are not perfect guarantees, but they point in the right direction.
Avoid clear-glass fixtures at eye level if the bulb will be visible from the walkway or driveway. Frosted glass can soften the bulb’s appearance, but it does not always control where the light goes.
Choose this, avoid that
Choose:
- Full-cutoff or down-facing fixture bodies
- Recessed LED sources that are hard to see from eye level
- Hooded or louvered heads for driveways and side yards
- Adjustable heads that can lock into a downward angle
- Warm 2700K–3000K light for most residential entries and paths
Avoid:
- Clear-glass fixtures where the bulb sits at eye level
- Bare LED wall packs aimed outward
- Horizontal floodlight heads used for wide property coverage
- Very high-output fixtures mounted around 6–8 feet high
- Cooler 5000K–6500K lamps in exposed residential fixtures
Match output to the job
For small porches, side entries, and short paths, moderate output often works better than a powerful flood. For larger driveways, use more output only with better control. A shielded 1,500-lumen driveway fixture is usually more useful than an exposed 2,500-lumen floodlight aimed outward.
Warm light around 2700K–3000K usually feels more residential. Cooler light may be appropriate for some task or security areas, but it should still be shielded and aimed down.
Practical Fix Order
First, re-aim at full dark
Aim the beam so the brightest zone lands on the ground or the object you actually need to see. Recheck from 20–30 feet away, from inside nearby windows, and from the direction a guest or driver would approach.
Second, block direct view of the source
Use a shield, hood, visor, louver, or fixture with a recessed LED. If the source disappears from normal viewing angles, comfort usually improves quickly.
Third, soften the hotspot
If one patch is still much brighter than everything around it, reduce output, widen the beam, or add a second lower-output fixture in a better position. The goal is readable surfaces, not one dramatic pool of light.
Fourth, split the lighting job
When one fixture has to cover several areas, glare usually returns. Separate the driveway, entry, steps, and path into smaller lighting jobs where possible.
Pro Tip: Change one variable per night. If you adjust aim, bulb output, and motion range all at once, you may not know which change actually solved the glare.
Questions People Usually Ask
Are LED outdoor lights more likely to cause glare?
They can be, especially when small, intense LED chips are exposed. The problem is not LED technology itself. It is high brightness from a small visible source with poor shielding.
Is 5000K too bright for outdoor lighting?
5000K is not automatically brighter than 3000K at the same lumen rating, but it often feels sharper outdoors. For residential spaces, 2700K–3000K is usually more comfortable.
Will a dimmer bulb fix outdoor glare?
Only sometimes. If the fixture is already aimed down and shielded, lowering output may help. If you can see the bare source, the glare mechanism is still there.
When should I replace the whole fixture?
Replace it when the fixture cannot hide the source, cannot aim downward enough, or keeps creating a hard hotspot after reasonable bulb and angle changes.
Outdoor glare is usually a control problem before it is a brightness problem. Start by checking whether the fixture is visible, where the beam lands, how strong the contrast is, and whether wet or glossy surfaces are bouncing light back.
A controlled 800-lumen fixture can make a walkway safer and calmer than a poorly aimed 2,000-lumen floodlight. The best outdoor light lets you see the property without noticing the fixture first.
For broader lighting principles, see the DarkSky outdoor lighting guide.