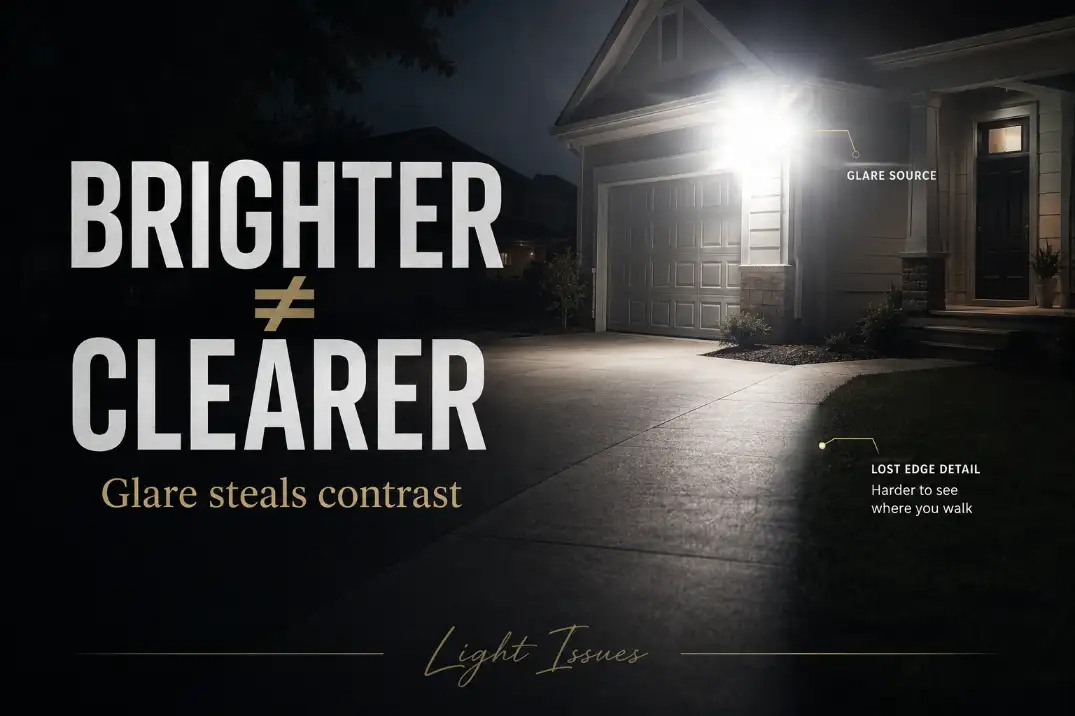
Brighter outdoor lights usually make visibility worse when the light source becomes easier to see than the area it is supposed to reveal.
The most likely problem is not low output. It is glare, contrast loss, poor aiming, or a beam that hits your eyes before it helps the ground.
Start with three checks: can you see the bare LED from 20–30 feet away, does the bright patch fall into darkness within 6–10 feet, and does the area become easier to read when you shade your eyes with your hand?
If yes, adding more lumens is probably the wrong repair.
This is different from a weak-light problem. Weak lighting stays dim everywhere. Bad outdoor lighting may look intense near the fixture but still hide steps, curbs, faces, gate latches, and driveway edges.
The Visibility Failure Is Usually Contrast, Not Darkness
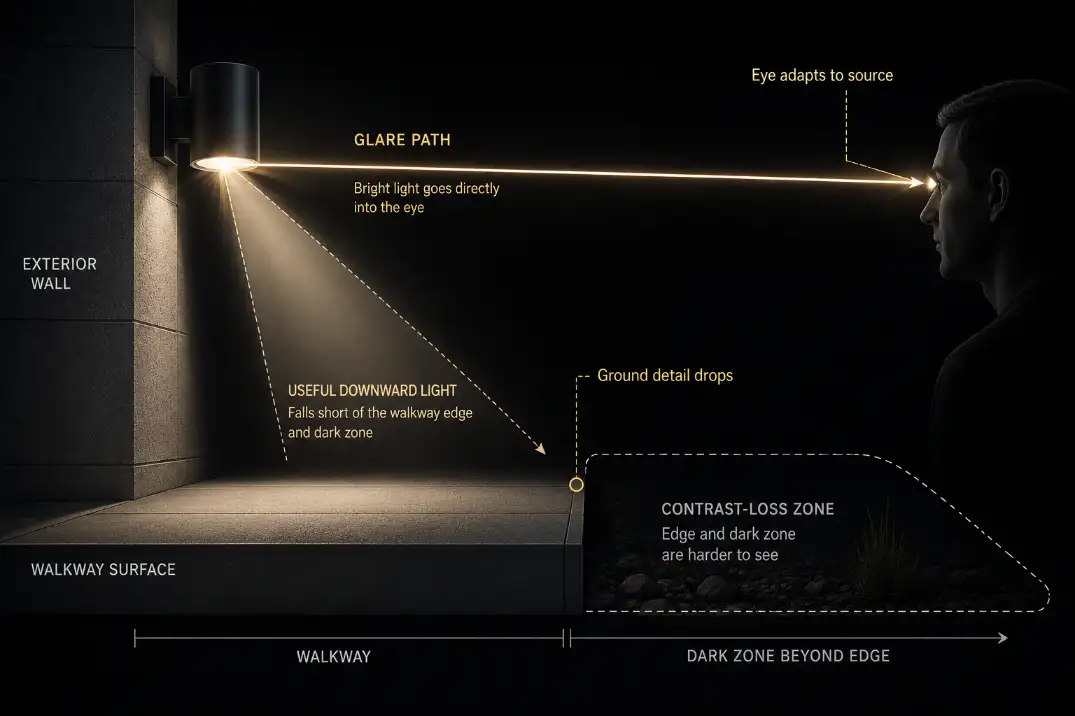
Good outdoor lighting is not just about brightness. It is about making useful details stand apart from their background. A walkway edge, stair nosing, parked car, hose, or curb needs contrast to be visible. When the fixture itself becomes the brightest object in the scene, your eyes adapt to that source instead of the surface.
Your eye adapts to the brightest object
At night, your vision adjusts around the strongest light in view. If that object is an exposed LED chip or a bright floodlight aimed outward, your pupils constrict and darker surrounding areas become harder to read.
The yard may feel “well lit,” but the details that matter for walking, driving, or recognizing movement can disappear.
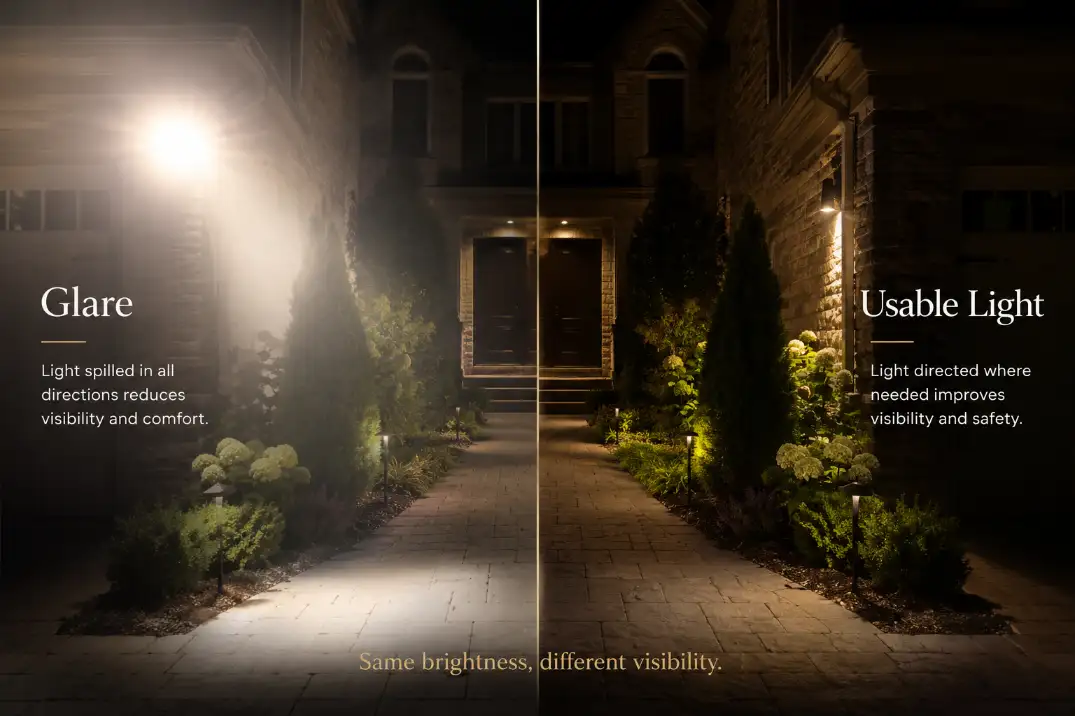
This is why a 2,000-lumen floodlight aimed across a driveway can perform worse than a 700-lumen shielded fixture aimed down. The first one creates intensity. The second one creates usable visibility.
The ground can be lit and still unreadable
A surface can receive light and still be hard to interpret. If the beam creates one hot spot, harsh shadows, and a dark falloff beyond it, the scene becomes visually noisy. You see brightness, but not necessarily edges.
That pattern is common when outdoor fixtures create bright spots and dark gaps. If the yard looks patched together instead of evenly readable, the issue may be closer to Outdoor Lights Bright Spots and Dark Gaps than a simple lack of power.
What People Usually Misread First
The common mistake is assuming the dark-looking part of the yard needs a stronger fixture. Sometimes it does. More often, the first bright patch is making everything beyond it look darker by comparison.
The exposed-source problem
If you can see the bare LED, bulb, or reflector directly from normal walking height, that fixture is already competing with the scene. This is especially common with wall lights mounted around 7–9 feet high, garage floodlights angled outward, and decorative clear-glass fixtures near front doors.
The practical rule is simple: you should notice the lit surface before you notice the lamp. If the lamp wins, visibility usually loses.
Brightness is often overestimated
Homeowners often overestimate how much light a small outdoor area needs. A short walkway, porch, side gate, or patio transition rarely needs the same output as a wide driveway apron or detached garage approach.
What gets underestimated is angle. A fixture tilted 15–30 degrees too high can send enough light into your eyes, a neighbor’s window, or reflective siding to make the area feel harsh without making the target easier to see.
5 Field Tests Before You Buy a Brighter Outdoor Light
| Test | Problem sign | What to change first |
|---|---|---|
| Stand 20–30 feet away | The fixture is the brightest object in view | Shield or re-aim the source |
| Shade your eyes with your hand | The area becomes easier to read | Reduce glare before adding lumens |
| Watch the falloff zone | Light drops hard after 6–10 feet | Improve beam spread or placement |
| Check after rain | Wet pavement looks blinding | Lower the angle and avoid exposed LEDs |
| Walk toward steps or curbs | Edges vanish behind shadows | Add softer, lower, better-placed light |
This test matters because it separates a symptom from the mechanism. “It looks dark” is the symptom. The mechanism may be glare, contrast collapse, poor beam spread, or a fixture aimed into the wrong viewing angle.
Why the Obvious Fix Fails
The obvious fix is replacing the bulb with a higher-lumen model. That often makes the problem worse. If the bare LED is visible, changing wattage is usually the wrong repair.
More lumens do not fix bad geometry
A brighter bulb sends more light into the same optical pattern. If that pattern already points toward your eyes, across a reflective driveway, or into a pale garage door, the added output simply amplifies the glare.
This is where placement matters more than product specs. If the fixture is too far from the task area, mounted at the wrong height, or aimed across the viewer’s path, stronger output will not correct the geometry.
Many cases that look like brightness problems are really Outdoor Lighting Placement Problems showing up as glare, shadows, or missed target areas.
Pro Tip: If the light makes you squint, do not start by buying a stronger bulb. Start by hiding the source from normal viewing angles.
Cooler white can look sharper but not clearer
Many outdoor LEDs are sold in 4000K–5000K ranges because they look crisp and security-oriented. In real residential spaces, especially against dark yards, cooler light can feel sharper and more glaring.
For entries, walkways, patios, and most front-yard lighting, 2700K–3000K is usually easier to live with. It will not fix bad aiming, but it can reduce the icy, high-contrast look that makes outdoor LEDs feel more aggressive than helpful.
Where Bright Outdoor Lights Backfire Most
Bright lights are not always wrong. A wide service yard, rural driveway, detached garage, or alley may need higher output. The problem is using high output where the viewing angle is close, reflective, or directly in line with the fixture.
Driveways and garage entries
Garage-mounted floodlights often fail because they are aimed outward from a high position. That can put the beam directly into the eyes of someone walking up the driveway or pulling in at night.
If the driveway looks bright near the garage but the vehicle edges, curb line, or walkway transition still disappear, the fixture is not solving the right problem. You may need a lower beam angle, wider spread, or additional softer light closer to the transition.
Porches, steps, and side paths
Porch lights with clear glass can be attractive during the day but visually harsh at night. They often expose the bulb while leaving the step edge below partially shadowed. That is a poor trade: the visitor sees the lamp clearly but not the surface they are stepping onto.
Side paths have a similar issue. One strong wall light can create a bright wall and a dark walking edge. In that case, the useful repair is often shielded downward light along the path, not a brighter wall fixture.
Security cameras
Too much light can also hurt camera visibility. A bright floodlight aimed toward the camera’s view can wash out faces, pale clothing, license plates, or reflective surfaces. It may also cause the camera to adjust exposure around the bright patch instead of the person or vehicle you want to identify.
For camera areas, the better goal is controlled illumination across the target zone. A softer, downward or side-angled light often captures more usable detail than a harsh beam pointed straight across the scene.
Conditions That Make Brightness Feel Worse
Some outdoor conditions amplify glare even when the fixture itself is not extreme.
Wet pavement and pale surfaces
After rain, concrete, pavers, sealed driveways, painted steps, and stone can reflect light back toward the viewer.
In humid parts of Florida or coastal California, damp surfaces may stay reflective for several hours after sunset. A fixture that feels tolerable on dry pavement can become blinding on a wet walkway.
White garage doors, light siding, and pale fences can create the same effect. If the beam hits those surfaces before it reaches the ground, they become secondary glare sources.
Dark surroundings
A 900-lumen fixture can feel more intense against a dark rural yard than a brighter fixture in a balanced suburban streetscape. The darker the background, the more important shielding becomes.
If your outdoor lights make one area feel too bright while another still feels too dark, the issue may match the pattern in Outdoor Lights Too Bright or Too Dark: uneven distribution, not a simple output shortage.
Sudden motion-light activation
Motion lights can add another problem: adaptation shock. When a dark area jumps to full brightness in less than a second, your eyes may need 2–5 seconds to settle. During that window, the area can feel bright but visually messy.
That does not mean motion lights are bad. It means sensor direction, beam angle, and output level need to work together.
If the fixture triggers constantly from passing cars, trees, or small animals, Outdoor Motion Sensor Light Too Sensitive may be the more useful fix than increasing brightness.
Better Fixes Than Installing a Brighter Light
The best repair is usually to control the light before increasing it. Get the beam out of your eyes and onto the surface that needs definition.
Shield the source
A hooded, full-cutoff, recessed, or downward-facing fixture usually improves visibility more than a higher-output bulb. The goal is not to hide all light. The goal is to hide the bright source while letting the useful light reach the ground, step, latch, or driveway edge.
Clear-glass decorative fixtures are weak performers here. They may create sparkle, but they often expose the lamp and scatter light sideways.
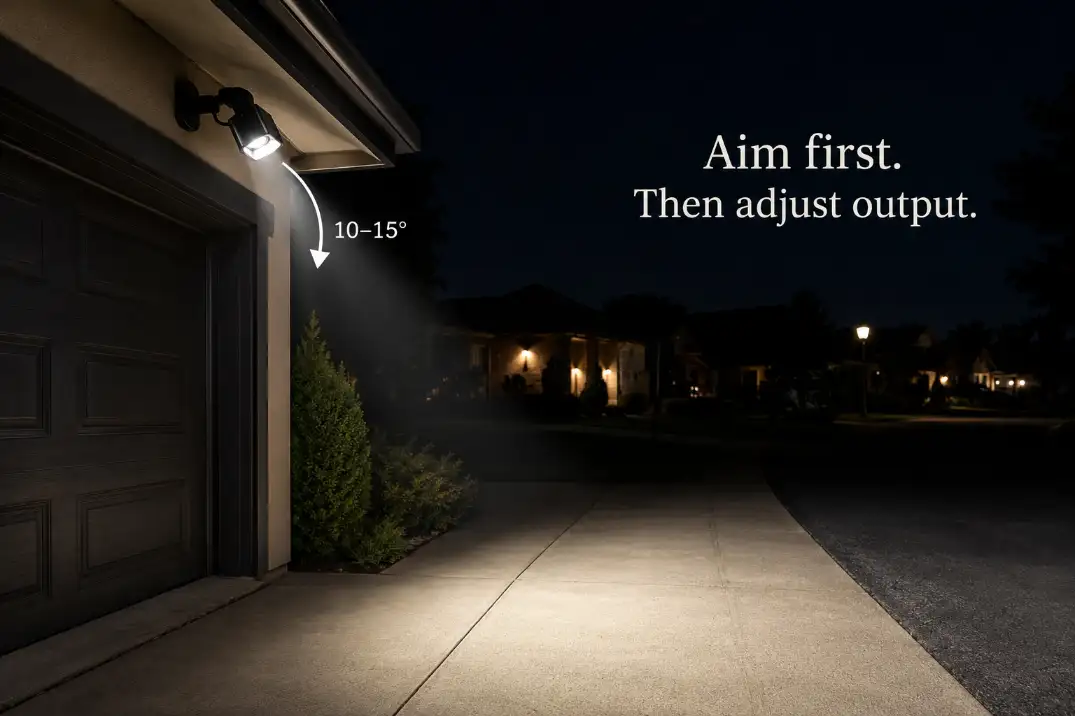
Lower the aim
For adjustable floodlights, aim the beam down until the brightest part lands on the target surface instead of at eye level. A downward correction of 10–15 degrees can noticeably reduce glare while keeping the same general coverage.
If the light is meant for a driveway, avoid aiming it toward the driver’s approach. If it is meant for a walkway, it should reveal edges and transitions, not shine across someone’s face.
Spread light instead of concentrating it
One intense fixture creates hard shadows behind objects. Two lower-output fixtures placed correctly can make the same area easier to use. This matters around steps, patio edges, side gates, and parked vehicles.
If the destination still feels unclear after glare is controlled, then reach may be the problem. In that case, Outdoor Lights Don’t Reach Far Enough can help separate true coverage limits from glare that only makes the space seem underlit.
When Brighter Actually Makes Sense
More light is justified only after glare, placement, and beam spread have been ruled out.
The target surface stays dim without glare
If you cannot see the light source directly, the beam is aimed down, and the target surface still looks weak, then output may be too low. This is more common on wide driveways, detached garages, large backyards, and long rural walks with no supporting ambient light.
Use the hand-shade distinction: if blocking the fixture from your eyes improves visibility, glare is the problem. If blocking the fixture does not help and the target remains dim, output or coverage may be too low.
The fixture itself may be the limit
Bulb changes stop making sense when the fixture exposes the light source, throws light sideways, or creates a tight hot spot. At that point, every bulb swap is trapped inside a bad optical setup.
Replace or shield the fixture before chasing wattage, lumens, or cooler color temperature. A controlled 800-lumen fixture can outperform a harsh 1,800-lumen fixture when the job is seeing steps, edges, and faces clearly.
Questions People Usually Ask
Can outdoor lights be too bright for security?
Yes. A light can be bright enough to reveal movement but still aimed so poorly that it hides faces, steps, or objects behind glare. Security lighting should make the area readable, not just intense.
Is warm white less safe than cool white outdoors?
Not automatically. Warm white light around 2700K–3000K can still provide strong visibility when the beam is controlled. Direction, shielding, and contrast usually matter more than choosing the coldest-looking LED.
Should I use a dimmer on outdoor lights?
A dimmer can help after the fixture is aimed and shielded correctly. It is not the first fix for an exposed LED, glare from wet pavement, or a beam pointed into the viewer’s eyes.
The Bottom Line
Brighter outdoor lights make visibility worse when they force your eyes to adapt to the lamp instead of the scene.
The right target is controlled light: shielded source, downward aim, even spread, moderate color temperature, and enough output for the actual surface.
Before buying a stronger fixture, do the hand-shade test, stand 20–30 feet away, and look for hard shadow within 6–10 feet of the bright patch.
If blocking the light with your hand makes the area easier to read, the fixture is not too weak. It is too visible.
For official definitions of glare and lighting terms, see the U.S. Department of Energy Lighting Principles and Terms.