
The light switches on when you walk across the driveway, but you can approach it along the walkway without a response until you are close. With a passive infrared, or PIR, sensor, that directional difference is the first clue to investigate before changing controls.
Compare your normal approach with a crosswise pass through a similar part of the sensor’s coverage, keeping settings unchanged. Repeated sideways detection paired with repeated straight-on misses supports a detection-geometry problem. Unreliable response in both directions calls for a broader diagnosis.
The goal is dependable activation during your ordinary approach. A setup that works only when you wave or step sideways still needs correction, even though the sensor has demonstrated that it can respond.
Why PIR Reads Cross-Traffic Better
A PIR sensor’s coverage is divided into detection zones rather than a solid cone of equally responsive space. Its lens directs infrared energy from different parts of the scene onto the sensing elements. Movement matters because it changes the infrared energy they receive.
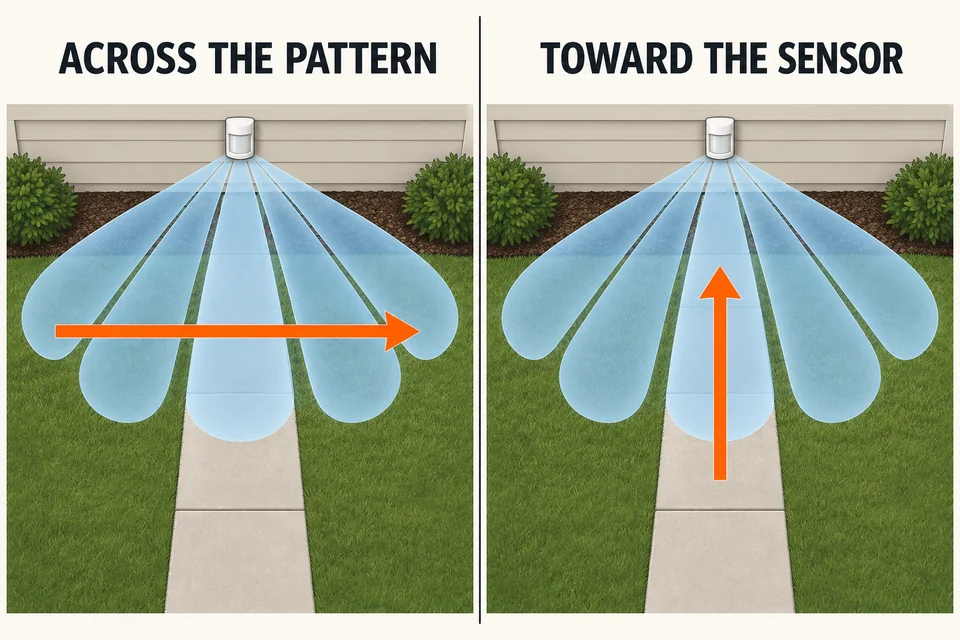
Walking across the pattern can carry your body through several zones, producing changes the sensor can recognize. Walking directly toward it may produce less change across those zones along parts of the approach. Activation may come later, when your position or movement produces a sufficient change.
This is one specific reason a motion light misses the walk path. The useful distinction here is whether the same fixture consistently responds differently to crossing movement and approaching movement.
Straight-on detection is still possible. Lens design, mounting position, distance, and the particular route all affect the result. A direct approach is a less favorable movement direction for many PIR installations, not an automatic blind spot.
The illustration below shows the principle, not the exact coverage of your fixture. Actual patterns can contain multiple rows and differently shaped zones. Use the manufacturer’s coverage diagram to understand your model; a simplified drawing cannot establish where its detection begins or ends.
The Weak Straight-On Approach
A useful directional comparison must avoid giving the sideways pass an easier test. Keep the walker, pace, settings, and surrounding conditions similar, and compare movement through a similar part of the intended coverage.
Choose a location on the ordinary approach where detection tends to fail. Compare that approach with a sideways crossing through a nearby area at a comparable distance. A close crossing beneath the fixture tells you little about an approach starting near the far edge of its range.
Notice what happens immediately before activation. If a small sideways movement repeatedly brings the light on after a direct approach fails, direction may be contributing. However, that movement might also bring you closer or carry you out from behind a porch post.
Keep your arms moving naturally. Deliberate waving adds another variable and can make a weak setup appear more dependable than it is.
Consistent crosswise response alongside late or inconsistent straight-on response supports investigating the approach angle. It does not establish the precise cause by itself. Before adjusting the head, check whether the sideways route also gives the sensor a clearer view of your body.
Aiming Across the Route
Adjust the sensor’s view of the route, then judge the result by walking it. A head that appears neatly aligned with the walkway can still favor movement across the path more than movement along it.
Find the sensor head before moving anything. On many floodlights, the PIR lens sits in a separate housing below or between the lamp heads. Moving the lamps alone may leave the sensing pattern unchanged.
Check the fixture’s instructions for permitted movement and its coverage diagram. Some heads rotate and tilt independently; others have restricted adjustment or a fixed orientation. There is no universal angle that works for every lens and mounting position.
Before physically loosening or repositioning hardware on a hardwired fixture, isolate power at the correct circuit. Keep the enclosure closed and use only the intended adjustment. If access is unsafe or the joint resists normal adjustment, stop rather than forcing the housing.
Make one modest change, secure the head as directed, then restore operation and allow the documented startup period. The useful adjustment brings a more responsive portion of the detection pattern onto the existing route.
The head must hold its new position. If the sensor head will not stay in position, resolve that mechanical problem before comparing detection results. A drifting head changes the test conditions between passes.
Aiming has a physical limit: rotation does not move the sensor to a different viewing position. When the fixture sits directly at the end of a straight walkway, the person still approaches largely toward its mounting point. Turning the head may change which zones intersect the route, but it cannot reproduce the viewing angle available from beside the path.
If permitted adjustments fail to improve repeated approaches, assess whether the mounting location offers a useful crossing angle at all. Repeating the same adjustment without a measurable improvement will not resolve that constraint.
Mounting Obstacles That Narrow the Pattern
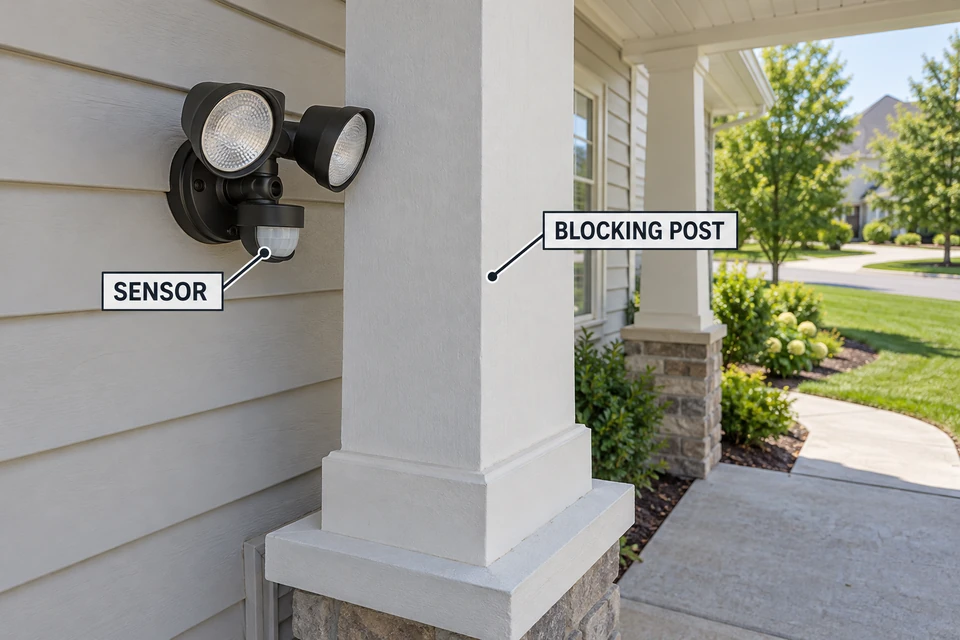
Check whether a sideways step changes visibility as well as movement direction. A porch post, deep wall recess, or projecting trim can hide part of the approach until the person moves beyond its edge.
That first clear view can trigger the light. The result resembles a cross-motion advantage, even though an obstruction contributed to the missed approach.
Inspect the relationship between the sensor, obstacle, and missed section of the path. Seeing the fixture from the walkway does not necessarily mean its sensing lens has an unobstructed view of your moving body. Judge the sightline from the sensor’s position without climbing or reaching unsafely.
The obstruction does not alter the lens’s underlying pattern; it removes usable coverage behind it. Increasing sensitivity cannot restore a view through a solid post.
If a removable object blocks the route, move it and repeat the comparison before changing aim. If the obstruction is part of the building, further rotation may simply exchange one hidden area for another. A different mounting position may be necessary, with qualified installation help where relocation involves electrical work.
The Side-to-Side Walk Test
Count only fresh activations from separate passes. Walking back and forth while the lamp remains on makes it difficult to identify which movement caused detection. If repositioning activates the light, wait at the next starting point until that cycle and any documented rearm interval have finished.
- Establish the baseline. Record the sensor’s starting aim and control settings. Use its documented test mode if available, or test in suitable normal nighttime motion operation. Allow the manufacturer’s startup period to finish before evaluating response.
- Select comparison locations. Identify the ordinary approach and a crosswise route through a comparable part of the intended detection area. Use paving joints or other fixed landmarks to track position. Keep both routes clear and avoid placing trip hazards.
- Test the straight approach. Begin outside the relevant coverage and walk toward the fixture at your normal pace. Note where activation first occurs, or that the pass produced no response. Do not add waving or a deliberate sideways movement.
- Test across the pattern. After shutoff and any documented rearm interval, cross the comparison area normally. Repeat from the opposite side as a separate pass. Keep settings unchanged and distinguish activation during the crossing from activation while reaching its starting point.
- Change one thing. Make one permitted aim adjustment or remove an identified movable obstruction. Follow the fixture’s adjustment precautions, then repeat the directional comparison. Changing aim and several controls together prevents you from identifying what helped.
- Verify normal use. Repeat the original approach several times in normal nighttime operation. Check whether activation now occurs consistently along the intended part of the route, without a sideways detour. Confirm that the sensor remains at its chosen angle.
If crossing passes remain dependable but the direct approach still fails, the directional limitation remains unresolved. Reconsider whether the mounting position offers a useful view of that route.
If neither direction responds reliably, continue with broader motion-sensor troubleshooting. This comparison alone cannot identify a failed sensor or another fixture fault.
Improvement only after emerging from behind structure points toward obstructed visibility. Improvement after a stable aim change supports retaining that adjustment—but only if it also holds during repeated normal approaches. The sideways pass is the diagnostic comparison; the original walking route is where the correction must prove itself.
For technical background on detection zones and crosswise movement, see Legrand’s explanation of passive infrared sensor technology.