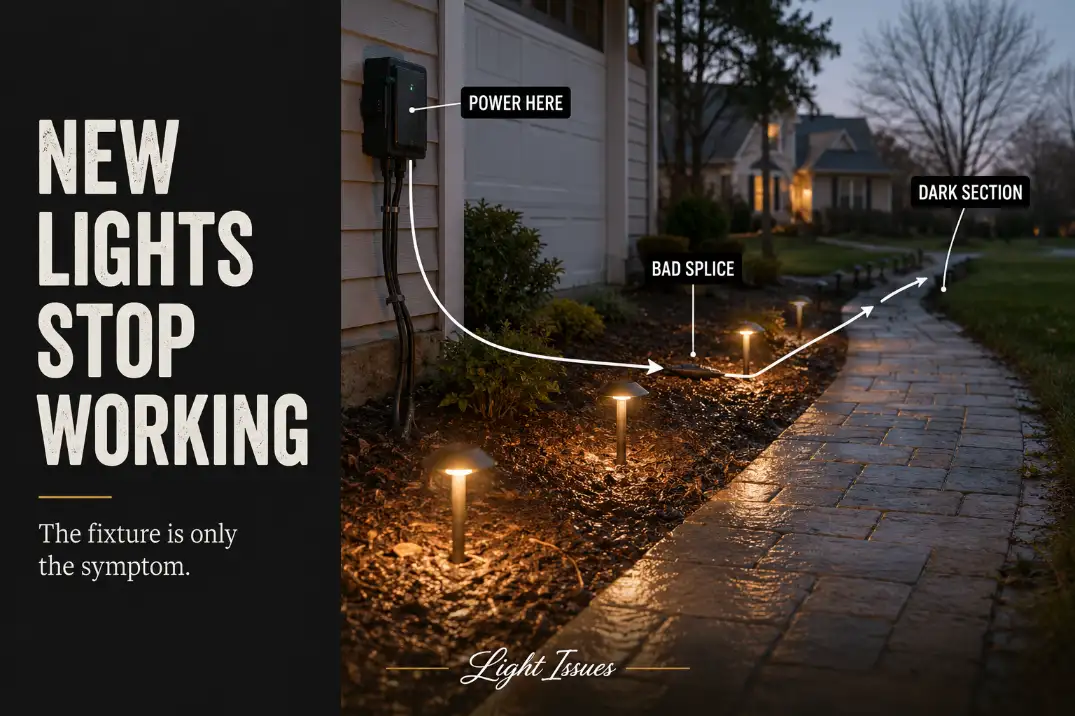
New outdoor lights that stop working after installation usually reveal the weakest part of the setup, not the age of the fixture.
The first failure window tells you where to look. If the system fails the first night, start with the outlet, GFCI, transformer, timer, photocell, or main line.
If it fails after the first rain or sprinkler cycle, inspect splice sealing, cable entries, and fixture ratings. If it works for 5–20 minutes and then shuts off, suspect overload, shorting, heat protection, or a transformer reset.
For low-voltage landscape lighting, the farthest fixture should usually stay above roughly 10.5–11 volts under load. If the first fixture is near 12 volts but the last one drops too far, the light is only showing the symptom.
The real problem is power loss along the run.

The First Failure Window Tells You Where to Look
If the lights fail the first night
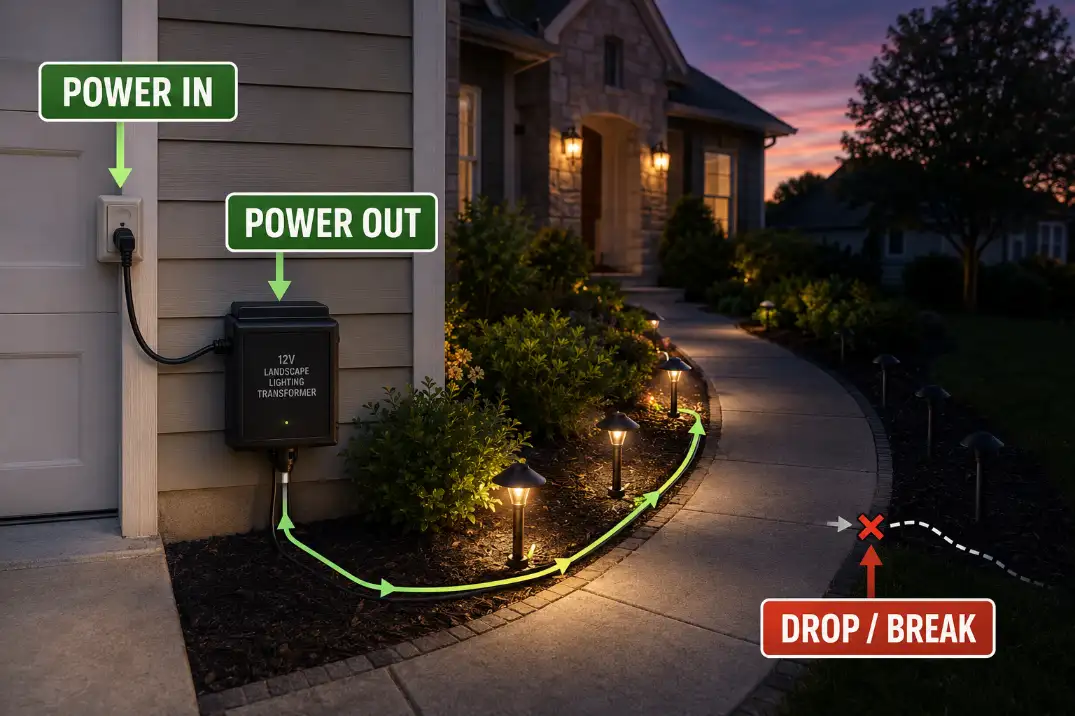
When every new light stays dark from the first night, do not start by replacing the fixture farthest from the house. A full-system failure usually begins before the yard wiring: the outdoor outlet, GFCI, transformer input, timer setting, photocell, or main low-voltage output.
A transformer can look active while the timer is in the wrong mode or the photocell still sees light from a porch, window, streetlight, or reflective wall. If the transformer is not sending usable low-voltage power into the run, the situation is closer to New Outdoor Lights Not Getting Power From the Main Line than to a bad-fixture problem.
If the lights fail after first rain or sprinklers
A system that works dry and fails after the first rain is telling a different story. The likely suspects move toward wet splices, low connector locations, water entering cable openings, or fixtures used in exposure they were not built to handle.
This matters because rain does not usually create the weakness in one storm. It reveals a weak seal, wrong connector, poor cable entry angle, or splice placed where water collects.
If failure appears within 24–72 hours of installation and after wet weather, moisture should outrank LED quality on the list.
If the lights work briefly and then shut off
Lights that turn on and shut off after 5–20 minutes are not the same as lights that never start. That pattern can come from an overloaded transformer, shorting on one run, heat protection, or a control setting that was only tested briefly during the day.
A two-minute setup test does not prove the system can survive a full 6–8 hour night cycle. It also does not prove the transformer behaves once it warms up, the photocell sees real darkness, or wet soil starts affecting a weak connector.
If only the far end looks weak
When the first few lights work but the farthest fixtures are dim, flicker, or fail to start, voltage drop becomes more likely than fixture failure.
This is especially common when too many fixtures sit on one long daisy-chain run, when wire gauge is too small, or when the farthest light is 100 feet or more from the transformer.
The useful comparison is simple: measure near the transformer side and again at the far end while the system is loaded. A healthy run should not collapse at the last fixtures while the first fixtures look normal.
Quick Diagnostic Checklist
Use this order before buying replacement fixtures:
- Confirm the outdoor outlet has power and the GFCI resets normally.
- Bypass or manually override the timer or photocell for one test cycle.
- Check transformer output while lights are connected, not only with no load.
- Compare voltage at the first fixture and the farthest fixture.
- Inspect every new splice for shallow contact, loose copper, or moisture.
- Look for a whole branch failing, not just one visible fixture.
- Recheck the system after the first rain or irrigation cycle.
Pro Tip: Take one photo of every splice before burying it. If one section fails later, the photo often shows which connector, branch split, or cable direction deserves the first check.
What Most Often Went Wrong During Installation
Loose splices beat bad fixtures
The most common early failure point is the splice. A connector that barely bites into the cable, a wire nut used where an outdoor-rated gel connector belongs, or a cable end left under tension can work for one evening and fail after soil movement, irrigation, or foot traffic.
This is the most important distinction in the whole repair. A dark fixture is the symptom. Poor contact is the mechanism. That is why replacing the visible light often disappoints: the new fixture is still being fed by the same weak connection.
The transformer may be too close to its limit
Low-voltage LEDs draw less power than old halogen fixtures, but transformer sizing still matters. A practical installation should leave some capacity instead of running right at the nameplate maximum.
If a 150-watt transformer is carrying around 140–150 watts of connected load, there is little margin for startup behavior, voltage loss, future additions, or a partially shorted run.
When the whole system shuts down or repeatedly resets, review the transformer before blaming the new lights. The difference between a failed transformer and an overloaded one is covered more deeply in Transformer Problems in Low Voltage Systems.
The cable run may be asking too much from the wire
Voltage drop hides inside many “successful” installations because the first fixtures may work while the last fixtures struggle. A system can look fine near the transformer and still fail at the far end.
Long straight runs, small wire, several fixtures on one cable, and daisy-chain layouts all increase the chance of uneven power. If the far end falls below roughly 10.5–11 volts under load, the repair may require changing the run layout, not changing the light.
For a fuller breakdown of that pattern, see Voltage Drop in Outdoor Lighting Systems.
The rating may not match the exposure
A fixture under a covered porch is not exposed like a path light in open rain or a spotlight hit by irrigation spray. New outdoor lights can stop working quickly when damp-rated parts, weak connectors, or poorly protected cable entries are placed in wet locations.
This is one condition homeowners often underestimate. The fixture may look sealed, but water usually finds the cable entry, gasket edge, low splice, or mounting seam first.
Failure Window Comparison
| Failure window | Most likely layer | First useful test | When DIY stops making sense |
|---|---|---|---|
| First night, nothing turns on | Outlet, GFCI, timer, photocell, transformer, main feed | Confirm power into and out of the transformer | When 120-volt wiring or a hardwired box must be opened |
| First rain or sprinkler cycle | Wet splice, cable entry, wrong rating, low connector | Inspect exposed splices and wet zones | When GFCI trips repeatedly after wet weather |
| After 5–20 minutes | Overload, short, heat protection, transformer reset | Disconnect one run at a time and retest | When the transformer repeatedly trips or heats abnormally |
| Only the far end is weak | Voltage drop, long run, undersized wire, overloaded branch | Compare first-fixture and far-fixture voltage | When voltage remains low after connector correction |
| One branch is dark | Bad branch splice, cut cable, loose connector | Test before and after the branch split | When multiple new fixtures fail on the same branch |
What People Usually Misread First
The visible dead light is not the diagnosis
The dark fixture is where the problem becomes visible. It is not always where the failure begins. With a new installation, the more useful question is whether the failure belongs to the whole system, one branch, one wet area, or the far end of a long run.
This keeps you from replacing the easiest part instead of testing the most likely one. Replace one fixture only after it fails on a known-good connection. Do not replace multiple fixtures on the same dead branch before testing that branch.
A dry setup test can be misleading
A system that works during installation may still fail under real conditions. Daylight testing can hide photocell problems. A short test may not reveal transformer heat. Dry soil may not expose a wet splice. A mild evening may not behave like a long stormy night.
That is why the first full night and first wet cycle are more useful than the first quick test. If a new system works dry but fails after rain, the article on Why Your Outdoor Light Works Fine Until It Rains fits that pattern more closely than a generic fixture replacement guide.
Brighter is not always healthier
A new light can look bright near the transformer while another fixture on the same run barely starts. That does not mean the dim fixture is cheap or defective. It may simply be receiving weaker voltage because of distance, load, wire size, or a weak connection upstream.
The healthier comparison is not “one light is bright and one light is dim.” It is “how much voltage reaches each fixture when the entire system is running?”
How to Test Without Making the Problem Worse
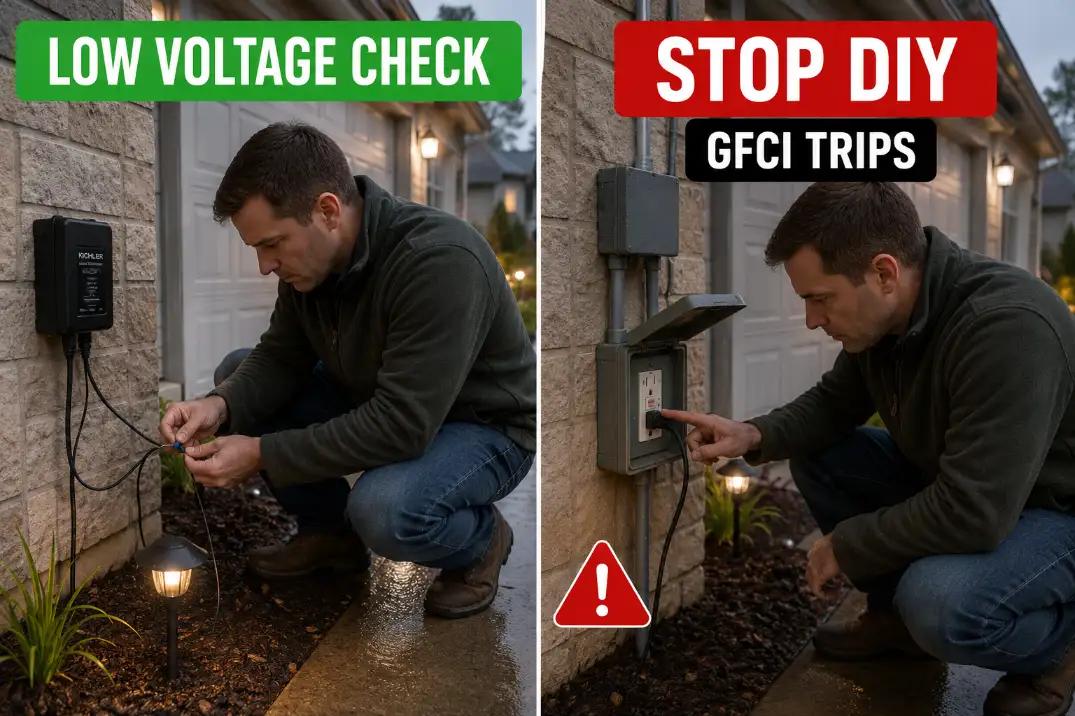
Separate low-voltage checks from line-voltage work
Most homeowners can inspect visible low-voltage connections with the transformer unplugged, re-seat outdoor-rated connectors, and isolate one lighting run at a time.
That is different from opening a 120-volt box, replacing a hardwired wall fixture, bypassing a GFCI, or modifying house wiring.
Repeated breaker trips, burnt odor, warm boxes, damaged line-voltage cable, or unknown wiring should stop the DIY process. In that situation, When to Call an Electrician for Outdoor Lighting Problems is the safer next step.
Test one change at a time
The best troubleshooting sequence is not dramatic. Confirm power into the transformer. Confirm low-voltage output. Disconnect one run at a time. Test before and after the first dead branch. Inspect the connector closest to the last working light.
Do not replace several connectors, move the timer, and swap fixtures in the same pass. If the lights start working, you will not know which change actually solved the problem.
Recheck after darkness
Photocells and timers can fool a daytime test. A photocell may keep the lights off because it still sees nearby light. A timer may appear correct but lose its program after a power interruption. A transformer may work in manual mode but fail in automatic mode.
For a new installation, the real test is whether the lights turn on after dark, stay on through the intended cycle, and come back the next night without a reset.
When the Standard Fix Stops Working
One wet connector is a repair; repeated wet failure is a design problem
If one connector was poorly seated, replacing it with a proper outdoor-rated connector may solve the issue. But if several connections sit in a low mulch pocket, against sprinkler spray, or under runoff from a roof edge, the installation will keep failing.
At that point, the repair is not just a better connector. The splice location, cable route, and fixture exposure need to change. The first rain is not the cause; it is the test the installation failed.
One weak far fixture is not the same as a dead system
A single weak far fixture may be corrected by fixing a connector, shortening a branch, or improving the cable layout. A whole system that dims, flickers, shuts off, or resets under load needs a broader review.
The transformer, total connected wattage, wire gauge, run length, and connection quality all work together. If the installation design cannot carry power evenly, a new fixture will not fix the underlying problem.
A tripping GFCI should not be treated as a nuisance
A GFCI that trips once during installation may have been disturbed. A GFCI that trips again after rain, after the transformer is plugged in, or when one specific run is connected is a warning sign.
Do not tape it, bypass it, or treat it as an inconvenience. If the system depends on defeating a protection device, the installation is not fixed.
Questions Homeowners Usually Ask
Can brand-new outdoor lights be defective?
Yes, but a single defective fixture is more likely than several defective fixtures on the same branch. If multiple new lights fail together, the power path, splice, transformer, or control setup should be tested first.
Should I wait to see if the lights start working again?
Only briefly if the issue may be timer or photocell confusion. If the failure appears after rain, trips a GFCI, or repeats on the same branch, waiting usually gives moisture and corrosion more time to spread.
Is flickering normal after a new installation?
No. A brief startup change can happen in some LED systems, but repeated flicker is not a normal break-in period. On a new installation, flicker usually points to voltage drop, loose contact, transformer behavior, incompatible control settings, or moisture.
Final Takeaway
New outdoor lights that stop working after installation usually fail for a reason the first test did not reveal. The fixture is often only the symptom.
The failure window gives the better clue: first-night failure points toward power and controls, first-rain failure points toward moisture and splices, 5–20 minute shutdown points toward load or protection behavior, and weak far-end fixtures point toward voltage drop.
Start with the pattern. Then test the power path before replacing parts. That is the difference between fixing the installation and only swapping the light that happened to go dark first.
For broader official safety guidance on ground-fault protection near water and outdoor electrical use, see the CPSC GFCI fact sheet.