Most early outdoor lighting failures come from installation weak points, not bad fixtures.
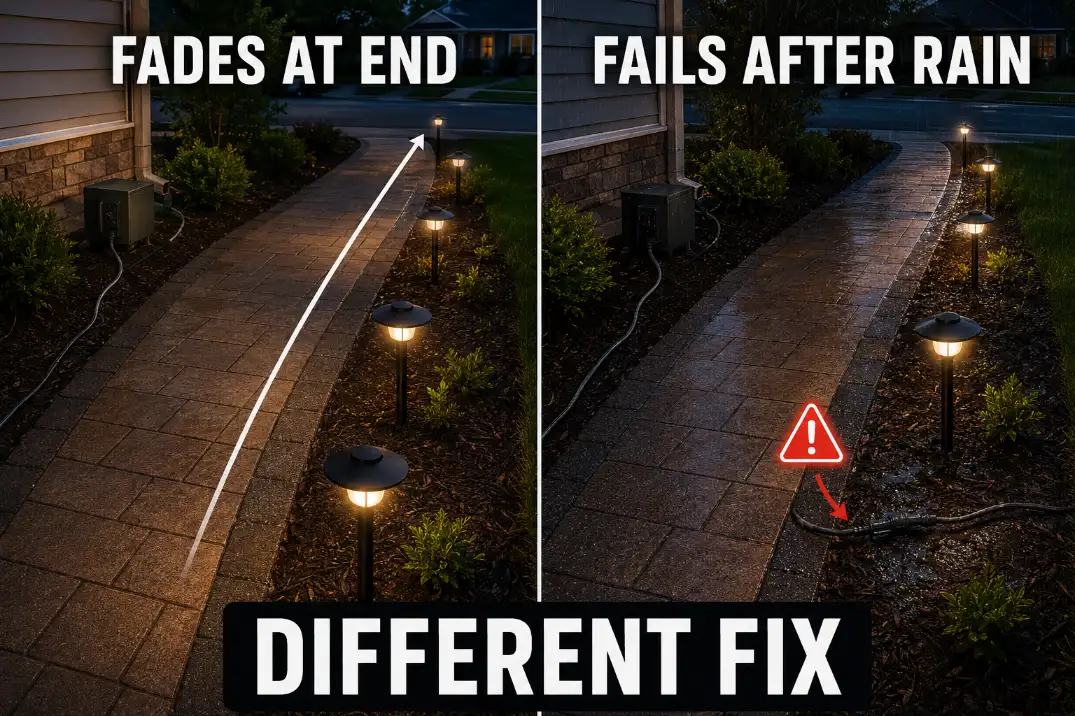
The first clue is the pattern: lights that fail after rain usually point to moisture, lights that dim at the far end of a run usually point to voltage drop, several lights failing together usually point to a shared cable or transformer issue, and lights that fail after adding fixtures usually point to load or layout.
A fixture failure within 30–90 days of installation is rarely “normal aging.” It is more often a wet splice, shallow cable, undersized run, overloaded transformer, damaged insulation, or fixture placed where water keeps attacking it.
The mistake is treating the dead light as the problem before checking the condition that feeds it. A single bad fixture can happen, but a repeated same-zone failure usually means the installation pattern deserves more attention than the light itself.
Start With the Failure Pattern, Not the Fixture
The fastest way to avoid wasted repairs is to identify when and where the failure happens before replacing anything. Outdoor lighting problems often look similar at night, but their causes are not the same.
Rain Failure Means Moisture First
If lights work during dry weather and fail after rain, irrigation, snowmelt, or damp mulch, moisture should move to the top of the list.
The problem may be inside the fixture, but it is just as likely to be at the splice, cable entry point, GFCI-protected supply, or damaged insulation.
A dry test can fool you. A loose or poorly sealed connection may pass when the system is first installed, then fail once wet soil and repeated irrigation reach it. That is why rain-triggered failure should not be treated like a simple bulb issue.
Far-End Dimming Means Power Path First
If the first lights near the transformer look normal but the last lights are dim, the failure is probably not the last fixture. The more useful question is whether the farthest fixture is receiving enough voltage under load.
On many 12-volt low-voltage systems, a drop of 1–2 volts between the first and last fixture can become visible. If a far-end fixture is reading near or below about 10.5 volts while the first fixture is healthy, voltage drop, cable length, wire gauge, or layout should be checked before buying replacement lights.
Group Failure Means the Shared Point Matters
When several fixtures fail together, the shared part of the system matters more than the individual lights. A whole branch going dark usually points toward a bad splice, damaged cable, transformer issue, timer or photocell problem, or a connection feeding that zone.
This is where homeowners often overestimate fixture failure and underestimate wiring layout. Four lights rarely fail independently on the same night for no reason. They usually share a weak point.
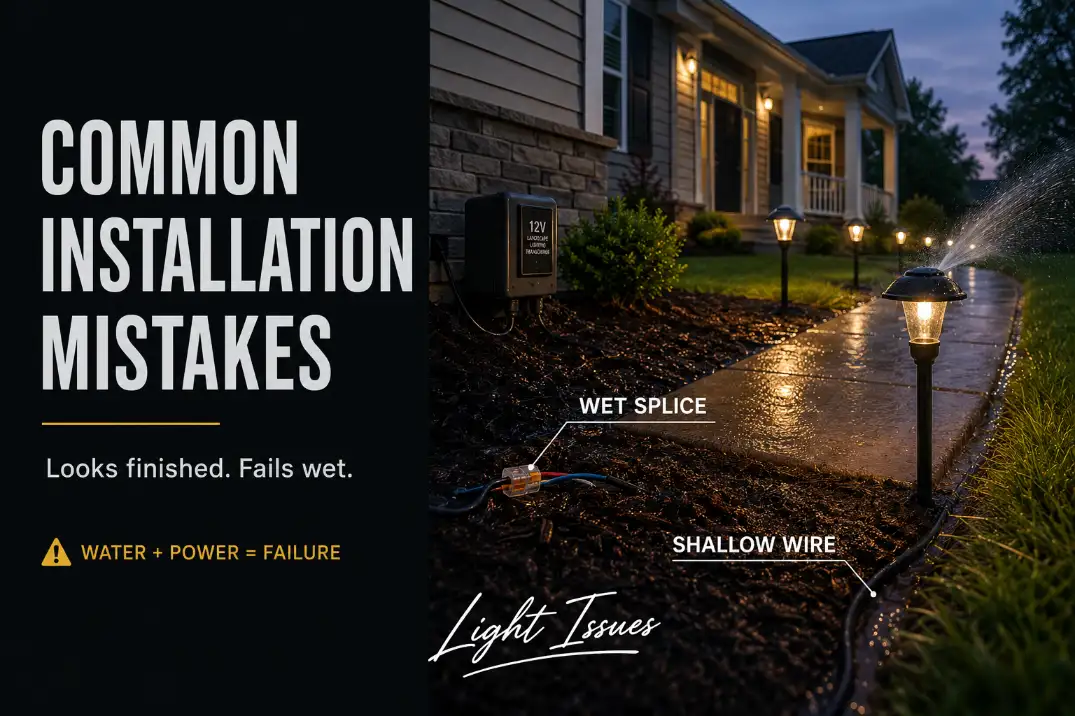
Moisture and Cable Mistakes That Cause Early Failures
The most common early failures usually happen where electricity meets the outdoor environment. The fixture may be rated for outside use, but the connection, cable path, and installation location still have to survive water, mulch, soil movement, and maintenance tools.
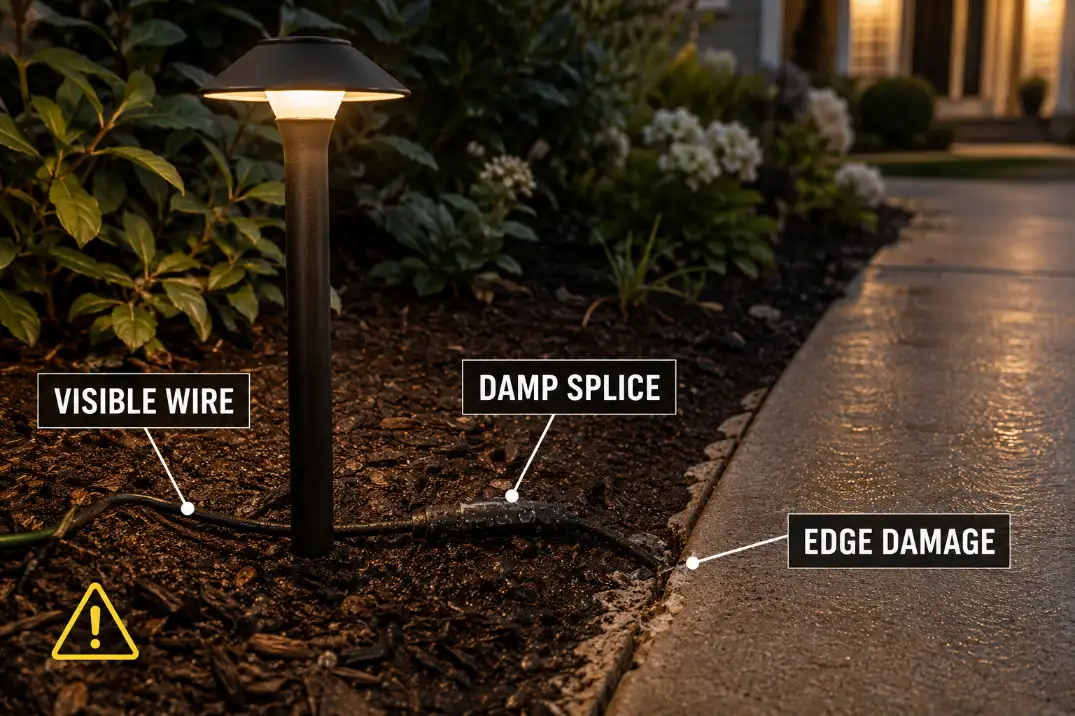
Wet Splices That Pass the Dry Test
A weak splice can look acceptable during installation and still fail after the first serious wet cycle. Standard indoor-style connectors, loose crimps, badly closed gel connectors, or buried connections sitting in damp mulch can all create intermittent power.
The mechanism is simple: moisture increases resistance, corrosion begins, and the connection becomes less stable. At first, the light may flicker. Later, it may shut off after rain or work only when the cable is moved.
If the fixture works after being handled but fails again after the ground gets wet, the connection is more suspicious than the light. That pattern is closely related to the moisture entry problems explained in Why Water Gets In Through Cable Entry Points.
Shallow Cable That Fails After Yard Work
Low-voltage cable does not need to be treated like a major underground service, but it still needs protection from ordinary yard life. Cable sitting just under loose mulch, crossing a bed edge, or running through a high-maintenance planting zone is easy to nick with an edger, shovel, aerator, rake, or cleanup tool.
A useful warning sign is wire that becomes visible within one season. If cable is exposed within 1–2 inches of the surface near a walkway edge, planting bed, lawn border, or maintenance path, damage is not a surprise.
It may not shut the system down immediately. A small cut can create intermittent power, moisture leakage, corrosion, or GFCI trips later.
Pro Tip: Inspect the cable route in daylight before replacing fixtures. Bed edges, sprinkler heads, and recently disturbed soil often reveal the problem faster than nighttime testing.
Fixtures Installed in the Wrong Wet Zone
A weather-rated fixture can still be installed in a bad location. A path light placed where mulch stays wet, a well light set in a low pocket, or a fixture hit directly by sprinkler spray several times per week is being exposed to more water than a normal outdoor rating can comfortably overcome.
Standing water is a practical threshold. If water remains around the fixture base for more than 24 hours after normal rain, the location should be questioned. If irrigation spray hits the fixture every morning, that repeated directed water can be harder on the system than occasional rainfall.
This is the condition many people overestimate: they assume “outdoor-rated” means the fixture can survive any outdoor placement. It does not.
Ratings help, but installation still decides whether water keeps finding the weakest opening. The difference between labels and real exposure is clearer in Outdoor Light Weatherproof Ratings.
Power Layout Mistakes That Make Good Fixtures Look Bad
When the failure follows distance, load, or added fixtures, the fixture is often innocent. The system may be delivering weak or unstable power.
Long Runs With Undersized Wire
A common mistake is using wire that is too small for the distance and total load. Power may be present, but not strong enough at the far end. That distinction matters because a voltage tester can show “something is there” while the fixture still performs poorly.
Runs near or beyond 100 feet deserve more attention, especially when several fixtures are loaded near the end. The longer the cable and the higher the wattage on that run, the more voltage can be lost before power reaches the last light.
If the first fixture looks bright and the last few look weak, the next step is not replacing the last few lights. It is checking wire gauge, run length, load, and voltage under load. Low Voltage Landscape Lighting Wire Gauge fits this problem when the system fades with distance instead of failing in one wet spot.
Transformers Loaded Too Close to Capacity
Another common installation mistake is treating the transformer’s rated wattage as the ideal working load. A 100-watt transformer carrying 95–100 watts may technically be within the label, but it leaves very little margin for long runs, voltage drop, heat, fixture variation, or future additions.
A better practical target is to keep expected load closer to 80 percent or less of rated capacity, especially on longer or more complex layouts.
That does not mean every system fails above that point. It means the margin shrinks, and small installation weaknesses become more visible.
If several lights dim after new fixtures are added, the added fixtures are not automatically defective. The system may have crossed the point where the transformer and cable layout can support the load cleanly. That pattern is covered more directly in Too Many Landscape Lights on One Transformer.
Daisy Chains That Put the Weakest Lights Last
Daisy chaining is not automatically wrong, but it becomes a problem when the layout places the longest distance and highest demand at the far end.
The first fixtures take power earlier in the run, while the last fixtures receive what remains after cable resistance and fixture load.
The visible symptom is often a dim driveway edge, weak far garden bed, or uneven walkway. The hidden mechanism is layout, not fixture quality.
When the last 2–3 fixtures are consistently weaker than the first fixtures, a hub-style layout, split run, or redesigned cable path may do more than another round of replacement lights.
The difference is explained in Daisy Chain vs Hub Landscape Lighting.
Quick Diagnostic Checklist
Use the pattern before choosing the repair:
- Failure within 30–90 days: suspect installation detail before normal fixture aging.
- Lights fail after rain or irrigation: check splices, cable entries, damaged insulation, and GFCI behavior.
- Farthest fixtures are dimmer: check voltage drop, wire gauge, run length, and layout.
- One branch fails while nearby lights work: look for a bad splice or damaged cable feeding that branch.
- Several lights dim after adding fixtures: check transformer load and total wattage.
- A fixture works when touched or moved: suspect a loose connection or strained cable before replacing the light.
What People Fix First but Should Not
The most visible part of the failure is not always the failed part of the system. Outdoor lighting repair gets expensive when visible symptoms are treated before system clues are checked.
Replacing Fixtures Before Testing the Branch
Replacing one fixture can make sense when one old or damaged light fails by itself. It makes less sense when several lights on the same branch flicker, dim, or shut off together.
Multiple fixtures acting the same way usually point to the cable, connection, transformer, control, or exposure that feeds that part of the system. Test that branch before blaming every light on it.
Sealing the Outside Without Finding the Entry Point
Sealant can help in the right place, but it is often used as a guess. If water is entering through a cable gland, cracked gasket, bad bottom opening, or wet splice, sealing the most visible seam may do little.
It can also trap moisture inside a fixture that already has water in it. The better repair is to find the entry point, dry or replace compromised parts, remake the connection with outdoor-rated materials, and move the weak point away from constant wet contact when possible.
Resetting a GFCI After Every Rain
A GFCI that trips after wet weather should not be treated as a routine reset. One nuisance trip may happen, but repeated trips after rain, irrigation, or snowmelt suggest current may be leaking where it should not.
That is a different category from a dim path light. If the same circuit keeps tripping after wet weather, use the warning signs in Outdoor Lights Tripping GFCI Outlets before continuing to reset and test.
Installation Mistake or Normal Aging?
| Signal | More Likely Installation Mistake | More Likely Normal Aging | Best Next Check |
|---|---|---|---|
| Failure within 30–90 days | Wet splice, shallow cable, bad location, overloaded run | Unlikely unless the product is defective | Inspect connections and voltage under load |
| Fails after rain | Moisture entry, damaged insulation, weak connection | Possible only if old seals are already worn | Check GFCI, splices, cable entries, and pooling water |
| Farthest lights are dim | Voltage drop, poor layout, undersized wire | Less likely | Compare voltage at first and last fixture |
| One old fixture gradually dims | Less likely | LED aging, lens discoloration, driver wear | Compare age, heat exposure, and fixture condition |
| Several lights fail together | Shared cable, transformer, branch, or control issue | Less likely | Trace the shared cable path |
| Light works when touched | Loose connection, strained cable, bad splice | Less likely | Remake the connection and inspect movement points |
The table matters because it keeps the repair from becoming emotional. A dead fixture invites replacement. A pattern invites diagnosis.
When Fixture Replacement Stops Making Sense
A standard repair is reasonable when the problem is isolated and visible. Replace a cracked fixture. Remake a bad splice. Move one light away from direct sprinkler spray. Correct one exposed cable section. Those fixes are specific enough to work.
The repair stops making sense when the same problem returns in the same zone.
Use the Two-Failure Rule
If the same location fails twice, stop treating the fixture as the whole problem. The repeated failure is telling you to inspect the condition around it: wet soil, cable route, splice location, transformer load, drainage, irrigation pattern, or branch layout.
This rule is especially useful when a fixture is replaced and fails again within a few weeks or after the next major storm. At that point, the new fixture did not solve the reason the old one failed.
Prioritize Safety Before Lighting Quality
The most annoying problem is not always the most important. A dim far-end light is a performance problem. A recurring GFCI trip after rain is a safety warning.
A transformer that is hot, buzzing, or carrying too much load deserves attention before beam angle, brightness, or style.
The repair order should be simple: water and safety first, power distribution second, individual fixture quality third. That order prevents a homeowner from spending money on cosmetic replacements while the real failure path remains active.

Questions People Usually Ask
Can low-voltage outdoor lighting still be unsafe?
Yes. Low voltage reduces some risks, but it does not make poor installation harmless. Wet connections, damaged cable, overloaded transformers, failing power supplies, and line-voltage supply problems can still create shock, heat, fire, or equipment failure concerns.
Is it normal for outdoor lights to fail after heavy rain?
No, not repeatedly. A properly installed outdoor lighting system should tolerate normal rain. If lights flicker, shut off, or trip protection after wet weather, check moisture intrusion, cable damage, poor splices, fixture placement, and GFCI behavior.
Should I replace all fixtures if several lights stop working?
Not first. Several fixtures failing together usually means they share a bad connection, damaged cable, transformer issue, control problem, or voltage problem. Replacing all fixtures can waste money if the power path remains weak.
The Real Installation Test Is Repeat Weather
A clean test at dusk does not prove an outdoor lighting installation is durable. The real test is what happens after irrigation cycles, storms, heat, mulch settling, freeze-thaw movement, and normal yard maintenance.
Good outdoor lighting installation is not just about placing attractive fixtures. It protects the cable path, keeps connections out of wet contact, sizes the transformer with margin, uses wire that fits the distance, avoids overloaded runs, and places fixtures where water and maintenance tools are less likely to attack them.
When those basics are missed, failures may look random. They usually are not. The system often starts failing exactly where the installation gave weather, voltage loss, or yard activity an easy place to win.
For broader electrical safety guidance on outdoor and wet-location power risks, see OSHA’s GFCI guidance.