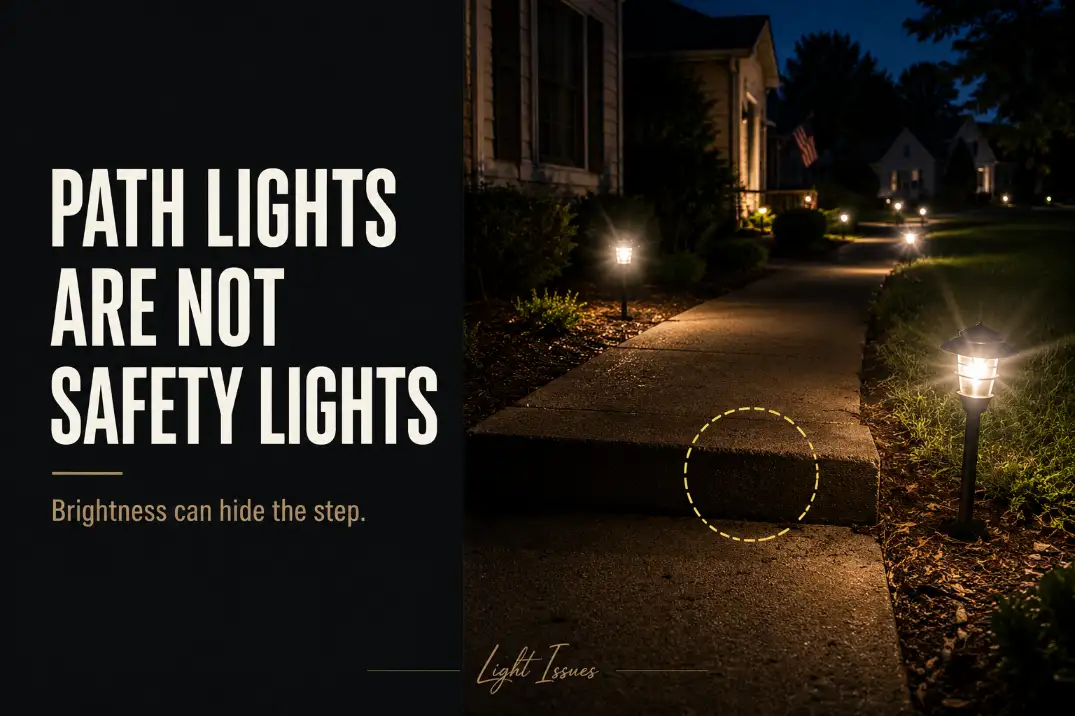
Path lights often fail as safety lighting because they mark the route without making the walking surface readable.
The first test is not how many fixtures are on. It is whether you can see the next foot placement, the edge of a step, and the surface change before you reach it.
A walkway can look lit and still be unsafe if bright pools are separated by 3–5 feet of shadow, if glare pulls your eye toward the fixture, or if a step edge disappears from 6–10 feet away.
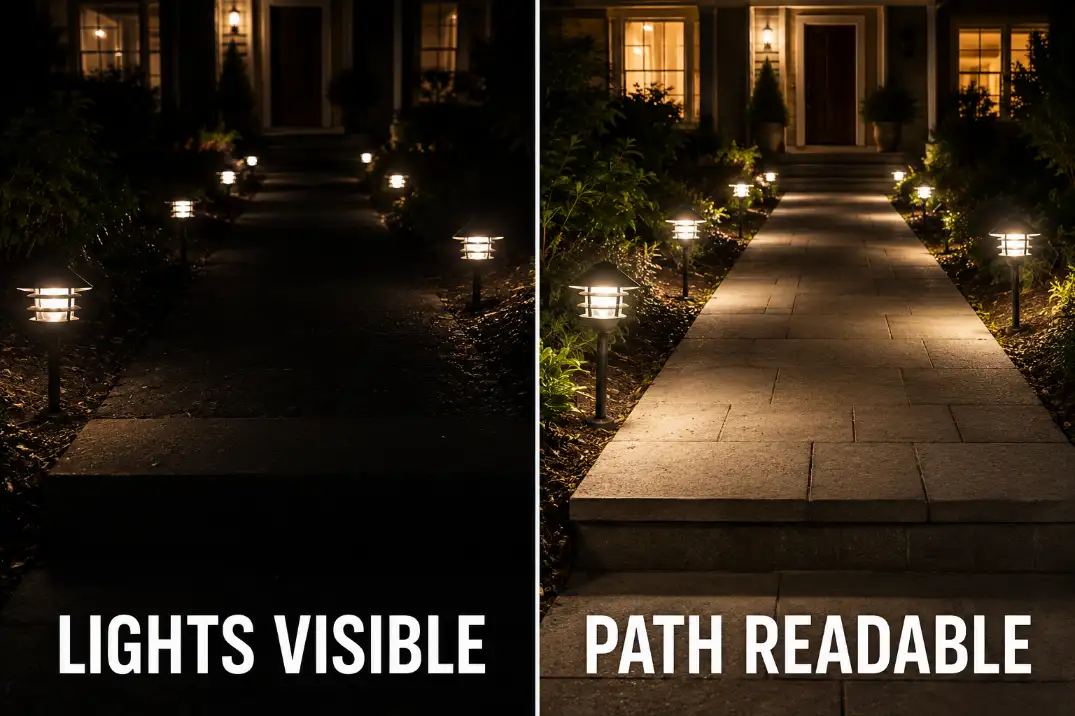
That is different from a walkway that is simply too dark. In many yards, the real problem is contrast: the lights are visible, but the hazard is not.
The Safety Test Is Foot Placement, Not Fixture Count
Path lights can guide people toward a walkway, but safety depends on what the eye can read while moving. A glowing fixture beside the path does not help much if the center of the walkway, the edge of a slab, or the first step after a landing stays visually flat.
The ground has to be readable one stride ahead
A useful walkway light lets someone see the next landing zone before stepping into it. That usually means the surface should be clear at least one normal stride ahead, especially near steps, curves, paver joints, driveway edges, and changes from concrete to gravel.
The practical test is simple: stand where someone naturally approaches the walk and look 6–10 feet ahead.
If the path edge, step edge, or surface texture only becomes clear when you are almost on top of it, the lighting is not doing enough safety work. A path light layout is failing when the fixture is easier to see than the next safe place to step.
Standard spacing is only a starting point
Many path lighting layouts rely on even spacing, often around 6–10 feet apart. That can look clean, but it does not guarantee safer walking. A 6-foot layout can still fail if the dark gap lands on a step, a curve, a lifted paver, or the place where the walkway meets the driveway.
The better question is not “Are the lights evenly spaced?” It is “Do the light pools overlap where feet actually land?” This is the same visibility issue behind Outdoor Lights Create Bright Spots and Dark Gaps: the eye reacts to contrast and shadow breaks, not just the number of lights installed.
Pro Tip: Test the walkway after your eyes have been outside for at least 5 minutes. A layout that looks fine when you first turn the lights on may feel much weaker once your eyes adjust to the darker yard.
What People Usually Misread First
The most common mistake is judging the lighting from the yard, porch, or driveway instead of walking the route. From a distance, a row of path lights can look finished. Underfoot, the same layout may create glare, dark gaps, or poor surface contrast.
Brightness is often overestimated
Brighter path lights are not automatically safer. They help only when the light lands on the walking surface without shining into the viewer’s eyes.
If the source is exposed, a brighter lamp can make the walkway harder to read because the eye sees the fixture before it sees the ground.
This matters most on narrow front walks and curved paths where the fixture sits close to the walking line. A low lamp that shines sideways can create a sharp visual hot spot at ankle height.
Once glare becomes the strongest visual cue, adding more output usually makes the same problem louder.
The broader version of that failure is explained in Why Outdoor Lights Create Glare, but path lights are especially deceptive because they can look gentle while still interrupting night vision.
Decorative symmetry is often mistaken for coverage
Path lights placed at even intervals can make a walkway look organized without making it safer. The fixtures may line the border beautifully while missing the actual walking line.
This is especially common when the lights are installed along mulch or planting beds instead of aimed across the surface people use.
The symptom is cosmetic order. The mechanism is misplaced light. If the beam lights the bed edge more than the walkway, the layout may improve curb appeal while leaving the trip zone underlit.
Quick Diagnostic Checklist
Use this at night from the direction people actually walk.
| Check | Healthy Condition | Problem Signal | What It Usually Means |
|---|---|---|---|
| Step edges | Visible from 6–10 feet away | Edge appears only when close | Light is landing too low or too far aside |
| Dark gaps | Shorter than one normal stride | 3–5 feet of shadow between pools | Spacing or beam spread is wrong |
| Glare | Fixture glow stays soft | Lamp pulls your eye away from path | Source is exposed or aimed poorly |
| Surface texture | Pavers, cracks, wet leaves readable | Ground looks flat and blank | Contrast is too weak on the walking plane |
| Clear route | At least about 36 inches open | Plants or edges push people sideways | Lighting is being asked to solve a layout problem |
Why the Obvious Fix Fails
The standard fix is to add more path lights in the same line. Sometimes that works, but only when the old layout was simply under-spaced and the beams already landed in the right place. More often, it repeats the same weak pattern.
More fixtures can multiply the wrong signal
If each fixture creates a bright dot and a small pool below it, adding more fixtures may create more dots without improving the walking surface. The path starts to read as a string of lights instead of one continuous route.
That is why the “more lights” fix often disappoints. It addresses the visible symptom — not enough glow — while ignoring the underlying mechanism: the light is not reaching the foot-placement zone evenly.
The runway effect can distract from the path
Path lights on both sides of a walkway can look balanced, but a long row of identical glowing points can pull attention away from the surface. The eye follows the dots instead of reading the slab edges, steps, or changes in grade.
This is not only an aesthetic problem. A strong runway effect can make a front walk feel bright while still leaving the practical walking cues weak.
The issue is covered more directly in Why Path Lights Look Like a Runway, but the safety lesson is simple: the fixture pattern should never become more noticeable than the ground.

What Actually Makes a Walkway Safer
A safer walkway lighting layout does not try to make every fixture obvious. It tries to make the route understandable. The surface should read softly and continuously enough that a person does not have to guess where to step.
Light the change points first
The most important places are not always evenly spaced. Prioritize steps, landings, turns, narrow sections, raised pavers, driveway crossings, and the first 3–4 feet after a door or gate. These are the places where a person changes stride, direction, or attention.
One well-placed shielded fixture near a step edge can contribute more safety than three decorative fixtures along a straight planting bed. A good layout is built around decisions, not decoration.
Aim across the path, not just along the border
A path light should help reveal the walking plane. If the beam stays mostly in the mulch, gravel, or planting edge, the fixture is performing as accent lighting. That may be attractive, but it is not the same as walkway safety lighting.
This is where placement matters more than fixture style. The same fixture can perform badly beside the path and much better when shifted, shielded, or aimed so the beam crosses the walking surface.
Related placement failures show up in Outdoor Lighting Placement Problems, where the light exists but misses the area that actually needs to be seen.
Test wet and dry conditions
Dry concrete can look readable under weak light. Wet concrete, damp pavers, black mulch, and fallen leaves reduce contrast.
In humid climates such as Florida, coastal moisture in California, or rainy Midwest weeks, a walkway can stay reflective or visually flat for hours after irrigation or rain.
Test the route 30–60 minutes after sprinklers or rainfall if wet surfaces are part of the normal condition. A layout that feels acceptable on a dry night can fail once the surface reflects fixture glare or hides small height changes.
When Lighting Is the Wrong Fix
Lighting can improve visibility, but it does not correct loose pavers, slick surfaces, poor drainage, or a walkway that is too narrow to use comfortably. At some point, the safer move is to fix the walking condition first and adjust the lighting afterward.
Repair raised or unstable surfaces first
If a paver lip or slab edge is more than about 1/4 inch, lighting is not the main fix. Better light may help someone notice the hazard, but it does not remove the trip point.
The same applies to gravel that washes across the path, settled stepping stones, or a walkway edge that breaks down after rain. Light can reveal the problem. It cannot make an unstable surface safe.
Clear the walking width before tuning the lights
If plants, edging, furniture, or seasonal growth reduce the usable walkway to less than about 36 inches, path lights are being asked to solve a route problem. People will naturally shift sideways, step off the intended line, or avoid the planted edge.
Trim the route, correct the edge, or widen the usable path first. Then tune the lighting around the path people can actually walk.
Add another lighting layer when there are height changes
Path lights alone are weak at showing vertical changes. Steps, raised landings, retaining edges, porch transitions, and uneven grades often need a different layer: shielded step lights, low wall lights, porch downlights, or carefully aimed area lighting.
This does not make path lights useless. It means they should guide the route while another layer reveals the height change. A path light is good at marking direction. It is not always good at defining a riser.
A Better Fix Sequence
Do not start by buying more fixtures. Start by finding the exact moment where the walkway becomes visually uncertain.
Mark the unsafe moments
Walk the route at night from both directions. Mark the points where your foot placement becomes uncertain: a hidden step, a dark curve, a glare point, a driveway edge, or a paver joint that disappears.
Two or three marked failures are more useful than a general complaint that the path needs more light. They tell you whether the problem is spacing, aim, glare, surface condition, or the absence of a second lighting layer.
Adjust before replacing
Move or rotate one fixture at a time. Aim the beam across the walking surface instead of along the bed edge. If glare is the problem, try lower output, better shielding, or a fixture with a stronger cutoff before adding more lights.
If the problem is dark spacing, focus on the gaps that affect actual foot placement. Some dark areas between fixtures are cosmetic. Others are functional.
Pathway Lights Leaving Dark Gaps is useful here because the real question is where the gap falls, not whether every inch of the path is equally bright.
Pro Tip: Fix the worst visibility point first, then walk the whole route again. One corrected step, curve, or edge can change how safe the entire walkway feels.
Questions People Usually Ask
Are brighter path lights safer?
Only if the added brightness lands on the walking surface without glare. A brighter exposed source can make the fixture easier to see while making the ground harder to read.
Can path lights make steps harder to see?
Yes. If the fixture lights the area beside or below the step but leaves the edge in shadow, the step can appear flatter than it is. Steps usually need clear edge visibility, not just nearby glow.
Do path lights fix an uneven walkway?
No. They can reveal an uneven slab, lifted paver, or loose edge, but they do not remove the trip hazard. Use lighting to reveal the edge; use repair to remove the hazard.
For broader pedestrian-friendly outdoor lighting guidance, see the U.S. Department of Energy.