
An outdoor post light that stops working is usually a power-path problem before it is a fixture-style problem. The first useful checks are whether one post is out or several outdoor lights failed together, whether the failure followed rain or irrigation, and whether a photocell needs 30–60 seconds to respond after being covered.
If the light failed right after a new fixture head or photocell was installed, treat that as a separate wiring or control mismatch branch, not as normal weather damage.
A burned-out bulb creates a simple outage. A wet splice, loose socket, tripped GFCI, or confused photocell creates a pattern: flickering, dry-weather recovery, repeated resets, or a light that works during testing but not at dusk.
If the post light comes back after 24–48 dry hours, the fixture has not fixed itself. It has given you a moisture clue.
Start With the Failure Pattern, Not the Part
Outdoor post lights sit close to soil, mulch, driveway splash, lawn irrigation, insects, and underground wiring. That location makes them more vulnerable than a protected porch light, even when the lantern head looks clean.
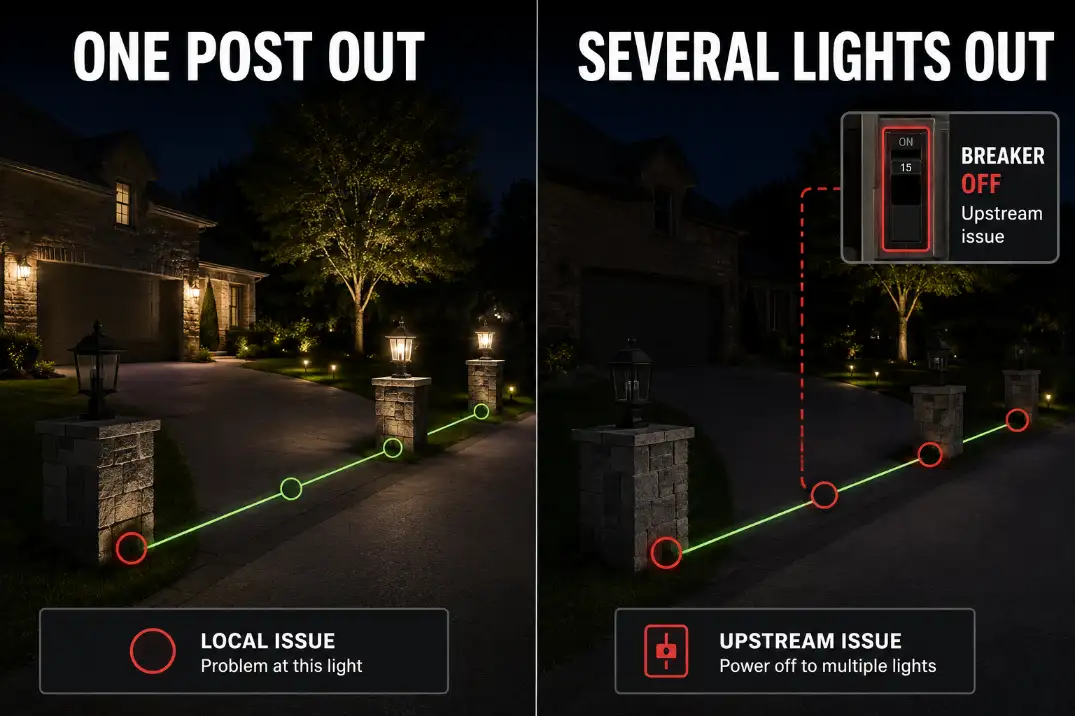
One Post Out Means Local Trouble
If only one post light is dead, start with the local parts: bulb, socket, photocell, wire splice inside the post, and water entry at the base or lantern cap. This is the most useful first split because it keeps you from chasing the breaker when the problem is inside one fixture.
A local failure often changes with touch, wind, moisture, or temperature. A bulb that flickers when seated, a socket with green-white corrosion, or a light that returns after a dry day points away from a simple burned-out lamp.
Several Lights Out Means Upstream Trouble
If the post light and other outdoor lights went dark at the same time, look upstream before opening the post. The cause may be a breaker, GFCI, timer, transformer, switch, or shared control. A 120-volt hardwired post light and a 12-volt landscape post-style fixture are not diagnosed the same way.
If the post is part of a low-voltage run, test the transformer side before opening the post. A low-voltage post-style fixture that is dim, weak at the end of a cable run, or failing with other yard lights may fit the same pattern as low voltage landscape lighting problems more than a single bad lantern head.
Quick Diagnostic Checklist
Use this order before buying parts:
- Test a known-good outdoor-rated bulb only if the socket looks dry and undamaged.
- Cover the photocell fully and wait 30–60 seconds before judging the response.
- Check nearby GFCI protection if the failure followed rain, irrigation, or snowmelt.
- Look for fogged glass, rust stains, green-white corrosion, or water at the post base.
- Compare one-light failure against whole-zone failure before replacing the fixture.
- Treat recovery after 24–48 dry hours as a moisture clue, not a repair.
- Stop testing if you see burned insulation, standing water in the post, or repeated breaker trips.
What People Usually Misread First
The visible symptom is “the post light is dead.” The useful question is whether it is dead all the time, only after weather, only at night, or only after a recent installation.
The Bulb Is Blamed Too Early
A burned-out bulb is possible, especially with older incandescent or compact fluorescent lamps. But repeated bulb failure is not random. If two known-good bulbs fail in the same post light, the socket, moisture path, photocell, or wiring connection deserves more attention.
Also check the bulb rating. Outdoor lanterns can trap heat, especially when the bulb sits inside a small enclosed head. A bulb that exceeds the fixture’s wattage or heat rating can damage the socket or shorten LED life. That is a fixture-condition problem, not just a bulb problem.
The Photocell May Be Working but Misled
Photocells often get blamed whenever a post light fails at night. Sometimes they are the cause, but they can also be fooled by nearby light. A porch light, driveway light, streetlight, reflective siding, or bright window can make the sensor think it is still daytime.
Cover the photocell fully with opaque tape or your hand and wait at least 30–60 seconds. If the light turns on, the sensor still responds. The problem may be sensor placement or stray light, not a failed fixture. If the light does not respond and power is present, the photocell may have failed.
For a closer control-side failure pattern, outdoor lights not turning on after timer or photocell issues explains why the control can be the weak point even when the fixture looks fine.
New Fixture or Photocell Failures Need a Different Branch
If the post light stopped working immediately after a new fixture head, new photocell, or replacement control was installed, do not treat it like a normal aging failure.
New-install problems often come from the control path: wrong voltage-rated photocell, incorrect line/load arrangement, missing neutral where one is required, a bypassed switch, or a timer and photocell fighting each other.
This is the point where routine homeowner testing should narrow the pattern, not turn into wiring guesswork. If the fixture is 120-volt hardwired and the new control does not behave as expected, the safest next move is a qualified electrical check rather than repeated trial-and-error connections.
Rain Recovery Is a Clue, Not a Fix
A post light that fails during rain and works after drying is not repaired. Moisture may be leaving the socket, splice, photocell, or post base temporarily. In humid coastal areas, damp air and salt can keep corrosion active long after visible rain stops. In northern states, freeze-thaw movement can widen small gaps around the base or lantern cap until water finds a repeat path.
Pro Tip: If the light recovers after a dry day, do not seal random seams first. Find the actual water entry point, because sealing the wrong edge can trap moisture inside.
Where Outdoor Post Lights Fail Most Often
The lantern head is the part people notice. The failure often starts lower.
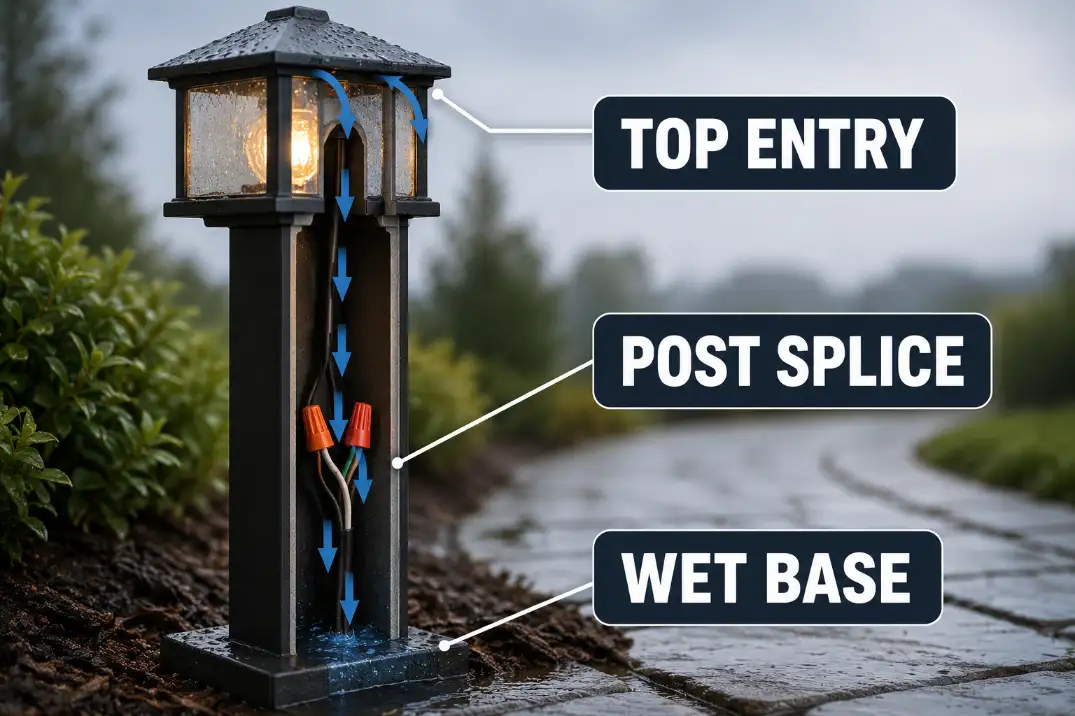
Post Base and Underground Entry
The post base is exposed to splashback, wet mulch, lawn irrigation, and soil movement. If mulch or soil sits 2–4 inches against the base, it can hold moisture against metal, conduit, fasteners, or wire entry points. Even a 1/8-inch gap can be enough for wind-driven rain, insects, and damp air to enter.
This is why replacing the top lantern can disappoint. The new fixture looks clean, but the weak splice, wet cable entry, or unstable base remains below it.
Socket and Lamp Holder
Inside the lantern, the socket can corrode, loosen, or lose spring tension. A bulb that feels loose, flickers when touched, or works only at a certain angle points toward socket trouble. With power safely off, visible rust, black marks, melted plastic, or a flattened center contact are warning signs.
A damaged socket is not always worth cleaning. If the socket material is burned, brittle, or distorted, the fixture has moved beyond a simple maintenance issue.
Wire Splices Inside the Post
Splices inside outdoor posts are vulnerable because they are hidden and rarely inspected. Indoor-style connectors, loose wirenuts, poor strain relief, and damp cavities can all create intermittent failures.
A connection may work for weeks, then fail when temperature swings, vibration, or moisture shift the conductors.
If the failure behaves like a loose connection, the repair logic is close to loose outdoor wiring connections: the important part is not just reconnecting wires, but making the connection stable and weather-appropriate.
Wiring, Water, or Sensor: How to Tell the Difference
| Symptom | More Likely Cause | Decision Signal | Next Move |
|---|---|---|---|
| Light never turns on | Bulb, socket, open connection, failed photocell | No response after bulb test and 60-second sensor cover test | Check the local power path safely |
| Works only after dry weather | Water intrusion or corroded splice | Returns after 24–48 dry hours | Inspect post base, cap, splice, and gasket |
| Trips GFCI after rain | Ground fault from moisture | GFCI trips during rain, irrigation, or snowmelt | Stop resetting repeatedly |
| Turns on during test but not at night | Photocell placement issue | Nearby light reaches sensor | Shield or relocate the sensor exposure |
| Flickers when touched or in wind | Loose socket or wiring | Movement changes output | Repair the connection, not just the bulb |
| Several outdoor lights fail | Upstream control or supply | Multiple fixtures affected together | Check breaker, timer, transformer, or shared circuit |
Why the Standard Fix Often Stops Working
The standard homeowner fix is bulb replacement. It makes sense once. It does not make sense five times.
Replacing Bulbs Stops Making Sense After Repeated Failure
If two known-good bulbs fail in the same post light, the fixture is no longer presenting a bulb question. The socket may be corroded, the photocell may be failing under load, the fixture may be overheating, or the wiring connection may be unstable.
A healthier post light should turn on consistently at dusk, stay on without flicker, and remain stable after rain. A failing one may need tapping, dry weather, or multiple resets to behave. That comparison matters more than the age of the bulb.
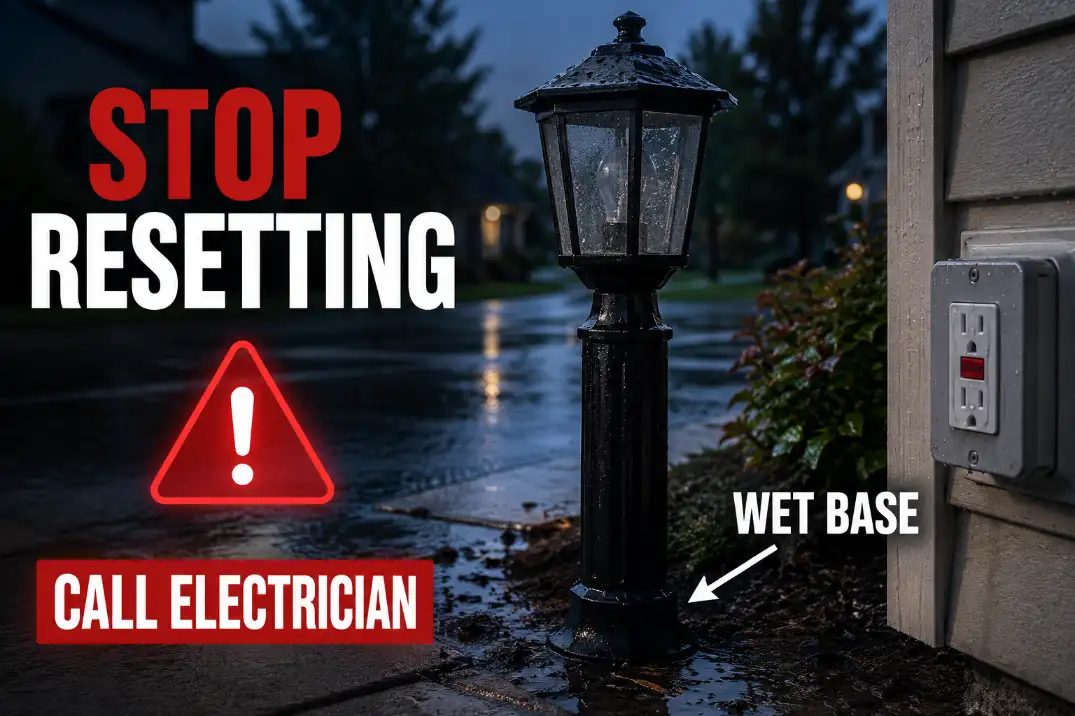
Resetting the GFCI Is Not a Repair
A GFCI that trips once during a storm may be reacting to a temporary ground fault. A GFCI that trips repeatedly is giving a safety signal.
Do not keep resetting it to “see if it holds.” If moisture has reached a conductor, socket, splice, or underground cable, repeated resets can hide the problem until it worsens.
If the lantern head looks dry but the trip follows saturated soil, heavy irrigation, or snowmelt, suspect the base entry or buried run before blaming the bulb. A wet underground path can trip protection even when the visible fixture appears normal.
For this failure branch, outdoor lights tripping GFCI outlets is the better match than a basic bulb-replacement guide.
Caulk Can Make the Problem Worse
Caulk around the wrong seam can trap water inside a post or lantern. Outdoor fixtures need controlled water shedding, intact gaskets, proper covers, and safe connection points, not a sealed capsule with damp air locked inside.
The better repair is selective: replace cracked gaskets, correct the fixture cover, use outdoor-rated connectors, clear soil from the base, and make sure water does not collect where the wiring enters.
Safe Fix Order for a Dead Post Light
Before opening anything, turn off the breaker that feeds the light. If you are not sure which breaker controls it, or if the post is on a 120-volt hardwired circuit and you are not comfortable verifying power safely, stop and use a licensed electrician.
Outdoor post lights often combine metal housings, wet locations, and buried conductors, which is not a good place for guesswork.
First: Confirm the Simple Parts
Use a known-good outdoor-rated bulb within the fixture’s rating. Check whether the bulb seats firmly. If the fixture has a photocell, cover it fully and wait. If it has a timer, confirm the current time, mode, and manual override.
This step should take minutes, not days. If the light still does not respond, do not keep changing bulbs.
Second: Inspect Moisture and Corrosion
With power off, look for fogged glass, water droplets, rust trails, swollen gaskets, green-white corrosion, insect nests, and a loose cap. A post light with corrosion at the socket or photocell area has been operating in a damp electrical environment.
Corroded outdoor connections are especially common where moisture sits instead of draining. If the connection itself is visibly oxidized or brittle, the logic in corrosion in outdoor light connections applies: cleaning the outside of the fixture will not restore a compromised electrical joint.
Third: Know the Service Boundary
Call an electrician when the breaker trips repeatedly, the GFCI will not hold, the post contains standing water, underground cable appears damaged, the post is loose, or you find burned insulation.
Also call if the fixture is line-voltage and the splice is buried, inaccessible, or not inside a proper rated enclosure.
Pro Tip: A post light near a driveway should be checked for movement. Even a slight lean can stress the underground entry and loosen conductors over time.
What Changes by Climate and Location
In Florida or other humid regions, moisture and corrosion move higher on the suspect list. Damp air, irrigation, and long rainy periods can age sockets and photocells faster than dry conditions.
Along coastal California or other salt-air locations, corrosion can continue even when the fixture does not look soaked.
In Arizona and other hot, dry regions, UV damage, brittle plastic lenses, heat-stressed photocells, and cracked seals may matter more than constant wetness. In northern states, frost movement can shift posts, crack seals, and create intermittent failures after winter.
Irrigation also changes the diagnosis. A post light hit by sprinkler spray three times a week may experience more moisture stress than a fixture that only sees occasional rain. If the failure appears after watering, not after storms, adjust the spray pattern before replacing the fixture.
Questions People Usually Ask
Can an outdoor post light fail because of a bad photocell?
Yes. A photocell can fail open, fail closed, or be fooled by nearby light. The practical test is to cover it completely and wait 30–60 seconds.
If the light responds, the sensor still works but may be seeing too much light at night. If it does not respond and power is present, the sensor may need replacement.
Why does my post light work after it dries out?
That usually means moisture is temporarily changing the electrical path. Water may be inside the socket, photocell, splice, post base, or underground entry. Dry recovery after 24–48 hours is a strong clue, but it is not a repair.
Should I replace the whole post light or just the fixture head?
Replace the fixture head only if the wiring, post base, control device, and power supply are sound. If corrosion, water, or unstable wiring is inside the post, a new head may fail the same way. The repair should follow the fault location, not the visible part.
What if the light stopped working right after a new photocell was installed?
Treat that as a wiring or compatibility problem first. The photocell may be the wrong type, incorrectly matched to the fixture voltage, or wired in a way that does not fit the switch and timer setup. If it is a 120-volt post light, do not troubleshoot by swapping wires at random.
For broader certification context on outdoor luminaire safety, see UL Solutions.