
Low voltage path lights usually stop working because power disappears before it reaches the fixture, not because every light suddenly failed.
Start by reading the pattern: all lights out usually points to the transformer, timer, photocell, outlet, or GFCI; a row that dies halfway points to a splice or cable break; dim end lights usually point to voltage delivery.
A healthy 12-volt landscape lighting system often measures roughly 12–15 volts at the transformer output, while a fixture receiving about 10.5 volts or less under load may dim, flicker, or stop.
That is different from a single failed lamp or LED module, which normally affects one fixture only. If the failure appeared within 24–48 hours after rain, irrigation, edging, or digging, treat connections and cable damage as more likely than fixture age.
Start With the Pattern, Not the Fixture
A low voltage path lighting system is easier to diagnose when you stop treating each fixture as a separate mystery. The pattern tells you where the failure probably begins.
If every path light is out
When every fixture is off, start upstream. Check the outlet, GFCI, transformer, timer, and photocell before opening individual fixtures. This is a supply-side failure until proven otherwise.
Do not begin by replacing lamps when the whole run is dead. That repair feels useful, but it usually wastes time. If every light is off, the shared power source matters more than the visible fixtures.
For a broader system-level symptom map, Low Voltage Landscape Lighting Problems explains how power, layout, load, moisture, and fixture issues overlap in low voltage systems.
If one section is out
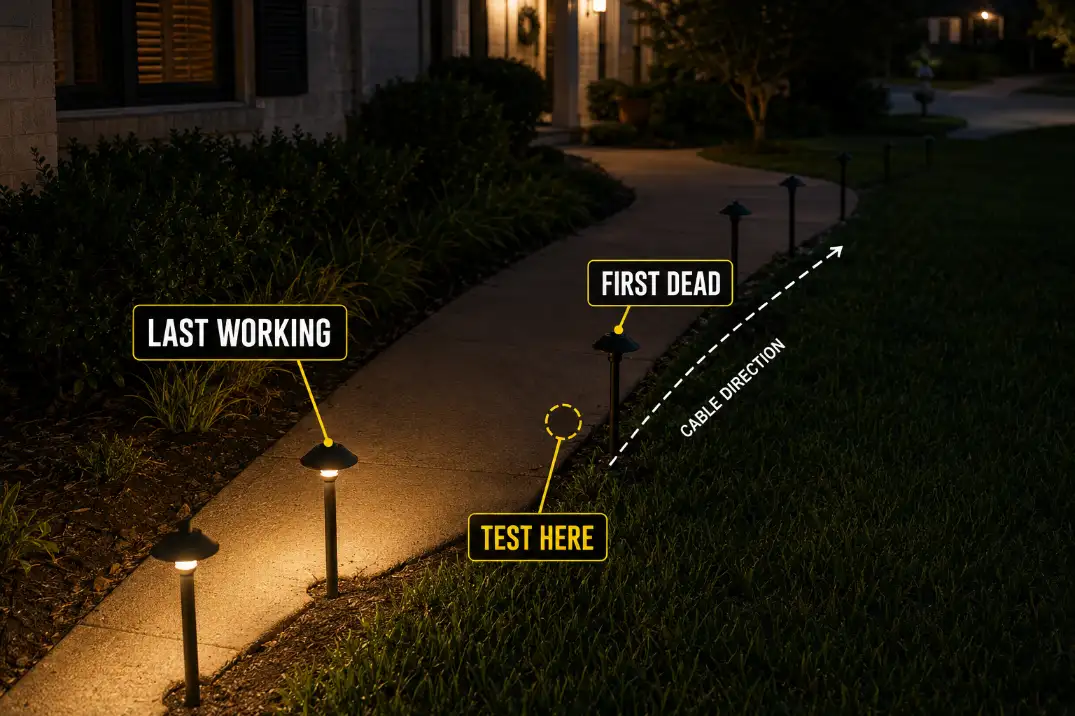
If the first few path lights work and the rest are dark, the most important location is the gap between the last working fixture and the first dead fixture. That is where a loose splice, cut cable, corroded connector, or failed branch connection often appears.
This pattern is more useful than the age or style of the fixture. A clean-looking 5-year-old path light can be fine while the connector feeding it has failed underground or inside wet mulch.
If the last lights are dim before they fail
Dim end-of-run lights usually point to voltage drop, undersized wire, a long cable run, too many fixtures, or weak connections. The symptom is dim light. The mechanism is poor voltage delivery.
That distinction matters because brighter replacement fixtures can make the problem worse. If the cable is already struggling to deliver power, adding fixtures with higher wattage increases the load instead of fixing the run.
Quick Diagnostic Checklist
Use this order before buying new fixtures:
- Transformer has incoming power and low voltage output.
- Timer or photocell is not blocking nighttime operation.
- GFCI outlet is not tripped or repeatedly resetting.
- First dead fixture has voltage at the cable connection.
- Splices are dry, tight, and free of green, black, or brittle corrosion.
- End-of-run voltage is not dropping below the fixture’s working range.
- Failure did not begin after digging, edging, irrigation work, heavy rain, or freeze-thaw movement.
Pro Tip: Cover the photocell fully for 2–3 minutes or use manual-on mode before assuming the transformer is dead.
Step-by-Step Diagnosis
1. Check the transformer and outlet first
Look for power signs at the transformer: indicator light, display, timer movement, click response, or a low hum. If the transformer plugs into an outdoor receptacle, test that outlet with another device and check the GFCI reset button.
If you use a multimeter, check the transformer label first. Most residential low voltage landscape lighting transformers output low-voltage AC, so the meter usually needs the AC volts setting.
Many 12-volt systems measure about 12–15 volts at the output terminals, depending on the transformer tap and load.
If the outlet is live but the transformer produces no low voltage output, the transformer, internal protection, timer, or control side becomes the likely issue.
If the transformer turns on for 10–20 minutes and then shuts off, think overload, shorted cable, water intrusion, or transformer protection rather than a simple bad lamp.
If the problem appears to involve the 120-volt outlet, the line-voltage side of the transformer, a damaged receptacle, or repeated breaker/GFCI trips, stop and use a qualified electrician.
For transformer-specific symptoms, Transformer Problems in Low Voltage Systems is the better next step than replacing path lights one by one.
2. Separate timer and photocell problems from power loss
A timer or photocell problem can imitate a dead lighting system. If manual-on mode works, the transformer and main power path are probably not the first suspect. The timer schedule, photocell position, or dusk sensor behavior deserves attention.
If manual-on mode does not work, move back toward the transformer output, outlet, GFCI, and main cable. A photocell near porch lights, garage lights, streetlights, or reflective windows can also keep the system off because it “sees” light when the walkway is actually dark.
A short delay after dusk is normal. A system that never turns on after 15–30 minutes of real darkness is not just waiting for the sky to dim.
For that specific symptom, Outdoor Lights Not Turning On After Timer or Photocell is a useful companion diagnosis.
3. Test where the working run becomes dead
When part of the path is working, do not keep returning to the transformer. Go to the first dead fixture. Turn the transformer off, open the connection carefully, then test the cable feeding that point after restoring power.
If voltage is present at the cable but the fixture stays dark, the fixture, lamp, socket, LED module, or fixture lead is suspect. If there is no useful voltage at the cable, the fault is upstream between that point and the last working fixture.

4. Test under load, not only on an open cable
This is where many diagnoses go wrong. A loose or corroded connection may show voltage when no fixture is drawing power, then collapse when the fixture is connected. That is why a no-load reading can look better than the real operating condition.
Measure at the transformer, then measure at the first weak or dead fixture with the system connected and running when possible.
A small difference is expected. A large difference is evidence. If the transformer reads about 12–15 volts but the far fixture receives around 10.5 volts or less under load, the fixture may not operate reliably.
The deeper cause may be cable length, wire size, fixture load, poor connections, or a layout that pushes too much power through one run.
Voltage Drop in Outdoor Lighting Systems goes deeper, but the field decision is simple: low voltage at the fixture means delivery is the problem.
5. Inspect splices before blaming the light
Splices are one of the most underestimated failure points in low voltage path lighting. They sit close to soil, mulch, irrigation spray, fertilizer, freeze-thaw movement, and foot traffic. A connector that works in dry weather may fail after rain because moisture finally reaches the metal contact.
Look for green corrosion, blackened copper, cracked insulation, loose pierce-style connectors, and wires that pull out too easily. A fixture can look perfectly fine above ground while the splice below it has become the weak point.
If several fixtures fail near planting beds, irrigation heads, or low wet areas, Corroded Wire Splices Outdoors is often more relevant than another bulb replacement guide.
What the Symptoms Usually Mean
| Symptom | More likely cause | Less likely first guess | Best next test |
|---|---|---|---|
| All path lights are out | Transformer, timer, GFCI, outlet, main cable | Every fixture failed | Test outlet and transformer output |
| First lights work, later lights are dead | Broken cable or failed splice | Bad bulbs in every dead fixture | Test first dead fixture connection |
| End lights are dim | Voltage drop, undersized wire, long run | Dirty lenses only | Compare transformer voltage to end voltage |
| Lights fail after rain | Wet splice, damaged cable, GFCI trip | Random fixture age | Inspect low spots and connectors |
| Transformer shuts off after 10–20 minutes | Overload, short, water intrusion, protection trip | Normal timer behavior | Reduce load and inspect cable |
| One fixture is out | Failed lamp, socket, fixture lead, local splice | Bad transformer | Test local voltage or swap fixture |
Fixes That Actually Change the Outcome
Replace weak connectors with weather-rated splices
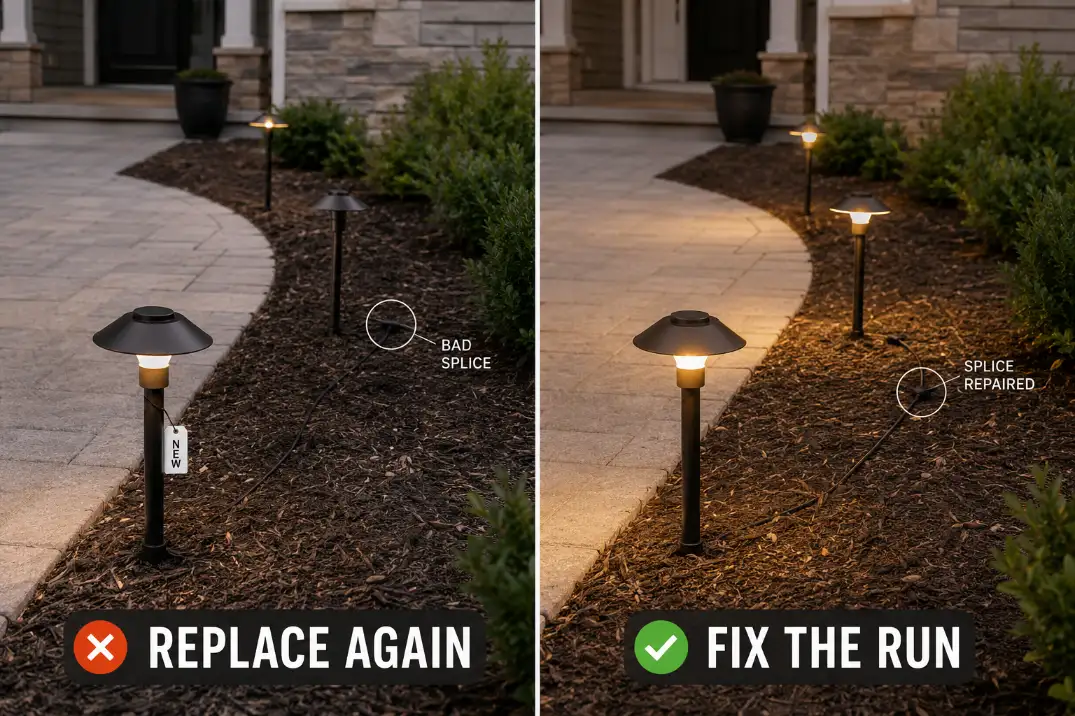
If a connector is wet, loose, corroded, or packed with soil, replacing the fixture will not solve the system. Cut back to clean copper, remake the connection with a proper outdoor-rated low voltage splice, and keep the connection out of the lowest wet spot when possible.
A twist-and-tape repair is not a permanent outdoor fix. Tape eventually traps water after the seal fails, especially in humid climates, irrigated beds, coastal areas, and northern states where freeze-thaw movement shifts soil and cable.
Check transformer load before adding brighter fixtures
Transformer capacity matters. A practical rule is to keep the total fixture wattage below about 80% of the transformer rating. On a 150-watt transformer, that means staying near 120 watts or less in normal use.
This does not mean every system above that line will immediately fail. It means the margin is gone. Long cable runs, small wire, aging splices, and wet conditions can turn a borderline system into a system that dims, flickers, or shuts off.
Reduce load or redesign the weak run
If voltage is low at the end of a long path, the fix may be layout-related. Splitting the run, using a hub-style layout, moving a fixture, reducing total wattage, or using heavier cable can matter more than installing new path lights.
Wire gauge is where many homeowners underestimate the system. A short, light run may tolerate smaller cable. A longer run with more fixtures may not.
If the system became unreliable after lights were added, What Wire Gauge Do You Need for Low Voltage Landscape Lighting? helps separate a fixture issue from a delivery issue.
Pro Tip: If the first fixture is strong and the last fixture is weak, do not judge the system by the transformer alone. Judge it by voltage at the fixture while the run is operating.
Stop resetting a GFCI that keeps tripping
A GFCI trip is not just an annoyance. It can indicate leakage current, water exposure, damaged cable, or a fault path near the outdoor power supply. One reset after a storm may restore operation. Repeated trips are different.
Low voltage fixture-side checks are not the same as opening the 120-volt side of a transformer or working inside a damaged outdoor receptacle.
If the GFCI trips repeatedly, if the transformer housing is damaged, or if water is present around the outlet or power connection, the standard homeowner fix stops making sense.
When Replacement Stops Making Sense
More than one fixture is dead
One failed fixture is plausible. Three dark fixtures in a row are evidence. When multiple path lights fail together, the shared cable, splice, branch, transformer, timer, or GFCI deserves priority.
The same area fails again
A repeat failure in the same 6–10 feet of walkway usually means the site condition is still attacking the system. Irrigation spray, mulch burial, edging tools, poor drainage, or soil movement may be damaging the same connection again.
Replacing parts without changing the exposure only resets the failure clock.
The last lights never match the first lights
If the first path lights are bright and the final fixtures are always weak, the system may be designed poorly for the cable length and load. Adding brighter fixtures can make that worse because the line has to carry more power.
This is where people often overestimate the fixture and underestimate the run. The light head is visible, so it gets blamed. The cable path is hidden, so it gets ignored.
Questions People Usually Ask
Why do the first path lights work but the rest do not?
That usually means the transformer is producing power, but power is being lost partway along the cable run. The most useful place to inspect is between the last working fixture and the first dead fixture.
Can low voltage lights test fine but still fail when turned on?
Yes. A weak splice or damaged cable can show voltage with no load, then drop too low when fixtures draw power. That is why under-load testing is more useful than a clean open-wire reading.
Should I use a higher voltage tap?
A higher voltage tap can help some long runs, but it is not a cure for bad splices, overloaded transformers, damaged cable, or poor layout. Fix connection and load problems before using tap voltage as a shortcut.
Should I replace the path lights or repair the system?
Replace a fixture when voltage reaches it properly and the lamp, socket, LED module, or fixture lead has failed. Repair the system when multiple lights fail together, the end of the run is dim, the GFCI trips, or the same area keeps failing after rain or yard work.
The fastest diagnosis is not “replace the bad-looking light.” It is finding where power stops. Once you know whether the failure begins at the transformer, timer, cable run, splice, voltage drop, or fixture, the repair becomes smaller, cheaper, and less likely to repeat.
For broader official electrical safety context, see the CPSC GFCI fact sheet.