
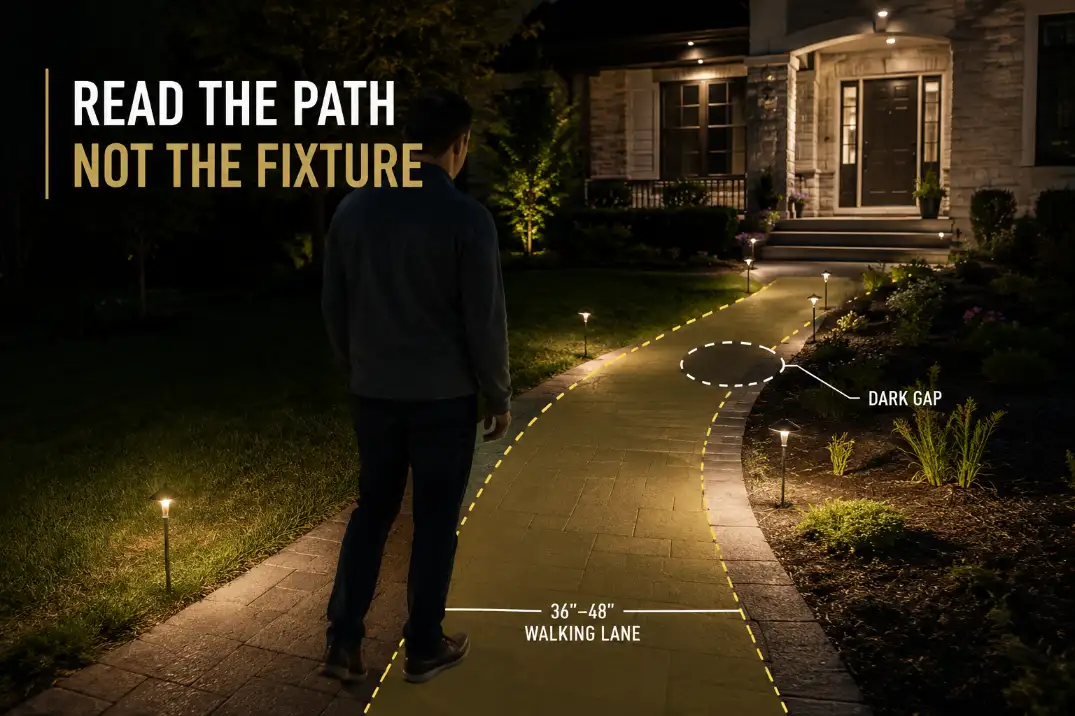
Walkway lights usually look uneven or unhelpful when the light pattern misses the 36–48 inch walking lane people actually use.
The first checks are not bulb brightness. They are overlap, fixture distance from the path edge, head height, and glare. If each light creates a 2–3 foot bright puddle but leaves a 4–6 foot dark gap, the problem is distribution.
If the fixture looks bright from the porch but the next step is hard to read while walking, glare is likely masking the surface.
A useful test is to inspect the path 20–30 minutes after full dark, when your eyes have adjusted and porch spill light is no longer helping. That separates a real pathway lighting problem from a temporary dusk impression.
A path light is unhelpful when it lights the fixture, mulch, or planting bed better than the next step.
Quick Diagnostic Checklist
Check the walking line, not the fixture line
The path should read as a continuous route from normal walking height. Stand at the beginning of the walkway and look 20–30 feet ahead. If the fixtures are visible but the walking surface is not, the lights are helping the landscape more than the person using the path.
A healthy layout does not need every inch equally bright. It does need enough overlap that the next step feels obvious.
For many residential path lights, 6–8 feet between fixtures is a reasonable starting range, but the correct spacing depends on beam width, mounting height, surface color, and curves.
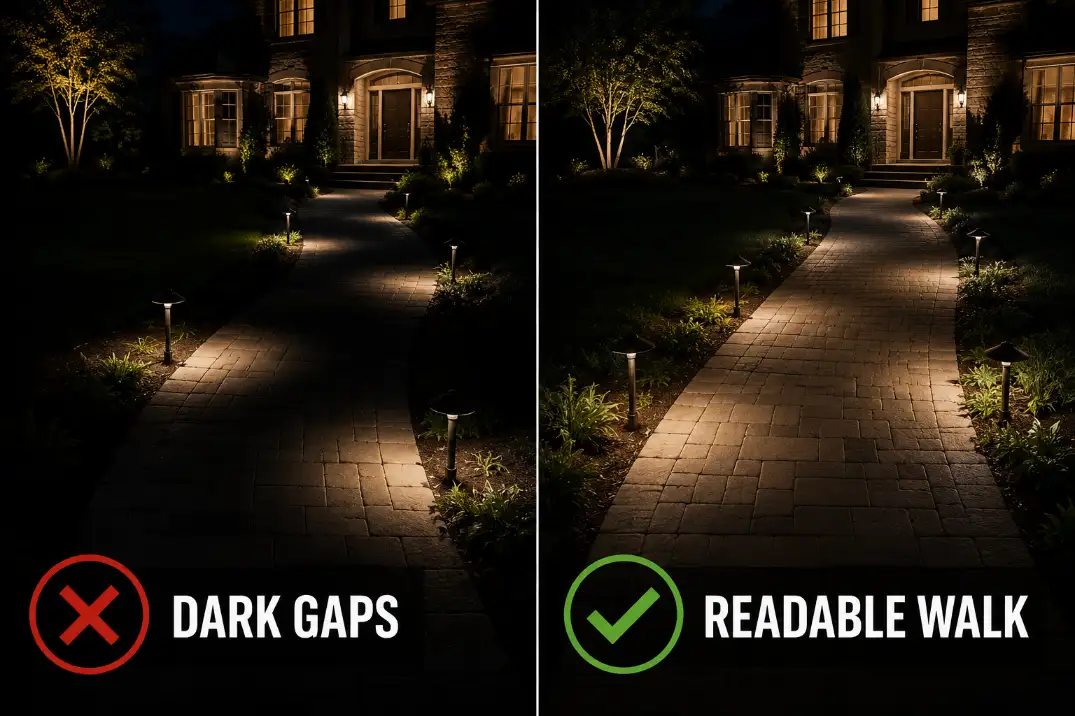
Look for bright pools and dead gaps
The classic failure pattern is a necklace of bright dots. Each fixture creates a pretty circle, but those circles never connect.
This is one of the most common patterns behind Outdoor Lights Bright Spots and Dark Gaps, especially along straight concrete walks where the fixtures were placed evenly during the day and never tested from walking height at night.
Cosmetic brightness is not the same as usable guidance. A light can look attractive in a product photo and still fail to define the edge of a real walkway.
Watch for glare at eye level
If you can see the LED source from 15–25 feet away, the fixture may be calling attention to itself instead of lighting the ground. That is a symptom. The mechanism is direct light reaching your eyes before it reaches the surface in a useful way.
Glare often makes homeowners overestimate how much light they have. The path feels “bright,” but the ground texture, step edge, or curve remains hard to read.
Why Walkway Lights Look Uneven
The light cones do not overlap
Most uneven pathway lighting starts with a spacing mistake. The installer spaces the fixtures by appearance during the day instead of by the nighttime light pattern.
A 10-foot gap might look neat on a plan, but if each fixture only throws useful light 3–4 feet along the path, the center goes dark.
The fix is not automatically “add more lights.” Sometimes one moved fixture repairs a gap better than two new fixtures. This is where Fix Poor Outdoor Light Placement matters more than buying a brighter lamp.
Pro Tip: Before adding fixtures, move one loose path light 12–18 inches closer to the walking edge and retest the gap after dark. Small shifts often change the pattern more than higher wattage.
The fixture is lighting mulch, not the path
Path lights are often placed too far into planting beds because they look cleaner there during the day. At night, that can send most of the useful light onto mulch, shrubs, or decorative stone while the walkway edge stays vague.
A practical starting point is usually 12–18 inches from the path edge, adjusted for the fixture head and beam spread. Too close can create a harsh stripe. Too far can make the walkway depend on reflected light from nearby surfaces.
The head height changes the light shape
Fixture height and shade shape decide how the light lands. A very short path light can create a tight, hard pool near the stem. A wider cap or slightly taller head can spread light more softly across the walking lane.
But a taller or exposed source can also create glare if the lamp is visible from the approach.
This is why a brighter bulb often disappoints. It does not change the geometry. It only makes the same small pool, exposed source, or off-path beam more intense.
The path changes direction, but the layout does not
Curves, steps, landings, and driveway crossings need more judgment than straight runs. Even spacing can fail at a bend because the user needs a visual cue before the direction changes, not after it.
A path that turns more than about 30 degrees should usually have a fixture or lighting cue near the decision point. Otherwise, the person walking sees a bright fixture behind the turn and a weak surface in front of it.
What People Usually Misread First
They blame low lumens too early
The most common wasted fix is replacing lamps with brighter ones. Brighter output can make glare and contrast worse if the fixture is aimed poorly or spaced badly. You get louder dots, not a clearer path.
For walkway lighting, useful light is usually low and controlled. Warm 2700K–3000K LEDs often feel more comfortable in residential paths than cooler, sharper-looking lamps.
But color temperature will not fix missing overlap. It only changes the feel of light that already lands in the right place.
They underestimate surface color
A pale concrete walk reflects more light than dark pavers, wet flagstone, or deep mulch beside a path. After rain, glossy surfaces can look brighter from one angle and less readable from another.
In coastal California or humid Florida yards, that wet-surface effect may show up often enough to matter.
This is why a walkway can look acceptable on a dry evening and unhelpful after irrigation or rain. The fixture did not change. The surface behavior changed.
They confuse glare with coverage
Glare makes a light feel powerful because your eye notices the source. Coverage means the ground is readable without staring at the fixture. Those are different outcomes.
If the fixture head is visible from the normal approach angle, the path may need shielding, a lower-output lamp, or a different head style.
A related issue appears in Why Outdoor Lights Create Glare, where the visible source becomes the problem even when the total amount of light seems high.
| What you see at night | More likely cause | Less useful first fix | Better first move |
|---|---|---|---|
| Bright circles with dark spaces | Fixture spacing or beam spread mismatch | Brighter bulbs | Shift spacing and retest overlap |
| Light looks bright but path still feels unclear | Glare from exposed source | More fixtures | Shield, lower output, or change head angle |
| First few feet of the walkway feel dark | First fixture starts too far inside the run | Adding light in the middle | Move the first cue closer to the entry |
| Curves or steps disappear | Missing cue at decision point | Equal spacing everywhere | Add or move light near the turn |
| Last few lights are noticeably dim | Voltage drop on long run | Re-aiming every fixture | Measure voltage near the far fixture |
When Power Is Actually the Problem
Placement is more likely than voltage drop
For a short walkway with three to six modern LED path lights, uneven appearance is usually layout, glare, or fixture selection. Voltage drop becomes more suspicious when the run is long, the far fixtures are consistently dimmer, or several lights fade in the same direction away from the transformer.
On a 12-volt low-voltage system, voltage drop is worth checking when the far fixture reads near the lower end of the lamp’s rated input range or is clearly lower than similar fixtures closer to the transformer.
As a practical field flag, readings around 10.8 volts or lower at the far end deserve closer inspection, but the exact point where output changes depends on the lamp and driver.
If the dimming follows the cable route rather than the path shape, Voltage Drop in Outdoor Lighting Systems is more relevant than another round of fixture repositioning.
Moisture and connections create intermittent unevenness
A layout problem looks the same every dry night. A connection problem may change after rain, irrigation, freezing weather, or soil movement.
In northern states, freeze-thaw movement can loosen shallow fixtures or stress connections over a winter. In sprinkler-heavy yards, one wet splice can make a section flicker or fade unpredictably.
Use this as the decision rule: if the same dark gap appears every night, suspect layout first. If the weak area changes after weather or watering, inspect power and connections before redesigning the path.
Fix Pathway Lights in the Right Order
Start with a night walk, not a shopping list
Walk the path in both directions after full dark. Do not judge from the porch, driveway, or street. The goal is to see whether the next 2–3 steps are readable without looking directly at the fixtures.
Mark the bad spots with painter’s tape, small flags, or chalk. A gap that looks obvious in memory often shifts when you test it from walking height.
This simple 10-minute check prevents the most common mistake: buying extra lights for the wrong location.
Test the entrance, exit, and turns
Do not center the first light too far inside the run. If the first visible pool starts 4–5 feet after the walkway begins, the entry still feels dark even when the middle looks balanced.
The same thing happens at the far end when the last cue dies before the porch, driveway, gate, or step.
Turns need the same logic. The light should help the person read the decision point, not simply decorate the curve after they have already reached it.
Adjust spacing before increasing output
Move one or two fixtures before changing bulbs. Along straight walks, test whether a 1–2 foot spacing change improves overlap.
At bends, move the cue closer to where the direction changes. Near steps, the riser or landing edge matters more than perfect fixture rhythm.
Before trenching or reburying cable, test new positions with temporary stakes or loose fixtures for one full night. If the path reads better from both directions, then make the layout permanent.
This is also where Outdoor Lights Don’t Reach Far Enough becomes useful, because reach is often a distribution issue rather than a raw brightness issue.
Reduce glare before adding brightness
If a fixture shines into the eye, solve that before increasing output. A lower-lumen lamp, frosted lens, shielded cap, or different head angle may make the path feel clearer even though the fixture is technically dimmer.
This is the point where a routine fix stops making sense: if two rounds of brighter lamps still leave the same dark gaps, brightness is no longer the lever. The layout or fixture type is wrong.
Pro Tip: Test one shielded or lower-output lamp in the glariest fixture before replacing the whole run. If the path becomes easier to read, the problem was contrast, not weakness.
What Changes Under Real Yard Conditions
Plant growth narrows the beam
Small shrubs and ornamental grasses can block low path lights within one growing season. A fixture that worked in spring may be partially buried by late summer. Even 6–8 inches of plant growth around the head can interrupt the beam enough to create a dark patch.
This is easy to underestimate because the plants look attractive during the day. At night, the same planting can act like a shade.
Slopes and raised beds tilt the pattern
A 4–6 inch grade change beside a walkway can make a low fixture aim above the path or into the edge instead of across it. On sloped front walks, the uphill side and downhill side often need different placement.
Matching the fixture spacing too perfectly can make the lighting look orderly but perform badly.
Too much contrast makes the path feel less safe
A path can be both overlit and under-helpful. Sharp bright spots make the dark areas feel darker by comparison.
This is why Outdoor Lights Too Bright or Too Dark is often the same problem seen from two angles: the eye is being forced to adapt to extremes instead of reading a calm route.
The healthier condition is not maximum brightness. It is lower contrast, controlled glare, and enough continuous surface visibility to make the next step obvious.
Questions People Usually Ask
Should pathway lights be staggered or placed across from each other?
Staggering usually looks more natural and avoids a runway effect, but it only works if the light still reaches the walking surface. Opposite pairs can help near steps, wide entries, or formal walks.
The better choice is the one that connects the path, not the one that looks symmetrical in daylight.
How far apart should walkway lights be?
Many residential path lights land somewhere around 6–8 feet apart, but that is only a starting range. Narrow beam fixtures may need tighter spacing. Wider, softer fixtures may work farther apart.
Curves, dark pavers, steps, and dense planting usually require closer judgment than a straight concrete path.
Are solar pathway lights more likely to look uneven?
Yes, especially when sun exposure varies along the path. One light may get 6 hours of direct sun while another gets 2–3 hours under a tree or roof edge. That creates uneven runtime and output even if the fixtures are spaced well.
When should the whole pathway lighting layout be redesigned?
Redesign makes sense when the path has repeated dark gaps, glare from several fixtures, poor cues at turns, and weak performance after spacing adjustments.
If more than about one-third of the fixtures need moving or shielding, small fixes may cost more time than resetting the layout properly.
For broader responsible-lighting principles, see the DarkSky and IES Five Principles for Responsible Outdoor Lighting.