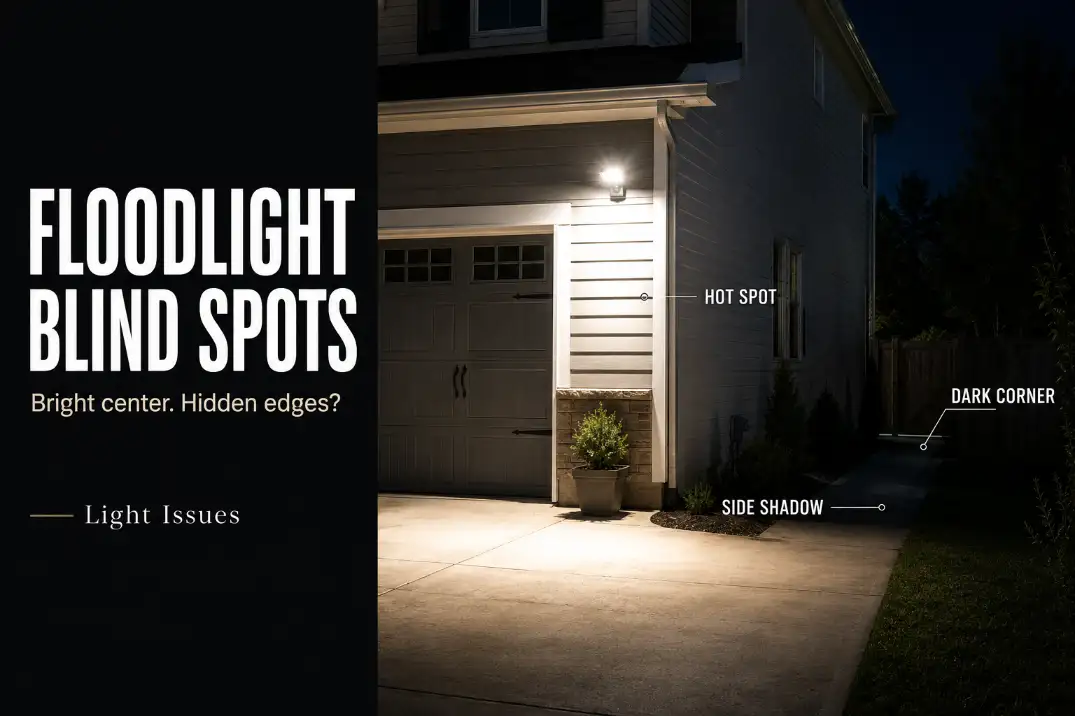
Floodlights create blind spots when the brightest part of the beam makes the rest of the yard harder to read. The usual pattern is not “not enough light.” It is a bright center, a blocked side shadow, or a corner the beam never reaches cleanly.
Start by checking where the beam lands, what objects interrupt it, and whether gates, steps, parked-car edges, or side doors remain readable after 5–10 minutes of eye adjustment.
This differs from a dim floodlight. A dim fixture leaves the whole area weak. A blind-spot floodlight creates contrast: the driveway, wall, or ground under the fixture looks bright, while the side path 25–40 feet away becomes harder to interpret.
If a latch, step edge, person, pet, or package disappears for more than 2–3 seconds while moving through the lit area, the issue is coverage quality, not just brightness.
Hot Spot Problem
The bright patch is the symptom
A floodlight hot spot usually forms when the beam lands too close to the garage door, wall, driveway surface, or ground directly below the fixture. That bright patch can look reassuring from inside the house, but it often says more about where the light is wasted than where the yard is protected.
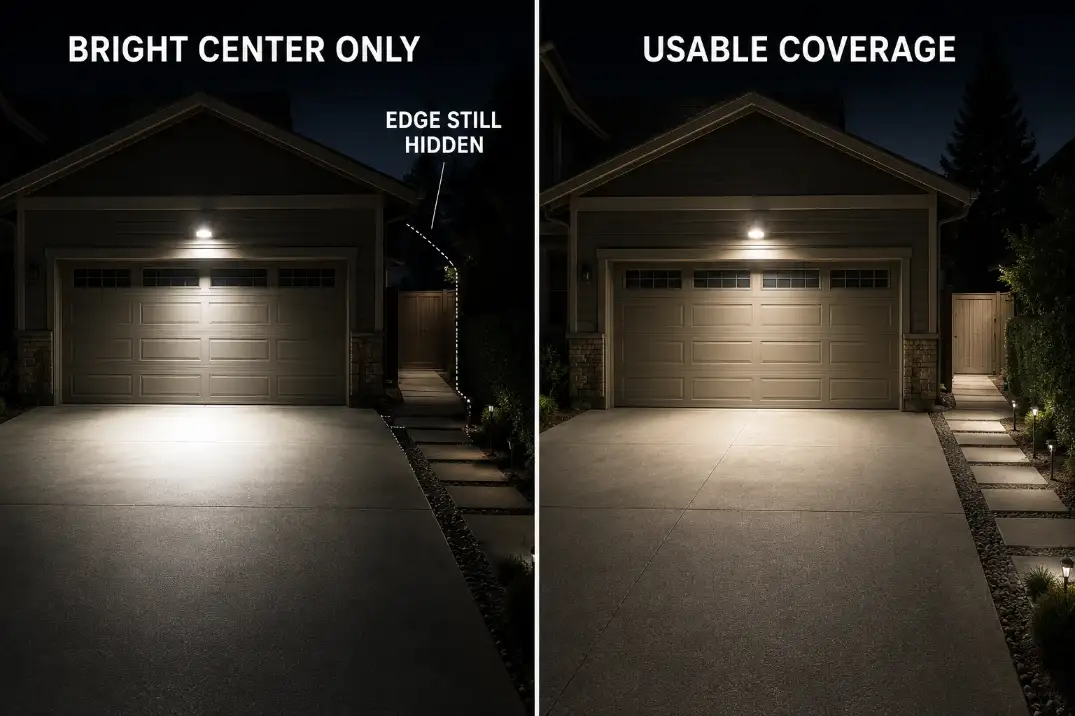
The useful target is rarely the brightest 8-foot circle under the fixture. It is the side gate, walking route, trash-bin path, car edge, patio step, shed approach, or back-door landing. When the floodlight overpowers the center and neglects those edges, visibility becomes uneven even though the fixture looks strong.
This is why replacing a working floodlight with a higher-lumen model often disappoints. If the beam geometry is wrong, more output usually makes the center harsher before it makes the dark edge safer.
The same problem shows up in Why Brighter Outdoor Lights Make Visibility Worse, where extra brightness can reduce practical nighttime awareness.
Four blind spots to separate first
Not every floodlight blind spot has the same cause. Sorting the type first keeps you from fixing the wrong thing.
| Blind Spot Type | What It Looks Like | More Likely Cause | Better First Move |
|---|---|---|---|
| Glare blind spot | Bright source pulls your eye away from the target | Fixture aimed too high or too outward | Aim downward or shield the beam |
| Object shadow | Dark pocket behind car, bin, column, or shrub | One-direction beam blocked by an object | Add cross-lighting or move the blocker |
| Corner blind spot | Gate, side yard, or wall return stays black | Beam cannot wrap around geometry | Add a separate targeted light |
| Wide-beam washout | Yard looks bright but edges stay vague | Beam spread is too broad and uncontrolled | Use lower-glare, better-aimed coverage |
| Camera washout | Security footage shows a white patch and dark approach | Hot spot sits near camera view | Move light off camera axis or shield it |
A practical threshold: if the center feels roughly 4–5 times brighter than the nearby edge to the naked eye, the light is probably creating a contrast problem.
You do not need a light meter to notice it. Squint slightly and see whether the gate, step, or side path disappears once your eye is pulled to the bright center.
Side Shadows
Normal objects create the hidden zone
Side shadows are easy to miss because they are caused by ordinary yard objects. A parked SUV, trash bins, porch column, grill, fence post, hedge, or raised planter can block part of the beam and create a pocket behind it. The floodlight is still working, but the object has become a shadow shield.
This matters most near movement zones. A shadow behind a planter in unused lawn may not matter. A shadow that lands on a gate latch, driveway edge, step, or side path does. If the shadow is 6–10 feet long and sits where someone walks, parks, reaches, or unlocks something, it is a real coverage failure.
Test from the route, not the window
Do the test after full dark, not at dusk. Walk the actual route someone uses: driveway to side gate, garage to trash bins, patio to shed, or back door to steps. Keep your eyes at normal standing height, about 5–6 feet above the ground.
If your own body, vehicle, bin, or column casts a deep shadow across the target area, the floodlight is too one-directional for that job.
This is also where glare becomes part of the blind spot. If the fixture shines toward your eyes before it lights the route, your pupils react to the bright source and surrounding detail drops out.
Why Outdoor Lights Create Glare explains that failure pattern more directly, especially when the bulb or LED face is visible from normal walking positions.
Aim Check: If the floodlight makes you look away before you can read the ground, the problem is not lack of attention. The light is fighting the viewer.
Dark Corners
Corners fail before open pavement
Floodlights usually cover open pavement better than corners. Fence returns, recessed side doors, garage alcoves, porch pockets, and narrow service paths often stay dark because the beam spreads across the front surface and never wraps around the edge.
That is why a yard can look lit from the street while the exact place you need to check remains hidden. A dark corner within 3 feet of a gate latch, step edge, side door, meter, or storage zone deserves more attention than a dim patch in the middle of unused lawn.
The strongest clue is consistency. If the same corner stays dark no matter how long the light runs, and the rest of the area looks bright, you are probably dealing with geometry rather than weak output.
This broader uneven-lighting pattern is covered in Outdoor Lights With Bright Spots and Dark Gaps.
The flashlight test saves wasted upgrades
Use a small flashlight as a diagnostic tool. Stand near the floodlight location and sweep the flashlight slowly across the yard. Any area the beam cannot reach cleanly from that position is unlikely to be fixed by a stronger floodlight head in the same spot.
This is where many repairs waste time. Replacing bulbs, increasing wattage, or buying a wider fixture does not fix a corner hidden behind a wall return, parked vehicle, fence bend, or shrub mass.
The beam path is blocked. The better fix is a second lower-output light, a different mounting position, or a more controlled aiming angle.
Security cameras add another version of this problem. A floodlight can make camera footage worse when the brightest patch sits close to the camera’s view and washes out the darker approach area.
If the video shows a white driveway center but loses faces, plates, or movement near the edge, the light is overpowering the image instead of helping it.
Wrong Height
Height is less important than beam path
Mounting height is one of the most overestimated floodlight fixes. Higher placement may throw light farther, but it can also flatten detail, lengthen shadows under objects, and aim glare across the yard.
For many residential wall-mounted floodlights, the most usable range is often around 8–12 feet above the ground. Above 15–20 feet, the fixture needs careful aiming or it may skip the near target area and light the far pavement instead.
The real question is not “How high is the light?” It is “Where does the beam land before it reaches eye level?” A high light aimed correctly can work. A lower light aimed straight outward can still create glare and dark edges.
Flat aim creates a false sense of reach
A useful floodlight is usually aimed downward, not outward. As a rough starting range, many problem fixtures improve when the heads are aimed about 30–45 degrees below horizontal instead of straight across the yard.
The exact angle depends on mounting height, beam spread, and distance, so treat that range as a field adjustment starting point, not a rule.
The beam should land on the walking zone, gate approach, driveway edge, or step area before it reaches someone’s eyes. If adjusting the head makes the center less dramatic but the edges easier to read, that is usually an improvement.
For a more focused aiming guide, How to Aim Outdoor Security Lights is the next logical reference when the fixture still works but the coverage feels wrong.
Wide Beam Mistakes
Wide Spreads Light, Not Useful Coverage
A wide beam sounds like the obvious cure for blind spots. In practice, it often spreads the same problem across more surfaces. The fixture still has one mounting point, one direction, and one set of blockers.
If the side gate is hidden behind a wall return, or the trash-bin path sits behind a parked vehicle, a wider beam may brighten the driveway while leaving the useful target vague.
Wide beams also create more reflected glare on pale concrete, white garage doors, vinyl fencing, light stucco, and glossy painted trim. The center looks brighter because those surfaces bounce light back toward the viewer.
Dark mulch, recessed steps, side gates, and fence pockets still absorb the weak edge of the beam.
One fixture cannot always do two jobs
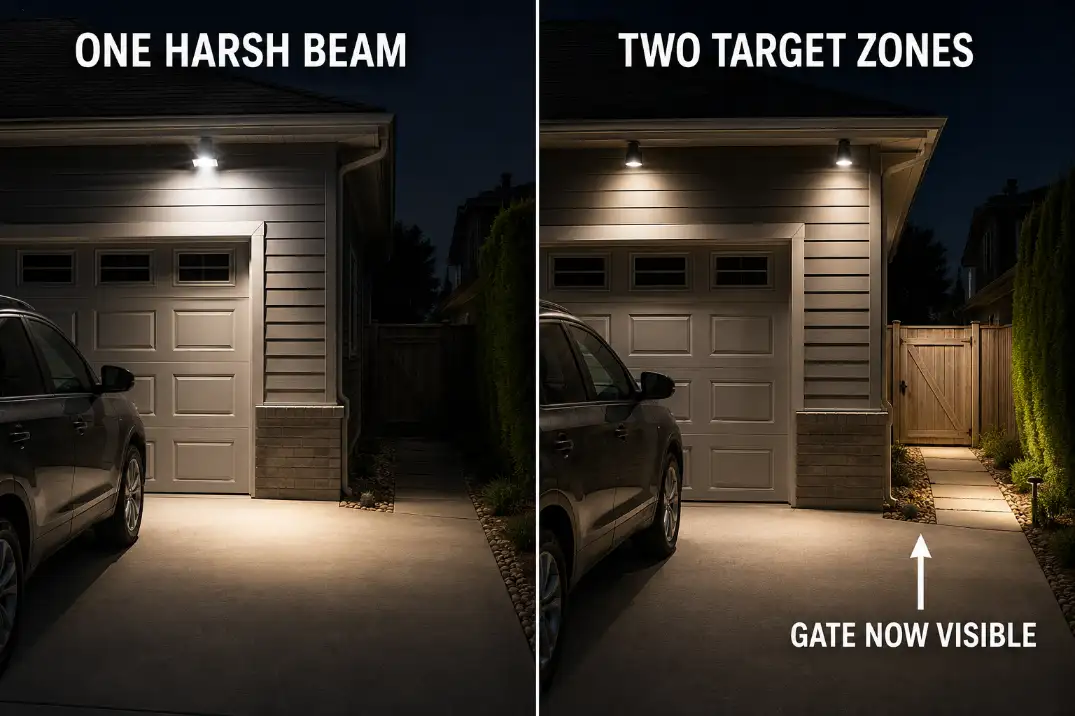
A wide floodlight stops making sense when one fixture is being asked to cover two separate zones: a driveway and a side gate, a patio and a service path, a back door and a detached shed, or a garage approach and a side-yard corner.
Once those areas are separated by a corner, parked car, fence return, or more than about 35–40 feet of usable distance, one large floodlight becomes a compromise.
In that situation, two lower-glare lights aimed at two real target zones usually beat one oversized floodlight. The yard may look less dramatic from a distance, but the actual route becomes easier to read.
When shopping for a replacement, Best Low-Glare Outdoor Security Lights is more useful than comparing fixtures by lumen count alone.
Better Coverage
First adjust, then split, then replace
Better floodlight coverage starts with movement, not square footage. Decide what must be visible first: side gate, driveway edge, trash-bin path, patio step, back door, car-side walkway, or garage approach. Then judge the fixture by those targets, not by the brightest patch it creates.
Use this order before buying a stronger fixture:
- Adjust if the target area is close but the beam lands too high, too flat, or too near the wall.
- Split the lighting if one fixture is trying to cover two separated zones.
- Replace the fixture if it cannot light the target without shining into eyes, windows, cameras, or neighboring property.
That last point is the boundary where routine adjustment stops making sense. If every useful aim creates glare, the fixture is doing the wrong job. You need a different position, a shielded design, or a more controlled beam pattern.
The quick blind-spot checklist
Use this after full dark, not during dusk:
- Stand outside for 5–10 minutes before judging the yard.
- Walk the normal route and pause at gates, steps, and parked-car edges.
- Look for shadows longer than 6 feet behind common objects.
- Check whether the fixture shines into your eyes before lighting the target.
- Compare the edge zone with the center; if the center dominates, coverage is uneven.
- Review camera footage for white hot spots and lost edge detail.
- Move one object, such as a bin or planter, and see whether the blind spot changes.
Add light only where the geometry needs it
The best fix is often smaller and more targeted than expected. Re-aim the existing heads first. If that does not reveal the hidden route, split the job.
A lower-output wall light near the side gate, a downward-facing fixture near steps, or a second shielded floodlight from another angle can solve the blind spot without making the whole yard harsher.
For homes where security lighting has become harsh, neighbor-facing, or difficult to walk under, Outdoor Security Lights Without Glare gives a cleaner path toward controlled coverage.
The final night check
After any adjustment, test from three positions: inside looking out, the normal walking route, and the darkest edge. Wait at least 15 minutes after sunset because dusk hides contrast problems. Walk slowly and check whether steps, latches, side paths, and parked-car edges are easier to read.
The best floodlight setup is not the one that makes the yard look brightest. It is the one that removes hidden pockets without creating a glare source your eyes, camera, or neighbors have to fight.
For broader official guidance on efficient outdoor lighting design, see the U.S. Department of Energy’s lighting design guide.