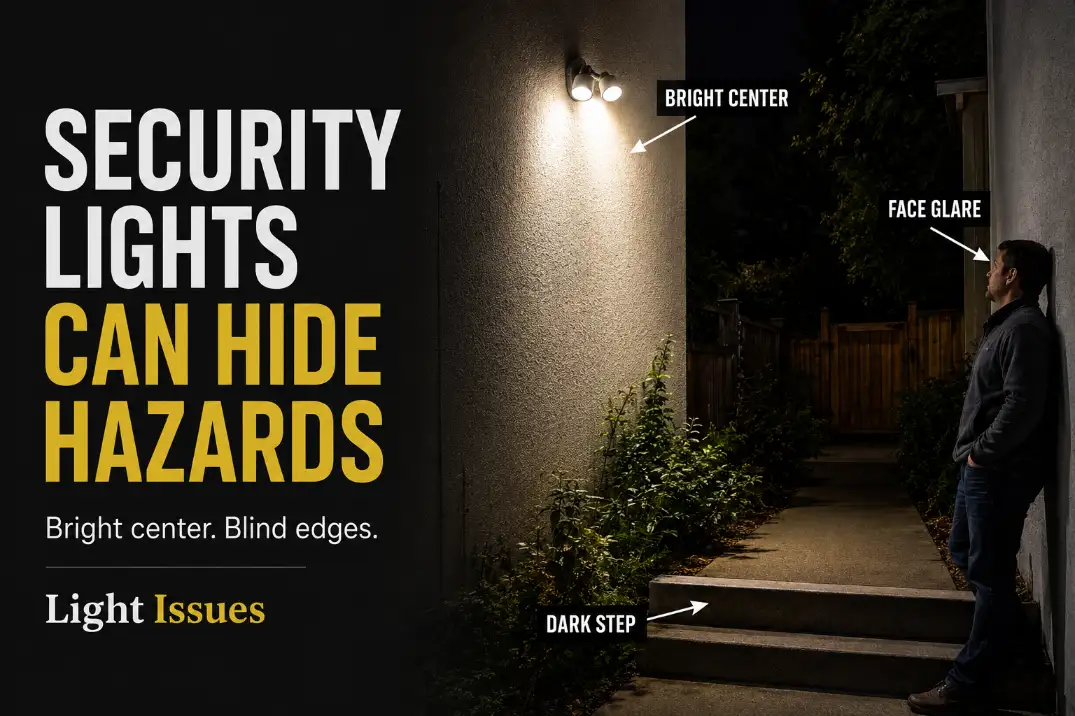
Security lights make a yard less safe when they create contrast shock instead of usable visibility. The usual problem is not a failed fixture or a weak bulb. It is a bright center patch, a visible bare lamp, and a dark edge exactly where someone has to step, turn, unlock a gate, or recognize a person.
Before buying a stronger floodlight, check the light from three places: the approach route from 20 to 30 feet away, the step or threshold from 8 to 12 feet away, and normal eye height near the fixture.
If you can see the lamp face directly from about 5 to 6 feet above the ground, or your eyes need 10 to 20 seconds to recover after looking near it, the light is already working against safety.
That is different from a yard that is simply underlit. An underlit yard needs more usable coverage. A poorly lit security zone usually needs less glare, lower aim, better shielding, and light placed on the actual route.
Too Much Brightness
The bright center is often the wrong target
The first mistake is overvaluing the brightest part of the yard. A 2,000- to 3,000-lumen dual-head security light can make siding, fencing, or the middle of a driveway look fully exposed while the walking line still fails. That is why a yard can look secure from a kitchen window and still feel harsh, uneven, and harder to move through outside.
The useful test is not “Can I see light?” It is “Can someone see the next 10 to 15 feet of movement without looking into the fixture?” If the answer is no, more brightness may only enlarge the hot spot.
A stronger bulb is often the wasted fix. If the beam is aimed too high or too far outward, extra output makes the glare stronger while the step, latch, or side path remains poorly defined.
That is the same visibility trap behind Brighter Outdoor Lights Can Make Visibility Worse: the yard looks brighter, but the useful detail does not improve.
Check the light from the route, not the switch
Many homeowners judge security lights from indoors because that is where the switch, app, or camera feed is. That view is misleading. From inside, the bright patch looks wide. From the approach path, the same fixture may sit directly in the eyes.
Stand where a visitor, delivery driver, child, or guest would actually move. Walk from the driveway, sidewalk, gate, patio edge, or trash-bin route. If the fixture feels impressive from the window but uncomfortable from the path, it is aimed for appearance rather than safe movement.
Dark Edges
The beam edge is where decisions happen
Dark edges are easy to underestimate because they sit outside the brightest part of the scene. But that is where real movement decisions happen.
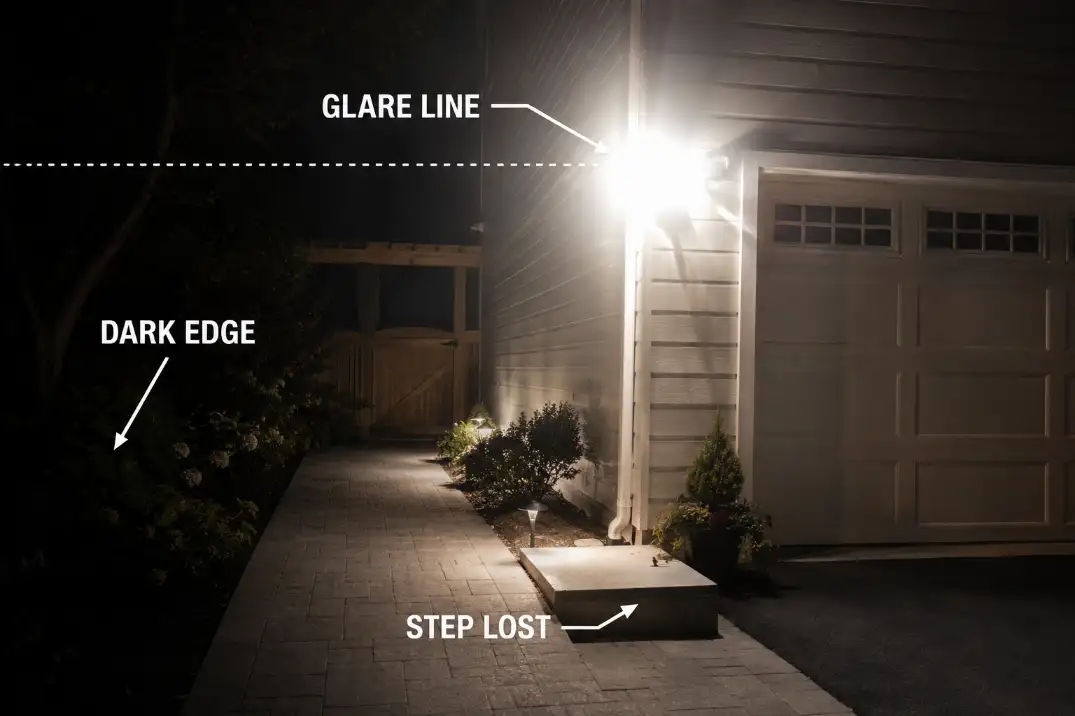
A person turns at the driveway edge, reaches for the gate latch, steps down from a patio, avoids a hose, or moves around a parked car. If the beam ends at that point, the light creates a bright island with a blind border.
A safer layout gives the route a softer transition. The light does not need to flood the whole lawn. It should reach about 3 to 5 feet beyond the active walking line so the edge of the beam does not land exactly at a turn, threshold, or step.
The symptom is the dark patch. The mechanism is poor beam transition. Adding another bright floodlight across the yard may create a second glare source without fixing the gap.
In many layouts, the better move is to lower the aim, narrow the hot spot, or add a lower route layer where the walking line actually falls, which is also the core problem in Outdoor Lights Leave Bright Spots and Dark Gaps.
A bright yard can still have a failed route
A route fails when someone has to enter darkness before reaching the next decision point. That can happen even if the lawn, fence, or wall is bright. Watch for these failure signs:
- The driveway is bright, but the walkway turn is dark.
- The door area is bright, but the step edge disappears.
- The camera sees motion, but faces become silhouettes.
- The gate is visible, but the latch area is in shadow.
- The beam ends before the route ends.
One weak edge may be acceptable in a low-use corner. Two or three weak edges along the main route usually mean the security light is not doing the job people assume it is doing.
Face Glare
If the lamp is the first thing you see, it is aimed wrong
Face glare is one of the fastest ways for a security light to lose its purpose. If the beam points outward at head height, the person entering the yard sees the fixture before they see the space.
Their eyes adjust to the lamp, not to the ground, face, step, or object they need to read.
This is where color temperature gets overestimated. A warmer 2700K to 3000K lamp may feel less sharp than a cool white lamp, but it does not fix direct glare. If the bare source is still visible from the path, the problem remains.
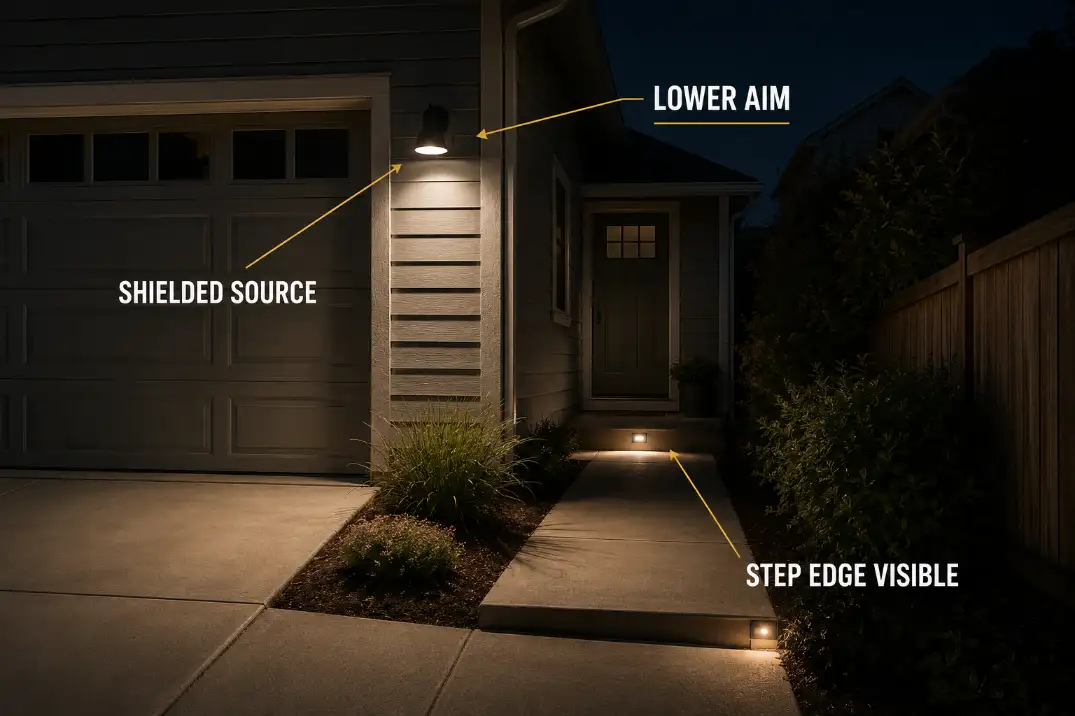
The priority is shielding and downward aim. The beam should land on the approach area, door zone, gate latch, driveway edge, or step — not into a person’s eyes. If you are trying to separate harshness from fixture direction, Why Outdoor Lights Create Glare is the better diagnostic path than simply shopping for a softer bulb.
Cameras can lose detail before people notice
A security light can help a camera in one direction and hurt it in another. The fixture may reveal motion in the yard but also throw flare across the lens, especially when the light sits close to the camera or points across its view.
The recording may show that someone moved through the scene, but clothing color, hand position, face detail, or direction of travel becomes hard to read.
That is not a camera failure first. It is usually a light-position problem. The better setup lights the person’s path from a slight angle while keeping the brightest part of the beam out of the camera’s direct line. For camera zones, a controlled lower-output light often beats a high-output floodlight pointed across the lens.
Hidden Steps
Steps need edge definition before the foot arrives
Steps become unsafe when the surface is bright but the edge is not readable. This happens near garage entries, deck stairs, back doors, side-yard thresholds, and raised patio edges.
A wall light above the door may brighten the landing while leaving the riser and step nose in shadow. From a distance, the area looks lit. At the moment of movement, the level change is vague.
A safer step zone gives definition before and after the change in height. The edge should be readable before your foot reaches it, not only once you are standing over it. As a practical check, the light should reveal at least 1 to 2 feet before the step and 1 to 2 feet beyond it.
Timing matters too. Motion lights that shut off too quickly can create a second problem. In many home yards, 60 to 120 seconds is more useful than a short burst that turns off while someone is unlocking a door, carrying groceries, helping a child, or moving slowly across a wet walkway.
If the main risk is walking safety rather than broad yard coverage, a lower path or step layer often works better than another floodlight, especially in situations like those covered in Path Lights and Walkway Safety.
Wet and dark surfaces raise the risk
Dark pavers, wet concrete, black mulch edges, and shadowed deck boards can hide level changes even when the fixture is bright.
This is common after rain in humid climates, near irrigation zones, and during winter evenings when surfaces stay damp longer. A wet step may reflect the floodlight while still hiding the edge line.
Do not judge the setup only on a dry clear night. Check it after rain or sprinkler use if that is when people actually walk through the area. A light that barely works on a dry surface often fails when the surface turns glossy.
Bad Beam Spread
One floodlight is often asked to do too many jobs
Bad beam spread is not always obvious because the light appears to cover a large area. The problem is where that coverage lands. One head may light the driveway. The other may light the fence. Meanwhile, the gate latch, side step, camera zone, and first walking turn remain weak.
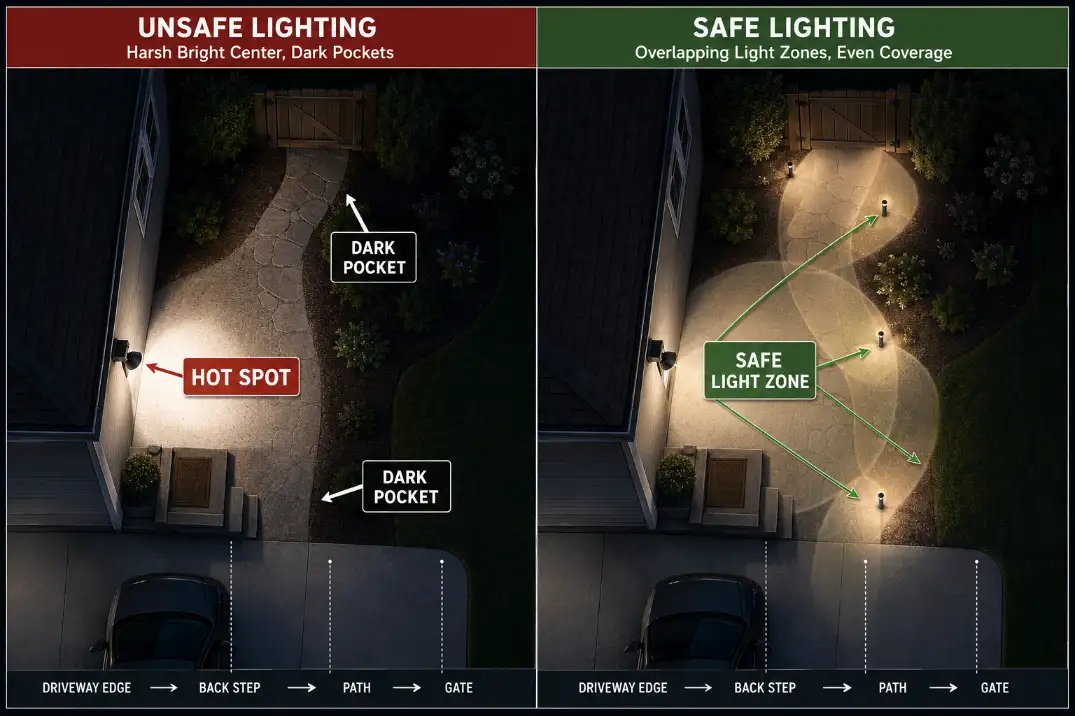
The common overreach is expecting one high fixture to handle deterrence, walking safety, face recognition, and camera support at the same time. Those jobs do not always want the same angle. A deterrent light may throw wide.
A walking route needs controlled ground visibility. A camera needs usable contrast without lens flare. When one fixture tries to do all three, glare usually wins.
Aim by walking the route, not by standing under the fixture. Start 30 feet out if the yard allows it, then check again around 20 feet and 10 feet. The light should reveal the route before the person reaches the hazard.
If the sensor triggers only when someone is already at the step or door, the beam may still be too late even if it is bright.
The point where routine adjustment stops making sense is when every aim position creates either glare or a missed route. That usually means the fixture is in the wrong location, the beam pattern is wrong for the yard, or one floodlight is being asked to solve a zone problem.
For fixture direction, Where to Aim Outdoor Security Lights is more useful than choosing a stronger replacement first.
Better Light Zones
Fix the zones in the right order
Better security lighting starts with zones, not maximum output. The first zones are usually the driveway-to-door route, the gate area, the step or threshold, and the face-recognition area near the entry. The lawn center, upper fence, blank siding, and far corners matter less unless they support one of those active decisions.
Use this fix order before replacing everything:
- Aim the beam lower so the light lands on the route.
- Shield the bare source so people do not see the lamp directly.
- Reduce output if the hot spot overpowers nearby detail.
- Add a low path or step layer where the route still fails.
- Replace the fixture only when aim, shielding, and output control cannot solve the scene.
A good security zone feels calmer than a harsh one. You can see the next step, read a person’s approach, and move through the space without squinting into the fixture.
| Problem signal | What it usually means | Better fix |
|---|---|---|
| Bright wall but dark ground | Beam is aimed too high | Lower the aim or choose a shielded fixture |
| Bare lamp visible from the route | Glare is reducing visibility | Shield the source or change fixture position |
| Step edge disappears | Light is coming from the wrong angle | Add low step or path lighting |
| Camera shows white flare | Beam crosses the lens view | Aim away from the camera line |
| Bright center with black edges | Beam spread misses the route | Create overlapping lower light zones |
Replace only when control is impossible
Replacement makes sense when the fixture has no shielding, the heads cannot aim low enough, the output cannot be reduced, or the beam pattern is too wide for a small yard. A fixture that only works when pointed into someone’s eyes is not a security upgrade.
For most homes, the strongest fix is controlled light aimed at the route, with enough overlap to remove dark edges and enough shielding to keep the lamp out of direct view.
That is the difference between a yard that looks lit and a yard that is actually easier to move through, recognize, and use after dark.
If the fixture itself cannot be aimed, shielded, or softened well enough, Best Low-Glare Outdoor Security Lights is the cleaner next step before buying another high-output floodlight.
For broader guidance on reducing glare, light trespass, and over-lighting, see DarkSky International’s values-centered outdoor lighting guide.