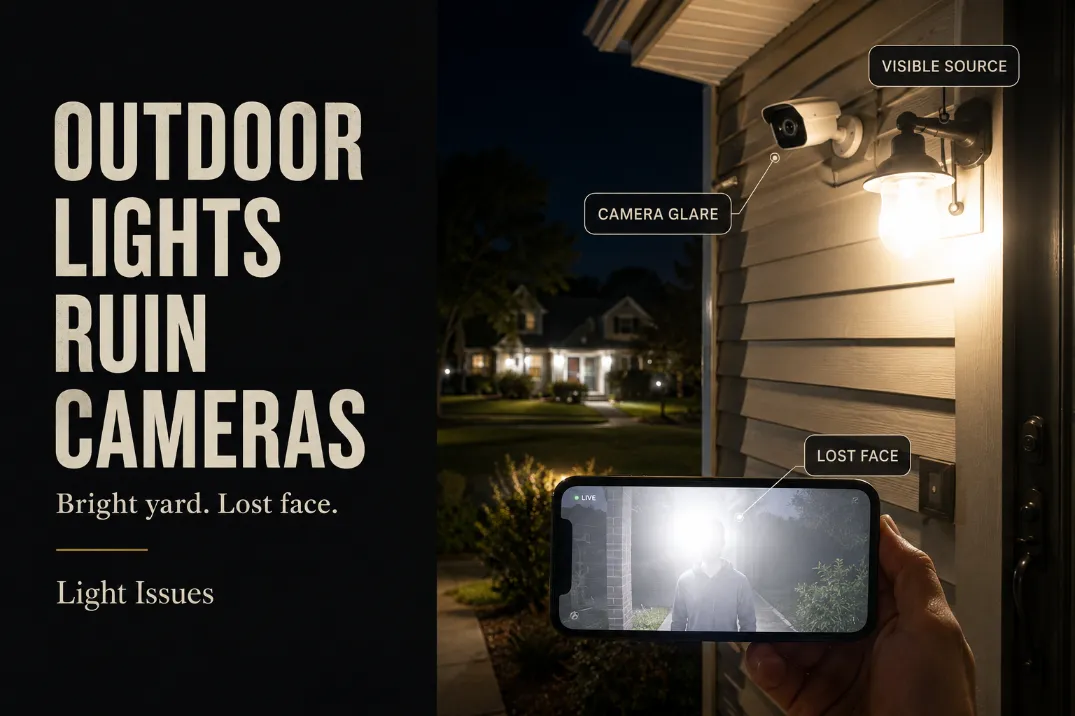
Outdoor lights usually ruin security camera footage for one of four reasons: the fixture is visible to the lens, a nearby wall reflects too much light, the person is backlit, or the light turns on after the useful part of the event has already happened.
The yard can look bright while the recording loses the only detail that matters: a readable face, clothing color, package handoff, or vehicle area at 10–20 feet.
The first check is not camera resolution. Review a saved nighttime clip and ask whether detail holds for at least 2–3 seconds as someone walks through the recognition zone.
If the clip turns white, streaky, hazy, or shadow-heavy after the light activates, the problem is usually lighting geometry. Camera settings help only after glare, reflection, infrared bounce, and motion timing are under control.
Blown-Out Footage
Brightness is not the same as usable evidence
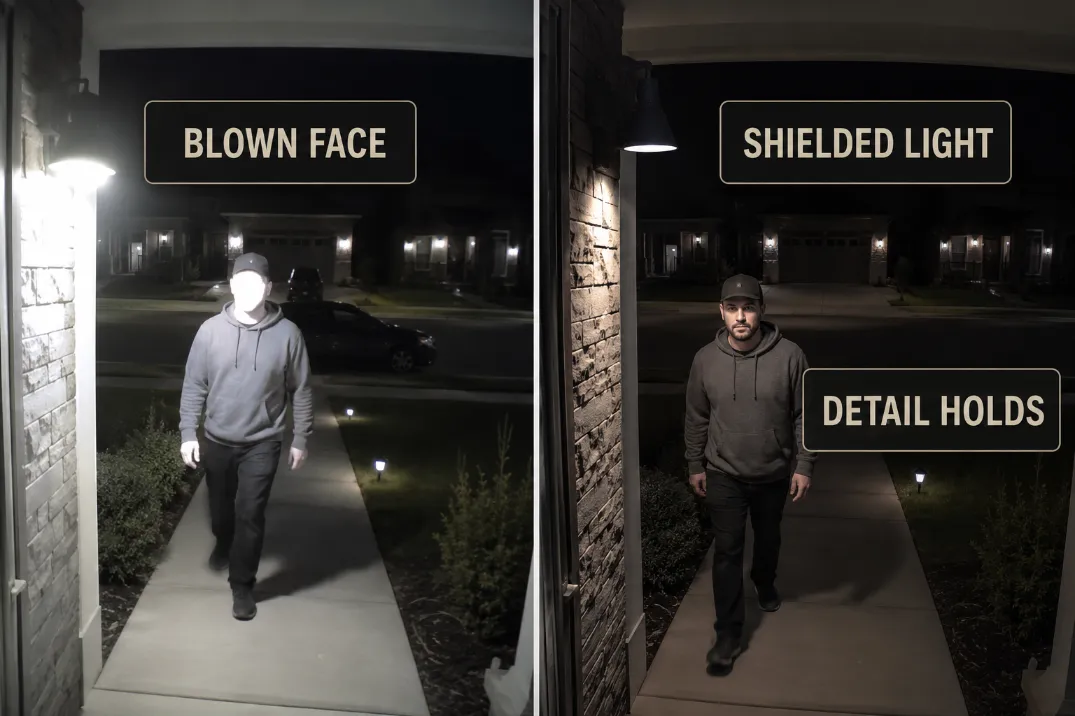
Blown-out footage happens when the camera exposes for the brightest part of the scene instead of the person or target area. A porch, driveway, or side gate may look well lit to your eyes, but the recording may flatten a face into a pale patch with no texture.
The difference is simple: healthy footage can contain bright areas and still preserve detail in skin, clothing, door hardware, and the ground.
Failing footage has one bright zone that controls the whole frame. Once that happens, adding a brighter bulb often makes the footage worse, not better.
This is why “more security light” is a common wasted fix. If the camera is already reacting to a hotspot, more output can force the exposure lower and make everything outside the hotspot darker.
The same visibility trap appears in Brighter Outdoor Lights Can Make Visibility Worse, but cameras make the failure easier to prove because the clip preserves the mistake.
WDR helps only after the layout is reasonable
Wide Dynamic Range, backlight compensation, and similar camera settings can help when the scene has mixed light and shadow. They cannot fully rescue a visible bulb, a white wall hotspot, or a floodlight aimed across the camera’s field of view.
A good rule: if the fixture itself or its reflection is the brightest object in the frame, camera settings are secondary. Fix the light position first. Then adjust WDR or night settings to fine-tune the remaining contrast.
Lens Glare
The light source is inside the camera’s optical zone
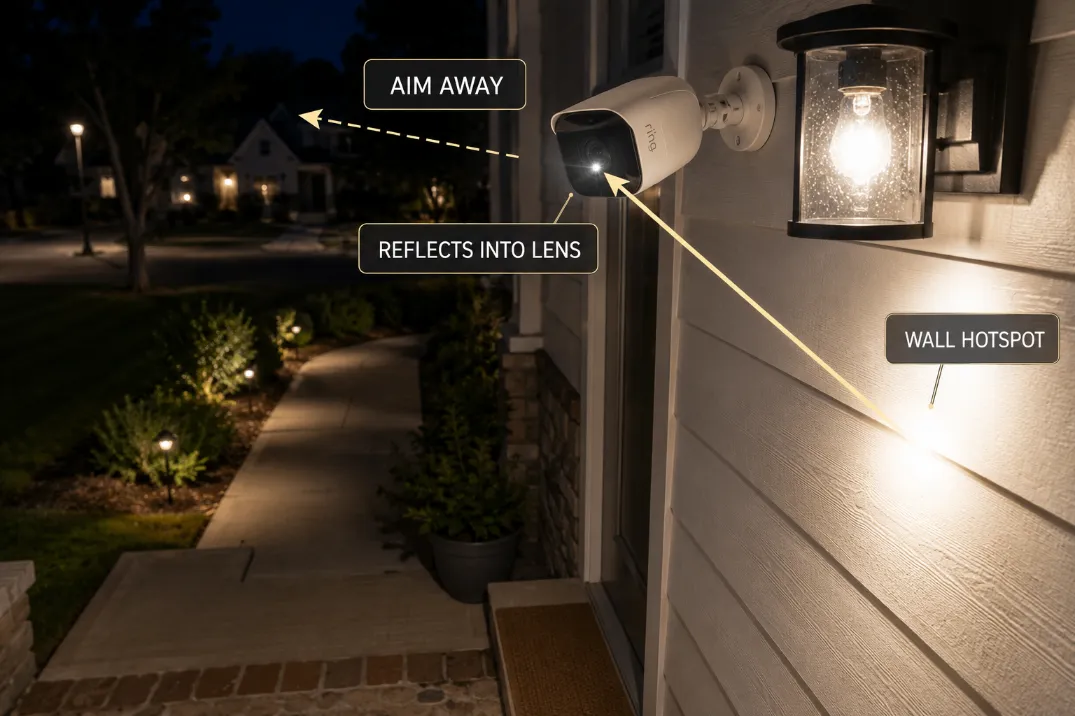
Lens glare shows up as streaks, rings, haze, starbursts, or a milky veil across the recording. This is more direct than general overexposure. It usually means the camera can see the bulb, LED array, fixture face, or a reflected version of it.
The fixture does not need to point straight at the camera. Many compact outdoor cameras and doorbell cameras have a wide field of view, often around 120° to 160°. A light mounted 1–2 feet beside the camera can feel “off to the side” in real life while still sitting inside the lens zone.
The more likely fix is to hide or move the source. The less useful fix is tilting the camera slightly and hoping the flare leaves the frame. That may move the streak, but it can also cut off the walkway, driveway edge, or package drop area.
Aim Check: At night, cover the fixture with cardboard for 10 seconds while watching the live view. If the haze disappears immediately, the light position is the problem.
This is the same principle behind Outdoor Security Lights Without Glare: useful security light should illuminate the target area without becoming the brightest thing the camera sees.
Infrared bounce can look like light glare
Not every glare problem comes from the outdoor fixture. If the camera uses built-in infrared night vision, IR light can bounce off nearby soffits, pale siding, glass, glossy trim, porch columns, spider webs, or even the camera’s own cover. The result can look like fog, dust, or a washed gray veil.
This is especially common when the camera is tucked too close to a ceiling, corner, wall, or glass surface. If the footage looks cloudy even when the outdoor light is off, test the camera with IR disabled or switch briefly to a visible-light night mode. If the haze changes, the camera’s night vision is part of the problem.
Do not confuse this with a weak camera sensor. A better sensor may improve the image, but it will still struggle if its own IR light is bouncing back into the lens from 2–6 inches away.
Wall Reflection
The wall can become the real light source
Sometimes the fixture is not visible in the camera frame, but the recording still looks washed out. In that case, look at the surfaces near the camera: white vinyl siding, pale stucco, glossy garage doors, painted trim, fences, and soffits.
A floodlight may be aimed toward the driveway, but if part of the beam lands on a pale wall 2–4 feet from the camera, the camera may expose for that wall instead of the person crossing the frame. The visible symptom is a bright background with a darker person in front of it.
This is a mechanism problem, not a cosmetic one. The bright wall is not just ugly in the footage. It steals exposure from the target.
Beam control beats camera darkening
Lowering camera brightness can make the wall look less intense, but it usually makes darker areas worse. The better fix is to reduce the hotspot: aim the fixture away from the wall, add shielding, lower the angle, or use a narrower beam.
This is where many floodlights disappoint. They cover a large area, but they also create hard bright zones and hidden dark pockets. If a floodlight makes the wall, driveway, or garage door dominate the frame, the failure pattern is close to Floodlights Create Blind Spots: the scene looks covered, but the useful detail is not where you need it.
Face in Shadow
A bright background can hide the person
A security camera does not need a dark yard to miss a face. It can also miss a face because the background is too bright. If the wall, porch floor, driveway, or garage door is strongly lit behind the person, the face may fall into shadow even though the scene appears bright overall.
This often happens when the light is behind the person relative to the camera. A visitor walking toward a door may be backlit by a garage light, side-yard floodlight, or high porch fixture. The recording shows a clear body outline, but the face stays dark.
The goal is not perfect studio lighting. The goal is readable face detail for at least 2–3 seconds before the person reaches the door, gate, or vehicle. If the face becomes readable only when the person is already inches from the camera, the lighting is arriving too late or from the wrong direction.
High fixtures are often overestimated
Homeowners often overestimate how useful a high bright fixture will be. A light mounted 8–10 feet high can spread across more area, but it can also cast brow, cap, and hood shadows across the face.
A lower, shielded, side-biased light often gives the camera better detail than a high exposed floodlight.
This is why locksets, door trim, and handles may look bright while the person remains unreadable. The entry feels secure because the hardware shines, but the camera target is still underexposed.
If you are adjusting an existing security fixture, the aim logic in Aim Outdoor Security Lights is a better next step than simply raising output.
Motion Timing
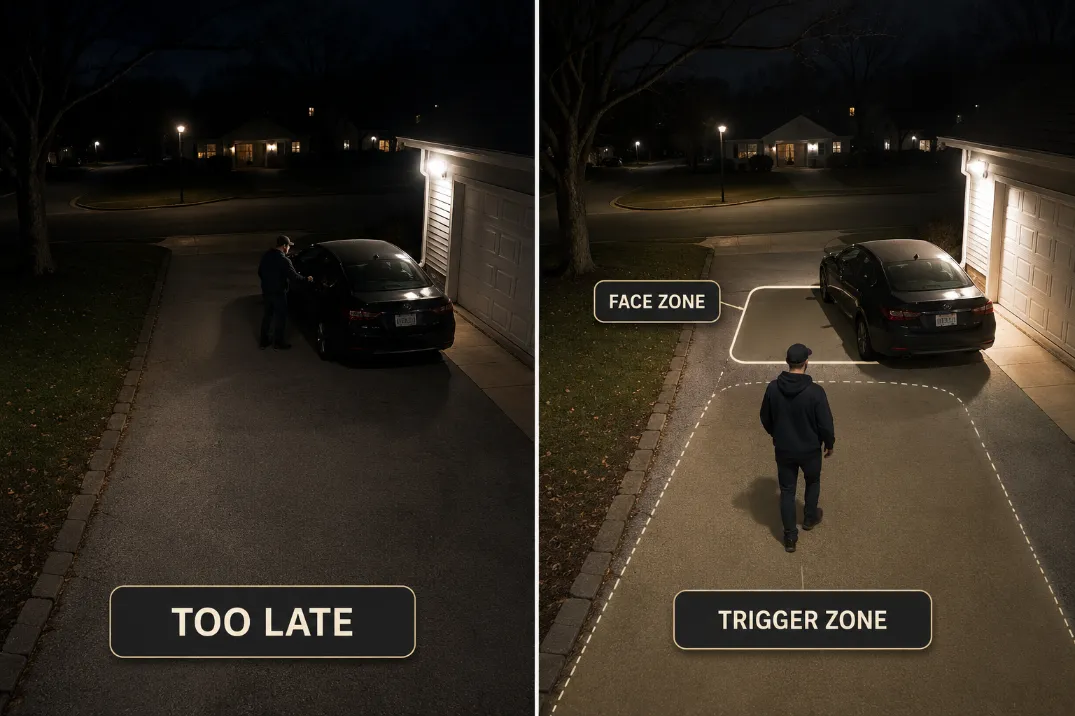
The light may activate after the useful moment
Motion timing is one of the easiest camera-light problems to misread. The clip starts, the person is already halfway through the frame, the light turns on, the camera exposure shifts, and the face becomes readable only after the person has turned away.
A useful motion light should trigger before the person reaches the key recognition zone. For a front walk, that often means 8–15 feet before the door.
For a driveway camera, the light may need to activate before the person reaches the vehicle, not when they are already beside it.
If the light takes 1–3 seconds to turn on and the person is walking normally, they may move 4–12 feet before the camera gets useful light. That distance is enough to miss the face, package action, or direction of travel.
Maximum sensitivity is not the fix
Turning the sensor sensitivity all the way up can create a different failure: false triggers, constant exposure shifts, and lights firing for traffic, tree movement, or animals.
The goal is not maximum sensitivity. The goal is earlier detection along the correct path.
If the light turns on too late, adjust the sensor angle, detection zone, or fixture placement before blaming the camera. If the light turns on too often, the problem may be oversensitivity rather than coverage.
The repair logic in Outdoor Motion Sensor Light Too Sensitive fits this situation better than simply installing a stronger bulb.
Camera View Test
Test the saved recording, not the yard
The most reliable test is a 10-minute nighttime recording with normal movement through the scene. Walk the front path, approach the door, pass the side gate, cross the driveway, and stand where a visitor or stranger would naturally be. Then review the saved clip on a full screen, not only the phone preview.
Use this quick diagnostic checklist:
- Face detail holds at 10–20 feet, not only at arm’s length.
- The bulb, LED array, or fixture face is not visible in the frame.
- White siding, trim, soffits, or garage doors do not dominate exposure.
- The light activates before the person reaches the recognition zone.
- Shadows do not hide the face under caps, hoods, or brow lines.
- The image stabilizes within about 5 seconds after the light turns on.
- Footage is not cloudy when visible lights are off, which may point to IR bounce.
Separate the symptom from the mechanism
| Camera symptom | More likely mechanism | Better first move |
|---|---|---|
| White face or washed clothing | Bright hotspot controls exposure | Shield source or lower aim |
| Rings, haze, or streaks | Fixture visible to lens | Move or block direct source |
| Cloudy image with lights off | IR bounce-back | Move camera from nearby surface |
| Bright wall, dark person | Reflection steals exposure | Aim away from siding or garage door |
| Clear body, hidden face | Backlighting or high angle | Add lower side/front light |
| Missed approach moment | Motion trigger too late | Shift detection zone earlier |
A new camera makes sense when the lighting is already controlled and the recording still lacks detail. It does not make sense when a visible fixture, wall hotspot, IR reflection, or late trigger is still dominating the frame.
When replacing the light makes more sense
Replace the fixture before replacing the camera when the footage improves as soon as you block, shield, dim, or redirect the light. That test tells you the camera can perform better; it is just being forced into a bad scene.
A better replacement is usually shielded, lower-glare, and easier to aim. It should light the approach path without showing the source to the lens.
If the camera improves when the fixture is temporarily blocked, a camera-friendly light from Best Low Glare Outdoor Security Lights is a more logical next step than chasing a higher wattage fixture.
Final Takeaway
Outdoor lights ruin security camera footage when they make the scene look safer to the eye but harder for the lens to read. The real test is not how bright the porch, driveway, or gate looks.
It is whether the camera holds face detail, avoids glare, controls reflection, avoids IR bounce, and captures the useful moment before the person leaves the recognition zone.
Start with the light path before blaming the camera. Remove visible sources from the frame, soften wall hotspots, keep faces out of backlight, and set the motion zone 8–15 feet earlier than the point you care about.
Once the scene is controlled, camera settings and upgrades become much more useful.
For broader official guidance on video security system planning, see the Department of Homeland Security’s Video Security Systems Technology Handbook.