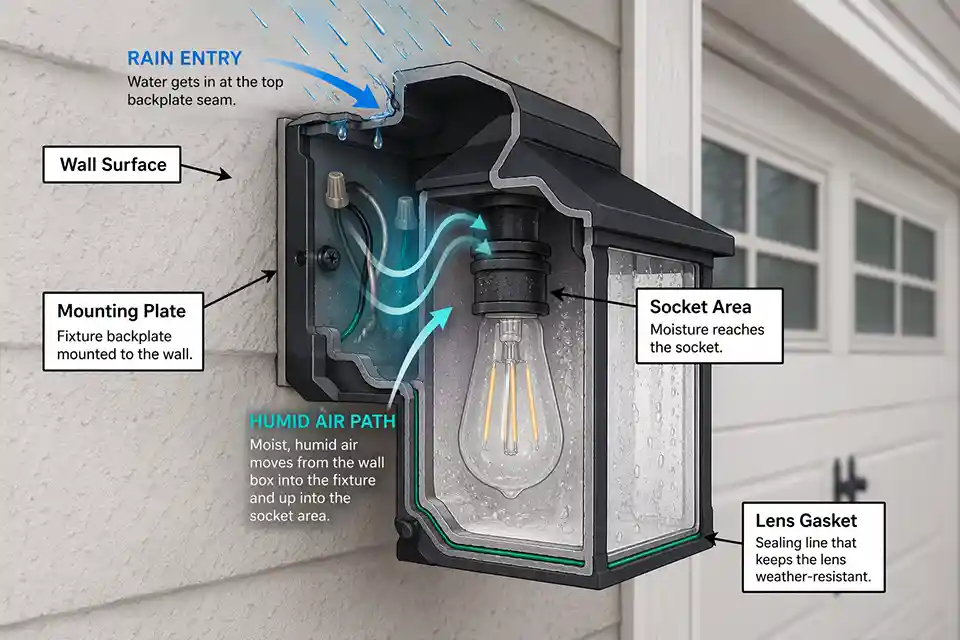
If moisture keeps showing up inside a garage entry light fixture, the problem is usually not generic humidity. It is usually one of three more useful failure patterns: water entering at the top of the backplate, damp air cycling through the wall box or cable entry, or a lens gasket that no longer seals evenly after years of heat, cold, and relamping.
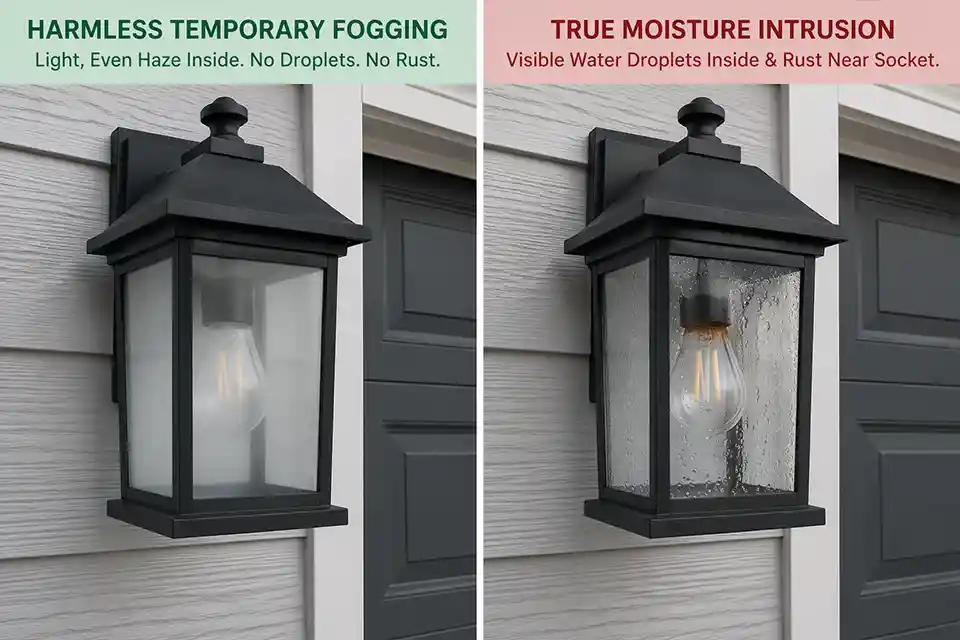
The first checks that actually separate normal from problematic are simple: does the haze clear within 30 to 60 minutes, do droplets remain beyond 24 hours, and does the fixture start flickering or failing within 1 to 12 hours after rain? Those signals matter more than the fog itself.
Garage entry fixtures also get misread because they sit in a half-protected zone. They may be near an overhang, but they still see wind-driven rain, driveway splash, and warm wall-cavity air that can mimic harmless condensation.
A thin film that clears quickly is one thing. Repeated droplets, rust on the socket, blackening near contacts, or a wet-weather trip is something else. That is moisture intrusion, not just a cosmetic weather effect.
Why garage entry lights fail differently than porch lights
Half-covered does not mean weather-protected
A garage entry light often looks more sheltered than it really is. If it sits near the outer edge of the garage opening, faces an open driveway, or catches sideways rain, it may function more like an exposed fixture than a protected one. This is where many homeowners overestimate the value of a shallow overhang.
That matters because a fixture labeled for damp locations may survive on a deep covered porch but struggle at a garage entry. Wind shifts the water path, and hard driveway surfaces can bounce moisture upward in ways people do not expect.
In practical terms, “under the eave” is not the same thing as “out of the weather.”
Warm wall-cavity air makes symptoms harder to read
Garage-adjacent walls often allow small amounts of warm indoor or wall-cavity air to move into the electrical box. When that air meets a cooler lens at night, light condensation can appear even without a direct rain leak. That is why a brief interior film is not automatically proof of a failed fixture.
The better threshold is persistence. If the haze clears in under 1 hour, the fixture may only be reacting to temperature change. If droplets remain visible after 24 hours of dry conditions, or if the problem returns after every storm, the odds shift strongly toward a seal, mounting, or entry-path problem.
If your landscape lighting looks cloudy from the inside, reading about condensation in outside light fixtures can help you decide what to do next.
Quick diagnostic checklist
- Light haze clears within 30 to 60 minutes: often temporary condensation, not yet a confirmed leak
- Moisture remains beyond 24 hours: likely intrusion or repeated damp-air cycling
- Droplets collect after rain, especially near the upper lens area: suspect backplate or gasket path first
- Fixture flickers, dims, or fails within 1 to 12 hours after rain: prioritize entry points over bulb replacement
- Rust on screws, green copper staining, or black marks near the socket: internal electrical parts are already being affected
- GFCI or breaker trips in wet weather: stop treating the issue as cosmetic
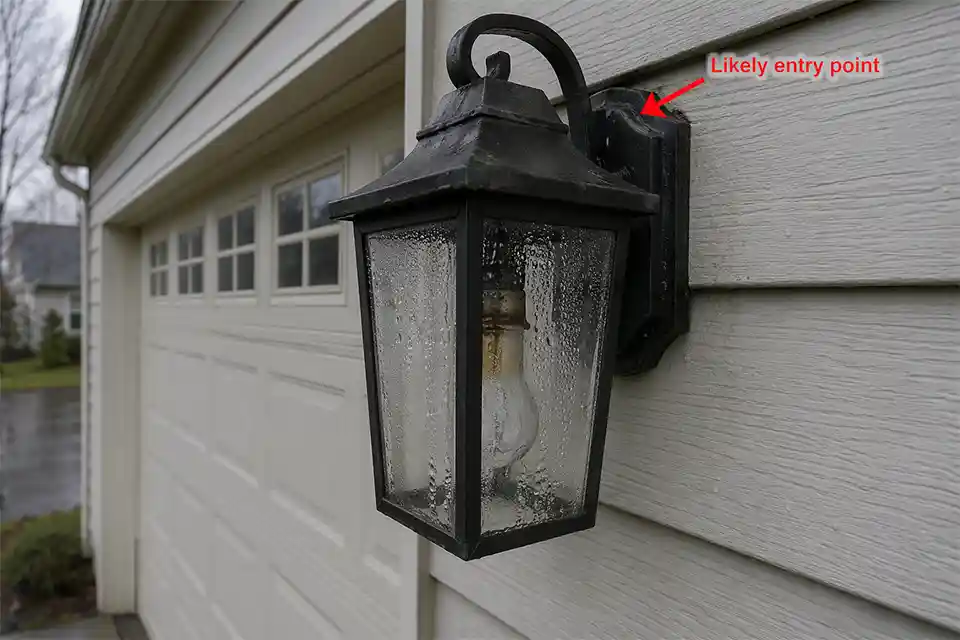
Where moisture usually gets in first
The top backplate seam is still the most likely cause
On garage entry fixtures, the top edge of the backplate is usually the highest-value inspection point. If the fixture is mounted over uneven stucco, textured brick, warped trim, or poorly supported siding, the plate may appear tight while still leaving a small upper gap.
Even a gap around 1/16 inch can be enough for wind-driven water to enter behind the housing.
This is the point people commonly underestimate. They focus on the visible water inside the glass, but that is often just where the moisture ends up.
The real failure path is behind the fixture, not through the front lens. If the light behaves normally in dry weather and starts acting up only after storms, the pattern often aligns more closely with Why Your Outdoor Light Works Fine Until It Rains than with a bad bulb.
Cable entry and wall-box air paths
Sometimes the fixture shell is not the main problem. The issue is the box opening or conductor entry behind it. If humid air can move through the cable entry or into the wall box, the fixture may repeatedly fog from the inside even when direct rain exposure seems limited.
That failure pattern can be deceptive because it may not leave obvious water trails. Instead, you get recurring haze, slow corrosion, and intermittent behavior that seems out of proportion to what you can see outside. That is where Why Water Gets In Through Cable Entry Points becomes especially relevant to the garage-entry scenario.
Lens gasket failure is common, but not always the first failure
The lens gasket matters, but it is not always the first place to blame. If the backplate fit is poor, replacing only the front gasket may buy a little time without changing the root problem. That is one of the fixes that often wastes time.
Still, gasket failure is real, especially after 5 to 8 years outdoors. Rubber hardens, compression becomes uneven, and the sealing line stops holding consistently around the corners. If the fixture has been opened many times for bulb changes, that wear tends to show up faster.
What people usually misread
More caulk is not automatically a better repair
One of the most common wrong turns is trying to solve everything with more exterior sealant. If the backplate is sitting crooked on brick, stucco, siding, or a trim block, a thick bead of caulk usually becomes a cosmetic patch rather than a real fix. It may slow water briefly, but it does not restore even compression.
Worse, full-perimeter caulking can trap water if the fixture design expects some drainage or if water is already entering from behind. The better question is not “how much can I seal?” but “is the fixture actually mounted flat and sealing where it is supposed to seal?”
A new bulb can hide the real problem
Another thing people overestimate is the value of a successful bulb swap. A moisture-damaged fixture can accept a new bulb and seem fine for several days, only to fail again after the next weather cycle. If there is rust on the lamp base, blackening near the socket, or tension loss at the contact spring, the bulb was never the real issue.
That is why visible function is not enough. The condition of the socket, hardware, and seal surfaces tells you more than a fixture turning back on once.
What changes with different mounting surfaces
The wall surface often decides whether a repair will last
Garage entry fixtures are commonly mounted on mixed surfaces: brick veneer, stucco, vinyl siding with a block, or painted wood trim. Each one changes how well the backplate can compress.
| Mounting surface | What usually goes wrong | Better fix | What wastes time |
|---|---|---|---|
| Uneven stucco or brick | Small upper gaps behind backplate | Flatten contact points or remount with proper support | Adding more exterior caulk only |
| Warped wood trim block | Plate twists when screws tighten | Replace or re-square the mounting block | Overtightening screws |
| Vinyl siding without a rigid fixture block | Seal line shifts as siding flexes | Use a proper siding mounting block | Packing gaps with sealant |
| Aged or distorted fixture body | Closure line no longer compresses evenly | Replace fixture | Repeating gasket and caulk repairs |
This is also where garage-entry fixtures differ from broader Water Inside Outdoor Light Fixtures. At a garage entry, the wall assembly and mounting surface often matter as much as the fixture body itself.
The repair sequence that actually makes sense
Start with power off and a real inspection
Turn off the breaker and verify the fixture is dead before opening it. If there is active moisture inside, give the fixture a genuine drying window of about 12 to 24 hours in dry conditions. Drying is not the fix, but it is the only way to inspect honestly.
What matters here is the difference between wet and damaged. A fixture can be wet and still salvageable. Once you see pitted contacts, rusted socket shells, brittle wire insulation, seized screws, or white and green residue around terminations, the repair value starts dropping fast.
Repair is reasonable only when the damage is still limited
A garage entry fixture is still a good repair candidate when the housing is structurally sound, the socket is clean, the wiring insulation is intact, and the failure is traceable to a gasket, seal surface, or poor mounting fit. In that situation, the repair sequence should be:
Replace the failed gasket or sealing element
Do not treat fresh caulk as a substitute for a failed internal seal. If the gasket is flattened, brittle, cracked, or permanently compressed, replace it.
Correct the mounting surface and plate alignment
If the backplate is not sitting flat, fix that before resealing anything. This step changes outcomes more than people expect.
Inspect conductors and splices for early corrosion
Once moisture reaches the electrical connection points, it stops being only a weatherproofing issue. It becomes a reliability issue. That is where Corrosion in Outdoor Light Connections becomes directly relevant to what happens next.
Reassemble carefully after relamping or cleaning
A smaller but important pattern is post-maintenance leakage. If the problem started right after a bulb change or seasonal cleaning, inspect the reassembly first. A gasket can pinch, dust can sit on the seal line, and screws can be tightened unevenly. Those mistakes are easy to make and easy to miss.
Pro Tip: If the fixture began fogging only after a bulb change, check lens seating and screw tension before chasing wall leaks.
When repair stops making sense
Wet-location mismatch is often the hidden reason repeat fixes fail
A fixture can be sealed carefully and still keep failing if it was never suited to the exposure level at that garage entry. If the light faces open weather, catches sideways rain, or sits near the driveway edge, a damp-location model may remain unreliable even after a decent repair.
This is one place where readers commonly underestimate the installation context. A garage entry can look partially covered while still behaving like a wet-location application. In that case, replacement with a true wet-location-rated fixture is often the smarter move.
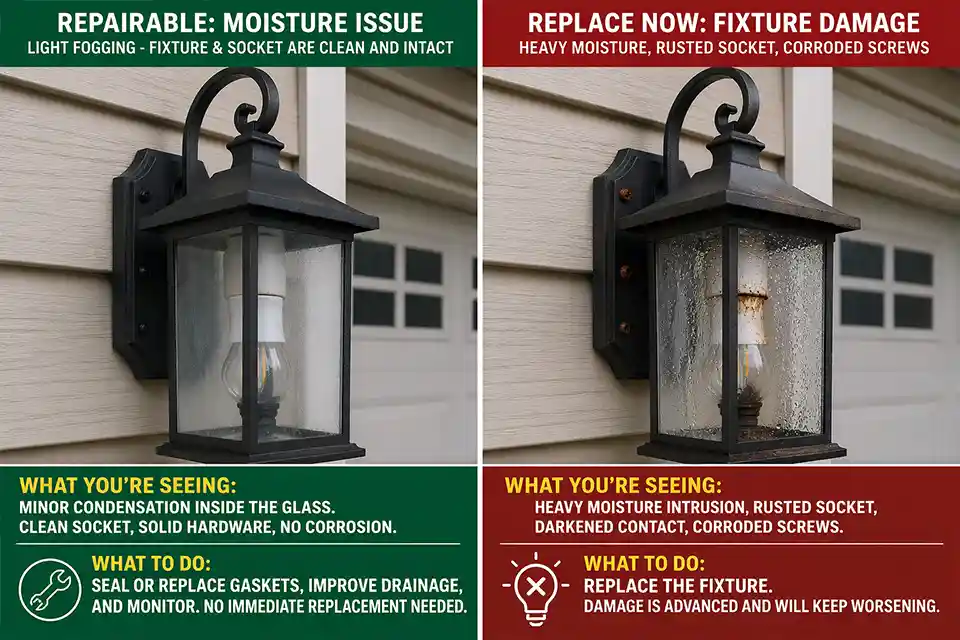
There is a clear boundary between salvageable and replace-now
If the socket is rusted, the contact area is darkened, the reflector is deteriorating, or the fixture has already gone through more than one wet-weather failure after a proper reseal, routine patching usually stops making sense. That is the decision point.
Garage entry lighting is not just decorative. It serves a main access point, and unreliable performance there matters more than it does in a less critical corner of the yard. Once the fixture has both recurring moisture and visible internal damage, replacement is usually the better answer than another round of small fixes.
A simple decision rule that saves time
Monitor it
If the fixture shows only a light film that clears within 30 to 60 minutes, with no rust, no droplets, and no wet-weather outage, monitor it through the next weather cycle.
Repair it
If moisture persists beyond 24 hours, returns after rain, or clearly traces to a gasket, top seam, or mounting problem while the internal electrical parts still look clean, repair is still reasonable.
Replace it or escalate
If the fixture trips a GFCI or breaker, shows socket corrosion, has brittle insulation, or fails again after one proper repair, move past patching. At that point, replacement or further electrical inspection is the sensible next step.
For broader fixture rating guidance, see UL’s Luminaires Marking and Application Guide.