
A front yard usually still looks dark after adding lights because the new light increased contrast instead of improving coverage.
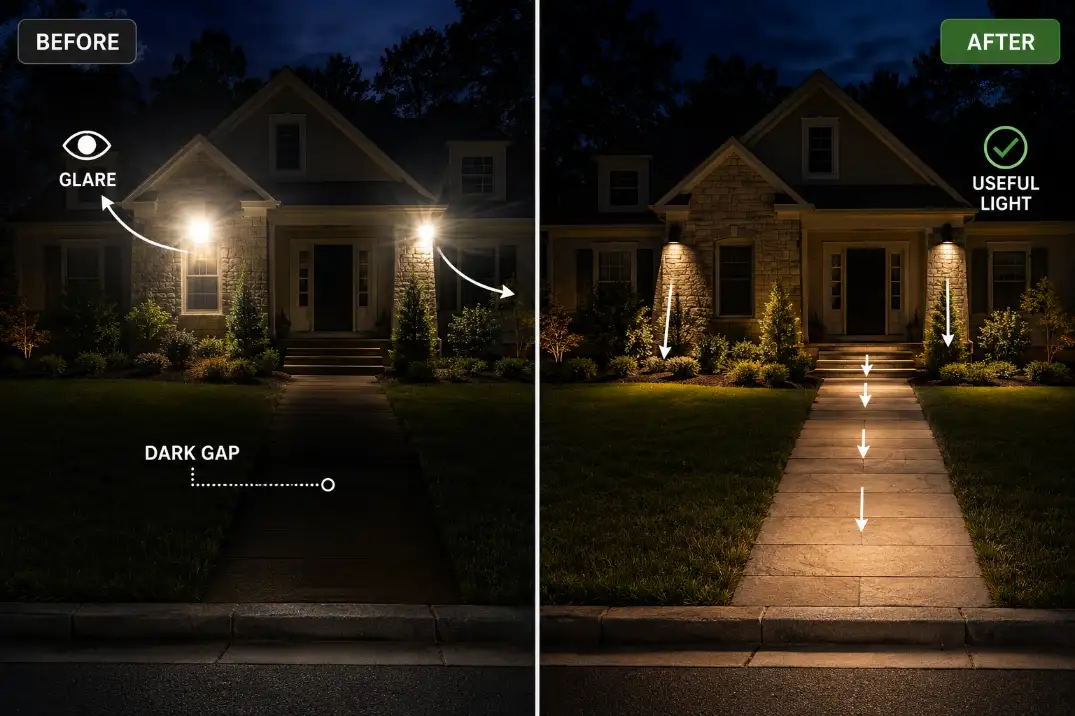
The first checks are not “Do I need brighter bulbs?” but “Where is the light landing?” Look for fixture glare within 3–6 feet of the light, dark walkway gaps longer than 8–12 feet, and house walls that look bright while the walking surface stays dim. Those signs point to placement, beam spread, or glare control.
This is different from a failing lighting system. If every fixture is weak, flickering, shutting off, or fading toward the end of the cable run, the system may be losing power.
But if some areas look harshly bright while the yard still feels hard to read, the lights are probably working; they are just lighting the wrong surfaces.
The Real Problem: Brightness, Coverage, and Contrast Are Not the Same
Most disappointing front-yard lighting falls into one of three patterns. Brightness is the amount of light available. Coverage is where that light lands. Contrast is how the bright and dark areas compare once your eyes adjust.
That distinction matters because the most common wasted fix is adding brighter bulbs to fixtures that are already placed or aimed poorly.
| What you notice after dark | What it usually means | Better first fix |
|---|---|---|
| Everything looks weak | Not enough usable output or power | Check lamp output, transformer load, and voltage |
| Bright dots with black gaps | Poor coverage | Adjust spacing, beam spread, or fixture position |
| Fixtures look bright but yard looks dark | Too much contrast or glare | Shield, lower, or re-aim the lights |
| House looks lit but path is dim | Light is hitting vertical surfaces only | Redirect light onto walking surfaces |
| Far end of yard fades | Voltage drop or overloaded run | Test the run before adding fixtures |
| Yard looked fine at first, then got darker | Plant growth, dirt, tilt, or solar charging loss | Clean, trim, re-aim, and inspect |
The fixture should not be the first thing you see
From the street or driveway, you should notice the lit path, entry, steps, or landscape shape before you notice the bulb. If the fixture itself is the brightest object in view, your eyes adapt to that glare. The surrounding lawn, walkway, curb, and planting beds then look darker by comparison.
That is why replacing a 300-lumen lamp with a 700-lumen lamp can make the yard feel worse. The brighter lamp may create a stronger hot spot without filling the dark space between fixtures. The result is more light, but not more visibility.
A lit house is not a lit front yard
Porch lights, garage sconces, and entry fixtures are useful, but they mostly light the wall around them. They rarely cover the start of the walkway, driveway edge, front steps, house numbers, or planting beds.
Homeowners often overestimate how much a bright facade helps because the house is the most visible object from the street. The more useful question is whether someone walking from the curb or driveway can read the route without guessing. If not, the yard has a coverage problem even if the house itself looks bright.

Why Adding More Lights Can Make the Yard Look Worse
Adding lights sounds logical when the yard feels dark, but it can multiply the same mistake. If each new fixture creates another bright dot without connecting the route, the yard becomes visually noisy instead of clearer.
More light can create darker-looking gaps
Outdoor lighting is judged by contrast. A small dark gap between two soft light pools may be barely noticeable. The same gap between two intense hot spots can look much darker.
This is why a walkway with five poorly spaced path lights can feel less comfortable than a walkway with three better-aimed fixtures. If each fixture lights about 3 feet of surface but the next fixture is 10 feet away, the walking route reads as disconnected patches.
The issue is covered more specifically in Outdoor Lights Creating Bright Spots and Dark Gaps when the yard has visible pools of light but no continuous coverage.
More brightness does not fix missed targets
A spotlight aimed above a shrub will still miss the walkway after you install a stronger lamp. A porch light shining outward will still create glare if the lens faces the viewer. A fixture hidden behind ornamental grass will still be blocked after you increase output.
That is the difference between the symptom and the mechanism. The symptom is “the yard looks dark.” The mechanism is usually light landing on walls, plants, lenses, or people’s eyes instead of the surfaces that need visibility.
Pro Tip: Judge the yard 30–60 minutes after full darkness, not at dusk. Dusk adds enough ambient light to hide gaps that become obvious later.
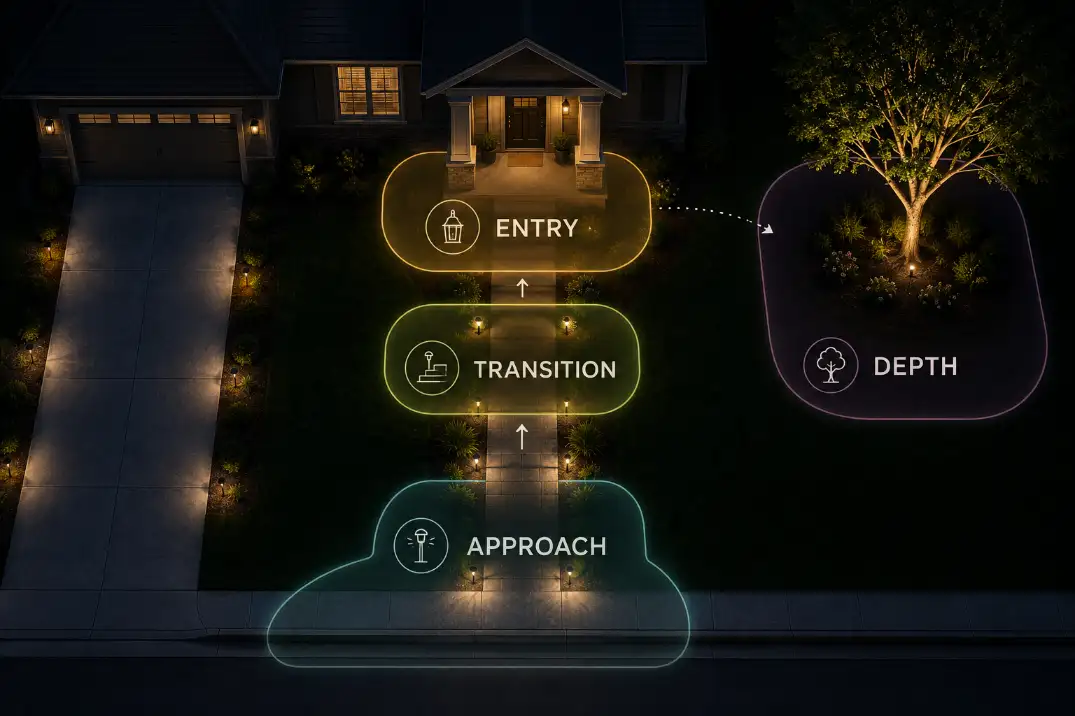
Light the Front Yard by Zones, Not by Fixture Count
A front yard does not need to be evenly bright from property line to porch. It needs enough connected visibility to guide the eye. The strongest layouts usually light four zones selectively.
The approach zone
This is where someone first enters the yard: the sidewalk, curb, driveway edge, or beginning of the front walk. If this zone is dark, the whole yard feels unwelcoming even when the porch is bright.
The fix is usually low, shielded light aimed across the walking surface or driveway edge. Avoid placing the fixture so close to the walkway that it lights only the mulch border.
Moving a path light 12–18 inches outward can sometimes spread light across the walking surface more evenly.
The transition zone
This includes curves, steps, slope changes, walkway intersections, and places where hardscape meets lawn or planting beds. These are the spots where darkness matters most because people need to see edges and elevation changes.
If the yard feels dark only while walking through it, not while viewing it from the street, the transition zone is probably underlit. Step edges, path turns, and driveway-to-walkway connections deserve more attention than open lawn.
The entry zone
The front door, lock area, porch steps, and house numbers need clear visibility without glare. A bright wall light beside the door may help with the lock but still leave the final step or threshold in shadow.
For entry areas, the goal is not maximum brightness. It is controlled light on the surfaces people actually use. If the entry fixture throws light toward the viewer, a lower-output lamp or better-shielded fixture may improve visibility more than a brighter bulb.
The depth zone
A front yard with only path lights can still feel flat and dim. One or two vertical accents give the eye depth: a tree trunk, porch column, stone wall, address marker, or architectural corner.
This does not mean lighting every plant. One clear vertical reference is often enough.
If an accent light keeps missing the tree, column, or wall it was meant to highlight, the problem is not the number of fixtures.
It is aim, mounting position, or beam angle. Outdoor Lights Missing the Target Area is the better next step when the light is on but not landing where it should.
Match the Fixture to the Job
A yard can look dark even with decent fixtures if the wrong fixture is doing the wrong job. Path lights, spotlights, floodlights, wall lights, and step lights solve different problems.
Path lights are for route continuity
Path lights should help people read the walking surface and its edges. They are not miniature lawn floodlights. If they create isolated circles with black gaps between them, the spacing, shield shape, or beam spread is wrong.
A useful threshold: if a fixture creates a hot spot less than 3 feet wide on a 4-foot walkway, it is probably too narrow, too close to the edge, or aimed poorly. The eye should see a connected route, not separate islands.
Spotlights are for depth, not general visibility
Spotlights are useful for trees, columns, address markers, and architectural details. But narrow beams can make the yard feel darker if they create dramatic highlights surrounded by empty black space.
Use spotlights selectively. One well-aimed vertical accent can make the front yard feel larger and more finished. Five sharp beams aimed at random shrubs can make it feel busy and uneven.
Floodlights are not a cure-all
Floodlights cover large areas, but they are easy to overuse. A floodlight mounted high on a garage or eave may reveal motion, but it can flatten the yard, create glare, and leave everything outside the beam feeling darker.
This is where people confuse landscape lighting with security lighting. Motion lights help detect activity. Landscape lighting helps people move through the yard comfortably and understand the space. A security floodlight may be useful, but it rarely fixes a front yard that feels visually unbalanced.
When It Is Not Just Placement
Placement and glare come first, but there are times when the system itself is limiting the result. The difference is behavior: design problems usually create repeatable dark areas, while electrical or environmental problems often create fading, flickering, early shutoff, or changing performance.
Voltage drop creates uneven fading
In low-voltage landscape lighting, the farthest fixtures can look weaker than the first ones on the run. This is more likely when the cable is long, the wire is undersized, or too many fixtures are connected to one run.
A healthy system should not have crisp, bright lights near the transformer and tired yellowish lights at the far end. If the last few fixtures are visibly weaker, especially after 30–90 minutes of operation, adding another light to that same run is the wrong move.
Voltage Drop in Outdoor Lighting Systems is a better diagnostic path when one side of the yard fades more than the rest.
Solar lights can turn on and still underperform
Solar lights are often blamed too late because they appear to be working. But a solar path light that turns on for 45 minutes and then fades is not providing useful front-yard lighting.
If panels receive only 2–4 hours of direct sun because of trees, roof overhangs, north-facing placement, or winter shade, the battery may start the night partly charged. In northern states, shorter winter days and snow cover can make this worse. In hot climates, battery aging can also shorten runtime.
A reliable solar light should remain useful for several hours after dark. If it fades within 1–2 hours, the yard may look dark because the light never had enough stored energy to begin with.
Moisture problems behave differently
Moisture and corrosion usually do not create a neat design problem. They create flickering, intermittent sections, tripped GFCI outlets, dim fixtures after rain, or lights that behave differently after irrigation.
That pattern is common in humid areas like Florida, coastal parts of California, and yards with frequent sprinkler spray. If the darkness changes after storms or watering cycles, fix the electrical reliability first. Rearranging fixtures will not solve a wet connection.
When the Yard Looked Good at First but Got Darker Later
A front yard can slowly lose useful light even if nothing major breaks. This is one of the most underestimated causes because the change happens gradually.
Plants grow into the beam
Fast-growing shrubs, ornamental grasses, and seasonal perennials can block a beam within 4–8 weeks during active growth. A path light that worked in spring may be buried by midsummer foliage. A spotlight that once hit a tree trunk may end up lighting leaves in front of it.
Trim before you replace. If the beam returns after pruning, the fixture was not the problem.
Fixtures tilt, sink, or get buried
Freeze-thaw movement in northern states, soft soil after heavy rain, and routine mulch refreshes can shift low-voltage fixtures. Even 1–2 inches of mulch around a small path light can reduce spread or block the lower part of the beam.
Check whether the fixture is still level, still above the mulch, and still aimed at the intended surface. This is a simple fix that often gets missed because the light still turns on.
Lenses get dirty
Irrigation minerals, dust, pollen, salt air, and lawn debris can reduce useful output. Dirty lenses rarely make a fixture go completely dark; they just make it look tired.
In dry desert conditions like Arizona, dust buildup can be noticeable. Near sprinklers, mineral film can dull the lens faster. If the system used to look better, clean the lenses before changing bulbs. It is one of the few easy fixes that can genuinely restore output.
A Practical Fix Order That Avoids Wasted Money
Start with what changes visibility, not what is easiest to buy.
1. Walk the route after full dark
Check the yard from the street, driveway, sidewalk, and front door. Do not judge only from a window or porch. The problem usually appears while moving through the yard.
2. Identify the first thing your eye sees
If your eye goes straight to the bulb, lens, or wall glare, reduce glare before adding light. Shielding, re-aiming, or lowering output may make the entire yard feel easier to see.
3. Mark actual dark gaps
Focus on walkway edges, steps, driveway transitions, house numbers, and the entry. Ignore dark lawn areas unless they affect safety or make the whole scene feel empty.
4. Re-aim and reposition existing fixtures
Angle accent lights lower if they are washing the house but missing the target. Move path lights that are too close to the walkway edge. Rotate shielded fixtures so glare is blocked from the main viewing direction.
For broader layout issues, Outdoor Lighting Placement Problems is useful when the entire front yard feels poorly arranged rather than simply underpowered.
5. Add lights only after the layout makes sense
Once glare, aiming, spacing, and plant blockage are corrected, add fixtures only where a specific gap remains. A 10-foot dark stretch of walkway may need one fixture. A wide driveway edge may need low shielded light.
Do not add lights just because the lawn is dark. Most front lawns do not need full illumination to look safe, finished, or welcoming.
6. Check controls and power if behavior is inconsistent
If fixtures do not turn on reliably, shut off early, or behave differently from night to night, the problem may not be design. Timers, photocells, transformers, moisture, and cable runs can all create darkness that looks like poor layout at first. If the system fails to turn on consistently, Outdoor Lights Not Turning On After Timer or Photocell fits that pattern better.
Questions People Usually Ask
Will brighter bulbs fix a front yard that still looks dark?
Only if the fixtures are already placed, aimed, and shielded correctly. If the light is hitting walls, shrubs, or your eyes, brighter bulbs usually increase glare without fixing the dark yard.
Should I light the whole front lawn?
Usually no. A front yard feels brighter when the walking route, entry, steps, and a few vertical reference points are visible. Fully lighting the lawn often wastes energy and can make the scene look flat.
Why does my walkway still look dark with path lights?
The lights may be too far apart, too close to the path edge, too narrow in beam spread, or blocked by plants. If dark gaps are longer than 8–12 feet, spacing or coverage is usually the issue.
Is a motion floodlight enough for front-yard lighting?
Not for most front yards. A motion floodlight can help with security, but it does not provide continuous orientation. It may also create harsh contrast that makes nearby areas look darker outside the beam.
The Bottom Line
A front yard that still looks dark after adding lights usually has a distribution problem, not a shortage of fixtures.
Fix glare first, then check whether light is landing on the walkway, steps, entry, driveway edge, and one or two vertical anchors.
Brighter bulbs and extra fixtures should come after aiming, spacing, shielding, plant clearance, and power checks—not before.
For broader guidance on responsible outdoor lighting, see DarkSky’s Five Principles for Responsible Outdoor Lighting.