
Quick Solution Summary
If deck or patio lights stop working after winter, the most common causes are moisture intrusion, corroded wire connections, tripped GFCI outlets, or damaged underground cables. Outdoor lighting systems endure months of cold temperatures, snow accumulation, and repeated freeze-thaw cycles. These conditions slowly weaken electrical components.
During winter in northern states such as Michigan, Minnesota, and Pennsylvania, temperatures often fluctuate between 15°F and 40°F (-9°C to 4°C). Water trapped inside connectors or fixtures expands when freezing and contracts again when temperatures rise. Over several cycles, this movement loosens seals and creates small openings where moisture enters.
Spring thaw then exposes the damage. Connectors may oxidize, fixtures can fill with condensation, and underground cables sometimes shift as frozen soil expands and contracts.
In most cases, the fix is straightforward. A quick inspection of the transformer, GFCI outlet, wiring connections, and fixtures usually reveals the issue within minutes. Once the faulty component is located, repairs typically involve drying fixtures, replacing corroded connectors, or repairing a short section of cable.
Why Outdoor Deck and Patio Lights Often Fail After Winter
Outdoor lighting systems are designed for harsh environments, but winter introduces several combined stress factors that can disrupt electrical performance.
The biggest issues come from three environmental forces:
-
freeze–thaw cycles
-
long-term moisture exposure
-
ground movement affecting buried cables
Deck and patio lights are particularly vulnerable because they are often installed close to soil, mulch beds, and wooden structures that retain moisture longer than open ground.
In coastal areas such as California or humid climates like Florida, winter storms can saturate the ground for weeks. Moisture then migrates into wiring connectors and fixture housings.
Over time, corrosion forms on metal contacts. Even a thin oxidation layer can increase electrical resistance enough to interrupt the 12-volt landscape lighting circuit used by most deck lighting systems.
A deeper explanation of how oxidation develops in outdoor wiring is discussed in
Corrosion in Outdoor Light Connections.
Understanding these environmental factors makes diagnosing spring lighting failures much easier.
Quick Diagnostic Checklist
Before replacing any fixtures or wiring, run through this quick inspection checklist.
-
Confirm the lighting transformer is receiving power
-
Reset nearby GFCI outlets
-
Inspect fixtures for condensation or standing water
-
Check visible wiring for loose connectors
-
Look for disturbed soil along cable paths
-
Test whether some lights still work while others fail
These simple checks solve many cases within a few minutes.
For example, if all lights are off, the problem is usually power related. If only part of the system fails, the issue typically lies somewhere along the wiring path.
Environmental Stress: Freeze–Thaw Damage
One of the most overlooked causes of outdoor lighting failure is freeze–thaw expansion inside electrical components.
Water expands by approximately 9 percent when freezing. When moisture enters a fixture or wire connector, the expansion creates pressure inside the housing.
After repeated cycles, several things may happen:
-
gasket seals loosen
-
connectors shift slightly
-
insulation cracks appear in wiring
These tiny changes often remain invisible but can interrupt electrical flow.
In northern climates where winter temperatures drop below 20°F (-6°C) for weeks, these cycles may repeat dozens of times throughout the season.
The result is often discovered only in spring, when lights suddenly stop working.
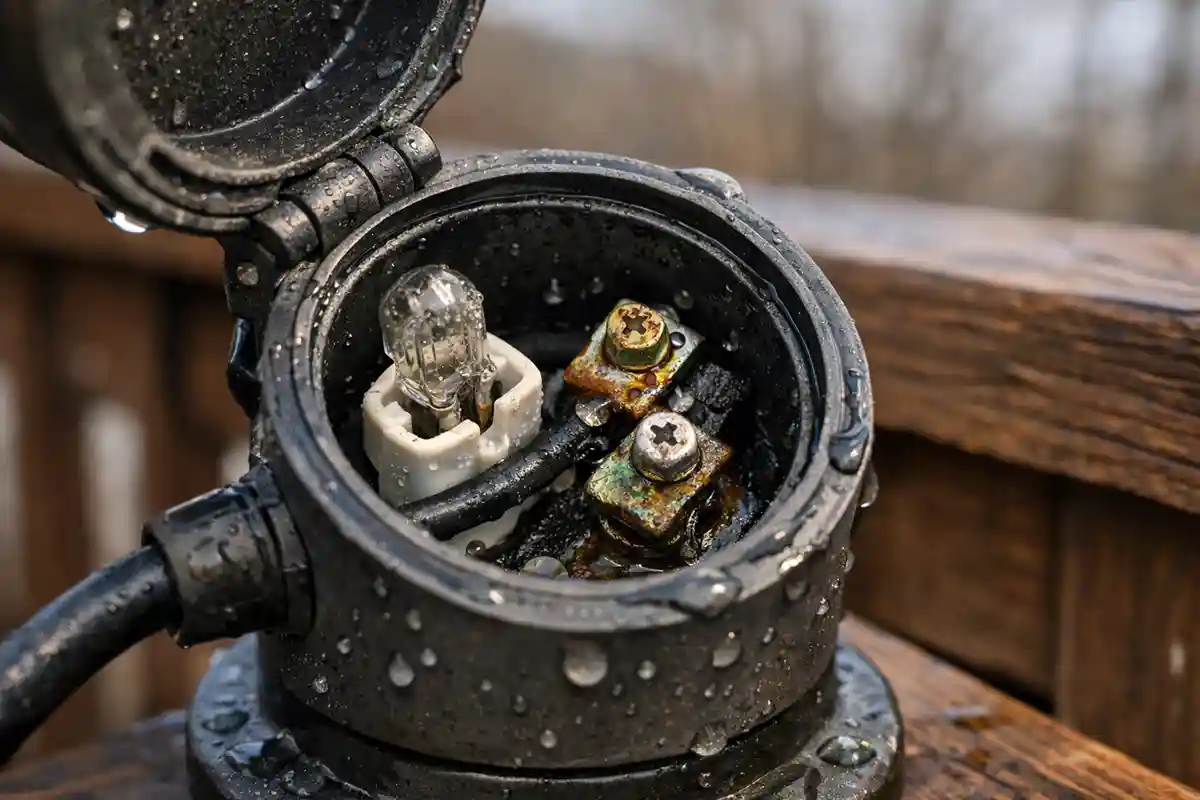
Moisture Intrusion in Outdoor Fixtures
Water exposure is one of the most common reasons deck lights fail after winter.
Moisture may enter lighting fixtures through:
-
deteriorated rubber gaskets
-
cracked plastic housings
-
poorly sealed cable entry points
-
loose mounting screws
Once inside the fixture, condensation forms when temperatures change. This moisture accumulates on internal wiring or LED driver components.
In humid regions where relative humidity frequently exceeds 70%, condensation can remain inside fixtures for long periods.
The effects include:
-
corrosion on metal contacts
-
intermittent lighting behavior
-
short circuits in LED modules
A deeper explanation of how moisture damages outdoor lighting systems can be found here: Moisture Damage in Outdoor Lighting Explained.
Even fixtures labeled as weatherproof may eventually allow moisture inside after several seasons of exposure.
GFCI Outlets and Safety Shutdowns
Many outdoor lighting systems are connected to GFCI (Ground Fault Circuit Interrupter) outlets. These outlets automatically shut off power if they detect a small electrical imbalance.
Moisture inside fixtures or wiring can trigger this protection.
When this happens:
-
all lights suddenly turn off
-
the transformer appears inactive
-
the outlet reset button may pop outward
Resetting the outlet usually restores power immediately.
However, if the GFCI trips again within 10–30 seconds, it often indicates a deeper wiring issue.
More detailed troubleshooting steps are explained in Outdoor Lights Tripping GFCI Outlets.
Ignoring repeated GFCI trips is not recommended because they often signal moisture or insulation damage somewhere in the circuit.
Underground Cable Movement During Winter
Landscape lighting cables are typically buried 6–12 inches underground. During winter, frozen soil expands and contracts repeatedly as temperatures fluctuate.
This movement can shift buried wires slightly.
Over time, connectors loosen or cables become strained where they enter fixtures.
In regions with heavy freeze cycles such as Illinois or Ohio, soil expansion can shift buried objects by 1–2 inches over the course of a winter season.
If several lights stop working beyond one point in the system, a damaged cable may be responsible.
A full diagnostic guide to identifying underground cable problems is available here:
Underground Lighting Cables Damaged: Causes, Signs, and How to Fix Them.
Repairing a damaged cable section usually restores power to all fixtures further along the circuit.
Table: Common Spring Lighting Failures
| Problem | Typical Signal | Likelihood | Recommended Action |
|---|---|---|---|
| Moisture inside fixture | Foggy lens or water droplets | High | Dry fixture and reseal |
| Corroded wire connector | Green or white residue on wires | Medium | Replace splice connector |
| Tripped GFCI outlet | Entire system off suddenly | Medium | Reset outlet and inspect circuit |
| Underground cable damage | Lights fail beyond one point | Medium | Locate and repair cable |
| Loose deck wiring | Lights flicker intermittently | Low–Medium | Tighten or replace connection |
Sometimes the issue is not immediately visible. If wiring connections appear loose or disturbed, this guide explains how outdoor wiring connections can fail over time:
Loose Outdoor Wiring Connections: How to Fix Them Safely.
Step-by-Step Troubleshooting Workflow
Once you confirm that winter conditions likely caused the lighting failure, the most effective approach is to troubleshoot the system in a logical sequence. Outdoor lighting systems are typically simple 12-volt low-voltage circuits, so identifying the problem usually requires checking only a few key components.
Start at the power source and move outward through the system.
1. Verify Transformer Power
Locate the landscape lighting transformer and confirm it is receiving power. Most residential transformers convert 120V household power to 12–15 volts for landscape lights.
Check for:
-
illuminated power indicator
-
timer or photocell operation
-
proper outlet connection
If the transformer shows no power, inspect the outlet and nearby breaker.
If the system suddenly shut down, a tripped safety outlet may be responsible. Detailed troubleshooting steps are explained in
Outdoor Lights Tripping GFCI Outlets.
2. Inspect the First Fixture in the Circuit
The first fixture after the transformer often reveals the root problem quickly.
Open the fixture and check for:
-
moisture inside the housing
-
loose wiring connectors
-
damaged insulation
If the first light functions normally but the rest of the system remains dark, the issue is usually located further along the cable line.
3. Test Voltage Along the Cable Run
Using a multimeter, measure voltage at several fixtures along the circuit.
Typical readings:
-
12–15 volts near the transformer
-
10.5–12 volts at distant fixtures
If voltage suddenly drops to zero after a certain fixture, the wiring between those points likely contains the fault.
4. Inspect Wiring Along Deck and Patio Edges
Lighting cables often run along deck posts, under railing boards, or through garden beds near patios.
Look for:
-
exposed wire sections
-
disturbed soil
-
cracked insulation
-
loose gel connectors
Even a small break in insulation can interrupt current flow in a low-voltage lighting system.

How to Repair Corroded Outdoor Wire Splices
Corrosion at wire connections is one of the most common spring lighting failures. Outdoor connectors are exposed to moisture, fertilizer chemicals, and temperature swings throughout the year.
Over time, corrosion forms a thin oxide layer on copper conductors. This layer increases electrical resistance and may prevent current from reaching downstream fixtures.
Typical signs include:
-
green or white residue on wires
-
brittle connector housings
-
flickering lights before failure
To repair the connection:
-
Turn off the transformer power.
-
Cut away the old connector and remove about ½ inch of insulation from each wire.
-
Twist the copper conductors tightly together.
-
Install a waterproof gel-filled landscape lighting connector.
-
Ensure the connector fully seals around the wires.
Corrosion-related failures are explained in greater detail in Corroded Wire Splices Outdoors.
Replacing a single damaged splice often restores several lights downstream.
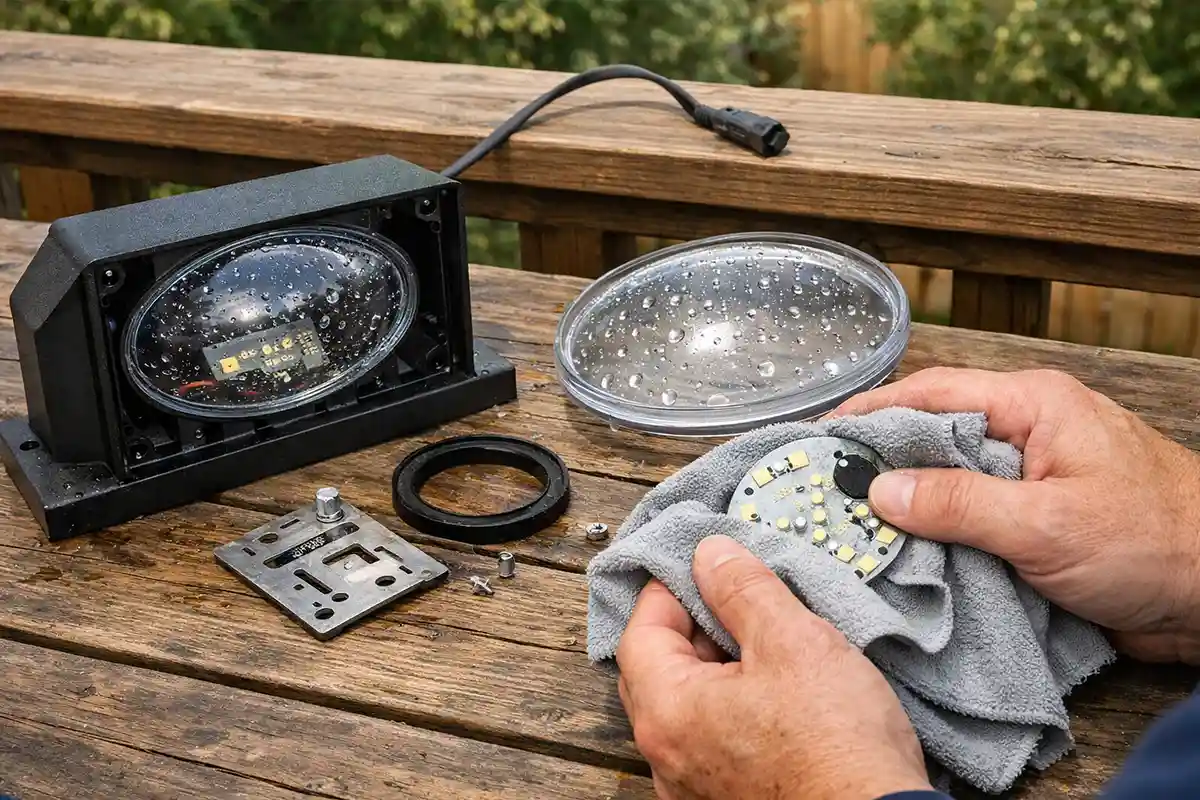
Fixing Water Inside Deck Light Fixtures
Water inside a fixture can short internal contacts or interfere with LED drivers.
This issue is especially common after winter because snow accumulation melts slowly around deck boards and railing posts.
If moisture is present inside a fixture:
-
Remove the lens or housing cover.
-
Dry internal components using a clean cloth.
-
Allow the fixture to air-dry for 30–60 minutes.
-
Inspect the gasket seal for cracks.
-
Reassemble the fixture and tighten mounting screws evenly.
If condensation continues to return, the fixture may need a new gasket seal or replacement housing.
Water intrusion problems are also connected to cable entry points, which are discussed here: Why Water Gets In Through Cable Entry Points.
Repairing a Damaged Underground Lighting Cable
If several lights fail beyond a certain point, a damaged cable section may be responsible.
Landscape lighting wires are typically buried 6–12 inches underground, but frost movement, gardening tools, or rodents may expose or damage them.
Signs of cable damage include:
-
lights working up to one fixture but failing afterward
-
exposed copper wires
-
sections of insulation chewed or cracked
Repairing the cable involves replacing a short section.
Basic repair steps:
-
Locate the damaged section of cable.
-
Cut out the affected portion.
-
Strip about ¾ inch of insulation from each cable end.
-
Insert the wires into waterproof splice connectors.
-
Seal the connections and rebury the cable.
If underground wiring failures occur repeatedly, a deeper explanation of cable problems can be found here: Underground Lighting Cables Damaged: Causes, Signs, and How to Fix Them.
Using high-quality gel connectors greatly reduces future moisture damage.
Preventing Future Winter Lighting Failures
Outdoor lighting systems can last 10–15 years when properly maintained. A few preventive steps before winter help protect wiring and fixtures from seasonal damage.
| Prevention Step | Impact | Recommended Frequency |
|---|---|---|
| Inspect wiring connectors | Prevent corrosion buildup | Once per year |
| Check fixture seals and gaskets | Reduce moisture intrusion | Every fall |
| Ensure cables remain buried | Protect against soil movement | Every 2–3 years |
| Clean fixture lenses | Maintain brightness | Twice per year |
| Inspect deck wiring routes | Detect rodent damage early | Every fall |
Preventive maintenance takes little time but significantly reduces spring repair work.
In areas with heavy rainfall or coastal moisture exposure, checking fixtures annually becomes even more important.
Frequently Asked Questions
Why do outdoor deck lights fail right after winter?
Winter introduces moisture exposure, freeze–thaw cycles, and soil movement. These conditions weaken connectors and wiring insulation, which often causes failures when temperatures rise.
Why do only some patio lights stop working?
Partial failures usually indicate a damaged wire, loose connector, or voltage interruption somewhere along the cable run.
Can freezing temperatures damage LED deck lights?
LEDs themselves tolerate cold temperatures well. However, moisture and corrosion around wiring connections can interrupt power to the fixture.
How long should outdoor landscape lighting last?
Most well-installed systems operate for 10–15 years with occasional maintenance. Connectors and fixtures exposed to moisture may require replacement sooner.
For additional technical insight into how environmental conditions affect outdoor electrical systems, the National Electrical Safety Foundation (ESFI) provides safety resources and guidelines: https://www.esfi.org