HOA-friendly outdoor lighting is often treated as a style category: choose a traditional lantern, reduce the bulb wattage, and submit a product photo. That can still leave the house with an oversized fixture during the day and an exposed, harsh-looking source after dark.
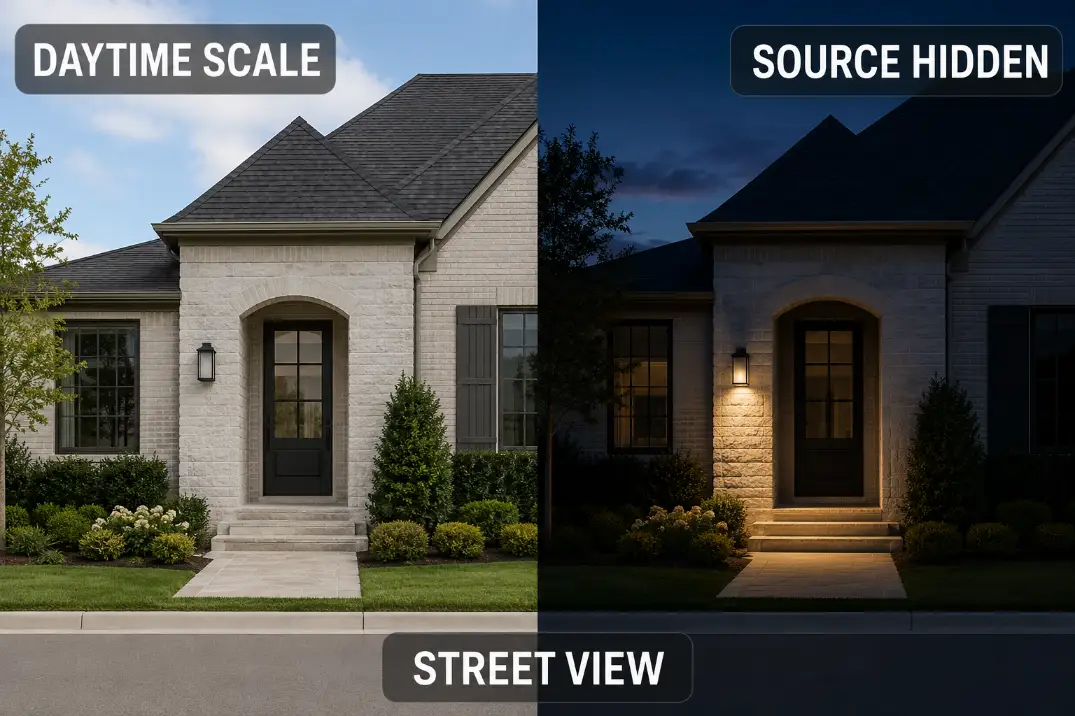
The stronger test is not whether the fixture looks conservative in isolation. It is whether the complete installation stays visually quiet from three positions: the daytime street view, the normal nighttime approach, and the neighboring-property direction.
Those views reveal different problems. The street shows scale and architectural fit. The approach shows whether the source hits the eyes before the light reaches the door or walkway. The side view shows spill that the homeowner may never notice from directly beneath the fixture.
Individual HOA documents still control what can be installed. This framework cannot predict approval, but it can eliminate choices that are difficult to defend before they reach the application stage.
What HOAs Usually Notice
Start with what changes the appearance of the elevation, not with the fixture’s style label. Reviewers may notice the finish, size, mounting position, projection from the wall, and relationship to the door or garage before considering the nighttime output.
Oversized lanterns, bright metallic finishes, exposed multi-bulb arrangements, and obvious floodlight hardware can dominate an otherwise restrained facade. The fixture does not have to be unattractive to become visually disruptive; it only has to draw more attention than the architecture around it.
Nighttime behavior creates a separate approval risk. A fixture that looks coordinated during the day may reveal a bare bulb, intense LED element, or bright clear lens after dark. The resulting point of light can become more noticeable than the doorway it is supposed to illuminate.
Consistency also matters when several fixtures appear in the same street view. A replacement with a different scale, finish, glass treatment, or light color can make the exterior look assembled one fixture at a time.
Use three viewpoints before treating a choice as low-risk:
- The street view in daylight reveals scale and architectural fit.
- The normal approach after dark reveals source glare and excessive contrast.
- The property-line view reveals spill beyond the intended area.
RULE CHECK
Review the community’s current architectural and exterior-lighting guidelines before selecting or submitting a fixture. General lighting principles cannot override local approval requirements.
A fixture photo shows the product. It does not show whether that product becomes dominant on the wall, uncomfortable from the sidewalk, or visible inside a neighboring room. The installed effect is what must pass the review.
Fixture Style and Scale
Match the house, not the catalog image
Reject a fixture that only looks right against a blank product background. Its form, finish, and visual weight have to make sense beside the actual siding, trim, door, windows, and roof details.
That does not mean every light must perfectly reproduce a named architectural style. A heavily ornamented lantern can look busy beside decorative trim, while a simple modern fixture may settle quietly into the same elevation. Coordination matters more than attaching a style label.
Traditional styling is not automatically safer. Clear-glass lanterns with exposed bulbs are familiar on residential homes, but familiarity does not prevent eye-level glare. Modern styling is not automatically inappropriate either; a compact fixture with a concealed source and restrained finish can be less visually aggressive than a decorative lantern.
Scale the fixture to the mounting area
Judge scale on the wall where the fixture will be installed. A deep light beside a narrow door may project farther than expected. A tall lantern between a door and window can crowd the trim. A fixture that looks modest beside a double garage may overwhelm a small side entry.
A simple elevation mockup is more useful than a universal fixture-to-door ratio. Place the proposed fixture on a straight-on photo of the house and scale it using the listed dimensions. That exposes visual weight, projection, and alignment before the fixture becomes a permanent object on the facade.
When several lights share one street view, they do not have to be identical. Their scale, finish, source treatment, and nighttime color should still look coordinated rather than collected through unrelated replacements.
Brightness Complaints
Do not use lumens as the first harshness filter. The first question is whether the viewer can see the bright source directly from the sidewalk, driveway, street, or normal route to the door.
A modest bulb can look severe when it is exposed at eye level. A higher-output fixture may appear calmer when the source is deeply recessed and the light remains on the intended surface. Dark surroundings make that difference stronger because an exposed LED can become the brightest object in the entire view.
Reducing output without changing source visibility may only make the entry darker while leaving the glare mechanism intact. The viewer still sees the bright point first; the step, lock, or house number simply receives less useful light.
Diffused glass can soften a point source, but diffusion is not directional control. A glowing enclosure may still send brightness toward the street, upper windows, and neighboring property. Fixture depth, shielding, lens position, mounting location, and aiming determine who can see the source.
The useful nighttime test is to stand where people naturally approach the house. Check the sidewalk, driveway entrance, street-facing angle, and path to the door. The light should reveal the task without making the fixture itself the dominant object.
Security locations need the same discipline. The principles behind outdoor security lighting without direct glare are more useful than increasing output until the entire area appears bright.
FIELD JUDGMENT
The harshest-looking installation is often not the one putting the most light on the ground. It is the one exposing the brightest source to the approach view.
No single lumen limit guarantees an HOA-friendly result across different houses. Wall color, mounting height, surrounding darkness, fixture optics, and viewing angle all change perceived brightness. Use a hard output cap only when the actual HOA document provides one.
Neighbor Spill Risk
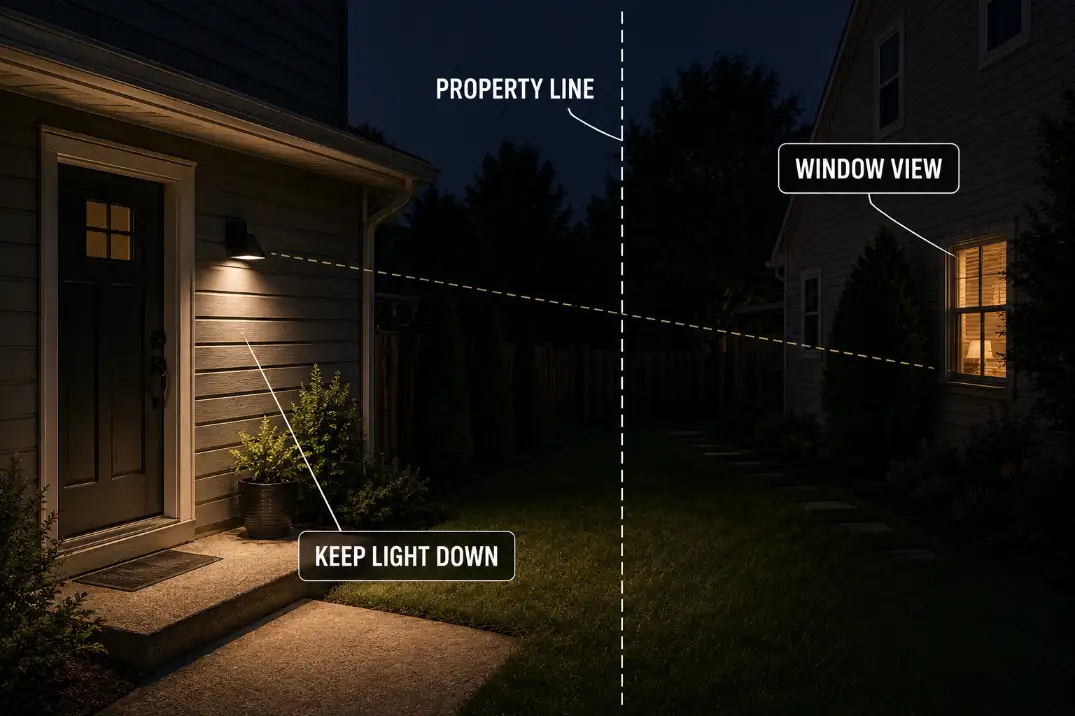
The decisive spill test is made from the side, not from directly beneath the light. The homeowner’s position may show a well-lit entry while hiding the source and beam from view; a neighboring window can reveal both.
Side spill may reach patios, bedrooms, upper floors, shared driveways, or the public sidewalk without producing an obvious problem on the homeowner’s own wall. Exposed side lenses, shallow shades, upward emission, high mounting positions, and outward-facing floodlights increase that off-property visibility.
The task area provides the practical boundary. Light on a door, step, path, or driveway serves a clear purpose. Light continuing beyond that area toward another property becomes harder to justify as necessary residential illumination.
A nighttime review should include the property-facing edge, the nearest neighboring-window direction, and the public approach. When security fixtures are involved, understanding where security lights should be aimed keeps this review focused on spill risk without turning it into a full aiming guide.
Motion activation does not remove the problem. A beam that reaches a window for only a few minutes may be more noticeable because the abrupt change repeatedly attracts attention. Frequent activations turn a temporary condition into a recurring one.
Shielding and downward control reduce the chance that the source or beam remains visible outside the intended area. They cannot rescue every mounting position, and they do not replace local rules.
Repeated side spill is one of the outdoor lighting patterns that create neighbor complaints. Finding it during a property-line review is easier than trying to correct it after the light has become a point of conflict.
The lower-risk fixture is therefore not the one that looks controlled from below. It is the one that remains visually quiet from the side.
Warm Light Advantage
Use color temperature as a finishing control, not as the primary fix. Warm light often appears more residential and less visually aggressive, but it cannot compensate for a visible source or uncontrolled direction.
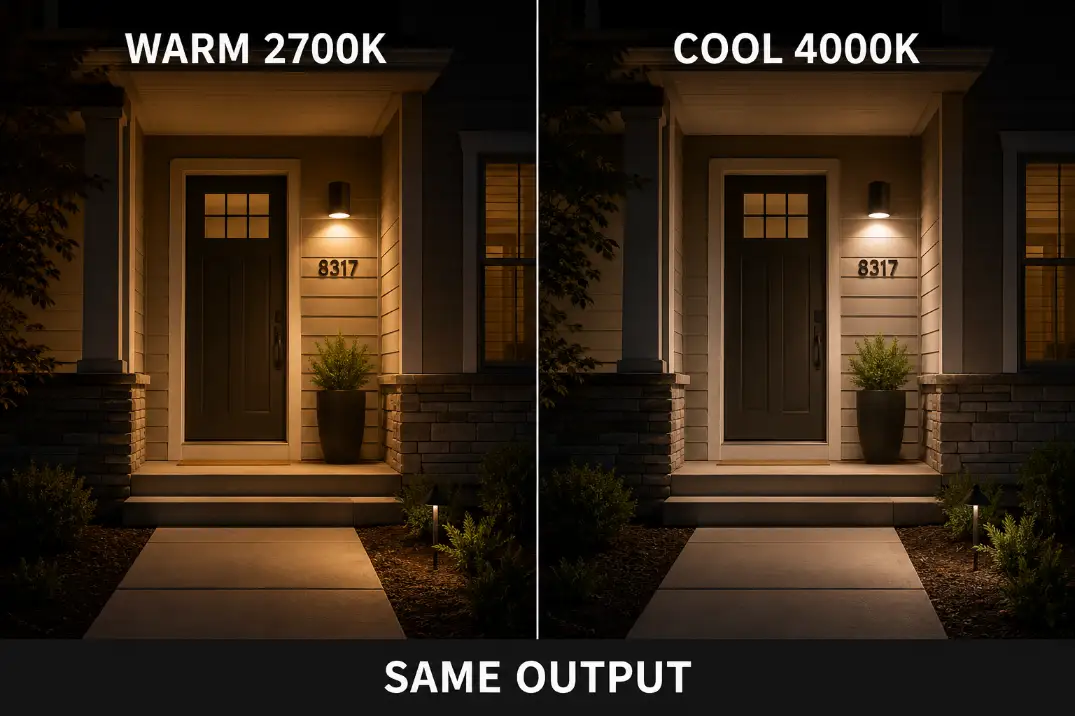
Around entries, patios, and garage walls, a range near 2700K to 3000K commonly creates a softer relationship with brick, wood, stone, and warm exterior paint. A 2700K source usually reads as more relaxed, while a controlled 3000K source can provide a slightly cleaner appearance without becoming conspicuous.
Higher color temperatures may stand apart against a dark street or a facade already lit by warm windows and porch lights. Color inconsistency can make one replacement fixture more noticeable than the small Kelvin difference alone would suggest.
Warm color still cannot correct:
- An exposed bulb or LED element.
- Excessive output.
- Poor aiming.
- Upward emission.
- Spill into a neighboring view.
A warm beam entering a bedroom window remains intrusive. Likewise, a shielded 3000K fixture can appear calmer than an exposed 2700K lantern.
Color comparisons should also be fair. Keep the fixture position, output, camera exposure, and illuminated area reasonably constant. Otherwise, the comparison measures brightness manipulation rather than color appearance.
Approval-Friendly Choices
The lower-risk choice is the fixture whose appearance and light behavior can be explained clearly on one marked elevation. “Approval-friendly” means fewer obvious points of concern, not guaranteed approval.
Entries and garage walls
Favor a concealed or recessed source, controlled downward distribution, moderate projection from the wall, and a finish that fits the visible exterior materials. Match the output to the doorway, house number, or driveway edge rather than trying to brighten the entire front yard from one fixture.
Do not assume a traditional form is automatically low-glare. An exposed bulb remains exposed inside a familiar lantern. Do not assume a modern form is automatically too commercial either. A quiet shape with a hidden source may have less visual impact than a decorative fixture.
Paths, steps, and security locations
For paths and steps, choose light that reaches the walking surface without placing a bright source at normal eye level. In security-sensitive locations, shielding and controlled direction matter more than an aggressive-looking fixture or broad flood pattern.
After applying those filters, homeowners who need category-level guidance can review low-glare lighting options for exposed security locations as a separate next decision rather than turning the HOA review into a product roundup.
When an application is required, retain a daytime fixture image, basic dimensions, finish information, color temperature, mounting location, and any manufacturer description of shielding or distribution. A marked elevation gives those details context that a product photo cannot provide.
APPROVAL SCREEN
Daytime appearance — Restrained finish and coordinated form — Highly reflective, ornate, or visibly commercial hardware
Fixture scale — Proportionate to the wall and nearby openings — Dominates trim, windows, or the entry elevation
Source visibility — Recessed, shielded, or concealed source — Bare bulb or intense LED visible from the approach
Light direction — Illumination contained on the task area — Side spill, uplight, or light crossing the property line
Color appearance — Consistent warm residential light — Isolated blue-white light that stands apart from the house
The fixture is only one part of the decision. Review the installed effect from the street during the day, from the normal approach after dark, and from the neighboring-property direction. A proportionate fixture with a concealed source, controlled spill, and consistent warm appearance creates a stronger submission, but the community’s current rules still control the result.
For a manufacturer-neutral framework covering targeted, controlled, low-level, and warm outdoor illumination, see DarkSky International’s Five Principles for Responsible Outdoor Lighting.