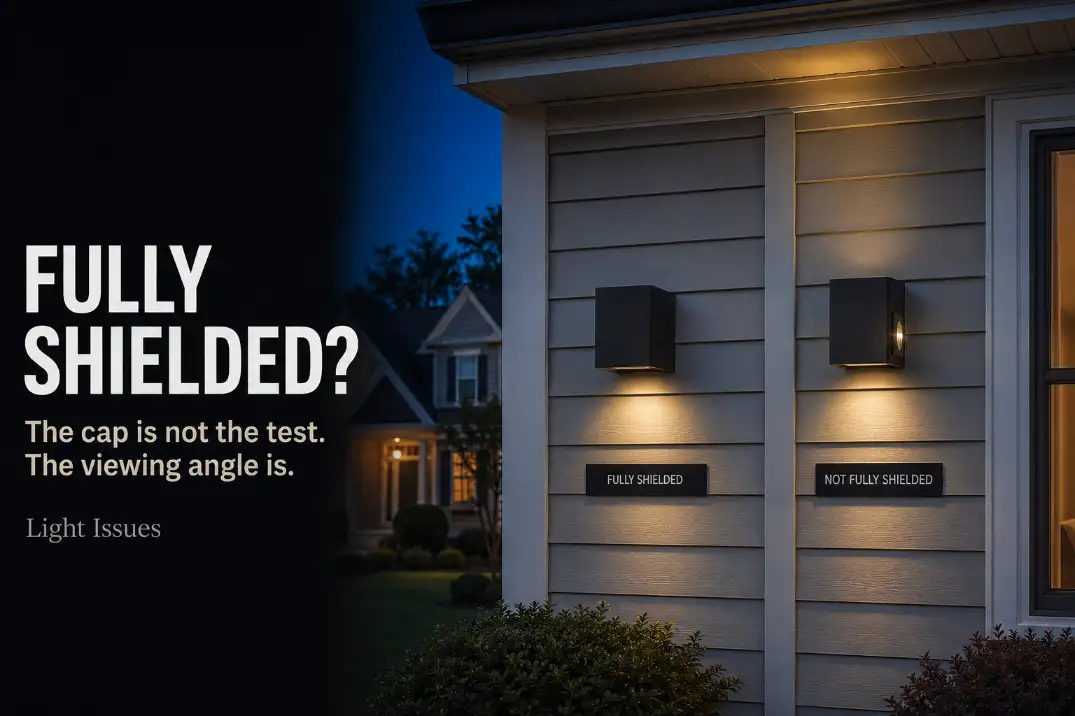
A roof, hood, or downward-facing opening can make an outdoor light look shielded. None of those details proves that it is. The useful test is whether the installed fixture keeps its light-emitting parts out of view and its direct output below the horizontal plane passing through the lowest emitting point.
That distinction matters because decorative coverage often controls only one direction. A cap may block light directly above the bulb while clear sides expose the source across the yard. A downward-facing fixture may still fail when it is tilted, mounted incorrectly, or built with a bright lens that protrudes below its shield.
Judge the light through three connected observations: source visibility, nighttime beam shape, and high-angle side spill.
These tests are narrower than the broader qualities associated with dark-sky-friendly outdoor lights, but together they reveal whether the shielding itself works after installation.
Visible Bulb Check
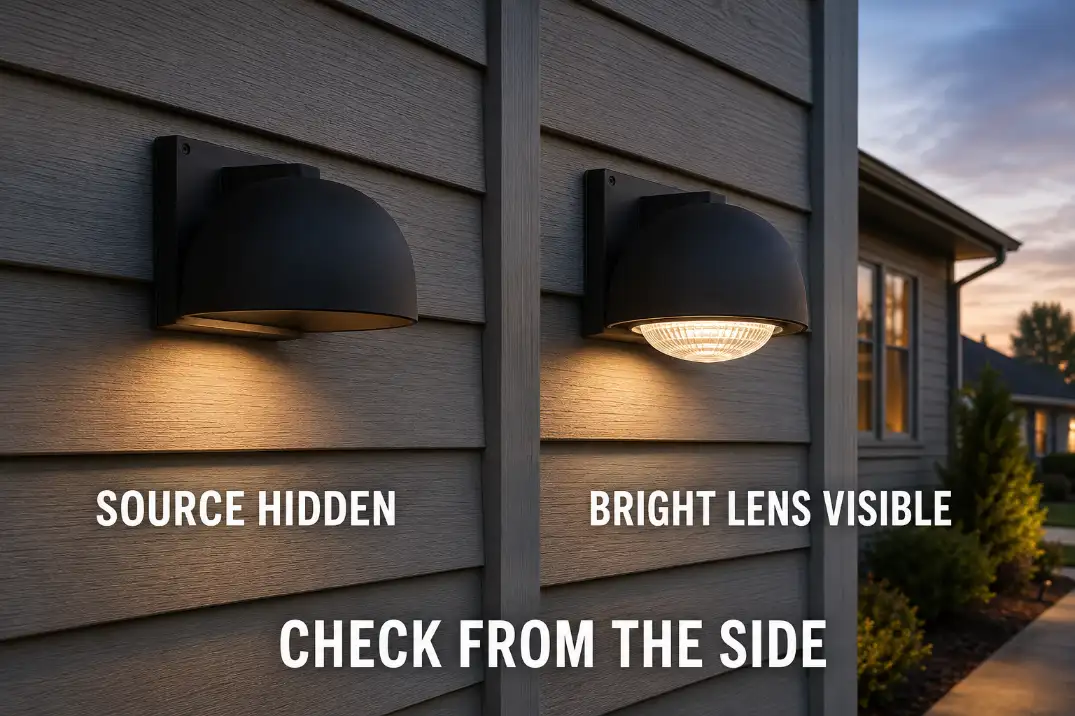
Start with the most decisive clue: if the bulb, LED board, bright lens, or illuminated reflector remains visible from the side, the fixture is not fully concealing its source from that viewpoint.
Check More Than the Bulb
Perform the first inspection with the light off. Stand away from the wall and look toward the fixture from the walkway, driveway, yard, and both sides of the approach. Do not limit the check to the position directly beneath it, where almost any top cover can appear effective.
The physical bulb is not the only component that counts. Clear glass, prismatic plastic, and diffusing panels become luminous surfaces when energized. A shiny internal reflector can also produce concentrated brightness even when the lamp itself sits above the fixture’s lower rim.
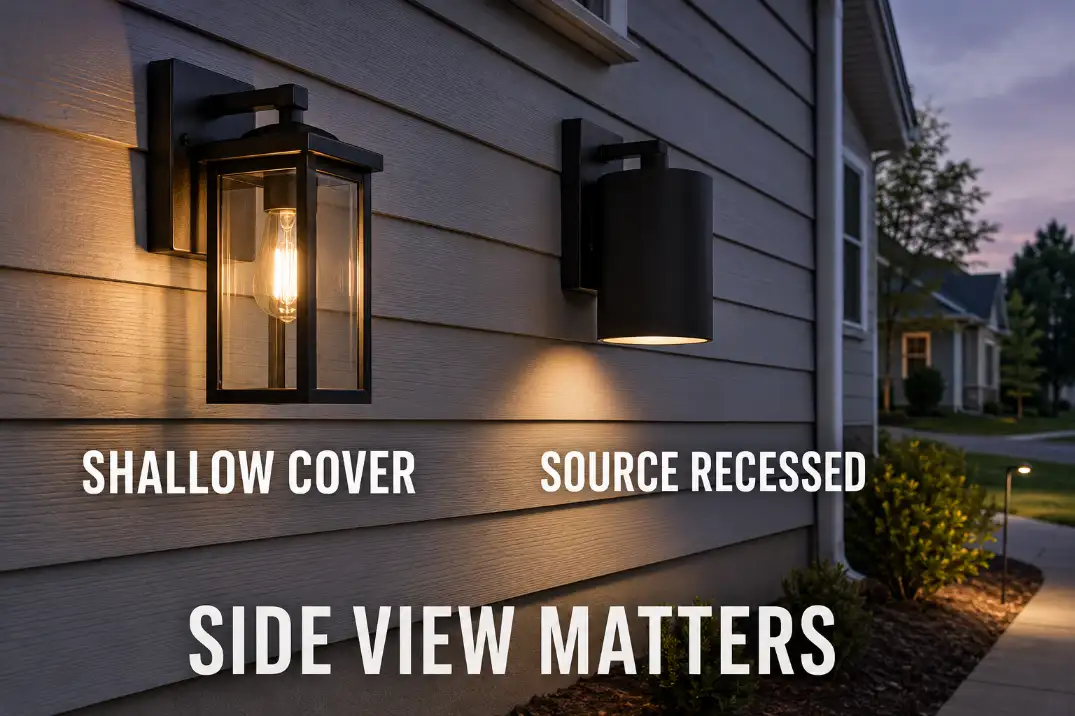
This is why decorative lanterns are easy to misjudge. An opaque roof may prevent direct emission straight upward, but transparent sides leave the lamp visible at normal eye height. That arrangement may direct part of its output downward, yet it does not provide the source control of a deeply recessed downlight.
The resulting clear-glass entry light glare is often the first sign that the decorative cover is doing less than expected.
Test the Installed Viewing Angles
Repeat the observation from realistic viewing positions, including farther across the yard and near the property edge. On sloped ground, inspect from the higher side as well. A fixture that conceals its source from straight ahead may expose it to someone approaching from below or looking from elevated neighboring ground.
Seeing the metal housing is not a failure. The warning is a directly visible component that becomes intensely bright when the light turns on. Check the hardware while it is off, then switch it on and repeat the observation from a safe distance rather than staring into the source at close range.
Installation angle is part of the diagnosis. A shield designed around a level lower opening can lose its cutoff when the fixture tilts away from the wall or is mounted in an unintended orientation.
Downcast Beam Shape
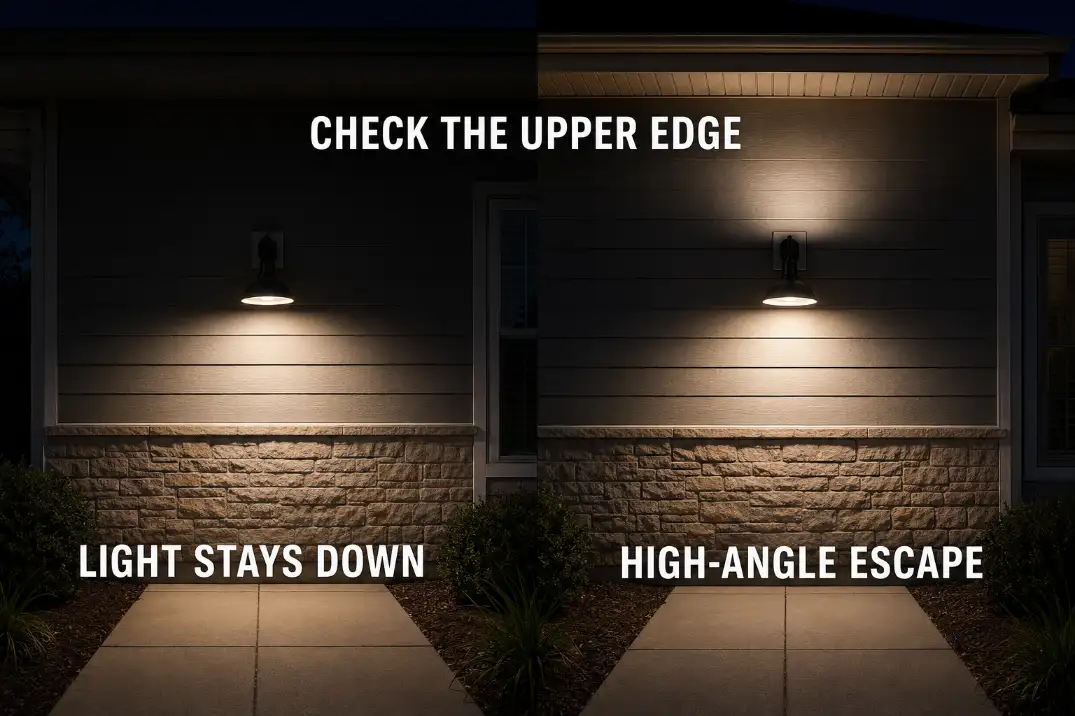
Pass the source-visibility check before judging the beam. A pool of light on the ground does not prove full shielding if a second portion of the output escapes toward the eave or upper wall.
Observe the fixture after dark from far enough away to see the ground, wall, and roofline together. Useful illumination should fall on the doorway, lower wall, steps, walkway, or intended ground area rather than extend above the fixture.
Read the Upper Edge of the Light
Look for direct illumination on the eave, upper siding, second-story surfaces, or tree canopy. A concentrated wedge reaching one of these areas is stronger evidence of upward escape than a generally brighter wall.
The beam boundary does not need to be razor-sharp. Textured siding, moisture, diffusion, and camera exposure can soften its apparent edge. Judge where the direct output travels, not whether the light forms a perfect geometric shape.
A broad pool below the fixture can still come from a fully shielded optic. Shielding controls the vertical boundary; it does not require the useful ground pattern to be narrow.
Separate Useful Spread From Upward Escape
Reflected light needs a different interpretation from direct emission. Pale siding, wet pavement, snow, and other bright surfaces can return some downward light toward the sky. A softly illuminated overhang caused by reflection does not automatically mean the fixture is unshielded.
The stronger warning is a distinct beam striking an upper surface or a bright emitting component visible from the side. When the source stays concealed and the upper surfaces remain outside the direct distribution, a wide illuminated area below can still pass the shielding test.
Side Spill Clues
The side-spill test answers what the ground pattern cannot: whether the fixture exposes concentrated brightness near eye level even while its main beam points down.
Walk across the fixture’s field of view at normal standing height. Watch for the bulb, lens, or reflector suddenly becoming visible as your angle changes. A bright horizontal streak or concentrated flash usually points to a shallow shield, a protruding emitter, an exposed lens, or a fixture tilted beyond the shield’s effective range.
Repeat the walk near the property edge. A light can appear comfortable near the doorway yet become harsh from farther away because distance reveals the lens beneath the shield.
A separate diagnosis of why outdoor lights create glare can determine whether excessive output, contrast, or placement remains a problem after shielding is checked.
Do not fail a fixture merely because it spreads light sideways across the ground. Fully shielded optics can distribute useful illumination laterally below the horizontal boundary. The failure clue is direct high-angle escape or an exposed luminous component, not width alone.
Full shielding also has a firm limit. A fixture can prevent direct uplight and still be too bright, create uncomfortable glare below horizontal, send backlight toward neighboring property, or illuminate more area than the task requires.
Wall Light Shielding
Judge a wall light by the depth and position of its emitting parts, not by the size of its decorative roof. A shallow cap over clear sides provides less control than a compact housing that recesses the source above its lowest opening.
An open bottom does not automatically disqualify a fixture. It can remain fully shielded when the LED or bulb sits above the opening, opaque upper and side surfaces conceal it, and direct output remains below the relevant horizontal plane.
Wall reflection beneath the fixture is expected. The more useful warning is a bright lens visible across the yard or direct illumination reaching the upper wall and eave. Fixture depth, emitter position, and the relationship between the source and lower rim matter more than the overall decorative silhouette.
Orientation remains part of the result. Installing a downlight upside down, tilting it away from the wall, or mounting it on a surface that changes its designed angle can create an upward path that the original housing was intended to block.
Floodlight Shielding
A floodlight passes only if its shield still works at the final aiming angle. A deep visor provides little protection once the head is raised far enough for the lamp face to become visible near the horizon.
Inspect each head separately. Look for a recessed emitter, a visor deep enough to block side views, and an installed angle that keeps the entire direct beam below horizontal. On a two-head fixture, one head may pass while the other exposes its source.
A shallow hood may hide the lamp when viewed from above but leave most of the lens visible from the driveway or neighboring yard. Conversely, a floodlight with appropriate optics can cover a broad ground area without being aimed upward.
Lowering the head is useful only when the housing can conceal the source at that angle. Some floodlights have exposed faces that remain visible through most of their adjustment range.
When the hardware provides enough source control, the next step is to aim the outdoor security light without raising its beam beyond the shielding boundary.
Buying Photo Red Flags
Treat missing viewing angles as missing evidence. A straight-on daytime beauty photo may conceal the underside, exaggerate the depth of a roof, or avoid the side position from which the lamp becomes visible.
What the Photos Must Show
Useful listings show the fixture from the side, from below, and in its intended installed position. Compare the emitter with the lowest rim: a deeply recessed source and opaque upper housing provide more meaningful evidence than words such as “hooded,” “downlight,” “cutoff,” or “dark sky.”
Exposed bulbs, clear side glass, protruding LED panels, shallow roofs, and lenses visible from normal eye height are practical red flags. Nighttime photos can be equally misleading when blown highlights, artificial glow, or unusually dark exposure hides the real beam boundary.
Technical documentation provides stronger evidence than styling language. A documented U0 uplight rating or applicable independent DarkSky approval supports the shielding claim. Its absence does not automatically prove failure, but it leaves more of the decision dependent on clear construction and distribution evidence.
When the Listing Is Still Inconclusive
A listing that never reveals the emitter, lower opening, side profile, or nighttime distribution deserves an inconclusive judgment—not an assumed pass. Look for a side-view drawing, photometric information, or a clear description of the installed orientation.
When an existing fixture clearly fails and replacement becomes the practical next step, carry the same source-control requirements into the review of low-glare outdoor security lighting options. Shielding should remain one filter within that decision, not a substitute for suitable output and placement.
Final Shielding Check
- The bulb, LED emitters, bright lens, and internal reflector stay concealed from side and higher viewpoints.
- Direct nighttime output remains below the horizontal plane through the lowest light-emitting part.
- Walking around the fixture does not reveal concentrated high-angle side spill.
- The installed position and aim preserve the shielding provided by the housing.
A fixture passes the practical field test only when all three forms of evidence agree. A hidden source with an upward beam fails. So does a downward beam produced by a lens that remains exposed from the side.
When the source stays concealed, direct output remains below horizontal, and the installed angle preserves both conditions, the shielding is doing its assigned job—even though brightness, glare below horizontal, and property-line spill may still require separate judgment.
For the technical definition and current U0 criteria, consult the DarkSky glossary.