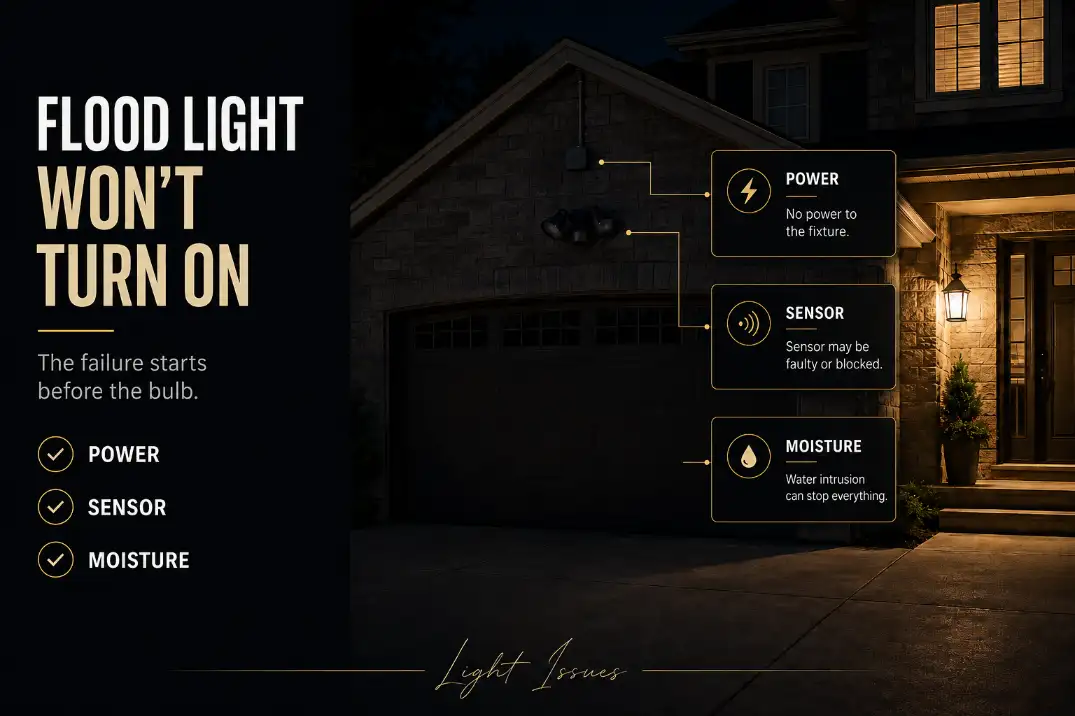
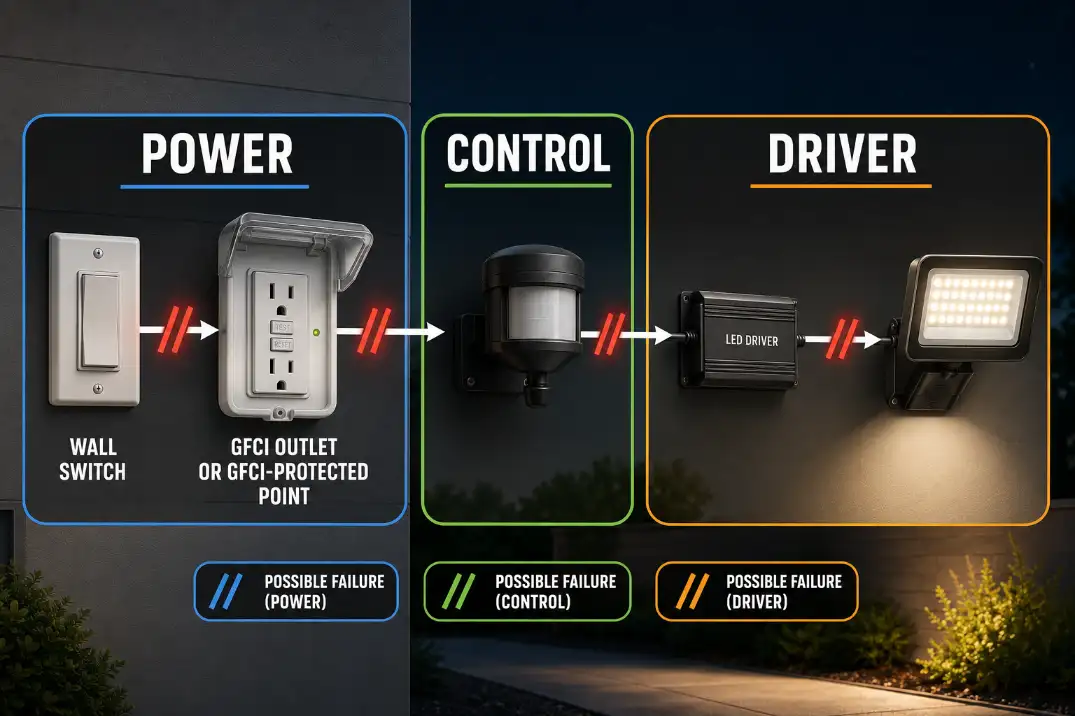
An outdoor flood light that is not working usually fails in one of four places: power, control, connection, or the fixture’s internal electronics.
The fastest useful test is not replacing the bulb first. It is splitting the problem in the first 5 minutes: reset power for 60 seconds, cover the photocell for 60–90 seconds, walk across the motion sensor’s detection path, and stop if a GFCI trips again.
That sequence tells you more than guessing. A flood light that never turns on is different from one that works in test mode, fails only after rain, or turns off after 5–20 minutes.
Those are separate failure patterns. A sealed LED flood light also changes the repair logic because there may be no replaceable bulb at all. Once power reaches the fixture and the controls are ruled out, repeated resets become wasted effort.
Outdoor Flood Light Not Working: The First 5 Checks
1. Reset power for 60 seconds
Turn the wall switch off for about 60 seconds, then turn it back on. If the light is on a breaker or GFCI-protected circuit, check those too.
Outdoor lights are often connected to a GFCI in the garage, basement, utility room, or exterior outlet box, not always next to the fixture.
If multiple exterior lights or outlets are dead, the flood light is probably not the starting point. That broader pattern belongs closer to why outdoor lights stop working than to a single fixture repair.
2. Cover the photocell for 60–90 seconds
A dusk-to-dawn flood light may stay off because it still thinks it is daytime. Cover the photocell completely and wait at least 60 seconds. Do not just wave your hand over it for a moment. Some controls need a short delay before they react.
Nearby porch lights, garage lights, streetlights, reflective glass, and even a bright white wall can confuse the photocell. This is one condition homeowners often underestimate. The fixture may not be dead; it may be obeying the wrong light signal.
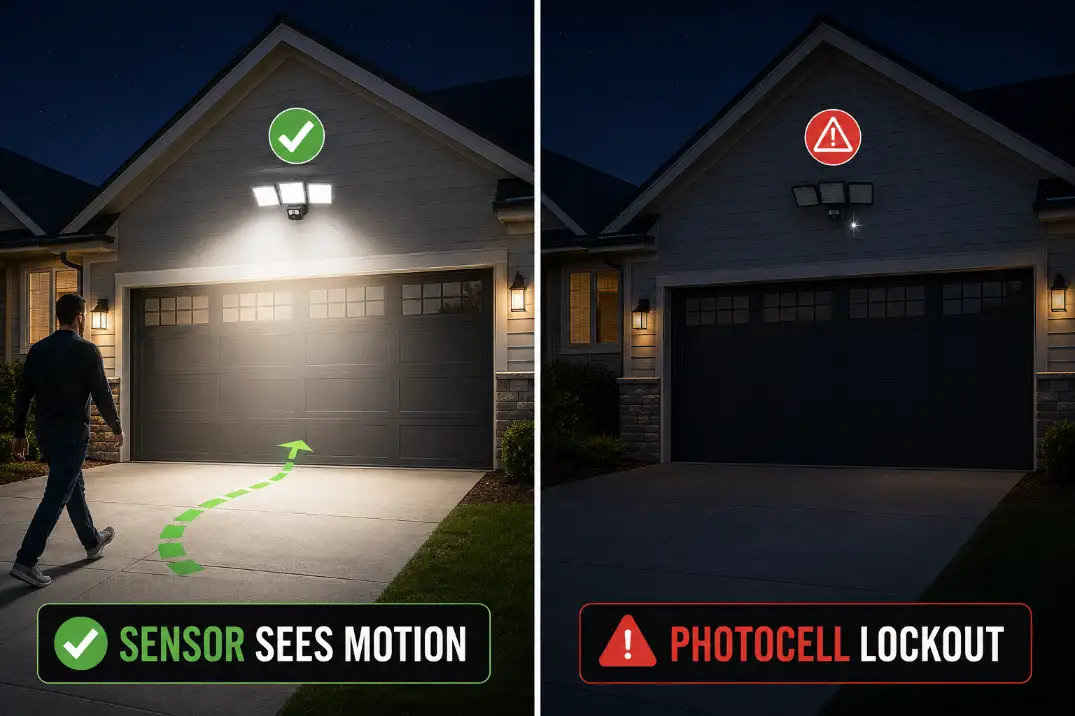
3. Test motion across the sensor, not straight at it
Motion sensors usually detect movement across their field better than movement coming directly toward them. Walk left-to-right across the detection zone from 10–20 feet away, then adjust sensitivity and range if needed.
A flood light mounted around 8–12 feet high usually gives a more useful detection pattern than one tucked too high under a roofline. If the sensor is aimed at the driveway surface, a tree branch, or the street, it may miss the area you actually care about.
4. Treat rain failure as a different problem
If the flood light stopped working after rain, snowmelt, irrigation, or humid weather, do not keep changing settings. Moisture changes the diagnosis. A wet junction box, corroded splice, leaking backplate, or damaged LED driver becomes more likely than a simple sensor setting.
A GFCI that trips once after a storm may be reacting to temporary moisture. A GFCI that trips again immediately after reset is a warning, not an inconvenience.
5. Identify the flood light type
Before buying parts, identify what kind of flood light you have. A screw-in bulb fixture, integrated LED flood light, motion sensor flood light, dusk-to-dawn flood light, and smart flood light do not fail in the same way.
A screw-in fixture may only need a lamp. A sealed integrated LED fixture usually points toward the driver, sensor, or whole fixture. A smart flood light can fail because of power, Wi-Fi, schedule settings, firmware behavior, or app control.
A smart flood light should still be tested like a normal fixture first, because app access does not prove the wall switch, GFCI, or line power is stable.
The Causes That Actually Change the Fix
The sensor is blocking the light
Sensor problems are more common than people think, especially when the light still works in test mode. A motion flood light may stay on for 30 seconds, 1 minute, 5 minutes, or 10 minutes depending on the setting.
If it turns on during a test but not during normal use, the fixture is probably not completely dead.
This is where many people overestimate the obvious fix. Replacing the bulb does nothing if the control is refusing to send power.
If the issue is mainly detection, timing, or mode behavior, the repair path is closer to an outdoor motion sensor light not working than a basic fixture failure.
The GFCI or breaker has opened the circuit
Outdoor flood lights often share protection with exterior outlets. When moisture, damaged insulation, or a failing fixture leaks current, the GFCI may shut the circuit down.
That can make the flood light look dead even though the fixture itself is only part of the story.
Do one reset. If it holds, keep testing. If it trips again, stop treating the reset button as a solution. Repeated tripping means the circuit is reacting to a fault condition.
Water has entered the box or fixture
Water does not need to fill the lens to cause failure. A small leak at the top of the backplate, cable entry, mounting screws, gasket, or wire connector can be enough.
In coastal California, salt air can speed corrosion. In northern states, freeze-thaw cycles can open tiny gaps around a fixture. In humid areas of Florida or after sprinkler overspray, the wiring cavity can stay damp even when the outside looks dry.
Timing helps. Immediate failure during rain points toward GFCI or ground fault behavior. Flickering hours later often points toward damp connections.
A fixture that dies days after a storm may have moisture damage inside the LED driver. If the specific pattern is rain-related, LED flood light not working after rain is the more focused diagnosis.
A loose or corroded splice is interrupting power
Outdoor wire connections deal with heat, moisture, vibration, and expansion. A splice can look acceptable from the ground and still be weak inside the box.
Corrosion adds resistance. Loose connections can make the light flicker, work intermittently, or fail when the wall is cold and recover when conditions change.
Pro Tip: If the flood light flickered before it died, check the wiring connection and LED driver path before assuming the wall switch is bad.
The LED driver or sealed fixture has failed
Integrated LED flood lights do not behave like old bulb-based fixtures. The LED chips and driver are often built into the housing. When the driver fails, the light may flash once, hum, flicker, stay dim, or turn off after warming up.
A fixture that turns on cold and shuts down after 5–20 minutes is often showing heat or driver failure. If confirmed power reaches the fixture and the sensor is not blocking operation, continued mode resets stop making sense.
At that point, the issue may be closer to outdoor LED driver failure than a settings problem.
Compare the Failure Pattern Before You Repair
| When It Fails | More Likely Cause | First Useful Fix | Stop Point |
|---|---|---|---|
| Never turns on | No power, failed control, dead fixture | Check breaker, GFCI, switch, and mode | Stop resetting if power is confirmed at fixture |
| Works only in test mode | Photocell, timer, or sensor setting | Cover photocell and reset normal mode | Stop if normal mode never responds after darkness test |
| Trips during rain | Moisture, damaged wiring, ground fault | Inspect GFCI, box, gasket, and connectors | Stop after the second trip |
| Flickers after storms | Damp splice or corrosion | Replace compromised connectors | Stop if corrosion extends into fixture wiring |
| Turns off after minutes | Heat or LED driver failure | Let it cool and retest once | Replace if failure repeats |
| Looks dead but app works | Smart schedule or control issue | Check app, Wi-Fi, automation, and switch power | Stop if line power is inconsistent |
How to Fix an Outdoor Flood Light That Will Not Turn On
Start with control settings, not replacement
Set the motion light to test mode if available. Then test motion across the sensor path. Adjust sensitivity only after confirming the light can turn on.
If the fixture has a timer, smart schedule, or dusk-to-dawn mode, check that the light has not been disabled by a program or daylight setting.
If the fixture works in test mode but not in normal night operation, the issue may be mode logic rather than hardware. In that case, outdoor security light test mode not working at night is the better next diagnostic path.
Open the fixture only after power is off
Turn power off at the breaker before opening the fixture or junction box. Then inspect for wet insulation, burnt wire ends, brittle insulation, rusted screws, green or white corrosion, cracked gaskets, and loose connectors.
Do not seal water inside the box. If the backplate leaked, correct the entry point first. Caulk may help along the top and sides of a backplate, but it is not a complete repair if the gasket, box, or cable entry is compromised.
Replace parts only when the test points there
Replace a screw-in bulb if the fixture uses one and power/control checks are normal. Replace outdoor-rated wire connectors if the splice is corroded. Replace the sensor if it is separate and clearly unreliable.
Replace the whole fixture when the integrated LED driver has failed, the lens has water inside, the sensor is built in and no longer reliable, or the housing is too deteriorated to seal properly.
A basic LED flood light often uses about 10–30 watts, while older halogen flood fixtures may use 90–150 watts. If an old halogen fixture needs major repair, replacement is usually the cleaner decision.
Know when DIY testing ends
DIY troubleshooting should stop when the GFCI or breaker repeatedly trips, the wiring box is wet, insulation is burned, wire colors or connections are unclear, or the fixture is mounted where safe ladder work is questionable.
A dead flood light is not worth turning a simple repair into a shock or fall hazard.
“The light will not turn on” is only the symptom. The useful repair path depends on whether the real problem is blocked control logic, interrupted power, water leakage, a corroded connection, or failed electronics.
When Replacement Is the Better Fix
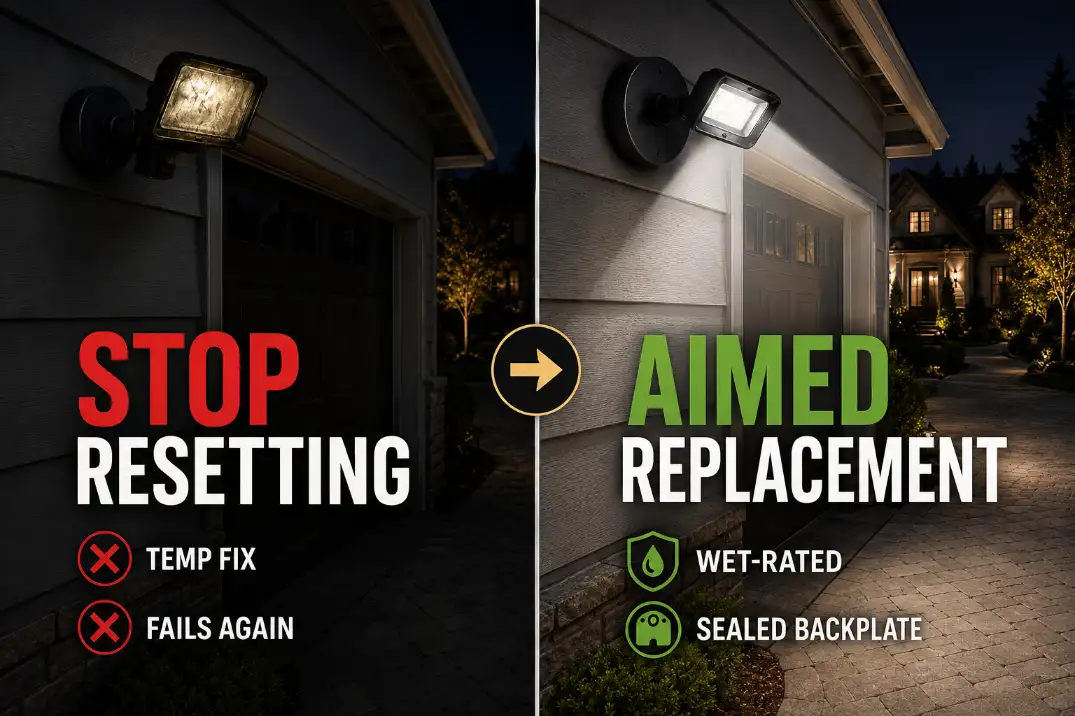
Stop resetting a fixture that keeps failing
One reset is diagnostic. Repeated resets are delay. If the light comes back briefly and fails again, especially after rain or warm-up, the system has already given you the clue.
Do not rescue a sealed LED full of water
If water is visible inside an integrated LED flood light, drying it may produce a temporary result, but it rarely restores long-term reliability. Once moisture reaches the driver board or LED assembly, replacement is usually more sensible.
Do not upgrade brightness without controlling aim
A dead flood light often gets replaced with a brighter one. That can create a new problem: glare. A well-aimed moderate-output flood light is usually more useful than an oversized fixture aimed straight outward.
If the replacement solves darkness but creates harsh spill, it can turn into an outdoor lighting glare problem instead of a real improvement.
Pro Tip: Choose a wet-location rated fixture for exposed walls. Use damp-location fixtures only where the light is genuinely protected from direct rain.
Questions People Usually Ask
Why does my flood light work in test mode but not at night?
That usually points to a mode, photocell, timer, or sensor issue. Test mode may bypass normal dusk-to-dawn behavior, so the fixture can appear healthy while the normal control path is still blocking operation.
Can rain permanently damage an outdoor flood light?
Yes. A wet connector may dry and work again, but water inside a sealed LED housing or driver compartment can cause delayed failure. If the problem returns after the next storm, the moisture path is still active.
Should I replace the sensor or the whole flood light?
Replace the sensor only if it is a separate part and the fixture is otherwise solid. If the sensor is built into an older integrated LED flood light, replacing the whole fixture is usually cleaner and more reliable.
Why did my new flood light stop working so quickly?
Early failure usually points to moisture entry, poor mounting seal, wrong location rating, or a weak wiring connection, especially if a damp-location fixture was installed where direct rain hits the wall.
It can also happen when the wall switch, GFCI, or smart control is unstable even though the fixture itself is new.
For broader official guidance on exterior lighting controls, see the U.S. Department of Energy Energy Saver.