If outdoor lights have inconsistent power, the quickest way to diagnose it is to sort the problem into one of four patterns: all lights unstable, one branch unstable, only far-end lights weak, or lights that fail after a delay. Those patterns usually point to different causes.
If every fixture cuts out together, start at the power source, GFCI, timer, photocell, or transformer. If the last lights on the run fade first, voltage drop is more likely.
If the system works for 10 to 20 minutes and then starts dimming or dropping out, heat and resistance are usually the real mechanism. And if the problem shows up after rain or irrigation and improves after 12 to 48 hours of drying, moisture intrusion is far more likely than a bad bulb.
The mistake most people make is starting with the fixture in front of them. In outdoor lighting, inconsistent power is usually a distribution problem, not a lamp problem.
A healthy 12-volt system will often deliver roughly 10.5 to 12.5 volts at working fixtures under load. Once you are consistently down around 10 volts or lower at the weak end, unstable output becomes much more likely.
The fastest way to narrow it down
Before opening fixtures or replacing parts, look at where the failure appears and when it appears.
If all the lights act up together
That usually means the issue is upstream. Think wall power, tripped GFCI, breaker, timer, photocell, or transformer. On a healthy low-voltage system, the transformer should deliver stable output under load, not just when tested with half the fixtures disconnected.
If all fixtures brighten, dim, or shut off at the same time, spend your first few minutes at the supply side. Do not start digging up wire runs yet.
If only one zone or side of the yard is unstable
That points more strongly to a branch problem: a weak splice, damaged cable, failed hub connection, or a buried section that has taken on moisture. When one branch stays normal and another misbehaves, the transformer becomes less likely than the wiring path feeding that specific section.
This pattern overlaps heavily with Outdoor Lights Not Working on One Side of the Yard, where the useful distinction is not simply that some lights work and some do not, but whether the failure line follows a branch layout.
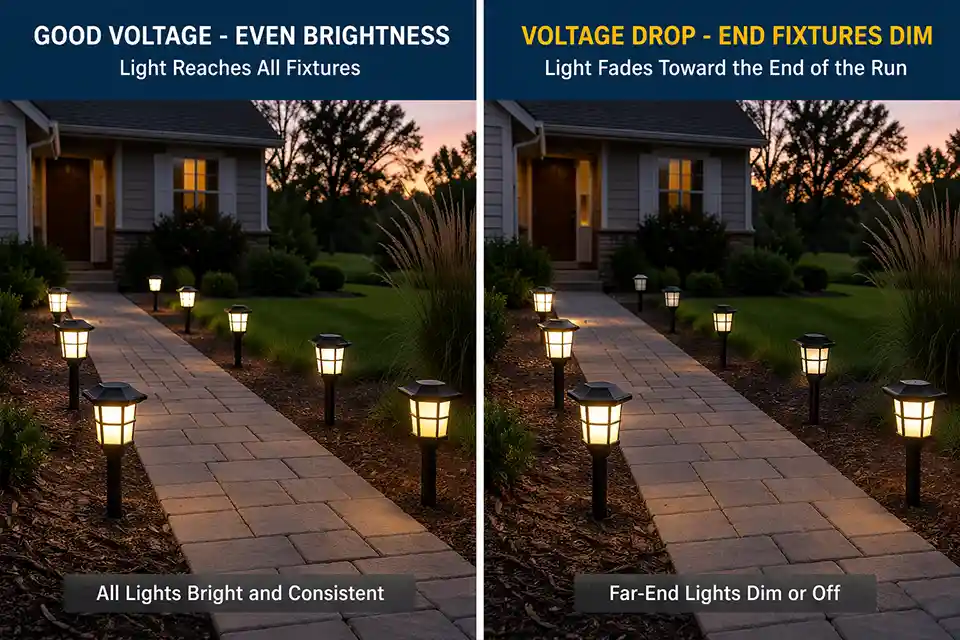
If the last fixtures are the weakest
That is classic voltage drop until proven otherwise. On 12-volt systems, the difference between a healthy fixture and an unstable one is often not dramatic on paper, but it is very visible in the yard.
If the first fixture reads around 11.8 to 12 volts and the farthest one is down near 9.5 to 10 volts under load, the dimming is not cosmetic. The run is losing too much voltage along the way.
If the problem starts after a delay
A delay matters. Lights that run normally for 5 to 20 minutes and then dim, flicker, or shut off usually point to heat-exposed weakness: a loose connection, corroded splice, overloaded transformer, or poor connection that gets worse as current flows.
That pattern is much more useful than the word intermittent, which sounds random but usually is not.
Test in this order so you do not chase the wrong part
A lot of wasted time comes from testing the right things in the wrong order.
1. Check the 120-volt side first
If the low-voltage transformer is plugged into an exterior receptacle, confirm the receptacle actually has power. Reset any GFCI device serving that outlet and confirm the breaker is not tripped. This takes less than 2 minutes and rules out an entire class of false leads.
People often overestimate how often a fixture fails first. In real systems, a dead receptacle or nuisance GFCI trip is more common than homeowners expect.
2. Test the transformer under normal load
A transformer can look fine when lightly loaded and still sag once the full system is running. Check output with the normal branch load connected. If the system starts normally and then drops off after 10 to 30 minutes, transformer strain or internal thermal behavior becomes much more plausible.
This is where Transformer Problems in Low-Voltage Systems become more relevant than fixture-level troubleshooting. A weak transformer can keep the circuit partially alive while still causing unstable output.
3. Split the problem by branch, not by fixture
If one run behaves and another does not, stop thinking in terms of bad lights and start thinking in terms of bad path. Identify the last reliably bright fixture and the first unstable one. The trouble is often between those two points.
4. Only then open splices and fixtures
Once you know whether the issue is upstream, branch-specific, or far-end specific, then it makes sense to inspect connectors, burial splices, and fixture taps. Doing this earlier often turns into random parts swapping.
Pro Tip: Find the last normal fixture and the first abnormal fixture before touching anything. That small boundary usually saves the most time.
What your meter reading is actually telling you
If the transformer holds steady under load but the far end reads much lower, the problem is usually voltage drop, branch resistance, or a weak connection downstream. If transformer output itself sags once the lights have been on for several minutes, the transformer or the supply side deserves more suspicion. If only one section collapses while another stays stable, that is usually a branch splice, hub, or buried cable problem rather than a whole-system power problem.
What actually causes inconsistent power most often
Not every possible cause deserves equal attention. A few patterns account for most real-world cases.
Weak or corroded splices
This is one of the most common causes, especially in older landscape lighting. A splice can still pass some current while adding enough resistance to create dimming, heat, and dropouts farther downstream. The visible clue is not always dramatic corrosion. Sometimes a thin oxide layer or a partly compromised connector is enough.
That is why Corroded Wire Splices Outdoors matter more than another round of bulb changes. Small connection problems create oversized symptoms.
Voltage drop on long or overloaded runs
A long daisy-chained run with too many fixtures on one branch will often start by making the far-end fixtures weak, then progress into inconsistent behavior as connectors age and load margins disappear. On low-voltage systems, even a 1.5 to 2 volt difference between the start and end of a run is meaningful.
A practical rule: if the far end stays below about 10 volts after you repair obvious connection issues, the problem is no longer just a bad splice. The design itself is probably too stretched.
Moisture intrusion
Water does not have to flood a fixture to cause trouble. Repeated sprinkler exposure, mulch moisture, shallow burial points, or cracked cable entry points can cause inconsistent operation that tracks with rain, irrigation cycles, or humid weather. Systems in Florida, coastal California, or shaded irrigated beds often reveal this pattern faster than drier climates do.
If the issue becomes worse after rainfall and partly improves after a day or two of drying, inspect connectors before assuming a component suddenly failed. Why Outdoor Lights Fail After Rain is often really a story about existing vulnerability, not weather acting alone.
Overloaded or aging transformer
A transformer near its practical limit can energize the system and still behave badly under sustained load. This gets missed because some fixtures may still work, which makes the transformer seem innocent. It is not innocent just because it is not fully dead.
What people underestimate here is cumulative load growth. A system that worked years ago may now have extra fixtures, longer runs, or older connections that raise resistance everywhere.
What people usually misread first
They treat dimness as a fixture problem
Dimness is a symptom. Power loss is the mechanism. Replacing one or two fixtures may appear to help for a while simply because connections got disturbed during the swap, not because the fixture was truly the cause.
They blame weather too broadly
Rain and irrigation matter, but mostly as triggers. They expose weak splices, poor seals, cracked entry points, and compromised taps. Weather is often the event that reveals the fault, not the root cause itself.
They normalize weak far-end output
This gets underestimated constantly. A little drop across a long run is normal. A big visible change from bright near fixtures to weak far fixtures is not. If the last third of the run looks noticeably different, the system is telling you something useful.
They ignore the one-fixture exception
If only one fixture behaves inconsistently while the rest of the run stays stable, the fixture itself becomes more plausible. In that case, a local tap, socket issue, internal LED driver, or moisture inside that one fixture is more likely than a transformer problem or whole-run voltage drop.
When a simple repair is enough and when it is not
This is where many articles get too vague. The useful line is not repair what is broken. The useful line is whether the system still has enough margin after the obvious repair.
A simple repair is usually enough when
- one connector or splice is clearly compromised
- one branch is affected but the rest of the system is stable
- transformer output stays steady under load
- far-end voltage recovers into a normal working range after the bad connection is repaired
A simple repair stops making sense when
- the same branch has multiple aging or wet splices
- the far end still runs under about 10 volts after connector repair
- the run is long and heavily daisy-chained
- more fixtures were added over time without redesigning the layout
- the transformer is already close to practical capacity
At that point, patching one more connector may restore service temporarily, but it will not restore margin. A redesign becomes smarter than another repair.
This is exactly where Outdoor Lights Losing Power at the End of the Line becomes the better comparison than generic intermittent lights. End-of-run weakness is often a layout problem wearing a repair problem’s clothes.
| Symptom pattern | More likely cause | Best first action | What usually wastes time |
|---|---|---|---|
| All lights unstable together | GFCI, receptacle, breaker, timer, transformer | Check power source and transformer under load | Replacing bulbs or fixtures |
| One branch unstable | Local splice, hub, or buried cable issue | Find last good and first bad fixture | Replacing the transformer first |
| Far-end lights dim or drop out | Voltage drop or overloaded run | Compare voltage near start and far end | Accepting visible dimness as normal |
| Problem after rain or irrigation | Moisture intrusion at splice or entry point | Open and rebuild vulnerable connections | Waiting for dry weather to solve it |
| Works, then fails after 10 to 20 minutes | Heat-related resistance or overload | Check transformer and warm connection points | Calling it random intermittent behavior |
What changes when the layout is the real problem
Connection repairs help only if the system still has enough design margin.
When heavier cable or a shorter run matters more than another splice repair
If a branch has become too long, adding more fixtures or repairing one splice will not fix the underlying voltage loss. In those cases, a heavier-gauge trunk cable, a split run, or a center-feed layout usually changes the outcome more than another connector replacement.
When a multi-tap transformer helps and when it does not
A multi-tap transformer can help compensate for predictable voltage loss on long runs by feeding that branch at a higher tap, but it is not a cure for bad splices, moisture intrusion, or damaged cable. If the issue is resistance from deterioration, a higher tap may mask the symptom for a while without fixing the failure point.
When redesign is the smarter decision
If a run has grown over the years, the system may no longer have enough margin to stay stable even after minor repairs. Once you are repeatedly fixing different points on the same branch, the better move is often to rework the branch layout rather than keep patching it.
Practical fixes that change the outcome
Rebuild bad connections instead of reusing them
If a splice looks compromised, replace it with a proper weather-resistant connector rather than tightening the old one and burying it again. That quick good-enough fix often buys only a short recovery window.
Reduce run stress if the layout is the real issue
Long single-run layouts are where voltage drop becomes stubborn. Splitting one overloaded branch into two shorter runs, center-feeding a layout, or moving to heavier-gauge trunk cable often does more than repeated connector repair.
Stop guessing and measure at the start and end
You do not need ten readings to get useful information. One reading near the transformer and one at the weak end of the run can tell you whether you are chasing an isolated fault or a design-margin problem.
Do not ignore controls
If lights work in daylight tests but fail at night, or if operation changes around dusk, the control side deserves more suspicion. Outdoor Lights Not Turning On After Timer or Photocell Issues is a separate failure pattern, but it overlaps enough that it should be checked early when all fixtures are affected together.
Pro Tip: If the system behaves differently in manual override than it does at dusk, stop chasing branch wiring until the control side is ruled out.

When to stop troubleshooting and call for help
Not every inconsistent power problem should stay in DIY territory.
Bring in a pro if you see any of these
- the GFCI resets and trips again immediately
- the transformer housing gets unusually hot
- a splice shows melting, charring, or arcing
- the issue is on the 120-volt feed side rather than the low-voltage side
- the circuit is near a pool, spa, dock, or persistently wet area
- buried cable damage means large sections need locating or replacement
That is the point where electrical safety matters more than squeezing out one more diagnosis step.
The bottom line
Most inconsistent power problems in outdoor lights come from a short list of causes, and they do not deserve equal suspicion. Start by classifying the pattern: all fixtures, one branch, far-end only, one-fixture-only, or delay-based failure. That decision tells you whether to focus on controls and supply, branch wiring, voltage drop, fixture-level failure, or heat-related resistance.
The biggest time-waster is replacing visible parts before proving the power path. The most useful shift is to stop asking which light is bad and start asking where the circuit stops behaving normally. Once you do that, the problem usually gets smaller very quickly.
For broader official guidance, see the CPSC’s GFCI safety guide.