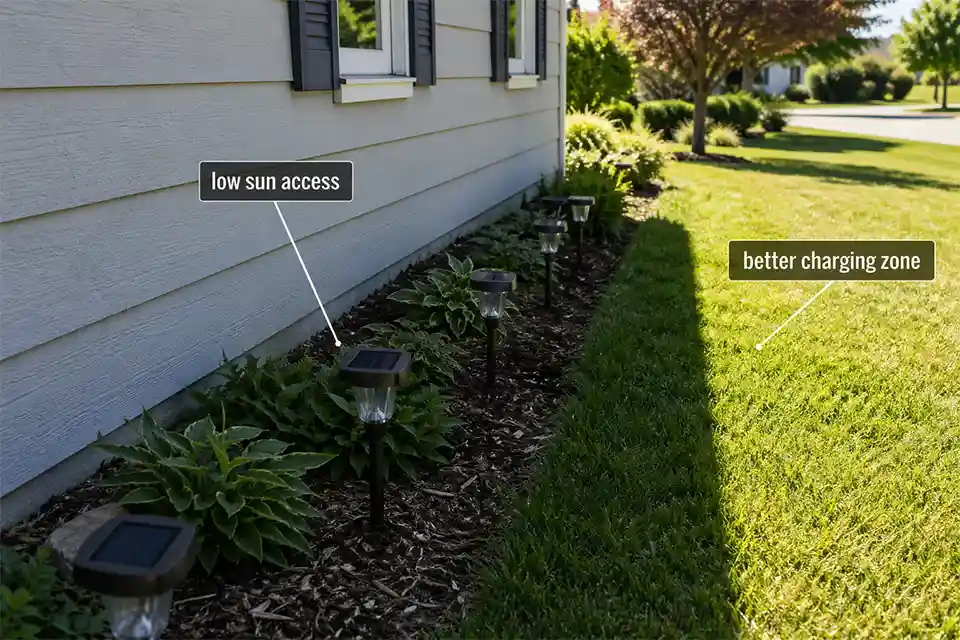
If solar garden lights fade early along a north-facing wall, the usual problem is not sudden product failure. It is chronic undercharging.
These installations often miss the most productive charging window, especially from about 9 a.m. to 3 p.m., and they also tend to lose open-sky exposure when lights sit tight against a wall, under shrubs, or below an eave.
That combination matters more than people think. A practical first check is simple: if a light lasts only 1–3 hours after dusk, fades faster after 2 cloudy days, and improves after 24–48 hours in a sunnier test spot, the location is usually the real failure point.
That is also the key difference from a true battery problem. Battery wear often weakens one unit first. A bad north-wall charging setup usually causes several lights in the same row to struggle together.
Why north-facing walls cause this pattern
A north-facing wall does not just reduce direct sun. It often creates a weaker charging geometry overall.
Less direct sun is only part of it
Many homeowners look at a bright yard and assume the lights should charge normally. But solar panels do not respond equally to every kind of brightness.
Reflected daylight and general ambient light can help a little, yet they rarely replace a few clean hours of direct exposure.
Along a north-facing wall, the panel may spend the middle of the day in weak light even when the yard itself looks bright.
Low sky view is the part people miss
This is where the diagnosis gets more accurate. A panel mounted 8–12 inches from a wall, surrounded by foundation plants, or tucked into a narrow side yard can lose charging potential from blocked sky view as well as blocked sun.
That is why this issue overlaps with Sun Exposure Issues in Solar Lights, but usually performs worse because the wall itself keeps the panel in a weaker solar position from the start.
The symptom is dim light. The mechanism is energy deficit.
That distinction matters. Fading output, short runtime, and inconsistent evening performance look like battery trouble, but those are symptoms.
The underlying mechanism is usually that the battery never gets fully recharged. Replacing batteries may improve things briefly, but it often wastes time if the panel still cannot collect enough energy day after day.
Quick diagnostic checklist
Use this before replacing parts:
- The lights run less than about 3 hours after a bright day.
- Several units along the same wall behave similarly.
- The panels get little or no direct sun between late morning and midafternoon.
- Runtime drops sharply after 2 cloudy days.
- One test light performs much better after being moved 6–10 feet into open sun for 24–48 hours.
If four or five of those signs are true, placement is more likely than product failure.

What people usually misread first
“The batteries are dying”
Sometimes they are, especially once lights get past about 18–24 months. But when a whole row fades early in the same location, shared exposure is the better first diagnosis. Simultaneous battery failure across multiple units is possible. It is just less likely than a shared undercharging pattern.
“They get daylight all day”
This is the most common misread. Daylight is not the same as productive charging. A north-facing bed may stay visually bright while still missing the stronger portion of the solar day. That gap becomes more obvious after overcast weather, in late fall, or in winter when the sun angle drops and the charging margin gets thinner.
“A more powerful solar light will fix it”
Usually it does the opposite. Brighter lights often demand more energy while using a small integrated panel. In a weak charging location, that mismatch becomes even harsher.
A high-output replacement in the same bad spot often disappoints faster than a lower-output decorative light would.
Pro Tip: Before buying batteries or replacement lights, move one existing unit into a clearly sunnier area for two full days. That small test is usually more revealing than any spec sheet.
The thresholds that actually help
The most useful question is not whether solar can work at all. It is what level of performance is realistic in that exact install spot.
| Panel exposure at the actual install spot | Typical result | What it usually means | Best next step |
|---|---|---|---|
| 0 direct sun hours | 1–3 hours of weak evening light | Standard integrated solar stake light is a poor fit | Move panel or change product type |
| 1–2 direct sun hours | 2–5 hours, often worse after clouds | Marginal location | Use lower-output light or remote panel |
| 3–4 direct sun hours | 5–8 hours on many decorative lights | Usually workable | Keep panel clean and reduce nearby shade |
| 5+ direct sun hours | Best chance at overnight decorative runtime | Location is probably adequate | Troubleshoot battery or fixture next |
That table is where the article should decide, not just describe. Along a north-facing wall, the real issue is often not whether the panel charges at all. It is whether it charges enough for the outcome you expect.
When standard solar garden lights stop making sense
This is the point many articles avoid, but it is the part readers usually need most.
Decorative glow is a lower bar
If you only want a soft accent effect for the first part of the evening, a north-facing wall may still be workable in some yards. An open yard with decent reflected light and a wider sky view can sometimes support that modest goal.
Path visibility is a different standard
If you want dependable light near steps, edges, gates, or walkways, the bar is much higher. A setup that gives 2–4 decent hours in summer but fades early in winter is not a strong safety solution. This is usually the point where standard integrated solar stake lights stop being a sensible choice.
All-night expectations usually need a different system
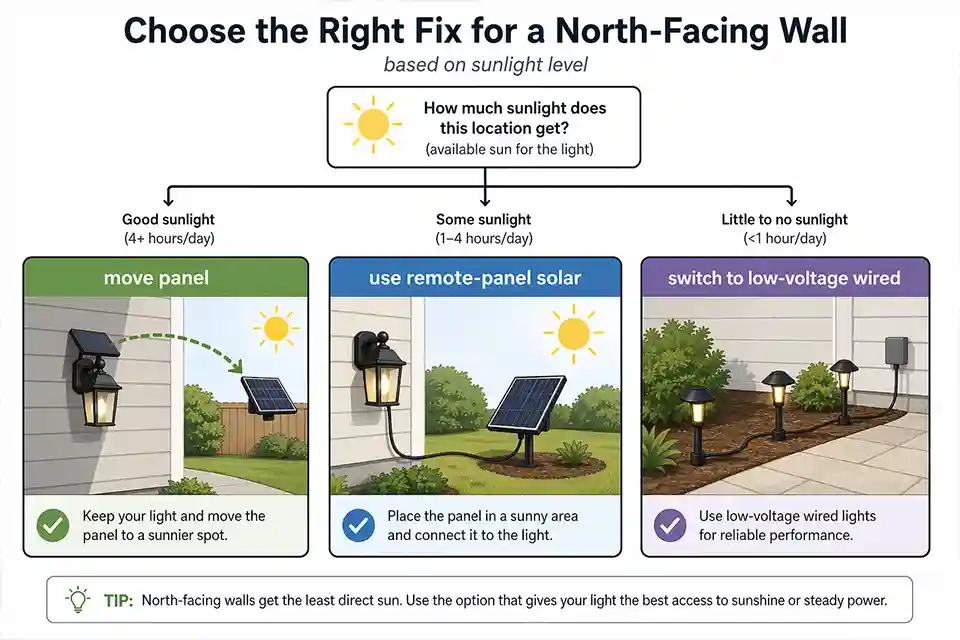
This is where routine fixes stop making sense. If the site gets little to no direct midday sun, standard integrated solar lights are often the wrong tool for that location.
A split-design unit with a remote panel in sunnier exposure is the strongest solar option. If the area needs reliable function rather than decorative effect, low-voltage wired lighting is often the more honest answer.
This is also why Solar Path Lights Losing Charge Under Roof Overhangs is closely related. In both cases, the panel is not simply shaded. It is trapped in a weak charging geometry.
The fixes that actually change the outcome
Move the charging surface first
The best fix is usually not replacing the whole light. It is improving where the panel sees the sky. Even moving the light or panel 3–6 feet away from the wall can matter if that shift opens late-morning or early-afternoon sun.
Clear local obstructions people underestimate
Small nearby blockers matter more than expected in already weak locations. Shrubs, edging plants, decorative fences, and downspouts can cut into a charging budget that was already limited.
Pulling the fixture farther into the bed or trimming back 12–24 inches of nearby growth can create a meaningful improvement.
Reduce the energy demand if relocation is limited
Lower-lumen decorative lights make more sense in marginal solar locations than bright “all-night” units with aggressive packaging claims.
This is where Weather Effects on Solar Lights Runtime becomes especially relevant, because cloudy stretches hit already weak sites much harder than strong ones.
Know when the problem is not charging
If the light never turns on at all even after a good test charge, the issue may not be power loss. Nearby artificial light can confuse the sensor, which is a different diagnosis covered in Solar Lights Not Turning On Near Streetlights. And if performance drops mostly during cold months, Seasonal Problems in Solar Lights may explain part of the pattern.
What changes in different U.S. conditions
Northern states make the weakness more obvious
In the Upper Midwest, Northeast, and mountain climates, shorter winter days and lower sun angles shrink the charging window even more. A setup that seems acceptable in June can become disappointing by late fall.
Bright climates are not a free pass
In Arizona, inland California, or other bright dry regions, a north-facing bed may perform a little better than expected if the sky view is open. But bright shade is still not the same as direct productive charging.
Cloudy stretches hit north-wall installs harder
In the Pacific Northwest or anywhere with repeated overcast days, these installations recover more slowly because they start with less charging margin to begin with. That is why underperformance in this scenario tends to show up in clusters rather than as a one-night anomaly.
Questions people usually ask
Can solar garden lights work on a north-facing wall?
Yes, but often only as limited decorative lighting unless the area still gets some direct sun and good open-sky exposure. “Works” and “works well” are not the same thing.
How long should I test before deciding?
Usually 24–48 hours in a clearly sunnier spot is enough. If runtime jumps after that short test, replacing the same style light in the same location is unlikely to be the best fix.
What is the smartest upgrade path?
Start by improving exposure. If that is not practical, move to a remote-panel solar design. If you need dependable path or step lighting, shift to low-voltage wired instead of forcing a weak solar location to do a job it is not suited for.
On north-facing walls, fading solar garden lights usually reveal a bad charging location, not a mysterious product defect.
For broader official guidance on solar access, see Colorado State University Extension.